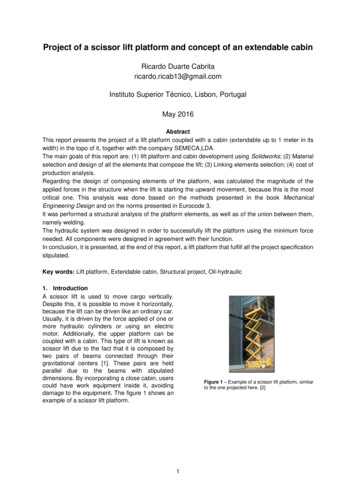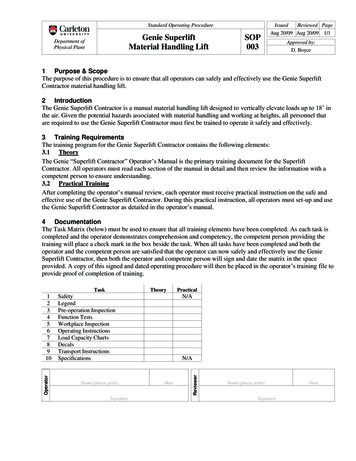
Transcription
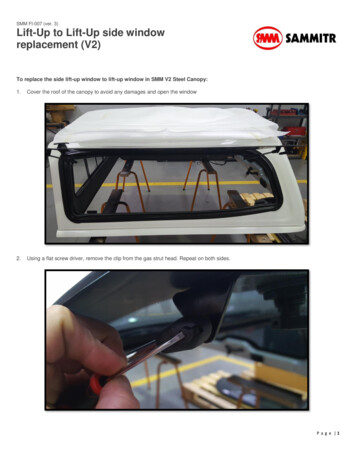
SMM FI-007 (ver. 3)Lift-Up to Lift-Up side windowreplacement (V2)To replace the side lift-up window to lift-up window in SMM V2 Steel Canopy:1.Cover the roof of the canopy to avoid any damages and open the window2.Using a flat screw driver, remove the clip from the gas strut head. Repeat on both sides.P a g e 1
SMM FI-007 (ver. 3)Lift-Up to Lift-Up side windowreplacement (V2)3.Take the gas strut out of the ball by pushing it to the side.4.Lift the window up and detach from the hinge.P a g e 2
SMM FI-007 (ver. 3)Lift-Up to Lift-Up side windowreplacement (V2)5.Remove internal rubber from the frame.P a g e 3
SMM FI-007 (ver. 3)Lift-Up to Lift-Up side windowreplacement (V2)6.On the canopy, by using masking tape, mark the positions of 10 screws.P a g e 4
SMM FI-007 (ver. 3)Lift-Up to Lift-Up side windowreplacement (V2)7.Unscrew 10 screws from the frame and remove the old frame by pulling it gently.P a g e 5
SMM FI-007 (ver. 3)Lift-Up to Lift-Up side windowreplacement (V2)8.Clean the frame to remove any dust.9.Refit bottom rubber.P a g e 6
SMM FI-007 (ver. 3)Lift-Up to Lift-Up side windowreplacement (V2)10. Seal the old holes.P a g e 7
SMM FI-007 (ver. 3)Lift-Up to Lift-Up side windowreplacement (V2)11. Prepare the new frame by removing the glass from the frame (Repeat steps 2-4).12. Fit the seal around the frame using masking tape on both ends to keep it in position during stretching.P a g e 8
SMM FI-007 (ver. 3)Lift-Up to Lift-Up side windowreplacement (V2)P a g e 9
SMM FI-007 (ver. 3)Lift-Up to Lift-Up side windowreplacement (V2)13. Fit the new frame to the canopy and ensure that the distance is the same on both sides. Use two clamps to hold the frame in place.P a g e 10
SMM FI-007 (ver. 3)Lift-Up to Lift-Up side windowreplacement (V2)14. Drill the first hole between clamps – above the markP a g e 11
SMM FI-007 (ver. 3)Lift-Up to Lift-Up side windowreplacement (V2)15. Screw the frame to the canopy using a cordless drill. To ensure you do not overtight the screw, set the right torque on the cordless drill.WARNING: Picture above is only an example. Please set the right Torque setting for your cordless drill.P a g e 12
SMM FI-007 (ver. 3)Lift-Up to Lift-Up side windowreplacement (V2)16. Repeat for the next 9 screws in the order marked below.7986510431217. Some examples on how to use clamps to drill other holes.P a g e 13
SMM FI-007 (ver. 3)Lift-Up to Lift-Up side windowreplacement (V2)P a g e 14
SMM FI-007 (ver. 3)Lift-Up to Lift-Up side windowreplacement (V2)P a g e 15
SMM FI-007 (ver. 3)Lift-Up to Lift-Up side windowreplacement (V2)18. Remove masking tape from the frame.19. Fit the glass and gas struts in reverse order.P a g e 16
SMM FI-007 (ver. 3)Lift-Up to Lift-Up side windowreplacement (V2)20. Install internal rubberP a g e 17
SMM FI-007 (ver. 3)Lift-Up to Lift-Up side windowreplacement (V2)21. Double check the job quality. The seal should be flat around the whole frame and has similar size being approximately 5mm.P a g e 18
SMM FI-007 (ver. 3)Lift-Up to Lift-Up side windowreplacement (V2)22. When the job is done, ensure that window doesn’t leak. Prepare the water test and check the canopy from inside.WARNING: Do not use a high pressure hose directly on the windows.P a g e 19
SMM FI-007 (ver. 3)Lift-Up to Lift-Up side windowreplacement (V2)23. Replace the locks if necessary to have the same key for all of locks in the canopy. Remove the allen head screws and a nut. Replacethe lock. Repeat in the reverse order for both locks.P a g e 20
Lift-Up to Lift-Up side window replacement (V2) P a g e 1 To replace the side lift-up window to lift-up window in SMM V2 Steel Canopy: 1. Cover the roof of the canopy to avoid any damages and open the window 2. Using a flat screw driver, remov