Transcription
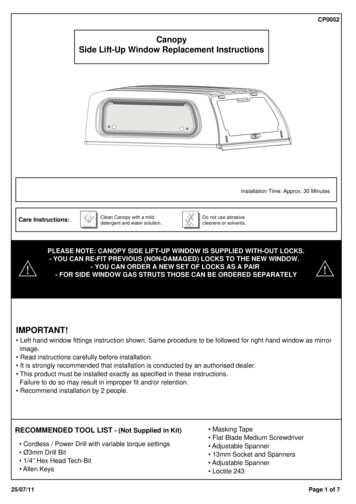
CP0052CanopySide Lift-Up Window Replacement InstructionsInstallation Time: Approx. 30 MinutesCare Instructions:Clean Canopy with a milddetergent and water solution.Do not use abrasivecleaners or solvents.PLEASE NOTE: CANOPY SIDE LIFT-UP WINDOW IS SUPPLIED WITH-OUT LOCKS.- YOU CAN RE-FIT PREVIOUS (NON-DAMAGED) LOCKS TO THE NEW WINDOW.- YOU CAN ORDER A NEW SET OF LOCKS AS A PAIR- FOR SIDE WINDOW GAS STRUTS THOSE CAN BE ORDERED SEPARATELYIMPORTANT! Left hand window fittings instruction shown. Same procedure to be followed for right hand window as mirrorimage. Read instructions carefully before installation. It is strongly recommended that installation is conducted by an authorised dealer. This product must be installed exactly as specified in these instructions.Failure to do so may result in improper fit and/or retention. Recommend installation by 2 people.RECOMMENDED TOOL LIST - (Not Supplied in Kit) Cordless / Power Drill with variable torque settings Ø3mm Drill Bit 1/4” Hex Head Tech-Bit Allen Keys25/07/11 Masking Tape Flat Blade Medium Screwdriver Adjustable Spanner 13mm Socket and Spanners Adjustable Spanner Loctite 243Page 1 of 7
CP0052PARTS CHECK SHEETCANOPY SIDE LIFT-UP WINDOW REPLACEMENTSPARTS IN MAIN CARTONLIFT-UP Windowwith Gas StrutsQty - 1LIFT-UP Window Clamp FrameQty - 1Hardware KitQty - 1PARTS IN HARDWARE KITFittingInstruction(MISC1876-2)CordQty - 2(SCRW0812)8-Gauge x 1/2”Hex Head ScrewsQty - 24PARTS IN SIDE WINDOW LOCK25/07/11Fitting Instruction(FIT-CP0052)Qty - 1(PROVIDED FOR CLARITY ONLY , TO BE PURCHASED SEPERATELY IF REQUIRED)Lock & HandleAssemblyQty - 2Rubber SealWasherQty - 2Rubber FlatWasherQty - 2Lock NutQty - 2Lock Cam withGrub ScrewQty - 2Lock KeysQty - 2Platic WasherQty - 2Page 2 of 7
CP0052DO NOT CLEANGLASS WINDOW PANELS1.Ensure that any broken glass is removedfrom the window frame & canopy interior.Ensure work area has been made safe.(ref. diagram1).CAUTION: Use caution when workingnear broken edges.Use a vacuum cleaner to removebroken glass.ALL INTERIOR VIEWS ARE SECTIONAL FOR CLARITYDiagram: 1 - CLEAN & CLEAR WORK AREA2. Apply masking tape to canopy roof and1/4”roof bow on both sides as shown.(Note the position of the roof bow bracketin relation to its attachment to the windowframe for reference to reattach to the newwindow frame.)Remove and retain the two (2) 8-gaugehex head screws from the roof bowbracket attached to the sliding windowonly as shown. (ref. diagram2).ROOF BOW BRACKET ONLIFT-UP WINDOW SIDE ONLY1 APPLYMASKING TAPE2 REMOVE8-GAUGE HEX HEAD SCREWSDiagram: 2 - APPLY TAPE & REMOVE ROOF BOW SCREWS3.1/4”From the inside of the canopy, removeand discard the twenty (20) 8-gauge hexhead screws on the perimeter of thelift-up window clamp frame.Remove and discard the lift-up windowclamp frame. (ref. diagram3).SIDE VIEW OF CLAMP FRAMEDiagram: 3 - REMOVE LIFT-UP WINDOW CLAMP FRAME25/07/11Page 3 of 7
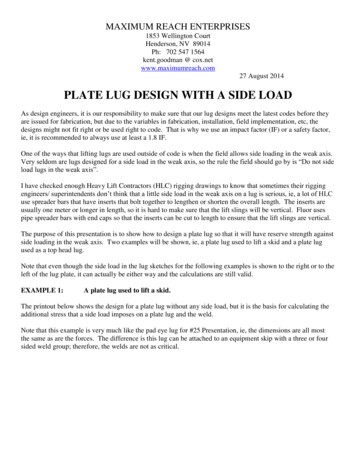
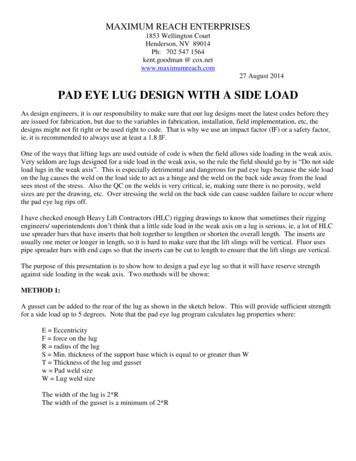
CP00524. Open the side lift-up window and remove the2 FIRST REMOVE THE PLASTICCLIP THAN PULL THE STRUTFROM THE STRUT BALL1 PULL THE METAL CLIPTO REMOVE:WITH SCREWDRIVERtwo (2) gas struts. To do this you will need aflat screwdriver. On the narrow end of the gasstrut fitted to the ball next to the lock, lift themetal clip with a screwdriver. This will allowyou to pull away the strut from the strut ball.On the wide end of the strut attached to thewindow frame, you will need to remove andretain the plastic cap with a screwdriver, thanyou can pull the strut from the strut ball.Please retain all the struts and plastic caps.Repeat for the other end of the window.(ref. diagram4).Diagram: 4 - REMOVE AND RETAIN GAS STRUTS5. From outside the vehicle, remove andFRONT OF VEHICLE523144 5 PULLWINDOW FROMFRONT CORNERS1 OPENWINDOWdiscard the lift-up window.To do this, ensure the window is open.Next, push window forward and pull fromeach rear corner in order as shown, untill thelift-up window pops out of the window opening.Now that the lift-up window has beenremoved, ensure that the window opening,canopy interior & work area is re-cleanedas more glass may have been introducedto the area of operation.(ref. diagram5).2 3 PULLWINDOW FROMREAR CORNERSDiagram: 5 - REMOVE LIFT-UP WINDOWENSUREWINDOW OPENING IS CLEAR6. Check that the window opening is clean& clear of any material that may affectthe placement of the new window.(ref. diagram6).Diagram: 6 - CLEAN & CLEAR WINDOW OPENING25/07/11Page 4 of 7
CP00527. Install the two (2) (MISC1876-2) cordlengths into position as shown.Note: The cord is positioned intothe extrusion channel on the undersideof the window. (ref. diagram7).FITTWO CORD LENGTHSCORD POSITIONDiagram: 7 - INSTALL TWO (2) CORD LENGTHS8.Install the lift-up window by Lift-Up thefront into position & ensure it is pushedfully forward and is resting neatly insidethe window opening, then push the rearlower corner into place, followed by therear upper corner.Then position the window centrally in themoulded window recess of the canopy.One person needs to continue to holdthe window in position. (ref. diagram8).9.From inside the canopy, position thelift-up window clamp frame (supplied)over the back of the lift-up window.Fasten the lift-up window clamp frameinto position with the twenty (20) 8-gaugehex head screws (supplied).IMPORTANT: Secure the four corners first,then work towards the middle of each edgein order as shown. (ref. diagram9).3 PUSHREAR UPPER CORNERINTO PLACE3121 SLIDEFRONT OF WINDOWINTO POSITION2 PUSHREAR LOWER CORNERINTO PLACEDiagram: 8 - INSTALL LIFT-UP WINDOW1 INSTALLCLAMP FRAME OVERLIFT-UP WINDOW1/4”32698475SECURE CLAMP FRAME WITH(20) 8-GAUGE HEX HEAD SCREWSDiagram: 9 - INSTALL LIFT-UP WINDOW CLAMP FRAME25/07/11Page 5 of 7
CP005210. Position the roof-bow so it is parallel to thefront of the canopy.Using the bracket holes on the roof bowas a drill guide, drill two (2) Ø3mm holes toa depth of 5mm, into the lift-up windowframe as shown.Secure the roof-bow to the lift-up windowreusing two (2) 8-gauge hex head screwsas shown.Remove all masking tape from roof bow.(ref. diagram10).Ø3mm5mm1/4”1 DRILL(2) Ø3mm holes2 FIT8-GAUGE HEX HEAD SCREWSDiagram: 10 - RE-SECURE THE ROOF BOW11. If the locks are not damaged and you are5 REMOVE LOCK &HANDLE ASSY ANDRUBBER SEAL WASHER6 LOOSEN HEX NUT7 REMOVERUBBER WASHER712433 REMOVE LOCK NUT &4 PLASTIC WASHERgoing to re-use them you will need toremove them as follows, on the inside ofthe window loosen grub screw. Remove andretain the lock cam, then the lock nut andplastic washer.From the outside of the window, removeand retain the lock & handle assemblyand the rubber seal washer.Check new window that there is a rubberseal between the metal bracket and theglass. If there is not then you will need toremove it from the window being replaced,by loosening the hex nut and removing therubber washer between the metal bracketand the glass. (ref. diagram11).2 REMOVE LOCK CAM1 LOOSEN GRUB SCREWDiagram: 11 - (OPTIONAL) REMOVAL OF (NON-DAMAGED) LOCKS12. If there is no rubber seal between the3 ORIENT LOCK &HANDLE ASSYFLATS TOP& BOTTOMHANDLE ISHORIZONTALHANDLE ROTATES90 CLOCKWISETIGHTEN 6HEX NUT TO 7NmSHORT ARMOF HANDLEIS ON RHS3 FIT LOCK & HANDLE ASSYAND RUBBER SEAL WASHER1 FIT RUBBERWASHER (IF REQUIREDBEHIND BRACKET)15 FITLOCK NUT454 FIT PLASTICWASHERDiagram: 12 - ORIENT AND FIT LOCKS TO WINDOW25/07/11glass and the metal bracket then loosenthe hex nut and fit the rubber washerbetween the metal bracket and the glassaligning the holes, then tighten the hex nutto 7Nm. From the outside of the window, fitthe lock & handle assembly and the rubberseal washer into the window ensuring it isoriented with the handle horizontal andthe two (2) flats on the barrel are top andbottom and the short arm of the handle ison your right hand side. From inside thecanopy fit the plastic washer then the locknut and tighten to 7Nm. Check lockorientation from outside the canopy, handleshould be horizontal and should rotateclockwise to orient the handle vertically asshown. Turn handle anti-clockwise so it ishorizontal for the fitment of the cam.(ref. diagram12).Page 6 of 7
CP005213. Open the window to fit the lock cam.1 OPENWINDOW3 TIGHTENGRUB SCREWAPPLY LOCTITE 2432 ORIENT & FITCAM LOCK4 CHECKLOCK OPERATIONTO OPEN & CLOSEFit the lock cam, ensuring the smoothrounded surface faces the window and theleg points down on the window as shown.Apply Loctite 243 to the grub screw andtighten it.Turn the handle clockwise 90 and closethe window, then rotate the handle 90 anti-clockwise to lock the window.Repeat Steps 12 & 13 for the other end ofthe window. Check locks function correctlyand glass seals to the window rubber.If locks are too stiff readjust the positionof the lock cam arm. (ref. diagram13).Diagram: 13 - ORIENT AND FIT LOCK CAM14. With the window open, attach the retained1 ENSURE WIDE ENDOF GAS STRUT ISMOUNTED TO TOPOF WINDOW FRAME2 MOUNT NARROW END OFGAS STRUT TO BOTTOM OF DOORgas struts.Remove the plastic clip from the head of thewide end of the gas strut. Push the strut headonto the strut ball till it cliks in and than pushthe round clip into the slots.Fit the narrow end of the strut into the strutball located at the bottom of window nextto the lock. The strut head should be pushedin till it clicks.IMPORTANT: Wide cylinder end should beattached to the top window frame strutbracket. Fit narrow rod end to the strutbracket at the bottom of the window nextto the lock as shown. Repeat for theother end of the window. (ref. diagram14).Diagram: 14 - CONNECT GAS STRUTS15. Check the functional operation of thewindow that has just been replaced.Do a water test to detrmine there areno leaks with a hose. Sealing of the glassagainst the window sealing rubber can bedone by tuning the position of the lockcams on the locks along the position ofthe lock cam shaft. (ref. diagram15).1OPEN & CLOSELIFT-UP WINDOW2CHECKLOCK OPERATIONTURN HANDLE CLOCK-WISETO OPEN (UN-LOCK)Diagram: 15 - CHECK WINDOW OPERATION25/07/11Page 7 of 7
canopy side lift-up window replacement instructions please note: canopy side lift-up window is supplied with-out locks. - you can re-fit previous (non-damaged) locks to the new window. - you can order a new set of locks as a pair - fo