Transcription
FOR BUSINESSyuboto.comSMS Extension Zoho CRM User Guide
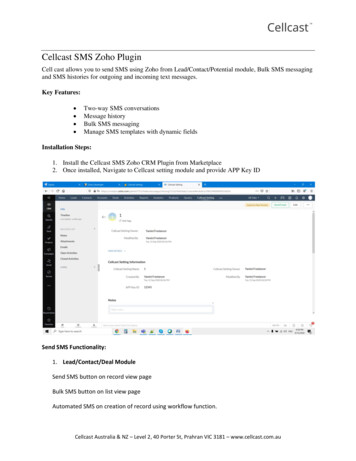
User Guide for Yuboto SMS Extensionfor Zoho CRMInstall the Yuboto SMS extension from Zoho MarketplaceIn the confirmation pop-up, enter your API Key and click “Save” to connect your Yuboto account with your Zoho CRMaccount:How to Get Started (API Key, Top Up, Sender IDs Request)To start using the Yuboto’s SMS Extension, visit our Omni Messaging Platform “Octapush” and follow the steps below: Register at https://octapush.yuboto.com/en-US/Register. Find your OMNI API Key in “My Account” screen at “API Integration” section (use the “API Key Based64 Encoded”)or request it from our support team at support@yuboto.com:2
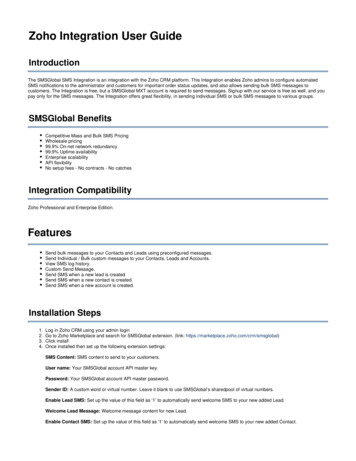
Top up your account balance or purchase the required credits to start sending messages: Visit the “SMS Sender IDs” page and request for the SMS Sender(s) that you want to have for your SMS campaignsby clicking the button “New SMS Sender ID Request”:Keep in mind that in order to be able to request an SMS sender ID, you need first to add your account billinginformation.Your SMS Sender ID can be up to 11 alphanumeric characters or 16 digits. If you want the recipients to be able to reply,please fill in the mobile number in international dialing format (eg. 3069XXXXXXXX for Greece).Warning: You need at least one approved SMS Sender ID, in order to be able to send SMS messages. Your SMSSender ID requests will be under review from the Octapush team.3
Send Individual or Bulk SMS to Contacts and Leads Visit the Contacts or the Leads list and choose which contacts or leads you want to send SMS to:After you have selected the desired contacts or leads, click the button “Send SMS with Yuboto” which is located on topof the list.4
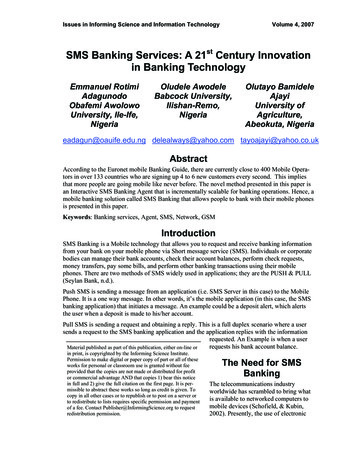
Keep in mind that you have also available the “Send SMS with Yuboto” button, in each contact or lead page: 5In “Send SMS with Yuboto” pop-up, create your SMS message by filling in the mandatory fields and once your SMSmessage is ready for sending, click the button “Send”:
Below you will find explanations for each field of the SMS form:1. Field “To”: Here are the mobile numbers that you have selected to send an SMS message.2. Field “Message Expiration”: Choose the time period that you want your message(s) to be expired. This means thatduring the period you choose, attempts will be made to send your message. Keep in mind that you are able tochoose between 30 seconds and 3 days. Also, you are able to choose “No Expiration“ if you wish your message(s)to not be expired.3. Field “Sender”: Choose from the drop-down the SMS Sender that you want for your SMS messages.4. Field “SMS Type”: Here you need to choose the type of the SMS message that you want to send to the recipients.You have the option to choose between “Simple SMS” and “Unicode SMS”. The difference is that with SimpleSMS you can send 160 characters per SMS and also, you may use Greek capital characters, Latin characters,digits, spaces, and the following symbols: !@@# % ”&*() - ,./?;:’ but with Unicode SMS, you can send 70characters per SMS and also you may use all the symbols and alphabets globally.5. Field “SMS Length”: Here you need to choose the length of the SMS message that you wish to send to therecipients. You have the option to choose between “Basic SMS” and “Long SMS”. This means that depending onwhat you choose to the “SMS Type” field, you need to select if you wish to send an SMS message up to or longerthan 160 7bit characters or 70 Unicode characters.6. Personalization Tags: Select the personalized information you want to add to your message. Keep in mind thatin case the content of one of the used personalized parameters is empty for a contact, then the message will besent with this piece of personalized information as blank.7. Field “SMS Text”: Here you need to type your SMS message.8. Field “Characters”: This is a disabled field which informs you about the number of characters you have typed inthe SMS Text field.9. Field “Number of SMS”: This is a disabled field which informs you about the number of SMS messages that youwill send to your recipients based on the characters you have typed on the SMS Text field.Send a testIf you wish to test your message before sending it to your recipients, you need to go to the bottom of the pop-upwindow and click on the button “Send a Test”:The pop-up window guides you on how to send your SMS to the mobile numbers that you wish for testing purposes.Keep in mind that you are able to send your test messages to more than 1 mobile number:6
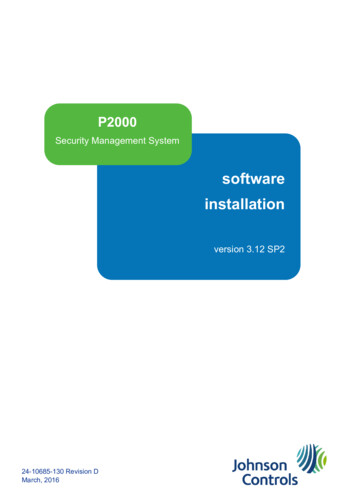
Warning: If your message includes personalization tags, keep in mind that they will not be replaced in the test message.In the pop-up window below, you have to fill in the field with a mobile number (including the country code), in order tosend your test(s). In case you wish to test your SMS message to more than one mobile number, you need to click on the“ ” button in order to generate a new field to input the extra numbers. If you want to delete a field, you need to clickon the red “X” button:Once you are ready, click on the button “Send an SMS Test” and the test message(s) will be sent.Check the delivery status of your SMS messages Visit the “Yuboto SMS History” module and check the delivery status of the SMS messages you have sent.“Status” column in Yuboto SMS History grid7
“Yuboto SMS Information” section in each message pageSend automated SMS using webhooks 8Create workflow rule for Contacts/Leads moduleSelect “Webhook” option in “Instant Actions”Fill in the webhook information and settingsSave the workflow
SMS Extension Zoho CRM User Guide. 2 Install the Yuboto SMS extension from Zoho Marketplace In the confirmation pop-up, enter your API Key and click “Save” to connect your Yuboto account with your Zoho