Transcription
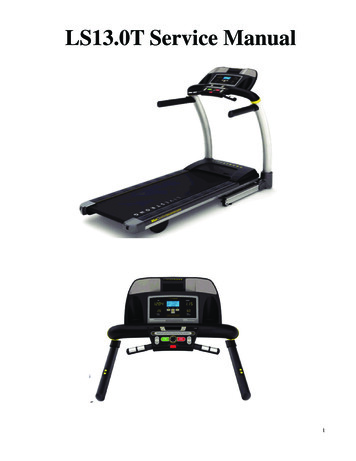
LS13.0T Service Manual1
TABLE OF CONTENTSCHAPTER 1: SERIAL NUMBER LOCATION . .3CHAPTER 2: PREVENTATIVE MAINTENANCE2.1Preventative Maintenance . 42.2Tension and Centering the Running Belt . .6CHAPTER 3: ENGINEERING MODE3.1Engineering Mode . . . .73.2Engineering Mode Overview . . .8CHAPTER 4: TROUBLESHOOTING4.1Electrical Diagram . .94.2Troubleshooting - No Power to the Console . .104.3Troubleshooting - No Console Response . . .124.4Troubleshooting - Incline Motor Issues4.5Troubleshooting - Speed Feedback Inaccurate . .144.6Troubleshooting - Noise Issues . . 164.7Troubleshooting - Speaker / Audio Issues . .18 . . .132
CHAPTER 1: Serial Number Location11-1 Serial Number Location3
CHAPTER 2: Preventative Maintenance2.1 PREVENTATIVE MAINTENANCEPreventative maintenance is the key to smoothly operating equipment, as well as keeping the user’s liability to a minimum.Equipment needs to be inspected at regular intervals.Defective components must be replaced immediately. Improperlyworking equipment must be kept out of use until it is repaired.Ensure that any person(s) making adjustments orperforming maintenance or repair of any kind is qualified to do so.AFTER EACH USE (DAILY)Clean and inspect, following these steps: Turn off the treadmill with the ON / OFF switch, then unplug the power cord at the wall outlet. Wipe down the running belt, deck, motor cover, and console casing with a damp cloth. Never use solvents, as they cancause damage to the treadmill. Inspect the power cord.If the power cord is damaged, contact Customer Technical Support. Make sure the power cord is not underneath the treadmill or in any other area where it can become pinched or cut. Check the tension and alignment of the running belt.Make sure that the treadmill belt will not damage any othercomponents on the treadmill by being misaligned. If any labels are damaged or illegible, contact Customer Technical Support for replacements.EVERY WEEK (WEEKLY)Clean underneath the treadmill following these steps: Turn off the treadmill with the ON / OFF switch, then unplug the power cord at the wall outlet. Fold the treadmill into the upright position, making sure that the lock latch is secured. Move the treadmill to a remote location. Wipe or vacuum any dust particles or other objects that may have accumulated underneath the treadmill. Return the treadmill to its previous position.EVERY MONTH - IMPORTANT! Turn off the treadmill with the ON / OFF switch, then unplug the power cord at the wall outlet. Inspect all assembly bolts of the machine for proper tightness. Remove the motor cover. Wait until ALL display screens turn off. Clean the motor and lower board area to eliminate any lint or dust particles that may have accumulated.Failure to doso may result in premature failure of key electrical components. Vacuum and wipe down the belt with a damp cloth. Vacuum any black / white particles that may accumulate aroundthe unit. These particles may accumulate from normal treadmill use.4
CHAPTER 2: Preventative Maintenance2.1 PREVENTATIVE MAINTENANCEEVERY 6 MONTHS OR 150 MILESIt is necessary to lubricate your treadmill running deck everysix months or 150 miles (240 kilometers) to maintain optimalperformance. Once the treadmill reaches 150 miles (240kilometers), the console will display the message “LUBE” or“LUBE BELT”. The treadmill will not operate while themessage is showing. Hold ‘STOP’ for 5 seconds to suspendmessage for 5 miles.Your treadmill came with a bottle of lubricant which can beused for two applications.Ɣ Turn off the treadmill with the on/off switch, then unplug thepower cord at the wall outlet.Ɣ Loosen both the rear roller bolts. (for best results, place tworemovable marks on both sides of the frame and note rollerposition). Once the belt is loosened, take the bottle oflubricant and apply it to the entire top surface of therunning deck. Tighten both rear roller bolts (matching up the marks for proper position) to original position. After youhave applied lubricant, plug in the power cord, insert the safety key, start the treadmill and walk on the belt for twominutes to spread the lubricant.Ɣ Lubricate the air shocks with Teflon based spray.Ɣ Once lubrication is complete, reset the console by pressing and holding ‘STOP’ and ‘SPEED ’ buttons for 5 seconds.5
CHAPTER 2: Preventative Maintenance2.2 TENSIONING & CENTERING THE RUNNING BELTIf you can feel a slipping sensation when running on the treadmill, the running belt must be tightened. In most cases, thebelt has stretched from use, causing the belt to slip. This is a normal and common adjustment. To eliminate this slipping,turn the treadmill off and tension both the rear roller bolts using the supplied Allen wrench, turning them ¼ turn to the rightas shown. Turn the treadmill on and check for slipping. Repeat if necessary, but never turn the roller bolts more than ¼turn at a time. Belt is properly tensioned when the slipping sensation is gone.The running belt has been properly adjusted at the factory before it was shipped. At times the belt can move off-centerduring shipment. Before operating the treadmill, make sure the belt is centered and remains centered to maintain smoothoperation.If the running belt is too far to the right side: With the treadmillrunning at 1 mph, turn the left adjustment bolt counter-clockwise¼ turn at a time (using the supplied Allen wrench). Check the beltalignment. Allow belt to run a full cycle to gauge if moreadjustment is needed. Repeat if necessary, until the belt remainscentered during use.If the running belt is too far to the left side: With the treadmillrunning at 1 mph, turn the right adjustment bolt counter-clockwise¼ turn at a time (using the supplied Allen wrench). Check the beltalignment. Allow belt to run a full cycle to gauge if moreadjustment is needed. Repeat if necessary, until the belt remainscentered during use.6
CHAPTER 3: Engineering Mode3.1 ENGINEERING MODE1) To enter Engineering Mode, press & hold the INCLINE UP “Ÿ” and SPEED DOWN “ɡɡ” keys at the same time for3-5 seconds until Engineering Menu appears on the display.2)Use the INCLINE and SPEED UP and DOWN keys to select a parameter.3)Press ENTER to enter a parameter setting.4)Use the INCLINE and SPEED UP and DOWN keys to change the parameter.5)Press the START key to save the change to the parameter.6)Press and hold the STOP key to exit Engineering Mode and return to normal operation.7
CHAPTER 3: Engineering Mode3.2 ENGINEERING MODE OVERVIEWMODEENG 0FUNCTIONDisplay TestDESCRIPTIONStart Key – LCD/LED onStop Key – LCD/LED offAny Other Key - Will show on the display window.Hold the STOP key for 3 seconds to return to the Engineering Menu.ENG 1Hardware TestMotor & Incline Motor Test.ENG 2Auto CalibrationAuto calibrates the speed only.ENG 3Switch FunctionUse the INCLINE or SPEED UP and DOWN keys to switch DEMOMODE off or on(Demo on 1 & Demo off 0 on DISTANCE window).Use the START key to select unit (1 KM & 0 Mile on TIME window).ENG 4InformationAccumulated Time and DistancePress and hold the START key for 5 seconds to clear all data.Remarks: Unit of Time is Hour.Unit of Distance is KM or Mile based on your set.SECOND LEVELSoftware VersionENG 8To Get to ENG 8 - Enter into ENG 3, the press and hold the SPEED UPand INCLINE DOWN key at the same time for 3-5 seconds.Press ENTER at P0 - Software version.Press ENTER at P1 - Select speed up rate (normal or quick).Press ENTER at P3 - Hold the START key to clear all data.ϡ “START” key to save the change.ϡ Demo off-- console will display Figure A after remove the safety key; Demo on--60 seconds later after remove thesafety key, the console will enter into DEMO ON MODE. The LED and LCD will display in turns (Figure B).FIGURE AFIGURE B8
CHAPTER 4: Troubleshooting4.1 Electrical Diagram9
CHAPTER 4: Troubleshooting4.2 TROUBLESHOOTING – NO POWER TO THE CONSOLENO POWER TO THE CONSOLE1)SYMPTOM:a. The power switch is in the on position, but the console will not turn on.2)SOLUTION:a. Check to see if the power switch is lit.If it is not, try a different outlet.- If the power switch still does not light up with a known good outlet, replace the power switch.b. Check to see if the MCB has power. There is a red power LED on the MCB that should be lit.c. If the MCB does not have power, check the connection of the power wiring from the power receptacle to the MCB.Use a multi-meter to measure AC1 & AC2, AC voltage shall be same as local’s standard voltage (110V-240V)- If AC voltage value is standard, replace the MCB as it shall be defective.10
CHAPTER 4: Troubleshooting4.2 TROUBLESHOOTING – NO POWER TO THE CONSOLE-CONTINUEDd. If the MCB does have power, check the connection of the console cable wire at the MCB and UCB.- Remove the console cable from MCB, and use a multi-meter to measure the DC voltage between the “GND pin” (Pin4&5) andthe ” 15V Pin” (Pin7 & 8)---see section 5.1. DC output is normally around DC 15V. If no output, replacethe MCB.- If output is around DC 15V, check the console cable. If it is defective, replace the console cable.- If the console cable connections are all good, replace the PCB.11
CHAPTER 4: Troubleshooting4.3 TROUBLESHOOTING – NO CONSOLE RESPONSETHE POWER IS ON, BUT MACHINE HAS NO RESPONSE1)SYMPTOM:a. The power is on and the console lights up, but the treadmill does not run when keys are pressed.2)SOLUTION:a. Check if the console beeps when all keys are pressed. If no, replace the keypads.b. Enter Engineering Mode (See Section 4.1), and scroll to ENG 1 (Hardware Test).Press the key “ENTER” first andthen the key ”START”.- When press the key “SPEED / -“, if the data on windows “TIME” & “DISTANCE” is changed, the console is ok.If not, replace the PCB.c. Turn off the power switch, and open the motor upper cover. Remove the red & black wires of motor from the MCB,and use a multi-meter to measure the resistance of drive motor.If the resistance is bigger than 10 ȍ, the drive motor is defective. Replace the drive motor.If the resistance is lower than 10 ȍ, the drive motor is ok. Then,- Check the connection of the speed sensor (encoder disk group) at the MCB (Figure A).- Remove the speed sensor (Figure B) from the motor and clean it, then re-test.- If the speed sensor is clean and has a good connection but still will not operate, replace the speed sensor.- Replace the MCB as the last step if machine does still not run after to take above actions.FIGURE AFIGURE B12
CHAPTER 4: Troubleshooting4.4 TROUBLESHOOTING - INCLINE MOTOR ISSUESINCLINE MOTOR ISSUES1)SYMPTOM:a. The incline motor does not lift up or down.2)SOLUTION:a. Enter Engineering Mode (See Section 4.1), and scroll to ENG 1 (Hardware Test). Press the key “ENTER” first andthen the key ”START”.-Press the key “INCLINE Ÿ/ź”.If can hear beeps from two relays (Figure A) at the MCB, the MCB is ok. Then check the connection of theelevation motor at the MCB (Figure B) first, try to unplug and re-plug these two pins. If can not resolve the issue,replace the elevation motor.FIGURE AFIGURE BIf there is no beeps from these two relays, MCB is defective and replace the MCB.13
CHAPTER 4: Troubleshooting4.5 TROUBLESHOOTING - SPEED FEEDBACK INACCURATESPEED FEEDBACK INACCURATE1)SYMPTOM:a. The treadmill speed is higher or lower than the actual speed.1) SOLUTION:a. Enter Engineering Mode (See Section 4.1), and scroll to ENG 2 (Auto Calibrate). Press the key “ENTER” firstand then the key ”START” (Figure A & B). The treadmill running belt will begin to move automatically from speedlevel P0 to P4.P0—speed range around 0-1 KMPHP3—speed range around 10-15 KMPH (FigureC)P1—speed range around 1-5 KMPHP4—speed range around 15-20 KMPH (FigureD)P2—speed range around 5-10 KMPHFIGURE AFIGURE BFIGURE CFIGURE DUpon successful calibration, the treadmill will beep several times. The console will automatically exitEngineering Mode and return to the start-up screen.14
4.5 TROUBLESHOOTING - SPEED FEEDBACK INACCURATE CONTINUEDb. If Auto Calibration can be completed successfully, normally this issue will be fixed.If “E1” error is presented on the console during auto-calibration (Figure E), check the connection of the speedsensor wire from the left frame (close to front roller pulley) to the MCB (Figure F & G). Replace the speed sensorwire if needed.FIGURE EFIGURE FFIGURE GIf auto calibration can be still not performed, replace the MCB as the last step.15
CHAPTER 4: Troubleshooting4.6 TROUBLESHOOTING - NOISE ISSUESNOISE ISSUES1)SYMPTOM:a. Thumping noise twice per rotation on new machine.b. Rubbing / grinding noise.c. High pitched “bell-like” sound from under the motor cover.d. Banging or clunking sound.e. Slapping / thunking / squeaking sound with each footstep.f. Rubbing sound underneath the treadmill.g. Squeaking noise when raising / lowering the deck into storage positions.h. Squeaking / grinding noise when using elevation.2)SOLUTION:a. This noise is from the roller or running belt.- If this is a new unit, some noise is normal as the running belt forms around the rollers.- Check that the belt is centered and tensioned correctly.- Remove and clean the rollers if needed.- Replace the rollers or running belt as needed.b. This sound is likely a moving component.- Remove the motor cover and check the drive belt for alignment and make sure it is not slipping or is frayed / cutin any way.Replace the drive belt if needed.- Make sure the optic disk on the motor is not rubbing the speed sensor.- Turn the motor by hand to see if motor brushes or bearings are rubbing. Replace the motorif needed.- Check the front and rear rollers, replace if needed.c. This sound is likely caused by the optic disk.- Check that the optic disk is tight on the motor and not rubbing the speed sensor.d. The sound is likely due to the unit not being level.- Check that all levelers are touching the ground.- Move the treadmill to another flat surface.16
CHAPTER 4: Troubleshooting4.6 TROUBLESHOOTING - NOISE ISSUES-CONTINUEDe. This sound is from the running deck / belt.- Check that the running deck is tightly attached to the frame.- Check the deck shocks for detioration or crumbling. Replace if needed.- Check to see if the air shock is making this noise, lubricate or replace if needed.f. This sound is likely due to the air shock.- Lubricate or replace the air shock as needed.g. This sound is likely from the incline motor.- Check that the incline motor connection points include Teflon washers.- Lubricate the incline motor worm screw and connection points with grease.- Replace the incline motor.C17
CHAPTER 4: Troubleshooting4.7 TROUBLESHOOTING - SPEAKER / AUDIO ISSUESSpeaker / Audio Issues1)SYMPTOM:a. No sound through the speakers but headphones work.b. No sound through headphones but the speakers work.c. No sound through speakers or headphones.d. IPod not charging.e. Speakers buzzing.f. Sound from one speaker only.g. Shock from headphones.2)SOLUTION:a. One of the speaker boards has a bad connection or is faulty.- Check the connection of the wires going from the speakers to the speaker power board.- Check the connection of the wires going from the speaker power board to the amp board.- Check the connection of the wires going from the amp board to the console.- Replace the speaker or amp boards and wiring.- Replace the speakers.- If the speaker board, amp board, wiring, and speakers do not solve the issue,replace the console.b. There is a bad connection between the headphones and the console.- Verify the connection of the music player to the dock or audio adaptor cable.- Verify the audio adaptor cable connection at the console.- Replace the headphone jack.- Replace the audio adaptor cable.c. There is a bad connection between one of the audio boards and the console.- Verify the connection of the music player to the dock or audio adaptor cable.- Verify the audio adaptor cable connection at the console.- Replace the audio adaptor cable.- Replace the console.d. IPod or IPod dock has a bad connection.- Verify the connection of the IPod.- Verify the connection of the IPod dock at the console.- Replace the IPod dock.18
CHAPTER 4: Troubleshooting4.7 TROUBLESHOOTING - SPEAKER / AUDIO ISSUES-CONTINUEDe. Speakers are not getting a clear signal through the speaker wires.- Check the speaker wire connections.- Check for any kinks or cuts in the speaker wires.- Replace the speaker wiring.- Replace the speakers.f. The speaker or speaker wiring is bad.- Check the speaker wire connections.- Switch the speaker connections from one speaker to the other to see if sound switches sides.- If the sound does not switch sides, replace the speaker board.- If the sound does switch sides, replace the speaker and speaker wires.g. Grounding issue.- Try a different set of headphones.- Check the grounding of the console.19
The treadmill will not operate while the message is showing. Hold ‘STOP’ for 5 seconds to suspend message for 5 miles. Your treadmill came with a bottle of lubricant which can be used for two applications. Turn off the treadmill with the on/off switch, then unplug the power co