Transcription
IntelliLinkAdministratorGuidePAYMENT SOLUTIONS IntelliLink Administration Guide P. 1/ 22
IntelliLink Administrator GuideFor all support-related inquiries, contact our support team:Phone: 877.346.1412Monday – Friday, 8:00 a.m. – 6:00 p.m. Central Time, except Federal holidaysEmail: CommercialCards@htlf.comCONTENTSEmployee Administration . 3Add a User . 3Modify User and User Details . 4Map an Account to an Employee Record . 6Delegate Accounts . 6Approval Delegate . 7Transaction Coding . 8Code a Transaction . 8Add a Code as a Favorite . 9Split a Transaction . 9Attach a Receipt . 9Add a Receipt to the Image Library . 10Company Administration . 12Create a New Charge Code . 12Edit a Charge Code . 13Set and Remove Default Codes. 14Add and Edit a Charge Group . 16Add/Remove a Charge Code to/from a Charge Group . 17Reports . 18Transaction Search—Company . 18Extract . 19Test Extract . 20True Extract . 21Image Extract . 22PAYMENT SOLUTIONS IntelliLink Administration Guide P. 2/ 22
EMPLOYEE ADMINISTRATIONADD A USERStep 1:Select Administration Overview Administration OverviewStep 2:Choose EmployeesStep 3:Close out of the pop-up, and select Add New Employee in the topleftStep 4:Fill out the personal details in the pop up—————————Employee IDFirst/Last NameEmail addressCompany Unit (must choose—select unallocated if not utilizing)Your password (Your administrator password)Charge Group (select All Codes if not utilizing)Report Group (Individual, Manager or Administrator)Approval Role (Approvee: 1, if using approvals)Manager Details—only select a level 1 manager unlessotherwise noted; select the person icon to the right to choosewho will approve this employee’s transactions— Default Coding—enter any employee level defaults, if applicable— Delegation—select the person icon to the right to choose whoshould also have coding rights to this user’s cardPAYMENT SOLUTIONS IntelliLink Administration Guide P. 3/ 22
— User details—as a standard, we always use the email addressas the username— Select SaveMODIFY USER AND USER DETAILSStep 1:Navigate through Administration Overview AdministrationOverviewStep 2:Select EmployeesStep 3:Change Return Results to All in the pop up, followed by SearchTo modify an employee’s Charge Group, Report Group or Approval Role,follow the below steps:Step 1:Select the box to the left of the employee(s)Step 2:Choose Manage selected employees at the bottom left of thescreenStep 3:Select which item to be changed (Charge Groups, Report Groups,Approval Roles or Rate Groups)Step 4:To add, select the ( ) next to the respective option, followed byDone and ConfirmPAYMENT SOLUTIONS IntelliLink Administration Guide P. 4/ 22
Step 5:To remove, select the (-) next to the respective option, followed byDone and ConfirmTo Modify a user’s personal details, select theicon to the rightStep 1:Within the pop up, select Edit next to Personal Details to changefirst/last name, email address, phone number and company unit.Step 2:To edit the manager (or approver), select Edit next to Manager andsearch for whom should approve this employee’s transactions.*Note: do not add a manager in hierarchy 2-6, unless this waspreviously discussed.Step 3:There’s an option to remove the employee record at the bottom ofthe pop up. Only use if the cardholder has no transactions. Forbest practice and reporting purposes, leave the employee recordattached to their respective card. You can lock their account andaccess to IntelliLink. Reference step below.Step 4:Theicon displays the account mapped to the employee recordTo set employee charge code defaults, select theStep 1:Step 2:icon.Select the drop down and search (as if coding a transaction) forthe code to defaultSelect saveEdit UsernameStep 1:Select theicon. *Note: as a standard, we use the email addressas a username. This ensures unique credentials across all domainsof IntelliLink.Change PasswordStep 1:Choose theicon. The user will be prompted to reset theirtemporary password upon loginReset Memorable WordStep 1:Theicon will allow the reset of both the memorable word andpassword. IntelliLink emails the temporary password to the user;this is the only way to reset the memorable wordPAYMENT SOLUTIONS IntelliLink Administration Guide P. 5/ 22
Unlock/Lock UsersStep 1:Thewill turnif:— The user unsuccessfully attempts to login three times— An admin locks their accountStep 2:To unlock, simply select the icon— If the user has forgotten their password, also reset thepasswordMAP AN ACCOUNT TO AN EMPLOYEE RECORDThis allows the employee to view this account’s transactions upon login. For reporting andbest practice, every card should be mapped to its own employee record, including billingaccounts, virtual cards, department cards, etc. There should never be an account unmapped,and there should only be one account mapped to an employee record (unless utilizing CashExpenses).Step 1:Navigate through Reports Company Administration AccountSearchStep 2:Ensure All accounts are selected both under Account Mapping andAccount ActivityStep 3:Step 4:Step 5:Select SearchSelect the digit in the Unmapped columnChoose theicon to the right, and search for the employeerecord that matches the card by selecting theicon to the right.DELEGATE ACCOUNTSThis allows employees other than who the account is mapped to code the card’stransactions. For example, virtual cards and ghost cards should be delegated to an employeeto code. Accounts can be delegated to multiple employees. Although like mapping,delegating the card is only making it visible to an employee. The card must still be mappedto its individual employee record. Refer to steps above for card mapping.PAYMENT SOLUTIONS IntelliLink Administration Guide P. 6/ 22
Step 1:Navigate through Reports Company Administration AccountDelegationStep 2:In the pop up, ensure All is selected for Delegated Accounts,followed by SearchStep 3:To delegate an account, check the box on the right sideStep 4:Select Delegate Selected Accounts in the bottom rightStep 5:Search for the user to delegate this account by choosing theicon to the rightwill remove the delegation to this employee on the accountallows an expiration date to be set for the delegationOption A:Option B:APPROVAL DELEGATEThis allows employees other than the manager (approver) to approve transactions. Forexample, if Manager X will be out for two weeks on vacation, it is useful to delegate ManagerX’s approval role to another employee so they can approve transactions on Manager X’sbehalf. This function also works well with centralized approval, as it takes the strain off onesingle manager to do all approving.Step 1:Navigate through Reports Company Administration ApprovalRole DelegationStep 2:Ensure NO is selected for Delegated Roles Only, followed bySearchSelect theicon to delegate this approver’s role to anotheremployeeSearch for the employee, and select theicon to the right toselectStep 3:Step 4:PAYMENT SOLUTIONS IntelliLink Administration Guide P. 7/ 22
OPTION A:OPTION B:OPTION C:will remove the delegation to this employee on the accountallows an expiration date to be set for the delegationwill show the delegation historyTRANSACTION CODINGCODE A TRANSACTIONAdministrators have access to all accounts for coding. There is a report that can be pulled(reference the Reports section) to view all accounts. If the PA also has an account,transactions will appear under the My Expenses section on the home page. Selecting the rednumber under Action Required, choosing the Expenses Tab Statement Period or selectingred number on the left side next to Expenses will all bring up the account holder’s expenses.Each option leads to the following view of expenses:Step 1:Select theicon to launch the pop up box for coding— All segments denoted with the blue * are mandatory-—must becoded to save— If codes are added as favorites (see below for instructions),they will be listed in each segment’s drop downStep 2:Step 3:Select or free text the code for all segments applicableAttach receipt (see below for instructions), if applicableStep 4:Add necessary description—free text boxStep 5:Select Save— Thewill turn to a, indicating coding has been completedPAYMENT SOLUTIONS IntelliLink Administration Guide P. 8/ 22
ADD A CODE AS A FAVORITEIntelliLink allows each user to save up to fifteen codes as a favorite, per segment. Favoritinga code adds it to the segment drop down, eliminating the search for codes on eachtransaction.Step 1:Step 2:Select theicon as if coding the transactionChoose the drop down on the segment to add a favoriteStep 3:Select [Search]Step 4:Search by Code Value, Description or leave code value anddescription blank and choose Search to bring in all codes availableStep 5:Select theStep 6:To remove a favorite, select theicon next to the code to save as a favoriteicon from the code on the rightSPLIT A TRANSACTIONIntelliLink allows transactions to be split between multiple lines, enabling the expense to besplit between multiple accounts.Step 1:Select theicon to the right of Line 1Step 2:Select how many lines to split the transaction between in the dropdownStep 3:Manually manipulate the line amounts (free text), if desiredStep 4:Step 5:Choose SaveContinue coding the transaction as normalATTACH A RECEIPTStep 1:Select theicon next to Receipt from the coding screenPAYMENT SOLUTIONS IntelliLink Administration Guide P. 9/ 22
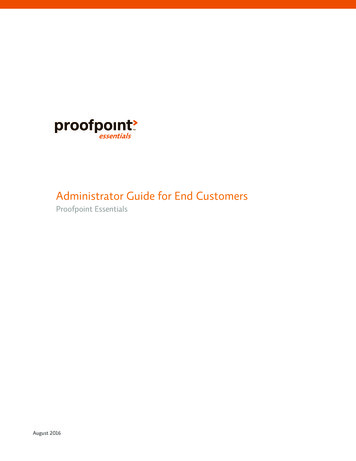
Option A:If there are receipts in the image library, select the image, andchoose linkOption B:To upload an image from the desktop, select the Upload icon in thetop leftOPTION C:To upload images via email, select the Upload via Email in thetoolbar— Email the image from your device to the email address listed— Note: there can be a short delay before the receipt displays inthe image libraryThe boxes next to Receipt will turn green with a checkmark,indicating the image has successfully been linkedNOTE:ADD A RECEIPT TO THE IMAGE LIBRARYCardholders can add receipts to the image library the following three ways:Option A: Upload via a unique Email Address— Each user is assigned a unique email address which can befound by selecting the Upload via Email option when entering toattach a receipt— This works best when the user saves the address as a contactin their phone, takes a photo of the receipt and sends it to thisaddress.— Note: the receipt could take a few hours to appear.Option B: Uploading via the Visa IntelliLink SpendManagement mobile application. End users can downloadthe above application, and attach the receipt through thebelow steps.PAYMENT SOLUTIONS IntelliLink Administration Guide P. 10/ 22
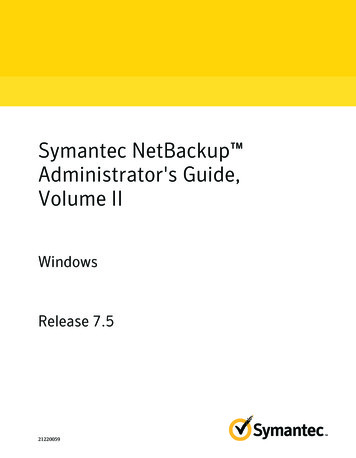
Step 1:Login with PINStep 2:Select the hamburger icon in the top leftStep 3:Select Receipts from the optionsPAYMENT SOLUTIONS IntelliLink Administration Guide P. 11/ 22
Step 4:Select the icon in the top rightStep 5:Choose to either attach a receipt using the camera or attach areceipt from your gallery.Option C: Upload from the desktop, as described above.COMPANY ADMINISTRATIONCREATE A NEW CHARGE CODEStep 1:Navigate through Administration Overview AdministrationOverviewStep 2:Select Charge CodesStep 3:Step 4:Exit out of the pop upSelect Create in the toolbarPAYMENT SOLUTIONS IntelliLink Administration Guide P. 12/ 22
Step 5:Fill out the below in the new pop up for the code (bolded option aremandatory)—————Step 6:Type: segment the code lives under (i.e. Department)Value: value of code (i.e. 400)Description: description of code (i.e. Human Resources)Advanced Description: any additional information to includeCharge Group: each code must be allocated to All Codes; addthe code to any additional groups that will need access to thenew code— Parent Type: segment parent code lives under— Parent Value: indicate the parent code for the new code, ifapplicable— Note: adding a child code is not possibleSelect SaveEDIT A CHARGE CODEStep 1:Navigate through Administration Overview AdministrationOverviewStep 2:Select Charge CodesPAYMENT SOLUTIONS IntelliLink Administration Guide P. 13/ 22
Step 3:In the pop up, search for the code to be modified by value,description or type, followed by SearchStep 4:Select the check box on the left sideStep 5:To modify the description or advanced description, select Edit fromthe toolbar— Note: account numbers cannot be modified.Step 6:Select Group Action in the toolbar to add/remove from a chargegroup, inactivate or activate, add or remove a parent relationshipor to delete the code. You can select multiple codes at once withthe Group Action function.— Note: deleting a code will completely remove it from thesystem. For best practice, only inactivate codes. Inactivatedcodes will not be available for coding purposes.SET AND REMOVE DEFAULT CODESIntelliLink allows for defaults to be set at the transaction level (by merchant group/merchantcategory/supplier), and it allows for defaults to be set by employee. Follow the below to setdefaults both by company and by employee. Note: setting default codes does not work inretrospect; therefore, any new default will only go into effect for new transactions posting tothe account.PAYMENT SOLUTIONS IntelliLink Administration Guide P. 14/ 22
Step 1:Navigate through Administration Overview AdministrationOverviewStep 2:Choose Organization in the top toolbarStep 3:Select Default CodesStep 4:Select a category to begin – i.e. Merchant GroupStep 5:Select which merchant groups to set a default code for, i.e.airlines, followed by searchPAYMENT SOLUTIONS IntelliLink Administration Guide P. 15/ 22
To AddStep A:Step B:To RemoveStep A:Choose Add in the top toolbarIn the pop up under Default Coding, add the code to theappropriate segment – i.e. If all hotel transactions should defaultthe GL Account to 4200, select the ( ) next to GL Account andchoose one of the codes listed, or enter the value/description andsearch.Select the item containing a default code, and choose delete fromthe top toolbarADD AND EDIT A CHARGE GROUPCharge groups restrict access to codes by employees. Charge groups improve codingefficiency, as employees can only see codes they will use. Once a charge group is created,employees and charge codes must be added to the group.Step 1:Navigate through Administration Overview AdministrationOverviewStep 2:Select Charge GroupsOption A:To edit the name, select the group, followed by Edit in the toolbarOption B:To remove all codes or all employees from the group, select thegroup, followed by Advanced ActionsOption C:To create a new group, select Create from the toolbarPAYMENT SOLUTIONS IntelliLink Administration Guide P. 16/ 22
ADD/REMOVE A CHARGE CODE TO/FROM A CHARGE GROUPStep 1:Navigate through Administration Overview AdministrationOverviewStep 2:Select Charge CodesStep 3:Use the pop up to search for the charge code to add to the groupStep 4:Select the box to the left of the code(s)PAYMENT SOLUTIONS IntelliLink Administration Guide P. 17/ 22
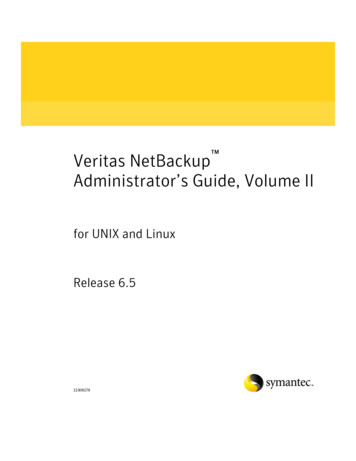
Step 5:Choose Group Action Add to Charge Group(s) or Remove fromCharge Group(s)REPORTSTRANSACTION SEARCH – COMPANYThis report is intended to be ran by the companyadministrator to see transactions across the company by allemployees.Step 1:Navigate through Reports Expenditure Analysis TransactionSearch – CompanyStep 2:Set report parameters in the large pop-up filterPAYMENT SOLUTIONS IntelliLink Administration Guide P. 18/ 22
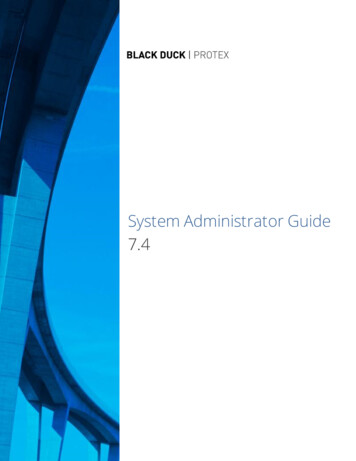
— Most common filtering is done by account holder name,statement period or by a specified date range— List displays best by selecting Transaction List in the bottomleft, followed by searchStep 3:Export by selecting Excel or PDF in the bottom leftStep 1:Navigate through Administration Period Management Statement PeriodStep 2:Select Extract next to the periodEXTRACT— Incomplete: transactions that have not been completed or arein error— Waiting: number of transactions pending approval— Question: number of transactions that have been returned tothe cardholder by the approver with a question— Approved: number of transactions that have been coded andapproved— No Rule: number of transactions that have no associatedapproval rulePAYMENT SOLUTIONS IntelliLink Administration Guide P. 19/ 22
TEST EXTRACTStep 1:Select Advanced to the far right.Option A:Test – Extract— Drip feed file of transactions— This will only export transactions that have been coded andapprovedOption B:Test – Flush— Pulls all transactions for the period regardless of completion orstatusOnce selected, confirm to create the extract fileNavigate to The Vault to download the fileAdministration File Management The VaultStep 2:Step 3:Step 4:Select OutboxStep 5:Select the download option to the right of the extractTRUE EXTRACTA true extract locks down all transactions. They cannot be modified once this extract iscompleted. For best practice, always run a true extract once coding has been completed forthe period.PAYMENT SOLUTIONS IntelliLink Administration Guide P. 20/ 22
Option A:Select Extract— Drip feed file of transactions— Only extracts transactions that have been coded and approvedOption B:Select Flush— Exports all transactions regardless of statusStep 1:Step 2:Once selected, confirm to create the extract fileNavigate to The Vault to download the fileAdministration File Management The VaultStep 3:Select OutboxStep 4:Select the download option to the right of the extractIMAGE EXTRACTExports all receipts into a zip fileStep 1:Step 2:Must first run the true Extract (not a flush extract)Once selected, confirm to create the extract filePAYMENT SOLUTIONS IntelliLink Administration Guide P. 21/ 22
Step 3:Navigate to The Vault to download the fileAdministration File Management The VaultStep 4:Select OutboxStep 5:Select the download option to the right of the extractPAYMENT SOLUTIONS IntelliLink Administration Guide P. 22/ 22
IntelliLink allows each user to save up to fifteen codes as a favorite, per segment. Favoriting . Option B: Uploading via the Visa IntelliLink Spend Management mobile application. End users can download the above app