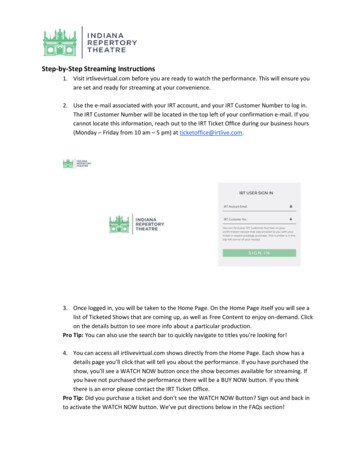
Transcription
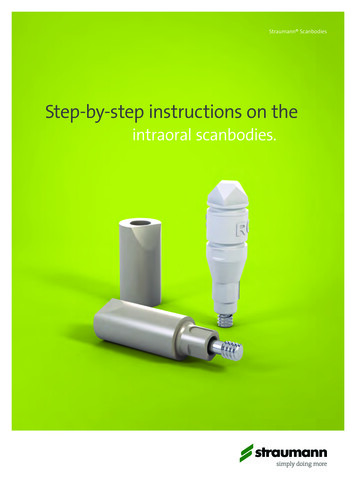
Straumann ScanbodiesStep-by-step instructions on theintraoral scanbodies.15X.820.indd 116.04.15 15:51
15X.820.indd 216.04.15 15:51
Straumann CARES Mono Scanbodyand Straumann ScanbodyProduct descriptionThe Straumann scanbodies represent the position and orientation of the respective dental implant, analogor abutment in CADCAM scanning procedures. This helps the CADCAM software to correctly align the subsequent CADCAM restorations.Product overviewTissue Level – implant levelStraumann CARES Mono Scanbody*Straumann Scanbody*n. v.NNCBone Level – implant levelStraumann NNStraumann CARES Mono Scanbody*RC048.167048.067048.168048.068RNBone level – Abutment Level(on Straumann Screw-retained Abutments)Straumann CARES Mono Scanbody*Straumann Scanbody*WN048.169048.069D 3.5 mmn. v.025.0000D 4.6 mmn. v.025.0001* all scanbodies are delivered with the relevant screw included115X.820.indd 116.04.15 15:51
Product typesStraumann offers two different types of scanbodies which differ intheir handling properties and scanner compatibility:ѹѹ Straumann CARES Mono Scanbodyѹѹ Straumann ScanbodyStraumann CARES Mono canbody for implant-levelSscanningNumber of componentsComponent/materialStraumann CARES MonoScanbody for abutment-levelscanningStraumann Scanbody* for scanning on implant level2: scanbody, self-retaining screw3: scan cap, scan post, screwScanbody: polymer (PEEK)Screw: titanium alloy (TAN)Scan post: polymer (PEEK)Scan cap: polymer (PEEK)Screw: titanium alloy (TAN)Compatibility with Straumann CADCAM systemScannerStraumann CARES Mono canbody for implant-levelSscanningStraumann CARES MonoScanbody for abutment-levelscanningStraumann Scanbody* for scanning on implant leveletkon es1Straumann CARES Scan CS2iTero Intraoral scannerDental Wings 3 SeriesDental Wings 7 Series215X.820.indd 216.04.15 15:51
Software compatibilitySoftwareStraumann CARES Mono canbody for implant-levelSscanningStraumann CARES MonoScanbody for abutment-levelscanningStraumann Scanbody* for scanning on implant leveletkon visual 5.0etkon visual 5.IOStraumann CARES Visual 6.0Straumann CARES Visual 6.2Straumann CARES Visual 7.0Straumann CARES Visual 8.0Straumann CARES Visual 8.8Straumann CARES Visual 9.0Straumann CARES Visual 9.5Note: The Straumann CARES Mono Scanbody for implant level can only be processed with theStraumann CARES Visual software Version 6.2 and higher. The Mono Scanbody for abutmentlevel can only be processed with the CARES Visual software Version 8.0 and higher. Therefore,ensure that the planning is executed with the corresponding software version. Do not mix theone-piece Mono Scanbody and two-piece Straumann Scanbody in one scanning process.315X.820.indd 316.04.15 15:51
Straumann CARES Mono ScanbodyProduct properties and benefitsImproved handlingѹѹ Only two components: scanbody and self-retaining screwImproved functionalityѹѹ Optimized geometry for the Straumann CARES Scan CS2, Dental Wings 3 Series, Dental Wings 7 Series Scanner and iTero ѹѹ Optimized system configuration for multi-unit restorationsѹѹ Available on implant level as well as on abutment level(for Straumann Screw- retained Abutments)High-performance materialѹѹ PEEK for excellent scanning resultsStep-by-step instructions for useStep 1 – DisinfectionDisinfect the Straumann CARES Mono Scanbody and the self- retaining screw.Use cleaning agents and disinfectant solutions that are suitable fordental use.Step 2 – Securing against aspiration2To prevent aspiration of the Mono Scanbody and the self-retainingscrew, ensure that the SCS Screwdriver and the screw properly engage when you pick up the screw.Step 3 – Assembling3Ensure that the components are clean, disinfected and undamaged(no scratches, deformations or discolorations).The self-retaining screw is a fixation screw for the Mono Scanbodyon the implant (or on the abutment). To assemble put the screw intothe scanbody and make sure it can still move but does not fall out(self-retaining feature).415X.820.indd 416.04.15 15:51
Step 4 – Placement4Mount the Mono Scanbody with the screw to the implant, analogor abutment. Use the Straumann SCS Screwdriver for this step.Check for proper fit and for any rotational or vertical looseness ofthe Mono Scanbody in the implant or the abutment. Hand-tightenthe self-retaining screw.Note: When using the Mono Scanbody on abutment level, the MonoScanbody is screwed to the Screw-retained Abutment. Make surethe engaging features of the Mono Scanbody are completely alignedwith the retention features of the abutment and that the MonoScanbody is seated properly.Note: If a single-tooth restoration is planned, ensure to orient theangled surface of the Mono Scanbody buccally (not adjacent to theapproximal teeth). Avoid any contact of the Mono Scanbody to theapproximal teeth.Step 5 – ScanningMake sure to select the right Mono Scanbody according to the software information.The Mono Scanbody is now ready for scanning. Ensure the correctorientation of the Mono Scanbody in order to avoid deformation orinaccurate scan information regarding the positioning of the implant, analog or abutment. Follow the instructions provided withthe scanner.Do not reuse the Mono Scanbody; it is intended for single use only.Note: Intraoral scanning is not available for multi-unit restorations.If multi-unit restorations are required, Mono Scanbodies are used inthe dental lab on a dental model: Place the Mono Scanbodies on thedental model, scan the model in the CARES Scan CS2, the DentalWings 3 Series or Dental Wings 7 Series and proceed with modelingthe restoration in the corresponding CARES Visual Software.515X.820.indd 516.04.15 15:51
Straumann ScanbodyProduct properties and benefitsThree-component scanbodyѹѹ Contains scan post, scan cap and fixation screwѹѹ For single-tooth restorationsѹѹ Scanbody geometry to meet requirements of the etkon es1 andiTero scannersWell-accepted materialѹѹ PEEK for excellent scanning resultsStep-by-step instructions for useStep 1 – DisinfectionDisinfect the scan post, scan cap and fixation screw.Use cleaning agents and disinfectant solutions that aresuitable for dental use.Step 2 – Securing against aspiration2Secure the Straumann Scanbody components against aspiration byusing surgical wire or floss in the special grooves around the scancap and the scan post. The fixation screw securely engages with theSCS Screwdriver.Step 3 – PlacementEnsure that the components are clean, disinfected and undamaged(no scratches, deformations or discolorations).Mount the scan post in the implant and check for proper fit.615X.820.indd 616.04.15 15:51
Step 4 – Assembling4Insert and hand-tighten the fixation screw. Use the Straumann SCSScrewdriver for this step. Check for proper fit and for any rotationalor vertical looseness.Place the scan cap onto the scan post. Ensure that the flat parts inthe connection area of the scan cap and the scan post are aligned.The flat parts are the rotational security feature between scan capand scan post. If correctly placed, the cap clicks onto the post. Slightly press with your fingertip to close any gaps between the cap andpost.4Step 5 – ScanningMake sure to select the right Scanbody according to the softwareinformation.The Scanbody is now ready for scanning. Ensure the correct orientation of the Scanbody in order to avoid deformation or inaccuratescan information regarding the positioning of the implant or analog.Follow the instructions provided with the scanner. Do not reuse theScanbody; it is intended for single use only.Note: All Straumann scanbodies and their components are intendedfor single use only. Multiple use of a scanbody can lead to inaccurate results. Make sure that the stability of the dental implant issufficient to support the screwing/unscrewing operations of thescanbodies. Scan spray is not required at any time.Further informationFor further details concerning intraoral use, please refer to the instructions for intraoral use: CARES Mono Scanbody, 701149, andStraumann Scanbody, 150.771.For additional information about the use of Straumann products,please call your Straumann customer service department.AvailabilitySome items in the Straumann Dental Implant System are not available in all countries.715X.820.indd 716.04.15 15:51
Important guidelinesPlease noteExplanation of the symbols on labels and instruc-Practitioners must have appropriate knowledge and instruction intion leafletsthe handling of the Straumann CADCAM products or other Straumann products (“Straumann Products”) for using the StraumannBatch codeProducts safely and properly in accordance with the instructionsfor use.Catalogue numberThe Straumann Product must be used in accordance with the in-Sterilized using irradiationstructions for use provided by the manufacturer. It is the practitioner’s responsibility to use the device in accordance with theseinstructions for use and to determine, if the device fits to the individual patient situation.Lower limit of temperature min. max.Upper limit of temperatureThe Straumann Products are part of an overall concept and mustbe used only in conjunction with the corresponding original components and instruments distributed by Institut Straumann AG, its max.Temperature limitationultimate parent company and all affiliates or subsidiaries of suchparent company (“Straumann”), except if stated otherwise in this min.document or in the instructions for use for the respective Straumann Product. If use of products made by third parties is not rec- Caution: Federal law restricts this device toommended by Straumann in this document or in the respectivesale by or on the order of a dental profes-instructions for use, any such use will void any warranty or othersional.obligation, express or implied, of Straumann.Do not re-useAvailabilitySome of the Straumann Products listed in this document may notbe available in all countries.CautionIn addition to the caution notes in this document, our products mustNon-sterileCaution, consult accompanying d ocumentsbe secured against aspiration when used intraorally.Use byValidityUpon publication of this document, all previous versions are superseded.Keep away from sunlightDocumentationFor detailed instructions on the Straumann Products contact your Straumann Products with the CE markStraumann representative. fulfill the requirements of the Medical Devices Directive 93/42 EECCopyright and trademarksStraumann documents may not be reprinted or published, in wholeConsult instructions for useor in part, without the written authorization of Straumann.Straumann and/or other trademarks and logos from Straumann mentioned herein are the trademarks or registered trademarks ofStraumann Holding AG and/or its affiliates.815X.820.indd 816.04.15 15:51
15X.820.indd 916.04.15 15:51
152.820/en/A/00 03/15International HeadquartersInstitut Straumann AGPeter Merian-Weg 12CH-4002 Basel, SwitzerlandPhone 41 (0)61 965 11 11Fax 41 (0)61 965 11 01www.straumann.com Institut Straumann AG, 2015. All rights reserved.Straumann and/or other trademarks and logos from Straumann mentioned herein are the trademarks or registered trademarks ofStraumann Holding AG and/or its affiliates.15X.820.indd 1016.04.15 15:51
Straumann CARES Mono Scanbody . and Straumann Scanbody . Product description. The Straumann scanbodies represent the position and orientation of the respective dental implant, analog or abutment in CADCAM scanning procedures. This helps the CADCAM software to correctly al