Transcription
G E T T I N G STARTEDfor Windows and the Mac
We at eInstruction are proud of our family of Interwriteproducts. We strive to continue to bring you the best thetechnology has to offer. We urge you to visit our Web site,where we will post the latest information regarding anyupdates and changes we have made that would impact theinstructions in this Getting Started document.www.einstruction.comClick on any of the Interwrite products to access productinformation, software downloads, documentation, and training information.Please recycle
Table of ContentsInterwrite Mobi1About This Guide1Product Overview1Know What I Know (KWIK) Screen1Interwrite Mobi Learner1Radio Frequency Technology2Workspace Pen2Workspace Software2Installation Overview3Setting Up Your Interwrite Mobi4Setting Up Your Interwrite Mobi Learner5Charging the Interwrite Mobi and Pen6The Electronic Interactive Pen7Installing the Software on Windows8Installing the Software on the Mac9Installing the USB Workspace RF Hub10Connect the Interwrite Mobi11Viewing Device Manager11Using the Device Manager Main Window12
Table of ContentsOperating the Mobi13Replacing the Interwrite Mobi Battery Pack14Operating the Buttons15Mobi Status Indicators15Mobi Learner Status Indicators16Working with the Mobi KWIK Screen17Selecting KWIK Screen Reports18Accessing SRS Reports With the Mobi18Getting Started with Interwrite Workspace19The Interwrite Workspace Toolbars21Presentation Files23Distributing Presentation Files24Additional eInstruction Resources24Battery Handling and Precautions25Warranty27
Getting StartedInterwrite Mobi 1Interwrite Mobi About This GuideThis Getting Started guide describes how to set up your Interwrite Mobi andInterwrite Pen II, install the Interwrite Workspace software, and establish acommunication connection with your PC or your Mac. It ends with an overview of the Interwrite Workspace software.Product OverviewThe Interwrite Mobi is a tablet system featuring the patented digitizer andpen-input technology. Used with the Interwrite Workspace software on a PCor a Mac, the Mobi acts as an input device allowing you to control the computer so you can run applications, open and edit files, and annotate screenimages and presentation files from anywhere in the room. When used withan Interwrite DualBoard, the Mobi provides the ultimate multi-input collaborative system for the interactive class room or the interactive meeting room.Know What I Know (KWIK) ScreenThe KWIK Screen displays StudentResponse System information that canbe used by the instructor for assessmentand evaluation purposes. It is a colorbacklit LCD display that interacts withthe computer to display the assessmentdata as it is acquired during a session.The type of data displayed is dependenton the Student Response System beingused. If one is not installed, the LCDscreen will be blank but will show theMobi Status.Interwrite Mobi LearnerThe Interwrite Mobi Learner screenidentifies the unit and displays variousstatus indicators. It informs the user ofbattery life, if the pen is in prox, if theLearner is in Mouse Mode, and whenthe unit is charging.
2Interwrite Mobi Getting StartedRadio Frequency TechnologyThe Interwrite Mobi system uses Radio Frequency (RF) wireless technology to establish communication between the Tablet and the computer. TheMobi comes with the RF module built into the Tablet, so the only installation required is the Workspace RF USB Hub on the computer.The Interwrite Pen IIThe electronic Interwrite Pen II,when positioned just above (in proxof) or touching the surface of a charged,powered-on, connected Tablet, controls themovements of the mouse on the computer. ThePen becomes a writing and drawing instrumentwhen one of the many Workspace Annotation Tools isselected from the projected Toolbar. When in AnnotationMode, a user can make notes on a PowerPoint Slide Show,highlight areas of interest on a spreadsheet, or edit a documentusing a wide range of pen attributes.Workspace SoftwareThe operation of your Mobi is facilitated by the Interwrite Workspace software. The software is installed as part of the process of establishing communication between the Mobi and the computer and is covered in this guide.The Workspace software has four operational modes: Lesson Mode, OfficeMode (Windows only), Annotate Over Desktop Mode, and Mouse Mode.An Interwrite Mobi, acting as an input device to the computer, remotelycontrols the computer from anywhere in the room. When the InterwriteDualBoard and a video projector are added, the computer’s desktop imageprojects onto the Interwrite DualBoard’s surface, and the board communicates as an input device to the computer.In this environment, both the person at the Interwrite DualBoard and userswith Tablets seated around the room can interact with the presentation.
Getting StartedInterwrite Mobi Installation OverviewThis section describes what you will bedoing and the order in which you willbe doing it to facilitate the setupof your Interwrite Mobi and itspreparation for use.1. Unpack YourInterwrite MobiThe package includes theInterwrite Mobi, the InterwritePen II, a Pen tether, a Mini USBcable, a Workspace RF USB Hub,and an eInstructionTM CD.2. Charge Your InterwriteMobi and Interwrite Pen IIYour Tablet and Pen must be charged before you can use them. First, placethe Interwrite Pen II in the Tablet’s Pen Slot. Next, plug the Mini USB connector into the Mini USB Port located at the top of the Tablet. The otherend is plugged into a USB Jack on the computer or USB Hub.3. Install the Interwrite Workspace SoftwareInstall the Interwrite Workspace Software using the CD provided to youin your Interwrite Mobi kit. The CD will launch automatically. Follow theprompts to complete the installation.4. Connect Your Interwrite MobiYour Interwrite Mobi must be able to communicate with the InterwriteWorkspace software on your computer. This communication link is established wirelessly between radio frequency communication modules—onebuilt into the Tablet and the other connected to the computer.3
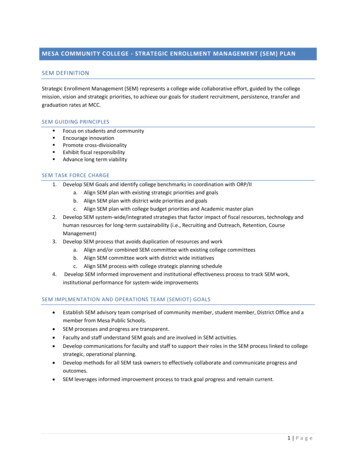
4Interwrite Mobi Getting StartedSetting Up Your Interwrite MobiThe Interwrite Mobi communicates with the computer using radio frequencytechnology. The RF communications module is built into the Interwrite Mobi.The Tablet communicates through its built-in RF module with another RFmodule, the Workspace RF Hub, installed on the computer. The InterwriteMobi is powered by Li-ion batteries, which provide about 10 hours of wireless operation before they have to be recharged.KWIK ScreenNavigationButtonsPower ButtonSoftKeysActive AreaInterwrite Pen IITop of Mobi LearnerPen/ Pen Storage SlotMobi Dock Charging ContactsMini USB Port for Charging(Optional Accessory)
Getting StartedInterwrite Mobi 5Setting Up the Interwrite Mobi LearnerThe Interwrite Mobi Learner communicates with the computer using radiofrequency technology. The RF communications module is built into theMobi Learner. The Tablet communicates through its built-in RF module withanother RF module, the Workspace RF Hub, installed on the computer. TheMobi Learner is powered by Li-ion batteries, which provide about 10 hoursof wireless operation before they have to be recharged.Status ScreenNavigationButtonsPower ButtonSoftKeysActive AreaInterwrite Pen IITop of Mobi LearnerMobi Dock Charging Contacts(Optional Accessory)Pen/ Pen Storage SlotMini USB Port for Charging
6Interwrite Mobi Getting StartedThe first thing you should do when you unpack your new Interwrite Mobi and Interwrite Pen II is charge them.Charging the Interwrite Mobi and PenBefore you use your Interwrite Mobi and Interwrite Pen II for the first time,they should be charged for about 12 hours. Whenever the Tablet battery islow and needs to be recharged, the Tablet Battery Status Icon will display onthe screen as an empty battery.1Place the Interwrite Pen II in the Pen Slot.2Connect the Mini USB Connector to the Mini USB Port at the top of theTablet.3Plug the other end of the cord into a USB port on your computer or into aUSB hub.The Interwrite Mobi can be used while it is charging.4When the Tablet and Pen are charged and the Battery Status displayindicates that it is charged, unplug the Charger from the Interwrite Mobi.5Press the Power Button to turn on the charged Interwrite Mobi.The buttons and status indicators are described in more detail in the Operating the Interwrite Mobi section.The Interwrite Pen II is charged only when it is placed in the PenSlot in the Tablet, and only when the Tablet is being charged. A Pencharge lasts over 40 hours. You should always charge the Pen whenthe Tablet is being charged.The optional Interwrite Mobi Dock can charge up to three Mobisat one time. Visit our Web site at www.einstruction.com for moreinformation about the Mobi Dock.
Getting StartedInterwrite Mobi 7The Electronic Interwrite Pen IIThe Interwrite Pen II is an input device to the computer. You will use it towrite and draw in Lesson Mode and to control mouse movements in MouseMode by moving the tip of the Pen just above (in prox of) or touching theTablet’s workspace surface. When the Pen Tip is in prox or touching theTablet’s workspace surface, it simulates the same effects you would get usingthe left mouse button both in Windows and on the Mac.Using the PenWhen the Pen is in prox, press the bottom end of the Rocker Button tosimulate a left mouse button double-click in Windows and on the Mac. Pressthe top end of the Rocker Button to simulate a right mouse button click inWindows and a Ctrl-click on the Mac. In Windows, hold down the bottomRocker Button and touch the Pen Tip to the Tablet’s workspace to erase. Onthe Mac, with the Pen Tip touching the Tablet’s surface, hold down the bottom Rocker Button to erase.Sleep ModeThe Pen goes into Sleep Mode after about two minutes of inactivity toconserve power. Touching the Pen to a surface, or clicking one of its RockerButtons, wakes up the Pen.Pen Tip – Up or DownSame as using MouseBottom End – Double-Click Left Mouse ButtonRockerButtonTop End – Right Click Mouse Button
8Interwrite Mobi Getting StartedInstalling the Software on WindowsThe Interwrite Workspace software must be installed on Windows bya user with Administrator privileges. Interwrite Workspace is compatible with Windows XP SP2 and Windows Vista.1Log in as Administrator.2 Insert the Interwrite Workspace CD into the CD drive on your PC.The Installer will autoload. If it doesn’t, click on the Start buttonon the Windows Task Bar and select Run from the menu.Type X:\setup.exe (X represents the CD drive letter).3Select the Install Interwrite Workspace Software menu option.4Follow the onscreen instructions for the software installation.You will know Interwrite Workspace hasinstalled successfully by the appearanceof the eInstruction iconin the SystemTray on the Windows Task Bar. (If the icondoes not appear, restart your computer.)When the Interwrite Workspace iconappears, it indicates that the eInstructionDevice Manager is now running in thebackground on your PC. Click on theWorkspace icon to display the DeviceManager menu options. Device Manager, in addition to managing the eInstruction hardware devices, provides directaccess to the Interwrite Workspacesoftware.Click the eInstruction iconin the System Tray of the Windows TaskBar to display the Device Manager Menu. Select the Check for Updatesoption. If a new version of Workspace is available, download it now.You should periodically check for updates.
Getting StartedInterwrite Mobi Installing the Software on the MacThe Interwrite Workspace software must be installed on the Mac bya user with Admin privileges. Interwrite Workspace is compatiblewith Mac OS X version 10.4.11 or higher.1Log in as Admin.2Insert the Interwrite Workspace CD into the CD-ROM drive onyour Mac. An Interwrite Workspace CD icon will appear on yourdesktop.3Double-click on the Interwrite icon on the desktop to display theCD’s contents. Double-click on the Install Interwrite icon.4Follow the onscreen instructions for the software installation.The appearance of the InterwriteWorkspace iconon the Menu barindicates that the eInstruction DeviceManager is now running on your Mac.It will load and run in the backgroundevery time you start up your Mac. Clickon the eInstruction icon to display theoptions on the Device Manager Menu,shown here. Device Manager, in addition to managing the eInstruction hardware devices, provides direct access tothe Interwrite Workspace software onthe Mac.Click the eInstruction iconin the Menu Bar to display the DeviceManager Menu. Select the Check for Updates option. If a new version ofWorkspace is available, download it now. You should periodically checkfor updates.9
10Interwrite Mobi Getting StartedInstalling the USB Workspace RF Hub Plug the USB RF Hub into one of the USB portson your computer.The RF Hub performs the following functions: Supports up to a maximum of 10 devices communicating simultaneously. Supports a connect button for the quick connection and pairing ofdevices without software interaction. The target responsiveness is toconnect within 5 seconds.Activation ButtonKeeping Track of the Workspace RF HubThe RF Hub is made to fit into the back of your Mobi Tablet. Place the Hubinto the allotted space. When the Hub is secure it will click into place.Activation ButtonRF Hub Space
Getting StartedInterwrite Mobi 11Connect the Interwrite MobiComplete the following steps to connect the Mobi to the computer.1234Insert the RF Workspace Hub into the USB port on your computer orUSB hub. Your computer will automatically detect the USB device. Theblue LED on the Workspace RF Hub will light up when it is plugged in.Press the lighted Activation button on the RF Hub. The blue light willstart blinking.Turn on the Mobi.Turn the Mobi over and press the blue Activation button next to thebattery opening to activate the Mobi’s RF signal.You have two minutes to press the Activation button on the Mobi. Pressingthe two Activation buttons initiates a pairing process. When the two RF devices have successfully paired, the blue button on the RF Hub will stop blinking and remain a solid blue until either the computer or the Mobi is turnedoff. Pairing the RF devices is a one-time operation. The two devices will nowrecognize each other every time the computer and the Mobi are turned on.Viewing Device ManagerYou will use the eInstruction Device Manager when you want to change theMobi’s preference settings. Make sure the Interwrite Mobi is powered on.Complete the following steps to view the Device Manager.1Click the eInstruction iconin the System Tray on theWindows Task Bar to display the Device Manager menu.2Select the eInstruction Device Manager option to displaythe eInstruction Device Manager window.3Use the icon or Options menu to view or change thepreferences on the Mobi.
12Interwrite Mobi Getting StartedUsing the Device Manager Main WindowOnce Device Manager is selected from the menu, the Device Managermain window opens. From this window, you can connect devices, viewproperties, set preferences, identify connected devices, lock or unlock tablets, and perform other management functions.The following table identifies the icons associated with the Device Managermain window.IconNameUsed ToAdd BluetoothLocate and connect Bluetooth devices to the Workspacesoftware.Connect orDisconnect DeviceDisconnect the device or devices from communicatingwith Workspace.Remove DeviceDeletes Device from Device Manager.BeepIdentify a specific Interwrite Device. Click Beep to makethe device beep.Calibrate BoardAlign the Interwrite Pen position relative to the projectedimage on the Interwrite Board’s surface. Use theInterwrite Pen to tap each white calibration point as itappears on the blue screen.Recalibration is required when either the Interwrite Boardor the projector has been moved.Lock or UnlockDevicePrevents all connected devices from inputting to thecurrent session. Locked Pads remain connected unlessthey are powered off.Select or DeselectPresenterAllows for a specific device to control the interaction ofWorkspace and has control over the other connectedInterwrite Devices in a session.Autoconnect DeviceConnects pre-selected devices when Device Manager isactivated.PropertiesOpens the Properties window for the selected InterwriteDevice.
Getting StartedInterwrite Mobi 13Operating the Interwrite MobiThe Interwrite Mobi provides the freedom to interact with a projectedpresentation from anywhere in the room. You can write annotations andrun applications remotely, giving you the opportunity to engage others andencourage participation.You use the electronic Interwrite Pen II on the Mobi’s active area, the areadefined by the Tablet Insert, to move the mouse cursor on the projectedimage, to select and use Workspace tools, and to click on the programmable SoftKeys indicated across the top of the Tablet Insert.KWIK ScreenNavigationButtonsPower ButtonSoftKeysActive AreaTop of MobiPen/ Pen Storage SlotMobi Dock Charging Contacts(Optional Accessory)Mini USB Port for Charging
14Interwrite Mobi Getting StartedReplacing the Interwrite Mobi BatteryPackThe Interwrite Mobi’s battery pack is accessed from the back of the Tablet.BatteryConnectorBattery CoverBattery ConnectorComplete the following steps to replace the battery:1Turn your Interwrite Mobi over. Push down on the Thumb Tab on theBattery Cover and lift it away from the back.3Remove the existing Battery Pack from the compartment.4Discard the old Battery Pack, following proper disposal procedures.5Position the new Battery Pack so that the metal contacts on the batteryalign with the metal contacts in the battery compartment on the Mobi.6Gently push the battery into the compartment until it snaps into place.7Fit the Battery Cover into the grooves and slide it until it clicks into place.
Getting StartedInterwrite Mobi 15Operating the ButtonsTo operate any one of the three buttons, push down with your finger, or hold thePen vertically above the button and touch the Pen Tip to the button and hold forseveral seconds.On/Off ButtonPress the On/Off Button for three seconds to activate the Mobi. The Mobi will gointo Power Management Mode (KWIK screen dims) after 2 minutes of inactivity andturn off after 2 hours of inactivity.Navigation ButtonsThe Navigation Buttons to the right of the KWIK screen allow you to scroll throughthe KWIK Screen options.Connect/Activation ButtonThe Connect button on the back of the Mobi allows it to communicate with theWorkspace RF Hub. The button is recessed to avoid accidental activation.Mobi Status IndicatorsThe following table identifies the icons displayed the KWIK screen that indicate theMobi’s status.IconRepresentsUsed To IndicateMouse ModeMobi is being used as a mouse on thecomputer.Paired withcomputerMobi is paired with the computer. Theicon flashes when Mobi is paired withthe computer. It is blank when there isno connection.USBMobi is connected to the computer viathe USB port.In ProxPen is in the proximity of the active areaand can be detected by the Mobi.In MenuThe KWIK menu is in use. The icon isblank if it is out of prox.Battery LifeIndicatorAmount of battery life left beforecharging. The battery icon fills up as thebattery charges.Pen ChargePen is charging in the Pen Slot.
16Interwrite Mobi Getting StartedMobi Learner Status IndicatorsThe following table identifies the icons displayed on the Mobi Learner status screenthat indicate the Mobi Learner’s status.IconRepresentsUsed To IndicateMouse ModeMobi Learner is being used as a mouseon the computer.Paired withcomputerMobi Learner is paired with thecomputer. The icon flashes when MobiLearner is paired with the computer. Itis blank when there is no connection.In ProxPen is in the proximity of the activearea and can be detected by the MobiLearner.In MenuThe Mobi Learner is in use.Battery LifeIndicatorAmount of battery life left beforecharging. The battery icon fills up asthe b
The first thing you should do when you unpack your new Inter-write Mobi and Interwrite Pen II is charge them. The Interwrite Pen II is charged only when it is placed in the Pen Slot in the Tablet, and only when the Tablet is being charged. A Pen charge lasts over 40 hours. You shoul