Transcription
WithMaintenance CoordinatorCMMS SoftwareSIMPLICITY SOFTWARE TECHNOLOGIES INC
The following set of slides will try to outlinethe installation, navigation and setup ofMaintenance Coordinator Software onto yourcomputerSIMPLICITY SOFTWARE TECHNOLOGIES INC
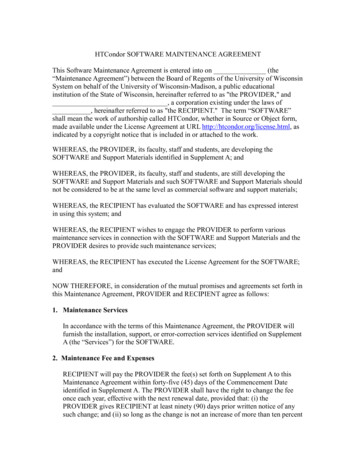
Insert the CD intoyour computerCD-ROM ReaderAllow the Auto Run Feature tostart the setup application.Follow on screen instructions andlet the program install itselfInsert the Software Activationmedia and activate the software
Install the program on eachYOUR SERVERClient or workstation. Copy only the databases to yourserver. Go to the Admin menu, selectDatabases and Set DatabasePaths option. Point to your databases on theServer.ProgramDatabases(Files with anMdb extension)Work Station(Full Installation)Work Station(Full Installation)Work Station(Full Installation)
There a couple of different ways of getting around inMaintenance Coordinator and these will be outlinednext
ModulesCategoriesYou can move between the different modules of MaintenanceCoordinator by simply clicking on a Category button on the Main Menuscreen followed by the module you want to open.
You can move between the different elements of MaintenanceCoordinator by accessing drop down menus and then selecting optionsfound there.
You can movebetween thedifferent optionswithin a module byaccessing itemsfound in shortcutbars found on theleft side of manymodules windows.
The application Ribbons are a replacement for your normalmenus and toolbars and is were you will access the majority ofavailable features.
As part of new Ribbon interface you’ll find the Application or Modulebutton that’s replaces the old File menu. Just click on it to open.
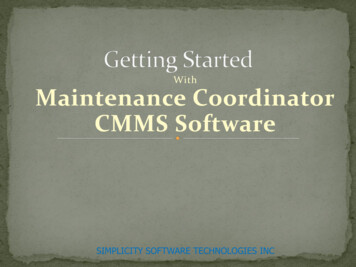
Earlier in this presentation we showed how to setup your databases, now we would like to show yousome additional settings that you can setup now.To get started please do the following: Open the Admin menu and select the ProgramSettings option.
On the Company tab you cansetup the following: Your Company informationsuch as address and phonenumbers Company LogoInformation from this screenis used with Purchasing andWork Order documentsThe Company Logo accepts bitmap images (bmp) that should be scaled to about1 inch by 1 inch. Use the Browse button to import your image.
On the Email tab you can setupthe following: Your out going email server orapplication.Information from this screenis used with the Auto WorkOrders email feature and forcontacting support.To use Outlook for out going mail click on the Use Outlook check box. To use yourcompany’s smtp type server, you must fill in the other section. Using the serversetup allows use with almost any email configuration including Outlook andNotes.
On the Display/Reports tab youcan setup the following: The graphical theme used bythe application. Set the Conserve Ink option.Information from this screenis used throughout theprogram.The Conserve Ink on Reports option does just that. Instead of having full coloredbars on many of the reports, it coverts them to just outlines, thereby saving youink or toner.
On the ISO Documents tab youcan setup the following: ISO document controlnumbersInformation from this screenis used for Work Order andPurchasing documents
Your database settingshould look somethinglike the picture shown.You can also use the Browsebuttons found here tohelp locate and setupyour database paths.The program uses MicrosoftAccess databases for datastorage.Please note that if a Network License is not purchased, the program willonly allow the database to reside on the C: drive.
We have just outlined foryou some of your initialprogram settings. There areactually many moresettings you need to lookat. Many of the modules,such as the Scheduler andPurchasing have their ownsettings that you need tosetup. These are normallyfound under the module’sFile menu.
Maintenance Coordinator Software onto your computer SIMPLICITY SOFTWARE TECHNOLOGIES INC . Insert the CD into your computer CD-ROM Reader Allow the Auto Run Feature to start the setup application. Follow