Transcription
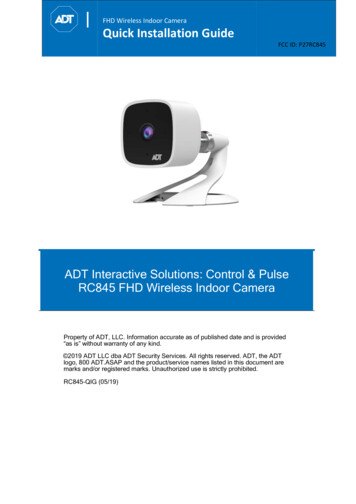
FHD Wireless Indoor CameraQuick Installation GuideFCC ID: P27RC845ADT Interactive Solutions: Control & PulseRC845 FHD Wireless Indoor CameraProperty of ADT, LLC. Information accurate as of published date and is provided“as is” without warranty of any kind. 2019 ADT LLC dba ADT Security Services. All rights reserved. ADT, the ADTlogo, 800 ADT.ASAP and the product/service names listed in this document aremarks and/or registered marks. Unauthorized use is strictly prohibited.RC845-QIG (05/19)
Table ofContentsADT HD Indoor CameraQuick Installation GuideFCC ID: P27RC845Table of Contents1Introduction . 3Overview . 3Features . 3Physical Details . 4Front . 4Rear . 4SD Card Slot (Future Enhancement) . 5Packaging Contents . 62Basic Setup . 7Installation . 7Assembling the Camera . 7Power-up . 7Check the LED Status . 83ADT Control Enrollment . 9Using Soft AP to Enroll Camera . 94ADT Pulse Enrollment . 12Using WPS PIN to Enroll Camera. 125Wall Mounting . 17Mounting Suggestion . 20Smart IR Function . 206Troubleshooting . 21If the Camera Continually Goes Offline . 21Appendix A . 22Technical Specifications . 22Regulatory Approvals . 22FCC Statement (US) . 22IC Statement (Canada). 232RC845 Indoor Full HD Camera Installation Guide
ADT HD Indoor CameraQuick Installation GuideIntroductionFCC ID: P27RC8451 IntroductionThis section provides information about the RC845 Indoor Day/Night HDCamera's features, components and capabilities.OverviewThe RC845 is an indoor day/night wireless camera with HD resolution and802.11n Wi-Fi connectivity intended for use with both ADT Control and Pulse .Features Standalone Design. The camera is a standalone system with built-in CPUand video encoder. It requires only a power source and a connection to thenetwork (Customer router for Control or ADT Pulse gateway). Dual Video Support. The RC845 supports H.264 and MJEPG videocompression. Day/Night Switch. With the day/night switching feature, you can view andrecord images even at night. IR LED Support. The two infrared LEDs can provide illumination for up to 5meters/16 feet, providing superior video quality under low-light conditions. 802.11ac/n Support. The 802.11ac/n standard provides backwardcompatibility with the 802.11b and g standards. Supports both Soft AP and WPS. Soft AP connectivity is used on the Controlplatform. Wi-Fi Protected Setup (WPS) uses a push button to connect to thePulse platform. Wireless Network. The RC845 is connected to the network wirelessly.RC845 Indoor Full HD Camera Installation Guide3
ADT HD Indoor CameraQuick Installation GuideINTRODUCTIONFCC ID: P27RC845Physical DetailsFrontFigure 1-1 Front PanelLight Sensor—This is a hardware sensor to detect daylight level or lux.Lens—The lens is fixed and cannot be adjusted. Please ensure that the lenscover remains clean of dust and debris.RearFigure 1-2 Rear Panel4RC845 Indoor Full HD Camera Installation Guide
ADT HD Indoor CameraIntroductionQuick Installation GuideFCC ID: P27RC845ComponentDescriptionDC Power InputConnect the supplied 12V power adapter here. Do notuse other power adapters; doing so may damage thecamera.Power LEDOn: (Green) Power on.Blinking: (Green/Amber)The power LED will blinkgreen/amber after initial startup is completed. Thisindicates that the Soft AP OR WPS PIN mode is ready.Network/WirelessLED(Green, Amber)Off: Wireless network is not connected, or camera is notsending/receiving data.On: (Green) Network connection is available.Blinking: (Green) Data is being transmitted or receivedvia wired/wireless connection.On: (Amber) If the LED is on for 5 seconds and thenturns off, the WPS function has failed.Blinking: (Amber) The WPS connection is in progress.WPS/Reset ButtonThis button serves two functions on the camera.WPS PIN Mode: When pressed and held for 5 secondsduring the Pulse enrollment process, the cameracreates an encrypted secure wireless connection.Reset: When pressed and held for 15 seconds, thecamera reboots and settings are restored to defaultvalues.microSD Card Slot (Future Enhancement)On the side of the camera is a small plate held in place with a retaining screw.Beneath this cover is a microSD card slot that will be used in a future softwarerelease.Note: As the microSD card slot is not functional at this time, please do notremove this protective cover.Figure 1-3 microSD Card Slot LocationRC845 Indoor Full HD Camera Installation Guide5
ADT HD Indoor CameraQuick Installation GuideINTRODUCTIONFCC ID: P27RC845Packaging ContentsThe following items are included in the package.Figure 1-4 What's in the Box6RC845 Indoor Full HD Camera Installation Guide
ADT HD Indoor CameraQuick Installation GuideBasic SetupFCC ID: P27RC8452 Basic SetupThis section provides information on how to assemble andconfigure the RC845 Indoor HD Camera for enrollment.InstallationAssembling the Camera1. Temporarily locate the camera close to the computer for enrollment.2. Attach the camera stand to the camera and connect the powercable.3. Screw/attach the camera onto the camera stand.Figure 2-1 Attaching the Camera to the StandPower-up1. Connect the 12V power adapter to the camera and power up near thelocation where you will be performing the enrollment.Caution: Use the power adapter provided. Using a different poweradapter may result in hardware damage.Figure 2‐2 Power ConnectionRC845 Indoor Full HD Camera Installation Guide7
ADT HD Indoor CameraQuick Installation GuideBasic SetupFCC ID: P27RC845Check the LED Status1. Power LED—The power LED lights up solid green during startup, whichtakes about one minute. After startup is completed, and prior toenrollment, the power LED blinks green/amber.2. Network/WPS LED—At power-up, the Network/WPS LED is off.o The Network/WPS LED will flash amber when the cameraattempts to connect wirelessly to the Pulse gateway.o The Network/WPS LED will turn solid green when the wirelessconnection is successful.3. Enroll the camera.o The process for enrolling the camera on Control is described inSection 3: ADT Control Enrollment.o The process for enrolling the camera on Pulse is described inSection 4: ADT Pulse Enrollment.4. Mounting the Camerao Mount the camera in its final permanent location. For mountingon a wall using the mounting bracket, see Section 5: WallMounting.Figure 2-3 Location of Status LEDs8RC845 Indoor Full HD Camera Installation Guide
ADT HD Indoor CameraQuick Installation GuideADT ControlEnrollmentFCC ID: P27RC8453 ADT Control EnrollmentThis section provides instructions for wirelessly enrolling the RC845 Indoor HDCamera onto the ADT Control platform. This process uses the Soft AP methodto wirelessly connect the HD Camera to the Customer’s network.Using Soft AP to Enroll Camera1. Set up the camera as described in the previous section.2. Connect the camera’s AC power adapter and plug it into a poweroutlet.3. Wait for the power LED to blink green/amber.4. Connect to the camera’s network SSID using a laptop or mobile device.The SSID is the model number of the camera and part of the MACaddress. For example, SSID RC845 (XX:XX:XX).5. Open a web browser (IE, Chrome, Firefox, etc.). Type in adtinstall.comand you will be directed to the install wizard page.6. Choose a language.7. Click Scan for Network SSID and select the Customer’s router SSID.RC845 Indoor Full HD Camera Installation Guide9
ADT HD Indoor CameraQuick Installation GuideADT CONTROLENROLLMENTFCC ID: P27RC845Note: Control cameras are known as tunnelingdevices and will connect to the Customer’s WiFi network to access the Internet to be addedto the Control platform. It is imperative that thecustomer understands that all cameralocations are limited by their existing Wi-Finetwork and its range. Additionally, theCustomer will need to enter their SSIDpassword during the subsequent step.8. Enter the wireless credentials and click Save.The Camera Power and Network LEDs will turn solid green. TheNetwork LED will flash when data is being transmitted. This indicatesthat the connection to the Customer’s router is complete.9. Connect a laptop or mobile device to the Customer’s network and log into the Control web portal, https://www.adt.com/control-login, tocomplete the setup.10. Select Video from the menu list.11. Click Settings and select Add Video Device.12. Select install from the video device list to begin adding camera. If alaptop or mobile device are not on the Customer’s network, then enterthe MAC address of the camera.10RC845 Indoor Full HD Camera Installation Guide
ADT HD Indoor CameraQuick Installation GuideADT ControlEnrollmentFCC ID: P27RC84513. Follow the on-screen instructions to finish adding the camera.RC845 Indoor Full HD Camera Installation Guide11
ADT HD Indoor CameraQuick Installation GuideADT CONTROLENROLLMENTFCC ID: P27RC8454 ADT Pulse EnrollmentThis section provides instructions for wirelessly enrolling the RC845 Indoor HDCamera into the ADT Pulse network. This process uses the Wi-Fi ProtectedSetup (WPS) with PIN method to wirelessly enroll the HD Camera to thegateway via the ADT Pulse Portal or TS Installer App.Using WPS PIN to Enroll Camera1. Set up the camera as described in section 2.2. Launch an Internet browser and log in to the Pulse portal or TS Installerapp.3. Enter the Manage Devices screen using one of these methods:o For Pulse portal, select the System Tab and click ManageDevices.o For TS Installer app, click the Pulse Devices link. The ManageDevices screen will display.4. In the Manage Devices screen, click Cameras.5. Click the Add Using WPS button located at the bottom of the screen.Figure 4-1 Clicking Add Using WPS12RC845 Indoor Full HD Camera Installation Guide
ADT HD Indoor CameraQuick Installation GuideADT PulseEnrollmentFCC ID: P27RC8456. Locate the camera’s PIN number on the product label on the rear of thecamera.7. Enter the camera’s PIN into the WPS PIN field.Figure 4-2 Entering the PIN8. Ensure that the camera is powered on and that the Power LED isflashing green/amber.RC845 Indoor Full HD Camera Installation Guide13
ADT HD Indoor CameraQuick Installation GuideADT CONTROLENROLLMENTFCC ID: P27RC8459. Click the Continue button to initiate the WPS process. The followingscreen appears.Figure 4-3 Adding Camera Using WPS Screen10. Press and hold the WPS/Resetbutton on the camera for 5 seconds toestablish a wireless connection.o The Network/WPS LEDflashes amber as the gatewayattempts to connect to thecamera. The wirelessconnection is successful whenthe Network/WPS LED turnssolid green.Note: You must complete the WPSconnection within 2 minutes or else theprocess will timeout. The time remainingis displayed in the upper-left portion ofthe screen.Figure 4-4 Pressing WPS Button14RC845 Indoor Full HD Camera Installation Guide
ADT HD Indoor CameraQuick Installation GuideADT PulseEnrollmentFCC ID: P27RC845The following screen is shown while the camera is configured.11. When the Camera Details screen appears, showing that the camerahas been enrolled, assign the RC845 a unique name (usually based onthe location of the camera) in the Name field, and then click Save.Figure 4-5 Saving Camera DetailsThe Pulse enrollment is complete. The newly added device is shown inthe Cameras list.RC845 Indoor Full HD Camera Installation Guide15
ADT HD Indoor CameraQuick Installation GuideADT CONTROLENROLLMENTFCC ID: P27RC845Figure 4-6 Newly Added Camera Is Shown12. At the top of the screen, click Go Back.You are returned to the Manage Devices screen. The total number ofinstalled cameras has increased by one.13. Click Close.14. Click Close again to confirm.15. Wait until the Power LED and Network LED are both lit solid green, andthen disconnect the camera from power.16. Install the camera in its final location. Please refer to Section 5: WallMounting.16RC845 Indoor Full HD Camera Installation Guide
ADT HD Indoor CameraQuick Installation GuideWall MountingFCC ID: P27RC8455 Wall MountingThis section provides details for final mounting of the RC845 HDCamera. You should ensure that the camera is configured andenrolled in the platform before permanently mounting it.Note: Ensure that the camera is configured and enrolled in ADT Controlor Pulse before permanently mounting it.1.Locate an unused, non-switchable, indoor outlet to plug the AC/DC PowerAdapter into. This outlet should be located as close as possible to thelocation where the camera will be permanently mounted.Caution: Do not plug in the power adapter until all the connections arecompleted and the camera is fully mounted.2.3.4.5.6.7.Locate the mounting plate at the bottom of the camera stand and slide themounting plate forward to release it from the stand.Hold the mounting plate at the location where you would like to mount thecamera and mark the location of the two mounting holes.Hold the stand at the location where you would like to mount the cameraand mark the location of the two mounting holes.Drill two pilot holes on the mounting surface at the marked location.If using the anchors, insert them into the mounting holes.Align the two mounting holes on the camera stand with the two pilot holesand mount the mounting plate to the surface using the two suppliedscrews.Figure 5-1 Installing the Camera Stand17RC845 Indoor Full HD Camera Installation Guide
ADT HD Outdoor CameraQuick Installation Guide8.WALLMOUNTINGFCC ID: P27RC845Slide the camera stand onto the mounting plate until it clicks into place.Figure 5-2 Attaching the Camera to the Stand to Mounting Plate9.Remove the cable organizer grommet from the stand, insert the powercable into the hole, run the cable through the organizer slot, and insert theorganizer grommet to hold the cable in place.10. Connect the power cable into the back of the camera and plug the adapterend into power outlet.Caution: Use only the power adapter provided. Using a different poweradapter can result in hardware damage.Figure 5-3 Connecting the Power Cable18RC845 Indoor Full HD Camera Installation Guide
ADT HD Indoor CameraQuick Installation GuideWall MountingFCC ID: P27RC84511. Screw/attach the camera onto the camera stand.Figure 5-4 Inserting Grommet12. Adjust the camera to the desired position and secure it firmly.13. Verify that the camera is active on the wireless network and is recognizedby the platform.RC845 Indoor Full HD Camera Installation Guide19
ADT HD Outdoor CameraQuick Installation GuideWALLMOUNTINGFCC ID: P27RC845Mounting SuggestionTo get the best video quality for targets at night, make sure that the camera’sfield of view does not include a large foreground object, such as tabletop, sidewall or column. If installing on a tabletop, place the camera as close to the edgeas possible. If installing on a wall, angle the camera so that a minimal portionof the wall or column is visible, as demonstrated in the photos in row 2 below.Smart IR FunctionThe RC845 uses a smart IR function for night viewing. This means that thecamera automatically adjusts the IR light output and gain. As a result, if anyobjects are in the close foreground of the image, the camera lowers the IR lightoutput to prevent overexposing those objects. The drawback of the smart IRfunction is that this feature causes background objects to receive less IR lightand to be displayed with lessened detail. This result is typical for the smart IRfunction. TABLETOP 20WALL RC845 Indoor Full HD Camera Installation Guide
ADT HD Indoor CameraQuick Installation GuideTroubleshootingFCC ID: P27RC8456 TroubleshootingThis section provides details for troubleshooting wireless connectionissues of the RC845 Indoor Day/Night HD Camera.If the Camera Continually Goes OfflineIf after it is enrolled the camera continually goes offline (Power LED blinkscontinually), the camera will automatically attempt to recover the wirelessconnection. If the camera cannot recover on its own, take the followingmeasures to re-establish the Wi-Fi connection.1. Power cycle the camera.2. If the previous measure fails, move the gateway closer to the camera, ifpossible.3. If the previous measure fails, press the camera’s reset button for 15seconds, and then re-enroll the camera into Pulse.4. If the previous measure fails, install a Wi-Fi Range Extender modelWN3000RPH-3ADPAS for Pulse only.21RC845 Indoor Full HD Camera Installation Guide
ADT HD Indoor CameraQuick Installation GuideAppendix AFCC ID: P27RC845Appendix ATechnical SpecificationsDimensions W x H x D2.56” x 2.56” x 1.32” (65mm x 65mm x 33.5mm),without standOperating TemperatureTemp: 32 F to 104 F (0 C to 40 C);Humidity: 0% to 85% RH (non-condensing)Storage Temp.Temp: -4 F to 158 F (-20 C to 70 C);Humidity: 0% to 90% RH (non-condensing)Video CompressionH.264 and MJPEGImage Resolution16:9 720p (1280x720); 4:3 XGA (1024x768);VGA (640x480); QVGA (320x240);Mixed Mode (720p, VGA, QVGA)Network ProtocolTCP/IP, HTTP, HTTPS, DHCP, UPnP, NTP,RTCP, DNSNetwork Interface1 RJ-45 USB connector for Ethernet (optional)Wireless InterfaceIEEE IEEE 802.11ac/ 802.11n/802.11b/802.11gcompatible, WEP 64/128 bit, WPA/WPA2personal security supportButton1, WPS/NetworkLEDs2, Power and Network/WPSIR LEDs2Power Adapter12VDC/1A, 100 to 240VACRegulatory ApprovalsFCC Statement (US)This equipment has been tested and found to comply with the limits for a Class Bdigital device, pursuant to part 15 of the FCC rules. These limits are designed toprovide reasonable protection against harmful interference in a residentialinstallation. This equipment generate
ADT HD Indoor Camera Quick Installation Guide INTRODUCTION FCC ID: P27RC845 4 RC845 Indoor Full HD Camera Installation Guide Physical Details Front Light Sensor—T