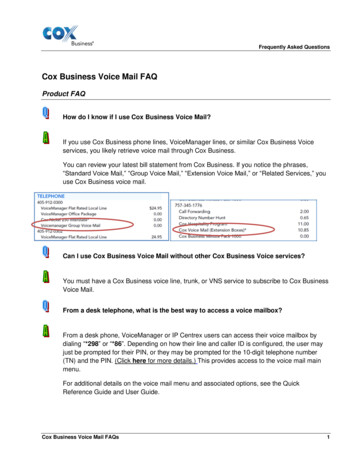
Transcription
Using PostalOne! and the Mail.dat ClientOverviewThis document is intended for PostalOne! users wanting to know more about using thePostalOne! Mail.dat Client to transfer electronic documentation. If you are reading an electronicversion of this document, click an item in the list below to go directly to that topic. Prerequisites, page 2 Purpose of the Mail.dat Client, page 2 Visiting the Business Customer Gateway, page 3 Logging On and Off, page 3 Setting up the Mail.dat Client, page 4Transferring Files to the PostalOne! Test Environment for Mailers, page 5 Validating TEM Mail.dat Files, page 6 Making Revisions, page 7 Transferring Files, page 8 Validating and Uploading Files, page 9 Reviewing Reports, page 9Going Live with PostalOne!, page 10 Certifying for PostalOne! Using Mail.dat, page 10 Going Paperless with PostalOne!, page 13Getting Support, page 13This document refers to material from the following sources: Postal Service Mail.dat Technical Specification User Access to Electronic Mailing Information and Reports Guide Test Process for Full-Service Simple Mail.dat MailingsRefer to the PostalOne! website available from the Business Customer Gateway for detailsregarding specific versions released.Technical Support: 800.624.5234Email: tech@bccsoftware.comFax: 585.272.9141 www.bccsoftware.com
Using PostalOne! and the Mail.dat Client2PrerequisitesYou must meet the following hardware and software requirements before submitting a mailing toPostalOne! using the Mail.dat Client. The Postal Service Mail.dat Technical Specificationdescribes these requirements in more detail. Business Customer Gateway Login: You must obtain a Login from the Business Customer Gatewayin order to log in to the PostalOne! Production and TEM servers. If you do not have a Login, go tohttps://gateway.usps.com/bcg/login.htm and click New User Registration. Mailer Identification (MID): You must obtain a Mailer ID to use Intelligent Mail Full Service. Applyonline through the Business Customer Gateway. Customer Registration Identification (CRID): This is the unique identification code generated by theUSPS for each location that obtains a service through the Business Customer Gateway. Your CRIDcan be located in the Manage Permits area of the Postal One! See “Managing Permits in the PostalOne! TEM Server” on page 4. User License Code (ULC): You must also obtain an IDEAlliance User License Code (ULC) togenerate a valid Mail.dat database. If you have BCC Mail Manager FS, or BCC Mail Manager with theMail.dat Option, you may obtain a ULC directly from BCC Software at no additional charge. Contactyour sales representative or BCC Software customer support. For more information on the specifics ofthe Mail.dat data interchange standard, or to obtain a ‘vanity’ Mail.dat User License Code, refer to theIDEAlliance website www.idealliance.org. Sufficient RAM to process the Mail.dat files: See System Requirements information in the PostalService Mail.dat Technical Specification. Software to generate, update, and cancel Mail.dat jobs: BCC Software’s Mail.dat Wizard has thecapability to update and cancel Mail.dat jobs. To use these features, you must use the Wizard togenerate the job, setting Mail.dat file set status on the Setup page to Original. In subsequentsessions, set Mail.dat file set status to Update or Delete.Purpose of the Mail.dat ClientA Mail.dat file set must be generated before using the Mail.dat Client. Refer to the BCC MailManager user manuals for detailed information on creating Mail.dat files.Mailers implementing Intelligent Mail Full Service MUST use the Mail.dat Client to validate andtransfer their Mail.dat file sets to PostalOne! due to the data structures required to support thedata volume. Use of the Mail.dat Client conserves bandwidth without compromisingperformance.Note: Alternatives to using the Mail.dat Client include using vendor-certified software, such asMail.xml, or for mailing jobs with fewer than 10 thousand pieces, the USPS Postal Wizard .Technical Support: 800.624.5234Email: tech@bccsoftware.comFax: 585.272.9141 www.bccsoftware.com
Using PostalOne! and the Mail.dat Client3Visiting the Business Customer GatewayThe first step in obtaining the PostalOne! Mail.dat Client is to visit the Business CustomerGateway.PostalOne! is part of a group of services accessed online through a common interface, theBusiness Customer Gateway. Use the following procedure to visit the Business CustomerGateway1. Go to the USPS Web site, http://www.usps.com/2. Scroll down until you see the Business Customer Gateway link on the lower right corner.3. Click Business Customer Gateway.Note: Alternatively, use the URL https ://gateway.usps.com/bcg/login.htm.Logging On and OffIt is recommended that mailers planning to transfer Mail.dat jobs to PostalOne! qualify to do so,or use vendor-certified software to produce their output files. Even those who are in fullproduction mode should have their ability to transfer jobs evaluated. Mail.dat users should usethe PostalOne! Test Environment for Mailers (TEM) to certify their ability to transfer and edit datafiles.To access TEM, log on to the Business Customer Gateway using the following steps:1. Go to the Business Customer Gateway (See “Visiting the Business Customer Gateway” on page 3.)Enter your User ID and password.2. Click Sign In. A “Welcome [user name]” message is displayed.3. Click Electronic Data Exchange (PostalOne!) from the Design & Prepare group to access thefunctions that this document discusses. (if you have not yet registered for PostalOne! apply for the“Manage Mailing Activity” service. Retry this step upon approval.)4. Note the separate areas for TEM and Production. During the first testing phase, you will download anduse the Mail.dat Client from the TEM section (Figure 1 on page 6). “You are in the Test Environmentfor Mailers (TEM)” is displayed at the top of the window when you are on the TEM server. (Thisdocument assumes that you are using the Windows version.)5. Click Sign Out to log off:Note: If you have forgotten your password, you must call the PostalOne! Help Desk at 1-800-522-9085 torequest a reset. You will get a temporary password that you must change after your next logon.Technical Support: 800.624.5234Email: tech@bccsoftware.comFax: 585.272.9141 www.bccsoftware.com
Using PostalOne! and the Mail.dat Client4Managing Permits in the Postal One! TEM ServerThe Manage Permits tab on the Testing Environment for Mailers (TEM) server, as well as on theProduction server, allows you to set up the permits needed for testing. If you are planning to runthe Periodicals scenario, you will need your Periodical Permit (permit type PE) associated withthe Postal One! TEM server.Important: Permits are maintained separately on each server. You could potentially have different permitson each.1. From the Manage Mailing Activity heading, click Manage Permits. The Associated Business screen isdisplayed.2. Click your company name. The Permit Search Form, with the permits linked to your business, isdisplayed.Note: If you do not have a PE permit type listed for your company, contact PostalOne! at 1-800-522-9085to learn how to get the necessary permits.Setting up the Mail.dat ClientTransferring Mail.dat file sets requires the PostalOne! Mail.dat Client. Download one version ofthe Client and PostalOne! environment (Production and TEM). The supported operating systemand environment are included in the .zip file’s name (for example, MDRClient-win32-TEM.zip orMDRClient-win32-PROD.zip) as well as in the window bar of the Client.Client Download and InstallationThe Postal Service Mail.dat Technical Specification contains instructions for installing andconfiguring the Mail.dat Client. Use the following steps to obtain and load the PostalOne! Mail.datClient.1. Create an install folder to house the application. The folder name must not contain any spaces(example: C:\postal1)2. Sign in to your PostalOne! account.3. Click Electronic Data Exchange (PostalOne!) from the Design & Prepare group.4. Click the Download Client Application link appropriate to your PostalOne! account and operatingsystem. Our examples use the TEM Client for Windows.5. When asked to Run or Save the file, click Save. Save the file to the folder created in Step 1.Technical Support: 800.624.5234Email: tech@bccsoftware.comFax: 585.272.9141 www.bccsoftware.com
Using PostalOne! and the Mail.dat Client56. Extract the.zip file to the same folder.The following subfolders are created as part of the extract: jreversion—Java Runtime Environment (Windows only, Unix users must supply their own JavaRuntime Environment)lib—PostalOne! Mail.dat Client program filesconfig—includes mdrsettings.conf fileNote: The extracted files must all remain in, and be run from, the same folder.Starting the Mail.dat ClientThis is one method for starting the interactive version of the Windows Mail.dat Client:1. Use Windows Explorer to select the folder containing the extracted Mail.dat Client.2. Double-click run-mdclient.bat.3. Enter your PostalOne! account name and password.4. Click Sign In.Getting Online Help with the Mail.dat ClientTo access online Help, click any Help link. These links are located on the top and bottom of mostpages. The Mail.dat Client also incorporates abutton next to key headings.Transferring Files to the PostalOne! TestEnvironment for MailersThis section describes how to transfer a Mail.dat file set to the TEM. Use the TEM to learn thePostalOne! interface, transfer mailing jobs representative of live data, and become familiar withreporting tools. The TEM is also a good place to learn about the errors that may arise during livedata transfer, and the means to resolve them.Regardless of Mail.dat version, the idea is to use the TEM to become comfortable withPostalOne! and Mail.dat before attempting to transfer production Mail.dat job files.Technical Support: 800.624.5234Email: tech@bccsoftware.comFax: 585.272.9141 www.bccsoftware.com
Using PostalOne! and the Mail.dat Client6Figure 1: Electronic Data Exchange-TEM sectionNote: This window is updated frequently by the USPS, and the image is current as of this writing. Thispicture is intended to demonstrate how the window appears, and may appear differently on the TEMsite.Validating TEM Mail.dat FilesThe first part of the process checks Mail.dat file sets for compliance with Mail.dat and PostalOne!standards.1. Presort a mailing.2. Generate the Mail.dat files.3. Using Windows Explorer, browse to the folder housing the TEM Mail.dat Client.4. Double-click the run-mdclient.bat file.5. Sign in, using your PostalOne! account name and password.6. Click Job Validation/Upload. The Job Validation/Upload window opens.7. Click Add Jobs. An Open dialog box is displayed.8. Select the Mail.dat job(s) to validate.The selected file (.hdr or .zip) is displayed in the Job Validation/Upload window, as in Figure 2 onpage 7.Technical Support: 800.624.5234Email: tech@bccsoftware.comFax: 585.272.9141 www.bccsoftware.com
Using PostalOne! and the Mail.dat Client7Figure 2: Selecting Mail.dat files for validation9. (Optional) Select Just Validate Job(s) under the Upload Selected Jobs? heading, then click Validate.The Validation Status window opens to report the results. If there are no errors, proceed to“Transferring Files” on page 8. Otherwise, continue with “Making Revisions” on page 7.Making Revisions1. Click View Validation/Upload History.2. To search for your job, see steps 3 through 6 of “Validating and Uploading Files” on page 9.3. Click your Job ID to view associated error messages.4. Review and address the errors. Refer to USPS supporting documentation for detailed information.5. After correcting the errors, generate a new Mail.dat file set. Then do one of the following: If you have logged off and closed the Client, return to Step 3 of “Validating TEM Mail.dat Files” onpage 6. If you have logged off but the Client is still open, return to Step 5 of “Validating TEM Mail.dat Files”on page 6. If you are still signed in, return to Step 6 of “Validating TEM Mail.dat Files” on page 6.Technical Support: 800.624.5234Email: tech@bccsoftware.comFax: 585.272.9141 www.bccsoftware.com
8Using PostalOne! and the Mail.dat ClientTransferring FilesOnce validation succeeds, you can transfer files to PostalOne!1. Click the Close button of the Validation Status window to return to the Home page.2. Click Job Validation/Upload:3. Click Remove to the left of any jobs that you no longer wish to transfer.Figure 3: Selecting Mail.dat files for transfer4. Under Upload Selected Jobs? select Upload after Validation.5. Click the Validate and Upload button.6. Accept the agreement.7. If the transfer fails, return to “Making Revisions” on page 7. Otherwise, continue.8. Click the Close button of the Validation/Upload Status window to return to the Home page.9. Follow the instructions in “Validating and Uploading Files” on page 9 to view the job’s progress.10. Continue submitting to TEM until the files upload successfully.Technical Support: 800.624.5234Email: tech@bccsoftware.comFax: 585.272.9141 www.bccsoftware.com
Using PostalOne! and the Mail.dat Client9Note: The USPS Postal Service Mail.dat Technical Specification contains detailed information aboutconfiguring and validating Mail.dat files, including descriptions of errors at the segment and file levels,descriptions of mailing cases that Mail.dat does not support, and a discussion of postage payment.Validating and Uploading FilesThe Mail.dat Client offers two levels of reporting: Validation/Upload History and Upload Metrics.Validation/Upload History supplies details on each job validated or uploaded to a PostalOne! account. Upload Metrics provides a more analytical approach, summarizing a period’s activityaccording to measurements like success ratios and average upload times.Was your job accepted? When? What was the Job ID? You can learn this and other informationon the Mail.dat Client by using the Job Validation/Upload History page.Once logged in to the Client, get job status information as follows:1. Click Home.2. Select the Validation/Upload History tab.3. Enter the range of dates for which you validated and/or transferred the files. Dates earlier than 90 daysbefore the current date result in an error message.4. Enter the Job ID, if known.5. Select the mailing facility CRID from which the job originated, if known. Otherwise, leave all mailingfacility CRIDs checked.6. Click Submit.The Validation/Upload data is displayed.Reviewing ReportsIf the job resulted in the generation of a Qualification Report and/or Postage Statements, use thefollowing procedure to view them:1. Visit the Business Customer Gateway Electronic Data Exchange Go to TEM Dashboard.2. Display your job on the Dashboard Management System page.a. Enter an appropriate range for the Submit Date.b. Unless you know your job status, set Job Statuses to All - Include All Job Statuses.c.Click Search. Your job should be among the group of those displayed. Click the appropriate Postage Statement ID to view a Postage Statement. Click the Job ID followed by Qualification Report to view that document.Technical Support: 800.624.5234Email: tech@bccsoftware.comFax: 585.272.9141 www.bccsoftware.com
Using PostalOne! and the Mail.dat Client10d.Verify that the forms from PostalOne! match those generated by Mail Manager.Going Live with PostalOne!Progressing from the evaluation stage to paperless document submission involves the followingsteps. Those reading electronic versions of this document can go directly to a step by clicking itsheading in the following list.1. Certifying for PostalOne! Using Mail.dat, page 102. Going Paperless with PostalOne!, page 13Certifying for PostalOne! Using Mail.datThis section describes how to obtain certification at the TEM level. It is the evaluation processthat PostalOne! account holders must undergo on the way to going paperless.Because BCC Software is a USPS approved vendor, Mail Owners and Service Providers thatprepare mailings with a single permit, identical weight pieces need only submit one test file toTEM for Full-Service Authorization.Transferring Mail.dat file sets requires following the procedures described in “Transferring Filesto the PostalOne! Test Environment for Mailers” on page 5.How BCC Software Can HelpBCC Software has enhanced the Mail.dat Wizard to update and delete Mail.dat file sets. Refer tothe Mail.dat information in the BCC Mail Manager user guides for detailed information on the useof the Mail.dat Wizard.ProcedureThe TEM testing process follows this general procedure.Technical Support: 800.624.5234Email: tech@bccsoftware.comFax: 585.272.9141 www.bccsoftware.com
Using PostalOne! and the Mail.dat Client11Validating file setsBefore transferring practice files to the TEM, use the Client’s validation tool to evaluate theiradherence to Mail.dat standards. (See “Validating TEM Mail.dat Files” on page 6.) When you canproduce file sets that consistently pass validation, use the link on the Electronic Data Exchangepage to notify the Help Desk that you are ready to do practice transfers.Informing the Help Desk of test readiness1. Log in to the Business Customer Gateway.2. Click Electronic Data Exchange.3. Download and install the TEM Client for your operating system. (The USPS updates the Clientregularly, and recommends frequent updates to maintain compatibility with the system.)4. Click the Start Testing - Notify Help Desk link that corresponds to your operating system and Mail.datversion. (See Figure 1 on page 6.) An email window opens.5. Include the following information in the e-mail:Subject Line: Level of Service (“Full Service” or “eDoc”) “Test Scenario Worksheet” and Class of Mail(Example: “Full Service Test Scenario Worksheet First Class Mail”)Body: Company nameAddressCityStateZIP CodeCRIDContact nameContact phone numberName of Post OfficeFile transfer method followed by service level. (Example: Mail.dat versionF for Full Service;Mail.dat versionE for use with Intelligent Mail Basic or POSTNET.)Attachment: Test Scenario worksheetHaving a job or jobs evaluated:1. Presort a mailing.2. Generate Mail.dat files, noting the .hdr file name and Job ID.3. If the Help Desk asks you to delete a postage statement or job, you may do so via the methods listedin Table 1 on page 12.Technical Support: 800.624.5234Email: tech@bccsoftware.comFax: 585.272.9141 www.bccsoftware.com
12Using PostalOne! and the Mail.dat ClientTable 1: Cancelling Postage Statements or JobsCancelling Postage StatementsUse the PostalOne! interface to cancel postagestatementsUse the Mail.dat Wizard to cancel postage statementsLog in to the Business Customer Gateway.Run the presort that contains the corresponding job.Click Electronic Data Exchange.Start the Wizard.In the Test Environment for Mailers (TEM) sectionunder Mail.dat, click Go to TEM.Set File set status to Update Mail.dat job.Click Dashboard.Go to the Containers page.Submit a query that includes the job number containingthe postage statement.Right-click a group of containers for which you had previouslygenerated a statement.To view all postage statements, click the sign thatheads the first column.Click Modify.Click the link to the postage statement.Set Status to Cancel.Click Cancel.Complete the Wizard.Review the statement, scrolling as necessary, until yousee the Back and Cancel buttons.Transfer the file set to PostalOne!Click the Cancel button at the bottom right of thescreen, followed by OK, to confirm.PostalOne! displays a Cancellation Response asacknowledgmentCancelling JobsUse the PostalOne! interface to cancel a jobUse the Mail.dat Wizard to cancel a jobLog in to the Business Customer Gateway.Run the presort that contains the job.Click Electronic Data Exchange.Start the Wizard.In the Test Environment for Mailers (TEM) sectionunder Mail.dat, click the Go to TEM.Set File set status to Delete Mail.dat job.Click Dashboard.Complete t
Oct 02, 2014 · Using PostalOne! and the Mail.dat Client Overview This document is intended for PostalOne! users wanting to know more about using the PostalOne! Mail.dat Client to transfer electronic documentation. If you are reading an electronic version of this document, click an item in the list below to go directly to that topic. Prerequisites, page 2File Size: 729KB