Transcription
Skip to contentManuals User Manuals Simplified.IP Centrex Cisco SPA504G IP Phone User ManualHome » Cisco » IP Centrex Cisco SPA504G IP Phone User Manual
Contents [ hide1 IP Centrex Quick Reference Guide2 Commonly Used Features and Functions3 Phone Display4 Feature Description5 Core Calling Actions6 Placing and Answering a Call7 Changing Your Ring Tone8 Ending a Call9 Adjusting the Volume10 Muting the Phone11 Idle Phone12 Phone Softkey Descriptions13 While on a Call14 While on Hold15 Commonly Used Features Access Codes16 Related Manuals:IP CentrexQuick Reference GuideUSE YOUR MY ACCOUNT ACCESS TO MAXIMIZE YOUR TELEPHONE CAPABILITIES Go tomyaccount.coxbusiness.com and enter your username and password. Your username is in your emailaddress and your password was provided to you by Cox Business via email. If you have forgotten yourpassword, enter your email address and click “Forgot your password?” to receive a temporarypassword.Commonly Used Features and FunctionsSEND A CALL TO VOICE MAIL // Press the xfer (Transfer) softkey and dial *55 plus the extensionnumber; then press dial OR you may press the XferVM softkey plus the extension number.TRANSFER A CALL // During an active call, press the xfer softkey. Dial the number, announce the calland press the xfer softkey again to complete the transfer.BLIND TRANSFER // Answer a call, press the xfer softkey, dial the receiving party’s number and pressthe xfer softkey again to complete the transfer.CALL FORWARDING // Press the cfwd (Call Forward) softkey and enter a number to which to forwardcalls. If you are forwarding calls to an external number, use the access and area code as required.Press Dial. The LCD displays Calls Forwarded. To cancel Call Forwarding, press the cfwd (Forward)softkey.CALL FORWARDING NOT REACHABLE // From the Voice Tools menu in MyAccount, click IncomingCalls. Select the Call Forwarding Not Reachable link. Enter the Call Forward To phone number and clickOK.INTERCOM (PUSH TO TALK)* // Press *50 on your keypad to initiate the Push to Talk feature, dialthe extension number, and press the dial. To page, all extensions, use Push to Talk in conjunction withthe Instant Group Calling feature that can be set up by your company’s telephone administrator.SPEED DIAL* // If you have programmed Speed Dial 8 into MyAccount, go off-hook and enter the onedigit code of the number you want to call, and then press #. If you have programmed Speed Dial 100into MyAccount, go off-hook, press the two-digit code of the number you want to call, and then press#.CALL PICKUP // Create a call pickup group in MyAccount. Once that is done, dial *98# to answer aringing extension in your pickup group.
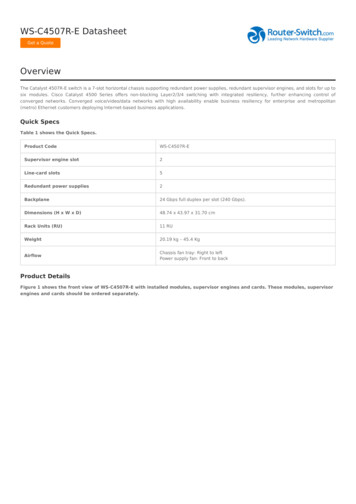
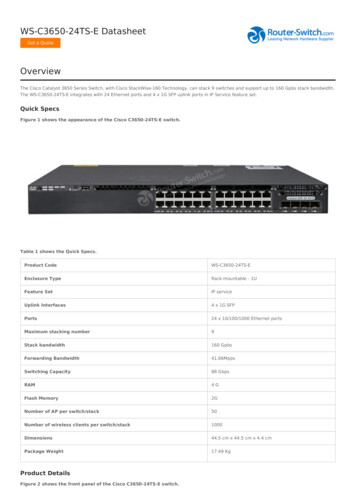
DO NOT DISTURB // Press the dnd (DND) softkey. The LCD screen indicates that Do Not Disturb isactive on the phone and calls are routed to voice mail. To deactivate, press the dnd (DND) softkeyagain.SET UP A CONFERENCE CALL // Dial the fi first party you want to conference. When the personanswers, press the conf softkey to place the person on hold. Dial the next number you want to includein the call and press conf again. Repeat these steps to add up to 15 participants to the call.PARK / RETRIEVE A CALL // While on an active call, press the hold key, obtain a second dial tone,and press *68 plus the extension number and #. To retrieve a parked call from that extension number,dial *88# plus the extension number and then press #.VOICE PORTAL* // Review the VoiceManager User Guide for feature activation and password setupbefore using Voice Portal. To change your Call Forwarding Personal Status Manager options, dial theVoice Portal access number for your area , and enter your 10-digit telephone number andVoice Portal passcode.UNIFIED MESSAGING* // From the Voice Mail/Portal Tools menu within MyAccount, select theMessaging Controls option. Click the Voice Mail Forwarding and Notifi cation Preferences link. Enter theemail address of where you want your voice mail messages sent. Check the Attach Voice Messagecheckbox. Select the radio button to the left of the Voice message disposition option you prefer. Clickthe Save link.*This feature may require confi duration before it can be used.Phone DisplayThe Cisco Model SPA504G has four line keys, the SPA508G phone has eight line keys, and theSPA525G2 has fi ve line keys.Feature Description1. HANDSET // Pick up to answer or place a call.2. SPEAKER // Speaker for phone.3. MESSAGE WAITING INDICATOR // When indicator is: Red: You have a new voice mail
Flashing Red: You have an incoming call4. LCD SCREEN // Your phone may vary, but commonly displays: Date and time Phone station name Line extension Softkey options5. LINE KEYS // Indicates phone line status: Green: Line is idle and ready to be used Red (steady): Line is active or in use Red (blinking steadily): Line is on hold Red (blinking twice then no color and repeat cycle): SCA line is in use Orange (steady): Line is unregistered (cannot be used) Orange (blinking): The line is not confi gured properly Off: The line key is not confi gured6. SOFTKEY BUTTONS // Located below the LCD screen. Performs the functions stated on the tabsthat display on the LCD screen.7. SCROLL NAVIGATION BUTTON // Press in any direction to scroll through the options on the LCDscreen.8. CENTER SELECT // Press to select the highlighted option.9. MESSAGES BUTTON // Press to access voice mail.10. HOLD BUTTON // Press to place a call on hold.11. SETUP BUTTON // Press to access a menu to confi gure features and preferences for this phone,access call history and provide phone status.12. MUTE BUTTON // Press to mute and un-mute your phone. Flashing red means no networkconnection exists.13. VOLUME BUTTON // Use to adjust the volume for the ringer when on the hook, the handsetvolume when the handset is off-hook, the headset volume when the headset is active, and thespeakerphone when it is active.14. SPEAKER BUTTON // Press to turn on speaker phone.15. HEADSET BUTTON // Press to activate the headset.16. KEYPAD // Press to dial numbers.Core Calling ActionsPlacing and Answering a Call1.2.3.4.5.Pick up the handset.Press the Speaker or Headset button.Press a line button and dial from the keypad.If the call arrives on your primary line, pick up the handset, press the Speaker or Headset button.If the call arrives on another line button, press that button.Changing Your Ring Tone1.2.3.4.5.6.7.Press the Menu button.Scroll to and select User Preferences.Scroll to and select Audio Preferences.Scroll to Extension (Line Key) to be changed.Press the right arrow.Scroll through Ring Tones. Press Play to hear.Press Select on chosen Ring Tone.Ending a Call1. Hang up the handset or press the endCall softkey. (Note: If you are using the speaker phone,press the Speaker button.)Adjusting the Volume
1. Lift the handset or press the Speaker button.2. Press or – on the volume button to increase or decrease the volume.3. Press Save to maintain the new level.Muting the Phone1. Press the Mute button on the phone to mute and un-mute the speakerphone or handset.Idle Phoneredial // Calls the last number dialed.dir // Opens preconfi gured address book.cfwd // Reroutes incoming calls to another telephone number.dnd // Do Not Disturb. Prevents incoming calls from ringing your phone. Calls forward tovoice mail automatically if that number has a mailbox.SCROLL lcr // Last Call Return. Redials last incoming call.PTT // Push to Talk. Enables intercom functionality.Phone Softkey DescriptionsWhile on a CallendCall // Ends the call.conf // Links two or more calls. To conference a call:1.2.3.4.5.Dial the fi rst party.Press the conf softkey.Listen for dial tone.Dial the second party.Press the conf softkey again. (If you hang up, the conference call disconnects.)bxfer // Transfers a call without introducing caller.xfer // Places the call on hold while you dial the number to which you want to send the call.1. While on an active call, press the xfer softkey and dial the receiver’s phone number.2. When the receiver answers the phone, introduce the call.3. Press the xfer key and hang up.SCROLL XferVM // Transfers call to voice mail.hold // Places a call on hold.While on Holdresume // Restarts a call on hold.endCall // Ends the call.newCall // Places a new call.redial // Calls the last number dialed.SCROLL XferVM // Transfers call to voice mail.dir // Opens preconfi gured address book.
cfwd // Reroutes incoming calls to another telephone number.dnd // Do Not Disturb. Prevents incoming calls from ringing your phone. Calls forward to voice mailautomatically if that number has a mailbox. Reroutes incoming calls to another telephone number.Some functions may be restricted by your telephone administrator.Dialing shortcut when using feature access codes: Press the # symbol to complete any dialing stringfor a faster connection.For more information on IP Centrex, go to myaccount.coxbusiness.com and click the Learn Morelink.Services not available in all areas. Other restrictions may apply. For technical support, dial1.866.272.5777.Commonly Used Features Access CodesCall Forward Always – Activate – *72Call Forward Always – Deactivate – *73Call Forward No Answer – Activate – *92Call Forward No Answer – Deactivate – *93Call Park – Press Hold *68 Extension numberCall Park Retrieve – Pick up the handset or press the hands-free button *88# Enter the extensionwhere the call is parked #Call Pick Up – Press *98 to pick up ringing extension. Press *97 Extension number # to answer aspecifi c extensionCall Return – *69Call Waiting – Activate – *43Call Waiting – Deactivate – #43Direct Voice Mail Transfer – Press transfer (xfer) then *55 Extension number #Intercom (Push to Talk) – *50 Extension number #Call Forward Remote Access – Dial your local Voice Portal Remote Access Number Enter your 10digit IP Centrex Station Number and PasscodeIP Centrex Cisco SPA504G IP Phone User Manual – Optimized PDF
IP Centrex Cisco SPA504G IP Phone User Manual – Original PDFRelated Manuals:1. Cox Business IP Centres Cisco SPA504G/Cisco SPA508G Phone User Manual IP Centrex CoxBusiness IP Centrex Quick Reference Guide for.2. Cisco 6841/6851 Multiplatform IP Phone User Manual Cisco IP Phone 6841 and 6851 MultiplatformPhones Quick Start.3. Cisco IP Phone 8800 Series Multiplatform Phones User Manual Cisco IP Phone 8800 SeriesMultiplatform Phones Quick Start Guide.4. Cisco IP Phone User Manual Cisco IP Phone Quick Installation Guide Introduction Integrating a Cisco.5. Cox Business IP Centrex Call Center Standard Agent/Supervisor User Manual Cox BusinessIP Centrex Call Center Standard Agent/Supervisor User Manual.6. Cisco IP Phones Shortcuts Guide Cisco IP Phones Shortcuts Guide Line Button Status Lights Solid.
IP Centrex Cisco SPA504G IP Phone User Manual Home » Cisco » IP Centrex Cisco SPA504G IP Phone User Manual. Contents [ hide . address and your password was provided to you by Cox Business via email. If you have forgotten your password, enter your email address