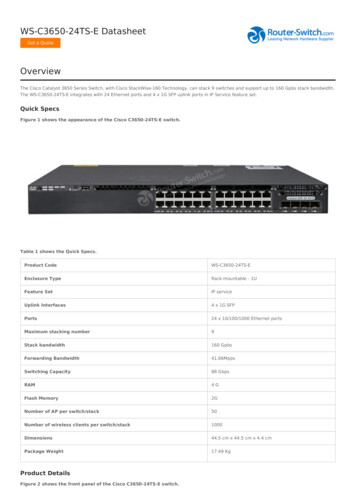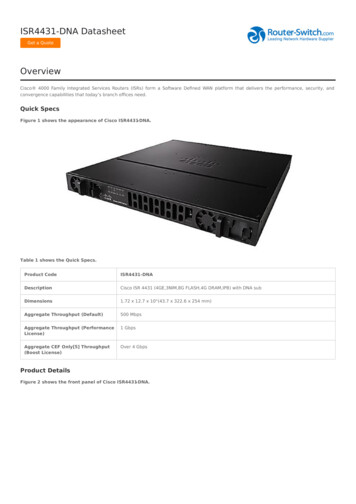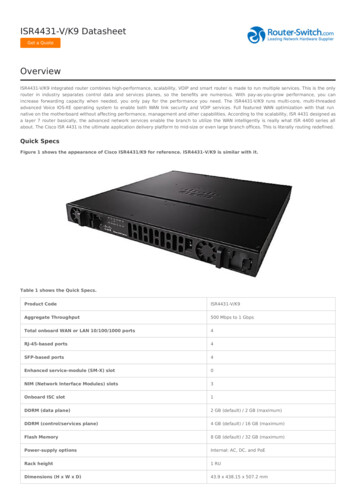
Transcription
Application NoteCisco Router and Security Device Manager Cisco WebVPNIntroductionCisco IOS WebVPN provides Secure Sockets Layer (SSL) VPN remote-access connectivity using a Web browser. WebVPN supports bothclientless and full-network-access SSL VPN capabilities.Clientless WebVPN provides secure access to private Web resources and to a company’s intranet sites. It uses a Web browser to connect toapplications such as HTML-based intranet content, e-mail, network file shares, and Citrix. This document gives an example of how to configurea WebVPN virtual server.The TCP Application Helper (port-forwarding Java applet) provides support for additional TCP-based applications that are not Web-enabled. Itextends the capability of the Web browser to enable remote access to TCP-based applications such as Post Office Protocol 3 (POP3), SimpleMail Transfer Protocol (SMTP), Telnet, and Secure Shell (SSH) Protocol.The Cisco SSL VPN Client enables dynamic, full network access remotely to any application. It offers extensive application support throughits dynamically downloaded client for WebVPN. With the SSL VPN Client, Cisco Systems delivers a lightweight, centrally configured, andeasy-to-support SSL VPN tunneling client that allows network-layer connectivity access to virtually any applications.Cisco Secure Desktop provides advanced endpoint security and offers data theft prevention on noncorporate devices. It is transparent to endusers and automatically creates a secure session under Microsoft Windows 2000 or XP.Cisco IOS WebVPN supportCisco IOS WebVPN is supported by Cisco Router and Security Device Manager (SDM) v2.3 with Cisco IOS Software Release 12.4(6)T. CiscoSDM provides wizards for both basic and advanced configuration, and provides monitoring information and statistics for user sessions,clientless access, and full network access.Deployment ScenarioThis document demonstrates how to configure a Cisco IOS WebVPN gateway. The sample configuration is based on the following networktopology (figure 1)Figure 1.Network Diagram 2006 Cisco System s,Inc.A llright reserved.Im portant notices,privacy statem ents,and tradem arks of Cisco System s,Inc.can be found on Cisco.comPage 1 of 19
Central SiteMobile UserInternetOutside interface172.28.49.115Inside WebVPN GatewayCisco Secure ACSAAA RADIUS ServerSample ConfigurationPrerequisitesThe router is installed with Cisco Secure Desktop and Cisco Secure WebVPN Client in the flash memory during SDM installation/upgrade(Figure 2), or manually copied to router flash.Figure 2.Cisco SDM Components 2006 Cisco System s,Inc.A llright reserved.Im portant notices,privacy statem ents,and tradem arks of Cisco System s,Inc.can be found on Cisco.comPage 2 of 19
Cisco SDM WebVPN GatewayAlthough the Cisco WebVPN feature allows dynamic configuration of end-user policy and require less manual configuration by end users andfield technicians, it still requires users to fully understand how to configure an authentication, authorization, and accounting (AAA) server, thegroup policy, and the dynamic crypto map on the WebVPN gateway side.Cisco SDM allows users to easily configure the Cisco WebVPN gateway with limited information. The following steps are used to configure thedeployment scenario using Cisco SDM.Create a Cisco WebVPN GatewayTo create a WebVPN gateway, at Configure Mode, select the VPN, select WebVPN, and then click the Create WebVPN tab to launch Createa New WebVPN wizard.In our case, the AAA is not enabled (Figure 3). To enable AAA, click Enable AAA, read the message, and click Yes to continue.Figure 3.Create WebVPN – Enable AAA 2006 Cisco System s,Inc.A llright reserved.Im portant notices,privacy statem ents,and tradem arks of Cisco System s,Inc.can be found on Cisco.comPage 3 of 19
After the AAA server is enabled, the Prerequisite Tasks show that DNS is not enabled (Figure 4). To enable DNS, click Enable DNS. You willbe directed to Additional Tasks/DNS properties to enable DNS.Figure 4.Create WebVPN – Enable DNSClick the Launch the selected task button to launch the WebVPN Wizard. Read the welcome note, and click Next. 2006 Cisco System s,Inc.A llright reserved.Im portant notices,privacy statem ents,and tradem arks of Cisco System s,Inc.can be found on Cisco.comPage 4 of 19
For IP address and name, select the IP address that users will enter to access the WebVPN portal page; Cisco SDM lists the IP addresses of allconfigured router interfaces and all existing WebVPN gateways. In our example, use the IP address of the router’s outside interface, select172.28.49.115, and give a unique name to access the gateway (in this case, the name MySDMWebVPN). You will be asked to enable secureCisco SDM access through 172.28.49.115; check the box (optional). If the box is checked, the URL that you must use to access Cisco SDM willchange after you deliver the configuration to the router. Review the information area at the bottom of the screen to learn the URL to use.For digital certificates, select the certificate that you want the router to present to clients when they log onto the gateway. In our example, we usethe router’s self-signed certificate.In the Information area, Cisco SDM displays the URL to log into the WebVPN service: https://172.28.49.115/MySDMWebVPN and the URLto access Cisco SDM: https://172.28.49.115:4443 (Figure 5). Read and write down the information, and click Next.Figure 5.Select an InterfaceYou will be prompted by a Cisco SDM Warning popup window. Read the information and click Yes. 2006 Cisco System s,Inc.A llright reserved.Im portant notices,privacy statem ents,and tradem arks of Cisco System s,Inc.can be found on Cisco.comPage 5 of 19
Use the User Authentication window to specify how the router is to perform user authentication. The router can authenticate WebVPN userslocally, or it can send authentication requests to a remote AAA server.In our example, we do not have a remote AAA server; all users will be authenticated locally. Select Locally on this router. Click the Add button to add a new user: Username: webvpnuser Password: cisco123 Encrypt password using MD5 hash algorithm: check Privilege Level: 1Click OK.The new user and the existing users will be listed (Figure 6). Click Next.Figure 6.IKE Proposal 2006 Cisco System s,Inc.A llright reserved.Im portant notices,privacy statem ents,and tradem arks of Cisco System s,Inc.can be found on Cisco.comPage 6 of 19
Configure the links and services that users will access in the Configure Intranet Websites window. Click Add to add a URL list, and theAdd URL List dialog will be displayed (Figure 7).Figure 7.Configure Intranet Websites Name: Teleworker Heading: Employee Connection Click Add and select Website. Label: EC URL: http://your company’s intranet network (in our example, WebVPN is configured with Cisco EmployeeConnection URL http://wwwin.cisco.com) Click OK.Click Add and select E-mail 2006 Cisco System s,Inc.A llright reserved.Im portant notices,privacy statem ents,and tradem arks of Cisco System s,Inc.can be found on Cisco.comPage 7 of 19
Label: Email URL: http:/your company’s web mail server; in our example, WebVPN is configured with Cisco’s OutlookWeb Access (OWA) http://email.cisco.com Click OK.Action: check Select, click Next.If a user requires access any application in the central site, the user’s PC must download the full tunnel client software and obtain an IP addressfrom the WebVPN gateway. In our example, we enable full tunnel feature and configure the full tunnel with following information: Check Enable Full Tunnel. IP Address Pool: Click and select Create a new IP Pool Pool name: WebVPN-Full-Tunnel Start IP address: 1.1.1.1 End IP address: 1.1.1.100 Check Install Full Tunnel Client Location: Click to configure a SSL VPN Client location. Note: By default, Cisco SDM lists the SSL VPN Client loadedon the router file system. Select SVC location dialog appears (Figure 8).Figure 8.Select SVC Location Select Router File System, click button, File Selection dialog appears (Figure 9).Select sslclient-win-1.0.2.127.pkg1Click OK.Figure 9.File Selection1SSL VPN client files for full tunnel client are packaged with Cisco SDM. In our example, it is installed onthe router flash. 2006 Cisco System s,Inc.A llright reserved.Im portant notices,privacy statem ents,and tradem arks of Cisco System s,Inc.can be found on Cisco.comPage 8 of 19
Click OK.For the Advanced Option, click Advanced (optional). Cisco SDM allows you to control the traffic that is encrypted, specify the DNS serverson the corporate intranet, and specify the proxy server settings that are to be sent to client browsers. In our example, we do not configure theadvance features. Click Cancel and then click Next.Cisco SDM allows you to determine the appearance of the portal page. You can select among the predefined themes listed, and obtain a previewof the portal page. Select Theme: Ocean Breeze (Figure 10), click Next.Figure 10.Customize WebVPN Portal Page 2006 Cisco System s,Inc.A llright reserved.Im portant notices,privacy statem ents,and tradem arks of Cisco System s,Inc.can be found on Cisco.comPage 9 of 19
View the Summary of Configuration. Click Finish if you are satisfied with the configuration, or click Back to revise the configuration. You willbe prompted by an alert. Read the information, click I read and understood, click Save shortcut on Desktop if necessary, and click OK. Oncethe commands are delivered to the router, you will be directed to the VPN / Web VPN / Edit WebVPN page. MySDMWebVPN should becreated and in service (Figure 11). Close Cisco SDM.Re-launch Cisco SDM as instructed. At Configure Mode, select the VPN from the left panel, click WebVPN, and select the Edit WebVPNtab. The Edit Web VPN window allows you modify or create WebVPN configurations. The top portion of the tab lists the configured WebVPNcontexts. The bottom portion displays details for that context (Figure 11).Figure 11.Edit WebVPN 2006 Cisco System s,Inc.A llright reserved.Im portant notices,privacy statem ents,and tradem arks of Cisco System s,Inc.can be found on Cisco.comPage 10 of 19
To view the newly created WebVPN gateway, at Configure Mode, select the VPN, expand WebVPN, and select WebVPN Gateways. TheWebVPN Gateway window provides the IP address and the digital certificate for the WebVPN contexts that use it. You can provide theinformation for a gateway in this window, and the information that will allow users to access a portal page.At Configure Mode, select the VPN, expand WebVPN, and select Packages (Figure 12). This window enables you to obtain software installbundles that must be downloaded to WebVPN clients to support WebVPN features, and to load them on the router. You can also use thiswindow to remove install bundles that have been installed.In our example, you should see the Cisco WebVPN Client software is installed, and Cisco Secure Desktop software has been loaded into therouter flash but not installed. Click the Install button to install the software.Figure 12.Packages 2006 Cisco System s,Inc.A llright reserved.Im portant notices,privacy statem ents,and tradem arks of Cisco System s,Inc.can be found on Cisco.comPage 11 of 19
2006 Cisco System s,Inc.A llright reserved.Im portant notices,privacy statem ents,and tradem arks of Cisco System s,Inc.can be found on Cisco.comPage 12 of 19
Access WebVPN PortalLaunch the WebVPN portal as instructed. In our example, https://172.28.49.115/MyWebVPN is given by the WebVPN wizard. Click Yes whenprompted by the Security Alert. The WebVPN Service Login displays (Figure 13).Figure 13.WebVPN ServiceEnter username/password webvpnuser/cisco123 to log in. Click OK to continue when prompted. The WebVPN Service Portal displays(Figure 14).Figure 14.WebVPN Service Portal 2006 Cisco System s,Inc.A llright reserved.Im portant notices,privacy statem ents,and tradem arks of Cisco System s,Inc.can be found on Cisco.comPage 13 of 19
A floating toolbar will be opened in a separate window (Figure 15).Figure 15.Floating ToolbarIf full tunnel is not enabled, you can access HTML-based URLs by entering the full URL path. You can also click the preconfigured URL ECand EMAIL on the portal, or select the URL from the floating toolbar.In our example, you will be prompted to install the SSL VPN Client for WebVPN. Read the security warning, and allow the installer to launchActiveX. Figure 16 shows the installer has been launched.Figure 16.SSL VPN Client 2006 Cisco System s,Inc.A llright reserved.Im portant notices,privacy statem ents,and tradem arks of Cisco System s,Inc.can be found on Cisco.comPage 14 of 19
You will be asked to authenticate the SSL VPN Server Certificate signed by an untrusted certificate authority. Click Yes to view the certificate.The SSL VPN Server Certificate Authentication window appears. Read the certificate and click OK to accept it. In our example, the router doesnot receive a certificate from a Certificate Authority server; a self-signed certificate is used (Figure 17).Figure 17.Certificate InformationYou will be prompted to accept the certificate again. Read the statement and click Yes to accept the self-signed certificate (Figure 18).Figure 18.SSL VPN Server Certificate Authentication 2006 Cisco System s,Inc.A llright reserved.Im portant notices,privacy statem ents,and tradem arks of Cisco System s,Inc.can be found on Cisco.comPage 15 of 19
Your local host (a PC or a laptop) will be assigned a new address from the WebVPN-Full-Tunnel.Locate and double click the SSL VPN Client icon from your toolbarto check the statistics and routerdetails of the full tunnel (Figure 19).Figure 19.SSL VPN Client StatisticsClick Disconnect to terminate the full tunnel. The SSL VPN Client will be removed from your local host.MonitoringUsers can go to Monitor Mode, select VPN Status, and expand Web VPN (All Contexts). Cl
Cisco SDM access through 172.28.49.115; check the box (optional). If the box is checked, the URL that you must use to access Cisco SDM will change after you deliver the configuration to the router. Review the information area at the bottom of the screen to learn the URL to use. For digital certificates, select the certificate that you want the router to present to clients when they log onto .