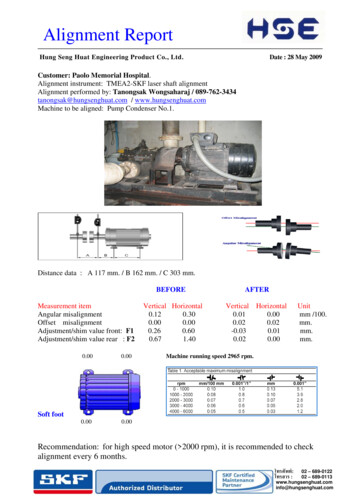
Transcription
WHEEL ALIGNMENT SPECIFICATIONS 1998 Pontiac Bonneville1998-99 WHEEL ALIGNMENTSpecifications & Procedures - Cars - Except SaturnGMAchieva, Alero, Aurora, Bonneville, Camaro, Catera, Cavalier,Century, Corvette, Cutlass, DeVille, Eighty Eight, Eldorado, Grand Am,Grand Prix, Intrigue, LeSabre, LSS, Lumina, Malibu, Metro, MonteCarlo, Regal, Regency, Riviera, Park Avenue, Prizm, Seville, Skylark,SunfireIDENTIFICATIONMODEL IDENTIFICATION Body Code (1)"C""E""F""G""H""J""K""N""V""W"Model. Park Avenue. Eldorado. Camaro & Firebird. Aurora & Riviera. Bonneville, Eighty Eight, LeSabre, LSS & Regency. Cavalier & Sunfire. ( 2) DeVille & Seville. Achieva, Alero, Cutlass, Grand Am, Malibu & Skylark. Catera. Century, Grand Prix, Intrigue, Lumina,Monte Carlo & Regal. Corvette"Y"(1) - Vehicle body code is fourth character of VIN.(2) - Includes Concours and D’Elegance. RIDE HEIGHT ADJUSTMENT* PLEASE READ THIS FIRST *NOTE:Proper ride height is necessary for correct wheel alignment.Check ride height with vehicle on level floor. Ensure lessthan 15.5 lbs. of weight is in trunk (other than spare andtools), fuel tank is full (unless specified otherwise),fronts seats are in full rearward position and tires are thecorrect size and properly inflated. Tire inflationspecification can be found on door pillar, sidewall of tire,sun visor or in glove box. On vehicles with electronicchassis controls, ensure all systems are functional beforeadjusting ride height or wheel alignment.Visually inspect vehicle for signs of abnormal height fromfront to rear or side to side. If ride height is not withinspecification, check, repair or replace suspension components.CHECKING PROCEDURE"C" & "G" Bodies & Seville1) Ensure Electronic Level Control (ELC) is operatingproperly (if equipped). Bounce front and rear end of vehicle 3 times.Measure dimension "A" to locate point to measure dimension "J".
Measure dimension "J" from underbody points to floor. Measuredimension "Z" between lowest part of ball joint and centerline ofcontrol arm bolt. See Fig. 1. See RIDE HEIGHT SPECIFICATIONS ("C" &"G" BODIES & SEVILLE) table.2) Measure dimension "B" to locate point to measure dimension"K". Measure dimension "K" from underbody points to floor. See Fig. 1.Measure dimension "D" between bottom of wheel bearing face andcenterline of outboard control arm bolt. See RIDE HEIGHTSPECIFICATIONS ("C" & "G" BODIES & SEVILLE) table."E" & "K" Bodies (Except Seville)1) Ensure Electronic Level Control (ELC) is operatingproperly. Bounce vehicle 3 times at front and rear. Measure dimension"Z" between centerline of front lower control arm bushing bolt andlowest part of ball joint. From the front side of rear suspension,measure dimension "D" between centerline of front inner bearingbushing bolt and centerline of front outer bushing bolt. See Fig. 2.See RIDE HEIGHT SPECIFICATIONS ("E" & "K" BODIES - EXCEPT SEVILLE).2) Measure dimensions "A" and "B" to locate measuring points"J" and "K". Measure dimensions "J", "K", "E" and "F" betweenunderbody and floor and center of wheel well and floor. See Fig. 2.See RIDE HEIGHT SPECIFICATIONS ("E" & "K" BODIES - EXCEPT SEVILLE).1998 "F" Body & 1998-99 "J" Body1) Lift at front bumper 1.5" (38 mm) and let settle. Repeat 2more times. Measure dimensions "A", "J" and "Z". See Figs. 3 and 4.See RIDE HEIGHT SPECIFICATIONS (1998 "F" BODY) or RIDE HEIGHTSPECIFICATIONS ("J" BODY) table.2) Push front bumper down 1.5" (38 mm) and let vehicle rise.Repeat 2 more times. Measure dimensions "A", "J" and "Z". Averagereadings for ride heights. See Figs. 3 and 4. See RIDE HEIGHTSPECIFICATIONS (1998 "F" BODY) or RIDE HEIGHT SPECIFICATIONS ("J"BODY) table.3) Lift rear bumper 1.5" (38 mm) and let settle. Repeat 2more times. Push rear bumper down 1.5" (38 mm) and let rise. Repeat 2more times. On "J" bodies, measure dimensions "B" and "K". On "N"bodies, measure dimensions "B", "K" and "D". See Fig. 3. RIDE HEIGHTSPECIFICATIONS (1998 "F" BODY) or RIDE HEIGHT SPECIFICATIONS ("J"BODY) table.1999 "F" BodyJounce front and rear bumper at least 1.5" (38 mm) and letsettle. Measure and note front and rear trim heights. See Fig. 5.Repeat 2 more times. Average measurements for trim heights. See RIDEHEIGHT SPECIFICATIONS (1999 "F" BODY) table.NOTE:On Metro, fuel tank must be at least 1/8 full."H" Body & Metro1) Bounce vehicle 3 times at front and rear. Measuredimension "Z" between centerline of front lower control arm bolt andlowest part of ball joint. See Fig. 6. See RIDE HEIGHT SPECIFICATIONS("H" BODY) table.2) On "H" bodies, measure dimension "D" between centerline ofrear lower control arm bolt and lowest point of ball joint (not greasefitting). See Fig. 6. See RIDE HEIGHT SPECIFICATIONS ("H" BODY) table.3) Measure dimension "A" from center of front axle to locatepoint to measure dimension "J". Measure dimension "J" between frontunderbody and floor. Measure dimension "B" from center of rear axle tolocate point to measure dimension "K". Measure dimension "K" betweenrear underbody and floor. See Fig. 7. See RIDE HEIGHT SPECIFICATIONS("H" BODY) or RIDE HEIGHT SPECIFICATIONS (METRO) table.
"N" Body1) Lift front bumper about 1.5" (38 mm) and allow vehicle tosettle. Repeat 2 more times. Distance "A" is from center of front axleto locate point to measure dimension "J". Dimension "J" is measuredfrom floor to bottom of rocker panel. Measure dimension "Z". Dimension"Z" is measured from bottom of ball joint to bottom of frame rail. SeeFig. 3. See RIDE HEIGHT SPECIFICATION ("N" BODY) table. Notemeasurements. Do this 2-3 times, and average measurements.2) Lift rear bumper up about 1.5" (38 mm) and allow vehiclesettle. Repeat 2 more times. Distance "B" from center of rear axle tolocate point to measure dimension "K". Dimension "K" is measured fromfloor to bottom of rocker panel. See Fig. 3. See RIDE HEIGHTSPECIFICATION ("N" BODY) table. Push rear bumper down about 1.5" (38mm) and allow vehicle to rise. Repeat 2 more times. Measure dimension"K" again. Average high and low measurements to determine true rideheight.NOTE:Ride height specifications for 1998 Prizm are not available.Prizm1) Lift front bumper 1.5" (38 mm) and let settle. Repeat 2more times. Push front bumper down 1.5" (38 mm) and let settle. Repeat2 more times. Measure dimension "Z" between center of lower controlarm mounting bolt and floor. See Fig. 8. See RIDE HEIGHTSPECIFICATIONS (1999 Prizm) table.2) Lift rear bumper 1.5" (38 mm) and let settle. Repeat 2more times. Push rear bumper down 1.5" (38 mm) and let settle. Repeat2 more times. Measure dimension "D" between center of rear trailingarm bolt and floor. See Fig. 8. See RIDE HEIGHT SPECIFICATIONS (1999Prizm) table."V" Body1) Ensure Automatic Level Control (ALC) is operative whiletaking measurements. Lift front bumper 1.5" (38 mm) and let settle.Repeat 2 more times. Push front bumper down 1.5" (38 mm) and letsettle. Repeat 2 more times. Measure dimensions "J" and "P". Dimension"J" is measured from bottom of rocker panel to floor. Dimension "P" ismeasured from top of tire to bottom of front tire (diameter). SeeFig. 9. See RIDE HEIGHT SPECIFICATIONS ("V" BODY) table.2) Lift rear bumper 1.5" (38 mm) and let settle. Repeat 2more times. Push rear bumper down 1.5" (38 mm) and let settle. Repeat2 more times. Measure dimensions "K" and "R". Dimension "K" ismeasured from bottom of rocker panel to floor. Dimension "R" ismeasured from top of tire to bottom of rear tire (diameter). SeeFig. 9. See RIDE HEIGHT SPECIFICATIONS ("V" BODY) table."W" Body1) Lift front bumper 1.5" (38 mm) and let settle. Push frontbumper down 1.5" (38 mm) and allow vehicle to rise and settle. Measuredimension "Z" between center of rear bushing bolt and lowest point ofball joint. See Fig. 10. Measure dimension "A" from center of frontwheel to locate point to measure dimension "J". Measure dimension "J"between lower rocker panel to floor. See Fig. 3. See RIDE HEIGHTSPECIFICATIONS ("W" BODY) table. If ride height is not withinspecification, replace damaged or worn suspension parts.2) Lift rear bumper 1.5" (38 mm) and let settle. Push rearbumper down 1.5" (38 mm) and allow vehicle to rise and settle. Measuredimension "D" from a point 1.18" (30 mm) from outboard of rear hosebracket bolt centerline to trailing arm to knuckle attachment boltcenterline. See Figs. 3 and 10. Measure dimension "B" to locate pointto measure dimension "K". Measure dimension "K" between from bottom ofrocker panel to floor. See Fig. 3. See RIDE HEIGHT SPECIFICATIONS ("W"BODY) table. If ride height is not within specification, repair or
replace damaged or worn suspension parts.NOTE:When taking measurements, the real time damping system mustbe operative during procedure. If ride height adjustment isnecessary, opposite trim height will be affected. Recheckvehicles ride height after each adjustment."Y" Body (Front)1) Lift front bumper 1.5" (38 mm) and let settle. Repeat 2more times. Push front bumper down 1.5" (38 mm) and let settle. Repeat2 more times. Measure from center of front axle to lower edge ofrocker panel (dimension "A") to locate dimension "J" measuring point.Measure dimension "J" from bottom of rocker panel to floor. SeeFig. 11. See RIDE HEIGHT SPECIFICATIONS ("Y" BODY) table. If frontride height is not within specification, go to step 3).2) Using Trim Height Measurement Gauge (J42854), measure leftand right side dimension "Z" between lowest point of ball joint andcenter of lower control arm mounting bolt. See Fig. 11. See RIDEHEIGHT SPECIFICATIONS ("Y" BODY) table. If ride height is not withinspecification, go to next step.3) If ride height adjustment is necessary, Trim HeightAdjustment Tool (J42743) must be used to prevent damage to rubbersheer pad on end of adjuster bolt. See Fig. 12. Adjust dimension "Z"by turning the spring adjuster bolt. One complete turn of adjusterbolt equals about 0.08" (2 mm). Remove trim height adjustment tool.Ensure maximum difference between left and right spring adjuster boltgaps does not exceed 0.196" (5 mm). Recheck ride height. Measure andadjust front spring adjuster bolt gaps. Bolt gaps should be between 0.078-0.944 (2-24 mm). See Fig. 13.NOTE:When taking measurements, the real time damping system mustbe operative during procedure. If ride height adjustment isnecessary, the opposite trim height will be affected. Recheckvehicles ride height after each adjustment."Y" Body (Rear)1) Lift rear bumper 1.5" (38 mm) and let settle. Repeat 2more times. Push rear bumper down 1.5" (38 mm) and let settle. Repeat2 more times. Measure from center of rear axle to lower edge of rockerpanel (dimension "B") to locate dimension "K" measuring point. Measuredimension "K" from bottom of rocker panel to floor. See Fig. 11. SeeRIDE HEIGHT SPECIFICATIONS ("Y" BODY) table. If rear ride height isnot within specification, go to step 3).2) Using Trim Height Measurement Gauge (J42854), measure leftand right side dimension "D" between lowest point of ball joint andcenter of lower control arm mounting bolt. See Fig. 11. See RIDEHEIGHT SPECIFICATIONS ("Y" BODY) table. If ride height is not withinspecification, go to next step.3) If ride height adjustment is necessary, adjust dimension"D" by removing spring bolt retainers and turning the spring adjusterbolt. One complete turn of adjuster bolt equals about 0.08" (2 mm).Ensure maximum difference between rear spring stud height does notexceed 0.196" (5 mm). See Fig. 14. Recheck ride height. Measure andadjust front spring adjuster bolt gaps. Rear spring stud height shouldbe between 0.866-1.811 (22-46 mm). Install retainers to bolts.RIDE HEIGHT SPECIFICATIONSNOTE:Corvette ride height specification is not available frommanufacturer.On "C", "G", "H", and "J" body, maximum variation betweenside-to-side and front-to-rear should not exceed .75" (19 mm). On "N"
body, maximum variation between side-to-side should not exceed 0.24"(6 mm). On all other models, maximum variation between side-to-sideand front-to-rear should not exceed .47" (12 mm).RIDE HEIGHT SPECIFICATIONS ("C" &"G" BODIES & SEVILLE) ApplicationIn. (mm)Dimension "A""C" & "G" Body (1) . 23.5 (597)Seville . 23.62 (600)Dimension "B""C" & "G" Body . 23.13 (588)Seville . 23.22 (590)Dimension "J""C" Body . 6.44 To 7.25 (164 To 184)"G" Body . 6.69 To 7.5 (170 To 190)SevilleStandard Suspension (KS) . 7.05 (179)Touring Suspension (KY) . 6.65 (169)Dimension "K""C" Body . 8.38 To 9.19 (213 To 233)"G" Body . 8.63 To 9.41 (219 To 239)SevilleStandard Suspension (KS) . 9.02 (229)Touring Suspension (KY) . 8.58 (218)Dimension "Z""C" & "G" Bodies . 1.19 To 2.0 (30 To 50)SevilleStandard Suspension (KS) . 1.57 (39.88)Touring Suspension (KY) . 1.18 (29.97)Dimension "D""C" & "G" Bodies . 3.0 To 3.75 (79 To 96)SevilleStandard Suspension (KS) . 3.39 (86)Touring Suspension (KY) . 2.99 (76)(1) - See Fig. 1. RIDE HEIGHT SPECIFICATIONS ("E" & "K" BODIES - EXCEPT SEVILLE) ApplicationConcours, DeVille & Eldorado (1)Dimension "A" .Dimension "B" .Dimension "J"Concours . 6.77 To 7.57DeVille . 7.16 To 7.96Eldorado . 8.26 To 9.06Dimension "K"Concours . 7.96 To 7.16DeVille . 8.35 To 7.55Eldorado . 8.03 To 8.83Dimension "E"Concours . 27.04 To 27.84DeVille . 27.43 To 28.23Eldorado . 27.75 To 28.55Dimension "F"Concours . 17.79 To 18.59DeVille . 20.98 To 21.78Eldorado . 27.51 To 28.31In. (mm)22.84 (580)22.17 (563)(172 To 192)(182 To 202)(210 To 230)(162 To 182)(172 To 192)(204 To 224)(687 To 707)(697 To 717)(705 To 725)(452 To 472)(533 To 553)(699 To 719)
eVilleEldorado"Z". 1.25 To 2.05. 1.61 To 2.41. 1.57 To 2.37"D". 0.7 To 1.5. 1.06 To 1.86. 0.74 To 1.54(32 to 52)(41 To 61)(40 To 60)(28 To 38)(27 To 47)(19 To 39)(1) - See Fig. 2. RIDE HEIGHT SPECIFICATIONS (1998 "F" BODY) ApplicationIn. (mm)1998 Camaro & Firebird (1)Dimension "A" . 16.5 (420)Dimension "B" . 14.4 (367)Dimension "J" . 7.6 To 8.4 (194 To 214)Dimension "K" . 8.0 To 8.8 (204 To 212)Dimension "D" . 4.2 To 5.0 (108 To 128)Dimension "Z"With 235-55 Tires . 0.8 To 1.6 (20 To 40)With 245-50 Tires . 1.1 To 1.9 (27 To 47)(1) - See Fig. 4. RIDE HEIGHT SPECIFICATIONS (1999 "F" BODY) ApplicationIn. (mm)1999 Camaro & Firebird (1)Dimension "1" (Side Rocker Panel) . 8.0 (203)Dimension "2" (Side Rocker Panel) . 8.2 (208)Dimension "3" (Front Fascia)Camaro . 17.0 To 17.8 (432 To 452)Firebird Except Trans Am With 235/55 Tires . 13.0 To 13.8 (330To 351)Trans Am With 235/55 Tires . 15.9 To 16.7 (404 To 424)Dimension "4" (Rear Fascia)Camaro . 14.0 To 14.8 (356 To 376)Firebird . 14.3 To 15.1 (363 To 384)(1) - See Fig. 5. RIDE HEIGHT SPECIFICATIONS ("H" BODY) ApplicationIn. nDimensionDimensionEighty Eight, LeSabre, LSS & Regency ( 1)"A" . 23.5 (597)"B" . 23.5 (597)"J" . 9.0 To 9.8 (229 To 249)"K" . 9.3 To 10.1 (236 To 256)"D" . 2.69 To 3.44 (68 To 88)"Z" . 1.94 To 2.75 (50 To 70)(1) - See Figs. 6 and 7.
RIDE HEIGHT SPECIFICATIONS ("J" BODY) ApplicationIn. (mm)1998 Cavalier & Sunfire (1)Dimension "A"Cavalier . 31.5 (800)Sunfire . 32.16 (817)Dimension "B" . 22.05 (560)Dimension "J" . 8.77 To 957 (223 To 243)Dimension "K" . 9.05 To 9.85 (230 To 250)Dimension "Z"With 14" Tires . -0.07 To 0.87 (2 To 22)With 15" Tires . -0.15 To 0.65 (-4 To 16)With 16" Tires . -0.24 To 0.56 (-6 To 14)1999 Cavalier & SunfireDimensions "A" & "B" . ( 2)Dimension "J" . 8.77 To 9.57 (223 To 243)Dimension "K"Except Convertible . 9.04 To 9.84 (230 To 250)Convertible . 9.24 To 10.04 (235 To 255)Dimension "Z"With 14" Tires . -0.24 To 0.56 (-6 To 14)With 15" TiresCavalier 2.2L 4-Door (3) . -0.4 To 0.4 (-10 To 10)Cavalier 2.4L 2-Door (4),Sunfire 2.2L 4-Door (3)& 2.4L 2-Door (4) . -0.32 To 0.48 (-8 To 18)Cavalier 2.4L 4-Door (5),Sunfire 2.4L 2 & 4-Door (5) . -0.35 To 0.45 (-9 To 11)Convertible 2.2L (5) . -0.2 To 0.6 (-5 To 15)Convertible 2.4L (5) . -0.12 To 0.68 (-3 To 17)(1)(2)(3)(4)(5)-See Fig. 3.Information is not available for 1999.With active suspension.With ride handling suspension.With soft ride suspension. RIDE HEIGHT SPECIFICATIONS (METRO) (1) ension"A""B""J""K""Z"In. (mm). 17.75 (450). 17.75 (450). 8.45 To 9.25 (215 To 235). 7.85 To 8.65 (200 To 220). 1.35 To 2.10 (35 To 5
WHEEL ALIGNMENT SPECIFICATIONS 1998 Pontiac Bonneville 1998-99 WHEEL ALIGNMENT Specificati