Transcription
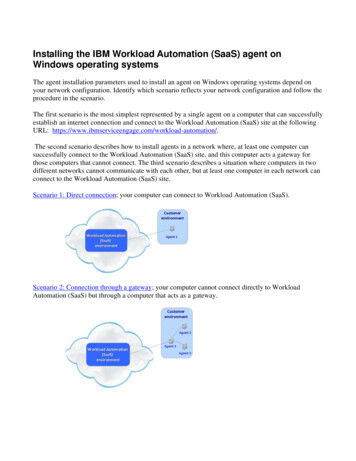
Installing the IBM Workload Automation (SaaS) agent onWindows operating systemsThe agent installation parameters used to install an agent on Windows operating systems depend onyour network configuration. Identify which scenario reflects your network configuration and follow theprocedure in the scenario.The first scenario is the most simplest represented by a single agent on a computer that can successfullyestablish an internet connection and connect to the Workload Automation (SaaS) site at the followingURL: on/.The second scenario describes how to install agents in a network where, at least one computer cansuccessfully connect to the Workload Automation (SaaS) site, and this computer acts a gateway forthose computers that cannot connect. The third scenario describes a situation where computers in twodifferent networks cannot communicate with each other, but at least one computer in each network canconnect to the Workload Automation (SaaS) site.Scenario 1: Direct connection; your computer can connect to Workload Automation (SaaS).Scenario 2: Connection through a gateway; your computer cannot connect directly to WorkloadAutomation (SaaS) but through a computer that acts as a gateway.
Scenario 3: Connection through multiple gateways; you have a network with different zones and atleast one computer in each zone can connect to Workload Automation (SaaS)Scenario 1: Direct connection; your computer can connect to WorkloadAutomation (SaaS)This scenario describes your environment if the computers on which you are installing the agents cancommunicate with the internet and connect to the Workload Automation (SaaS) omation/.The following image depicts your environment:To install the agent, complete the following steps:1. Verify the supported operating systems and prerequisites in Supported operating systems.2. Before you start the installation, ensure your computer meets the following requirements: Windows 32-bit: temporary disk space 360 MB, installation directory space 538 M Windows 64-bit: temporary disk space 360 MB, installation directory space 658 M3. If you did not already download the agent installation files, go to the Downloads section on theYour subscription page. The email you received when you requested your trial directs you tothis page.4. Go to the directory where you downloaded the agent installation files, in our example,\SaaSAgent.
5. Extract the agent installation files to this directory: On Windows 32-bit, extract the SCWA-SaaS WINDOWS.zip On Windows 64-bit, extract the SCWA-SaaS WINDOWS X86 64.zipWhen the extraction completes, the following directory structure is created on your computer: On Windows 32-bit, SCWA-SaaS WINDOWS\SCWA-SaaS On Windows 64-bit, SCWA-SaaS WINDOWS X86 64\ SCWA-SaaSDirectory structure:6. An install.bat file is provided to facilitate the agent installation. You can use this file to installthe agent using the agent default parameter settings. To install the agent on one or morecomputers, double-click install.bat.7. A command prompt opens, type y to continue with the installation as shown on the screen:If you receive the message “Do you want to allow the following program to make changes tothis script?” click Yes.
The installation begins and displays the following information:The installation creates the Windows user Saasuser and generates its password, as shown on the panel.This is an automatically generated password that changes for each installation.Note: Because this password is not written to a log file, you must take note of it. Yourequire this password for subsequent tasks such as uninstalling the agent.During the installation, if you receive the following security warning, click Run to continue:The name of the agent displayed in Workload Automation (SaaS) is this computer host name prefixedwith the Environment ID you receive by email.Using the install.bat the agent is installed with the Windows user Saasuser in the%ProgramFiles%\IBM\TWA Saasuser directory by using the 31114 port. To launch the
installation using values different from the default settings, follow the instructions in Command syntaxand parameters.For example if the 31114 port is already in use you receive the following message:AWSFAB374E JM port is already used in some other instance. Please specify some other port valueIn this case, to install your agent, you must specify an alternative port number in the range 1-65535using the command for Agent 1 as shown in Table 1 under the Scenario 2 section.After a successful installation proceed with the installation of another agent if necessary. If theinstallation did not complete successfully, analyze the errors displayed on the screen, correct them asdescribed in the operator response section of the message, and rerun the installation.Scenario 2: Connection though a gateway; your computer cannot connectdirectly to Workload Automation (SaaS) pages but through a computerthat acts as a gateway.This scenario describes your environment if the computer where you are installing the agent cannotconnect to the Workload Automation (SaaS) site, but a computer in your network can connect toWorkload Automation (SaaS). This computer acts as a gateway in your network zone.The following image depicts your environment:To configure your network first install the Workload Automation (SaaS) agent on the computer thatcan connect to the Workload Automation (SaaS) site following the instructions in Scenario 1: Directconnection; first agent install, your computer can connect to Workload Automation (SaaS). In thefigure, this corresponds to Agent 1.On the computer that cannot connect to the Workload Automation (SaaS) site, in the figure above thiscorresponds to Agent 2 and Agent 3, install the Workload Automation (SaaS) agent as follows:1. Verify the supported operating systems and prerequisites in Supported operating systems.2. Before you start the installation, ensure your computer meets the following requirements: Windows 32-bit: temporary disk space 360 MB, installation directory space 538 M Windows 64-bit: temporary disk space 360 MB, installation directory space 658 M
3. If you did not already download the agent installation files, go to the Downloads section on theYour subscription page. The email you received when you requested your trial directs you tothis page.4. Go to the directory where you downloaded the agent installation files, in our example,\SaaSAgent.5. In this directory, extract the agent installation files file: On Windows 32-bit, extract the SCWA-SaaS WINDOWS.zip On Windows 64-bit, extract the SCWA-SaaS WINDOWS X86 64.zip6. When the extract completes, the following directory structure is created on your computer: On Windows 32-bit, SCWA-SaaS WINDOWS\SCWA-SaaS On Windows 64-bit, SCWA-SaaS WINDOWS X86 64\ SCWA-SaaSDirectory structure:7. The installation steps require that your login account has Administrator rights. To verify thatyour login account has Administrator rights, see Check your Windows User Account Control(UAC) settings.
8. Open a command prompt with the Administrator login account, by right-clicking theCommand Prompt icon and selecting Run as Administrator. The following figure is anexample of what is displayed on Windows 7 operating systems:9. In the command prompt, move to the directory where you extracted the agent installation files:In our example, for Windows 64-bit, run:cd C:\ SaaSAgent \ SCWA-SaaS WINDOWS X86 64\ SCWA-SaaS10. Install the agents by using the following command:cscript installAgent.vbs -new -uname user name -password user password acceptlicense yes -gateway remote -gwhostname host name of Agent1 Where:-uname user name is the name of the user for which the agent is installed. Choose avalid user account ID for your operating system. The installation creates the user on yourcomputer, if it does not exist. The agent you install runs with this account ID.-password user password is the password of the user for which you are installing theagent. Follow your company rules for the password characters and length.-gateway remote specify this parameter if the workstation on which you are installingthe agent can communicate with the Workload Automation (SaaS) site through agateway installed on a different agent from the agent you are installing here.
-gwhostname host name of Agent1 specify in this parameter the fully qualifiedhost name or IP address of the remote gateway you want to use, in our example Agent 1.By default the agent is installed in the %ProgramFiles%\IBM\TWA user name directory byusing the 31114 port. user name is the name of the user that you specify in the -unameuser name option. If you specify an installation directory that contains blanks, enclose it withindouble quotation marks. To launch the installation by using values different from the defaults,follow the instructions in Command syntax and parameters.For example if the 31114 port is already in use you receive the following message:AWSFAB374E JM port is already used in some other instance. Please specify some other portvalueIn this case to install your agent you must specify an alternative port number in the range 165535 using the -jmport port number option as shown in the command described in thefollowing table:Table 2. Agent installation command for computers in the same network zone specifying a portdifferent from the defaultAgentInstallation syntaxAgent 1cscript installAgent.vbs -new -uname user name -password user password -jmport port number -acceptlicense yesAgent 2 or Agent 3cscript installAgent.vbs -new -uname user name -password user password -gateway remote -gwhostname host name of Agent1 -gwport jmport number Agent1 -jmport port number -acceptlicense yes
If you receive the following security warning, click Run to continue:The name of the agent used in the Workload Automation (SaaS) user interfaces is this computer hostname prefixed with the Environment ID you received by email. To change all these default values, seeCommand syntax and parameters.After a successful installation proceed with the installation of another agent if necessary.If the installation did not complete successfully, analyze the errors displayed on the screen, correctthem as described in the message operator response section, and rerun the installation.Scenario 3: Connection through multiple gateways; you have a networkwith different zones and in each zone at least one computer can connectto the Workload Automation (SaaS) siteThis scenario describes your environment if you have a network with different zones and in each zoneat least one computer can connect to the Workload Automation (SaaS) site. A zone identifies a part ofyour network in which all the computers can communicate with each other.
The following image depicts your environment:In this scenario, to configure your network, first install the Workload Automation (SaaS) agent oncomputers that can connect the Workload Automation (SaaS) site. In the figure above this correspondsto Agent 4. Then install the Workload Automation (SaaS) agent on computers that cannot connect tothe site. In the figure, this corresponds to Agent 5 and Agent 6.To install the agent both on computers that can connect to the Workload Automation (SaaS) and onthose that cannot connect to the site, complete the following steps:1. Verify the supported operating systems and prerequisites in Supported operating systems.2. Before you start the installation, ensure your computer meets the following requirements: Windows 32-bit: temporary disk space 360 MB, installation directory space 538 M Windows 64-bit: temporary disk space 360 MB, installation directory space 658 M3. If you did not already download the agent installation files, go to the Downloads section on theYour subscription page. The email you received when you requested your trial directs you tothis page.4. Go to the directory where you downloaded the agent installation files, in our example,\SaaSAgent.5. In this directory, extract the agent installation files file: On Windows 32-bit, extract the SCWA-SaaS WINDOWS.zip On Windows 64-bit, extract the SCWA-SaaS WINDOWS X86 64.zip6. When the extract completes, the following directory structure is created on your computer: On Windows 32-bit, SCWA-SaaS WINDOWS\SCWA-SaaS On Windows 64-bit, SCWA-SaaS WINDOWS X86 64\ SCWA-SaaS
Directory structure:7. The installation steps require that your login account has Administrator rights. To verify thatyour login account has Administrator rights, see Check your Windows User Account Control(UAC) settings.8. Open a command prompt with the Administrator login account, by right-clicking theCommand Prompt icon and selecting Run as Administrator:9. In the command prompt, move to the directory where you extracted the agent installation files:
In our example, for Windows 64-bit, run:cd C:\ SaaSAgent \SCWA-SaaS WINDOWS X86 64\SCWA-SaaSTable 3. Agent installation command for computers in different network zonesAgentAgent 4Agent 5 or 6Installation syntaxcscript installAgent.vbs -new -uname user name -password user password –gateway local –gwid gateway site label -acceptlicense yescscript installAgent.vbs -new -uname user name -password user password -gateway remote -gwhostname host name of the Agent4 -gwport jmport number Agent4l -acceptlicense yesWhere:-uname user name Specify the name of the user for which the agent is installed. Choose a valid user account ID foryour operating system. The installation creates the user on your computer, if it does not exist.The agent you install runs with this account ID.-password user password Specify the password of the user for which you are installing the agent. Follow your companyrules for the password characters and length.-gateway localSpecifying this parameter you install the agent on a computer that can connect directly with theWorkload Automation (SaaS) site and that routes communications for other computers thatcannot communicate directly with the Workload Automation (SaaS) site. This is the default.-gwid gateway site label Specify a name that identifies your gateway site. This parameter is required when you havemore than one zone. The default is GW1. The name must start with an alphabetic character oran underscore character ( ), and it can contain only the following types of characters:alphabetic, numeric, underscores ( ), hyphens (-), and periods (.) Gateways that have the samegateway site label can mutually take over routing communications to the agents connected tothem. All the gateways belonging to the same zone must have the same gateway site label andmust communicate with each other. In our example, when you install Agent 4, you must ensurethat you specify a gateway site label different from the one for Agent 1 so, for example, -gwidRome. If the –gwid option was not specified at the time of installation on Agent 1, then itsgateway site label assumes the default value, GW1.-gateway remote -gwhostname host name -gwport jmport number Agent4-gateway remote specify this parameter if the workstation on which you are installing the agentcan communicate with the Workload Automation (SaaS) site through a gateway installed on adifferent agent from the agent you are installing here.-gwhostname host name of Agent4 specify in this parameter the fully qualified hostname or IP address of the remote gateway you want to use, in our example the host name forAgent 4.-gwport jmport number Agent4 Specify the remote gateway port number.
By default the agents are installed in the %ProgramFiles%\IBM\TWA user name directory byusing the 31114 port. user name is the name of the user that you specify in the -uname user nameoption. If you specify an installation directory that contains blanks, enclose it within double quotationmarks.If the 31114 port is already in use you receive the following message:AWSFAB374E JM port is already used in some other instance. Please specify some other portvalueIn this case to install Agent 4 you must specify an alternative port number in the range 1-65535 usingthe -jmport port number option, to install Agent 5 o 6 you must specify -gwport port number where port number is the same as the -jmport port number Agent4 . The installation commandis described in the following table:Table 4. Installation syntax for agents in different network zones specifying a port different from thedefaultAgentAgent 4Agent 5 o 6Installation syntaxcscript installAgent.vbs -new -uname user name -password user password -acceptlicense yes –gateway local –gwid gateway site label -jmport port number cscript installAgent.vbs -new -uname user name -password user password -acceptlicense yes -gateway remote –gwid gateway site label -gwhostname host name of Agent4 -gwport jmport number Agent4 If you receive a message like the following one, click Run to continue:
The name of the agent used in the Workload Automation (SaaS) user interfaces is this computer hostname prefixed with the Environment ID you receive by email. To change all these default values, seeCommand syntax and parameters.After a successful installation proceed with the installation of another agent if necessary.If the installation did not complete successfully, analyze the errors displayed on the screen, correctthem as described in the message operator response section, and rerun the installation.Command syntax and parametersCommand syntax and parameters you can specify to install the agent. The optional parameters areindicated within parentheses. If you do not specify a value for a parameter, the command uses itsdefault value.Command syntaxcscript installAgent.vbs -new -uname user name-password user password-acceptlicense yes[-displayname agent name][-hostname host name][-inst dir install directory][-jmport port number][-gateway local [-gwid gateway site label] -gateway remote -gwhostname host name -gwportport number]Parameters-uname user nameUser for which the product is installed. Do not confuse this name with the user performing theinstallation logged on as administrator, or with the user name you received with the "Your trialis now ready" email.-password user passwordUser for which the product is installed.-acceptlicense yes noSpecify whether or not to accept the License Agreement. If you specify no the installation exitswithout performing any action.-displayname agent nameThe name of the workstation on which you run your workload when using the user interfaces.The name cannot exceed 14 characters. If you use more than 14 characters the name istruncated. The default is this computer host name prefixed with the Environment ID you
received by email. If you customize it, the name of the workstation is set to the agent nameprefixed by the Environment ID.hostname host nameThe fully qualified host name on which the agent is contacted. The default is the host name ofthe computer on which you install the agent.-inst dir install directoryThe installation directory where the agent is installed. The default is%ProgramFiles%\IBM\TWA user name, where user name is the name of the user that youspecify in the -uname user name option. If you specify an installation directory that containsblanks, enclose it within double quotation marks.-jmport port numberThis is the port through which this agent is contacted. The default is 31114. The valid range isfrom 1 to 65535.-gateway local -gwid gateway site labelSpecifying this parameter you install the agent on a computer that can connect directly with theWorkload Automation (SaaS) site and that routes communications for other computers thatcannot communicate directly with the Workload Automation (SaaS) site. This is the default.-gwid gateway site label Specify a name that identifies your gateway site. This parameter is required when you specify –gateway local. The default is GW1. T
directly to Workload Automation (SaaS) pages but through a computer that acts as a gateway. This scenario describes your environment if the computer where you are installing the agent cannot connect to the Workload Automation (SaaS) site, but a computer in your network ca