Transcription
PROJECT PLANCompactstorage shedThis project originally appeared in The Family Handyman magazine.For subscription information, visit www.familyhandyman.comPlease note that pages that appeared in the magazine as advertisements will not be included with this pdf. Page numbering may beinterrupted if an advertisement ran within the original story. Addresses, phone numbers, prices, part numbers and other information mayhave changed since original publicationCopyright 2005 Home Service Publications, Inc. All rights reserved. Unauthorized reproduction, in any manner, is prohibited. The Family Handyman, Handy Hints and Great Goofs are registeredtrademarks of RD Publications, Inc. Ask Handyman, Handyman Garage, How a House Works, Re.Do, Re.Mod, TFH Reports, The Home Improvement Authority, Using Tools, Woodworks, Wordless Workshop, Workshop Tips, You Can Fix It, You Can Grow It are trademarks of RD Publications, Inc.
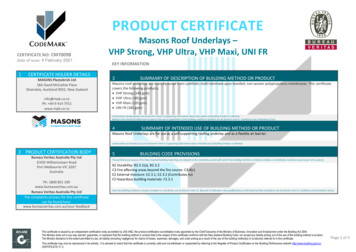
COMPACTstorageiSHEDSized forsmall spacesPack a lot of yard gear into thissmall shell, and do it with styleby Gary WentzEasy-accesstool lockerin back34JUNE 20 06 THE FAMILY HANDYMAN
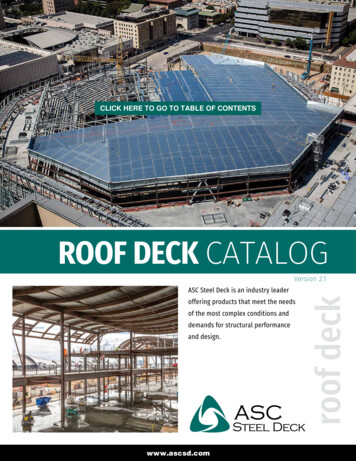
storage shediIffyou need a home for allyour garden tools andsupplies but have limited yard space, thissmall shed is a perfect storage solution.With its 6 x 6-ft. footprint and classicGeorgian styling, it fits into tight spotsand adds charm to any back yard. The“front room” (53 x 65 in.) provides plenty of space for shelves and even a smallpotting bench, while the double door onthe back of the shed creates a spaciouseasy-access tool locker. For easy care, wechose low-maintenance siding and trimmaterials that hold paint and resist rotbetter than wood.Tools, time and moneyWe engineered this shed for easy, modularconstruction; you can build the majorparts in your driveway and assemble themon site. While this isn’t a complex project,it does require basic building skills. We’llshow you how to assemble the frame, butwe won’t show you all the finish detailslike how to hang doors or shingle theroof.You’ll need a drill, a circular saw, amiter saw and a router. Although notabsolutely essential, a table saw will makethe project go much easier and faster. Wealso recommend a compressor and an airpowered brad nailer for faster, better triminstallation. Plan to spend two weekendsbuilding the shed and another day or twopainting. The total materials bill for ourshed was about 1,300. If you opt for ablank wall on the back of the shed ratherthan a double door and a tool locker,you’ll save about 200.Preconstruction planningCall your city building department to findout whether you need a permit to buildthis 36-sq.-ft. shed. Also ask about anyrestrictions on where you can place theshed. If you plan to build near the edge ofyour lot, for example, you may have tohire a surveyor to locate your propertylines. You can build this shed on a site thatslopes as much as 6 in. over 6 ft. But ifyour site is steeper, consider building alow retaining wall to create a level site. Tofind some of the shed /4" PLYWOODFLOOR1Frame the walls and floor following Figures A and B. Cover the floor with 3/4-in.plywood, the walls with cement panels and the divider wall with pegboard.MAINTRUSSSPACERHALFTRUSSGUSSET2Cut the truss parts and assemble them with 1/2-in. plywood gussets and1-1/4-in. screws. Screw 1/2-in. spacers to the bottom chord on the main truss.cially the fiber cement panels and composite trim boards—you’ll probably haveto call local lumberyards or special-orderthrough a home center. Special orders cantake six weeks to arrive, so choose yourmaterials long before you plan to build.Frame the whole shedon your drivewayFraming the floor and walls is the fastestpart of this project. Before you get started,select your prehung front door so youknow the dimensions of the rough open36JUNE 20 06 THE FAMILY HANDYMANing needed in the front wall. We chose a36-in. door that required a 38 x 82-1/2-in.rough opening. Your door may requireslightly different dimensions. The bigopening at the back of the shed will easilyaccept two 30-in.-wide prehung doors.Frame the 6 x 6-ft. floor from pressuretreated 2x6s as shown in Figure A .Whenever you fasten treated lumber, besure to use nails or screws that are rated towithstand the corrosive chemicals in thelumber (check the fastener packaging).Use pressure-treated 2x4s for the bottomplates of the walls. Cut the plates to the
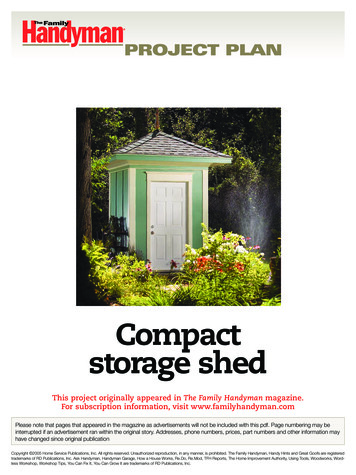
2x4 RUNG2x4 RUNG1-1/2" x 1-1/2" ANGLE BRACKET1-1/2" x 1-1/2" ANGLE BRACKET2x4 SOFFIT BACKER2x4 SOFFIT BACKERFigure AShed1/2" PLYWOOD ROOF SHEATHING1/2" PLYWOOD ROOF SHEATHINGASPHALT SHINGLESASPHALT SHINGLES1/2" PLYWOOD GUSSET1/2" PLYWOOD GUSSET2x4 SOFFIT BACKER2x4 SOFFIT BACKER1/2" MDO PLYWOOD SOFFIT1/2" MDO PLYWOOD SOFFIT3/4" COVE3/4" COVE30" PREHUNG DOOR30" PREHUNG DOOR1x6 FASCIA2x4 SPOKE 1x6 FASCIA2x4 SPOKE2" FASCIA RAIL2" FASCIA RAIL2x4 TIEPLATE2x4TIEPLATE5-1/4" CROWN MOLDING5-1/4" CROWN MOLDING2x4 “L” HEADER2x4 “L” HEADER4" BAND4" BANDASTRAGALASTRAGALHEAD CASINGHEAD CASING2x4 TOPPLATE2x4TOPPLATE2x4 STUD2x4 STUD1/4" PEGBOARD1/4" PEGBOARD2" BATTEN2" BATTEN4-7/8" CORNER BOARD4-7/8" CORNER BOARDFIBER CEMENT PANELFIBER CEMENT PANEL2x4 TREATED BOTTOM PLATE2x4 TREATED BOTTOM PLATE3/4" TREATED PLYWOOD FLOOR3/4" TREATED PLYWOOD FLOOR2x6 TREATED SLEEPERS2x6 TREATED SLEEPERSFigure BFloor planand wall layout3-1/2" x 8'2x6 TREATED JOIST2x6 TREATED JOIST6'3-1/2" x 8'6'3" x 83" PLYWOODTRIMMER11-3/4"3" x 83" "2' x 8'2' x 8'65"65"ALL STUDS 94" LONGALL STUDS 94" LONG38"38"4-1/2"4-1/2" 7"7"7"6'7"6'24"24"53"53"4' x 8'4' x 8'Figure CMain truss13-1/2"13-1/2"24"24"7"7"5 1/2"5 1/2"12"12"10"10"78-1/4"78-1/4"20 MITER20 MITERBOTTOM CHORD 12' 3"3-1/2" x 6" SPACERBOTTOM CHORD 12' 3"3-1/2" x 6" SPACERFigure DHalf truss4-1/2"4-1/2"3-1/2" SIDE CASING3-1/2" SIDE CASING36" PREHUNG DOOR36" PREHUNG DOOR1x6 CORNER BOARD1x6 CORNER BOARD3"3"7"7"20 MITERS20 MITERS76-7/8"76-7/8"22-1/4"22-1/4"BOTTOM CHORD 72-1/4"BOTTOM CHORD 72-1/4"16-1/2" x 8'16-1/2" x 8'THE FAMILY HANDYMAN JUNE 20 06373" MIN.3" MIN.12"12"3-1/4"3-1/4"12"12" PLYWOOD GUSSETSALL 1/2" THICK.
storage sheddimensions shown in Figure B. Then cut20 wall studs to 94 in. and assemble thefour walls. Also frame the small headerwall (14 in. x 65 in.) that fits above theback doors.Before you sheathe the floor and wallframes, take corner-to-corner diagonalmeasurements to make sure each frame issquare. Fasten 3/4-in. treated plywood tothe floor frame with 1-5/8-in. screws. Alsoscrew pegboard to the interior pegboardwall. Nail cement panels to the front andsidewalls (Photo 1). Position the cementpanels flush with the bottom plate, not thetop plate (the wall frames are 1 in. tallerthan the cement panels). The two sidewalls have identical framing, but be sureto attach the sheathing so the right andleft sides mirror each other. The cementpanels on the front wall overhang theframing by 3 in.HUBGUSSETMAINTRUSSHALFTRUSSGUSSET3Screw half trusses to the main truss and tie them together with 9 x 21-in. hubgussets and 2-1/2-in. screws. Trim the main truss to form a pyramid.A complex roofmade simpleA typical pyramid roof requires lots ofcompound angle cuts and endless trips upa ladder to test-fit all the tricky parts. Notthis one. There are no compound anglesor complex calculations at all. Andground-level construction means fasterprogress with less strain.Build the main truss and two half trusses first (Photo 2). Choose the straightest2x4s you can find for these parts. FiguresC and D show the dimensions and angles.Your angle cuts don’t have to be perfect;the gussets will make the trusses plentystrong even if the parts don’t fit tightly.Join the three trusses with two hub gussets (Photo 3) made from plywood leftover from the floor. The “rungs” that fitbetween the trusses have 45-degree bevelcuts on both ends. You can tilt the shoe ofyour circular saw to cut bevels or use amiter saw. In order to create a square roofframe, all four lower rungs must be thesame length. Cut them to 103-1/8 in., setthem all in place to check the fit and thentrim them all by the same amount untilthey fit identically between the trusses.With the lower rungs in place, insert thespokes (Photo 4). One end of each spokehas a double bevel cut; make a 45-degreebevel from one side, then flip the 2x4 overand cut from the other side. This forms a32"32"UPPER RUNGLOWER RUNGSPOKE4Fasten the upper rungs between the trusses with 2-1/2-in. screws. Position theouter edge of the rungs flush with the tops of the trusses.FLOORPEAGRAVELSLEEPER5Dig two trenches 6 in. deep and fill them with pea gravel. Then level treated 2x6sleepers over the gravel and set the floor on the sleepers.38JUNE 20 06 THE FAMILY HANDYMAN
storage shed90-degree point that fits into the cornerwhere the main truss and half truss meet.To complete the roof frame, install theupper rungs (Photo 4).Assemble the shed on site6Anchor the walls to the floor with 3-in. screws. Start with a sidewall, then addthe front wall, followed by the pegboard wall and the other sidewall.PLYWOODTRIMMERTIEPLATEREARHEADERThe shed floor rests on a simple foundation: 2x6 pressure-treated “sleepers” laidon a bed of pea gravel. Dig two paralleltrenches about 10 in. wide, 6 in. deep andcentered 6 ft. apart. The trenches can runparallel to the sidewalls or the front andback walls of the shed. Fill the trencheswith pea gravel. Lay the 6-ft.-long sleeperson the gravel. Using a level, determinewhich sleeper is higher (Photo 5). Levelthe higher sleeper along its length byadding or removing small amounts ofgravel. Then add a little gravel under theother sleeper to make it level with the first.On a sloped site, one end of a sleeper maysit below grade while the other rests abovethe surrounding soil. You can also screwextra layers of 2x6 over the sleepers tocompensate for a sloped site. We addedtwo extra layers to both of our sleepers.That raised the shed and allowed us toslope the surrounding soil away from theshed. Set the floor on the sleepers so thatthe joists span the space between thesleepers. At each corner, drive a 3-in. screwat an angle through the floor frame intothe sleepers.7Set the rear header on 1/2-in. plywood trimmers and screw it into place frominside. Nail on overlapping tie plates to lock the walls together.8JUST DROPPEDIN FROMKRYPTONSOFFITBACKERS40JUNE 20 06 THE FAMILY HANDYMANScrew 16-ft.2x4s to theshed to form aramp. Position yourstepladders beforeyou slide the roofframe up the rampand onto the shed.Center the roofframe and fastenthe trusses at eachcorner with a pairof angle brackets.Install 2x4s toprovide nailingbackers for thesoffit.
storage shedStand the wallsand set the roofYou’ll need a helper to carry and stand upthe walls. Set one of the sidewalls in placeSUPPORTBLOCKand screw it to the floor every 2 ft.Position the bottom plate (not the cementsheathing) flush with the outer edge ofthe floor. Use a level to make sure the rearend of the wall is plumb and brace it witha 2x4 (Photo 6). Position the front walland screw it to the floor. Then driveSheathe the roof with 1/2-in. plywood. Cut each piece 3 in. extra long, nail it in1-5/8-in. screws through the overhangingplace and cut off the excess. Temporary support blocks help position the plyfront sheathing to tie the front and sidewood as you nail it.walls together. Add the pegboard wallnext, followed by the other sidewall and2"-WIDE FASCIA RAILfinally the rear header wall. Make sure all Figure EMETAL DRIP EDGEthe walls are plumb, and nail tie plates Fascia and crown detailsover the walls (Photo 7).1/2" CDX PLYWOODTIE PLATESOFFIT BACKERTo safely set the 160-lb. roof frame intoplace, you’ll need two helpers, twostepladders and a ramp made from a pairof 16-ft.-long 2x4s. Secure each 2x4 withthree 3-in. screws and brace them near the2-1/2"15"-WIDE MDO SOFFITmiddle with a horizontal 2x4. Then sim3/4"COVEMOLDINGply slide the roof frame up the ramp andTOP PLATE5-1/4"-WIDE CROWN MOLDINGonto the shed (Photo 8). Center the roof5-1/2"-WIDE FASCIAframe so that all four lower rungs are the4"-WIDE BAND3/8" COVE94" STUDsame distance (16-1/2 in.) from and par1/4" ROUND-OVERSallel to the walls. Fasten the roof frame1"-WIDE ASTRAGALwith metal angle brackets and install sof-9Low-maintenance cement panels“Fiber cement” siding is basicallycement reinforced with cellulosefibers. We chose it because it’sdurable, affordable and rot-proof,but especially because it holds paintlonger than most other exteriormaterials. Exactly how much longerdepends on a variety of factors, butbuilders have told us of cases wherepaint on fiber cement lasted twiceas long as paint on nearby wood.Fiber cement is most common ina plank form that’s used for lap siding. But it’s also available in 4 x 8-ft.sheets (3/16 in. thick) with texturedor smooth surfaces (we used thesmooth). Some home centers andlumberyards stock the sheet material; others have to special-order it(about 30 per sheet).Working with fiber cement is alot like using other sheet materials.Pick up a brochure where you buythe panels or go to the manufacturer’s Web site for specific instructions. You have to leave 1/8-in.spaces between sheets, for example. When nailing, place nails atleast 3/8 in. from edges and 2 in.from corners. Although pros usespecial blades to cut fiber cement,you can cut it with a standard carbide circular saw blade. Cuttingwhips up a thick cloud of nastydust, so a dust mask is mandatory.Two suppliers of fiber cementsiding are www.james-hardie.comand www.certainteed.com.42JUNE 20 06 THE FAMILY HANDYMAN
storage shedFigure FCorner boardsfit backers (Photo 8) before you sheathethe roof with 1/2-in. plywood (Photo 9).3/8" ROUND-OVERS3/8" ROUND-OVERSElegant trimfrom plain "10Nail and glue the corner boards in place. Install thenarrower side first, making sure it’s flush with thecorner. Then add the full-width piece.Figure G Door trim2-3/8" x 46"2-3/8" x 46"3/8" COVE3/8" COVE3/8"ROUND-OVER1-3/4" x 44-3/4"3/8" ROUND-OVER1-3/4" x 44-3/4"3/8" COVE3/8" COVE1-1/4" x 43-3/4"1/4" ROUND-OVER1-1/4" x 43-3/4"1/4"x ROUND-OVERFRIEZE 5-1/2"42-1/2"FRIEZE 5-1/2" x 42-1/2"1/4" DOORJAMB REVEAL1/4" DOORJAMB REVEAL3/8" ROUND-OVER3/8" ROUND-OVERSIDE CASINGSIDE3-1/2"CASINGx 81"3-1/2" x 81"1" x 43-3/4"1" x 43-3/4"(The lengths of your trimcomponents may differ)FRIEZE5-1/4" CROWNDoors and casing11Nail and glue the moldings tothe frieze board one at a time.Then fasten the head casing above thedoor with construction adhesive andbrad nails.44Most of the trim on our shed is madefrom a “composite” material that standsup to Mother Nature better than wood(see Editor’s Note, p. 46). We used pinewood moldings only where they’re sheltered from sun and rain. The compositeboards we used are 5/8 in. thick and comein the same widths as standard woodboards. In a few cases we used theseboards “as is.” But we dressed up most ofthe trim parts with a router. The routerwork adds only a couple of hours to theproject and creates a much more elegantlook. You’ll need three router bits to shapethe trim boards: a 1/4-in. round-over, a3/8-in. round-over and a 3/8-in. cove bit.Figures E and F provide the specifics.Here are some other details: Install the fascia and fascia rails first(Figure E). Then shingle the roof. Weused asphalt shingles. Be sure to installmetal drip edge over the fascia. Composite trim must be butted at corners, not mitered, since miter jointsoften open over time. For soffit material, we used 1/2-in.MDO (medium density overlay), whichis plywood with a tough resin coating.MDO is available at some home centersand lumberyards ( 45 per 4 x 8-ft.sheet). You could also use plywood orfiber cement soffit board. For the crown molding under the soffits, we used a large (5-1/4-in.) coveprofile (Figure E). To get molding thatwide, you may have to visit a lumberyard or special-order from a homecenter. Corner boards hide nail heads and theedges of the cement panels (Photo 10).To hide the cement panel joints andother nails, nail and glue two 2-in.-widebattens over the studs on each sidewall.JUNE 20 06 THE FAMILY HANDYMANWe chose a classic six-panel door for thefront of our shed and trimmed it withelaborate casing. To make the side casings,just rip your trim material to 3-1/2 in.
storage shedEditor’s Note: Hooked on composite trimOne day a few years ago, my locallumberyard did me a huge favor: Itran out of the redwood boards I hadalways used for trim. The only alternative was a “composite” madefrom “wood fiber and resin.” Sawdust mixed with glue sounded like arecipe for problems, but I gave it atry and haven’t used wood trimboards since.Composite trim looks better afterit’s installed and keeps its goodlooks longer than wood. Everyboard is straight and free of imperfections like knots or splits. It doesn’t chip or splinter when you cut orrout it. It holds paint longer thanwood and resists rot better thanwide and rout both edges with a roundover bit. Install the side casings so theyproject 1/4 in. above the doorjamb opening. Your side casings may be slightlylonger or shorter than the length listed inFigure G.Photo 11 shows how to assemble thehead casing that fits over the side casings.The five parts that make up the head casing may also be longer or shorter than thelengths listed in Figure G. To determinethe correct lengths, measure across theside casings from the outer edge on oneto the outer edge of the other. For ours,that measurement was 42-1/2 in. If yourmeasurement is more or less, just add orsubtract from the length measurementsgiven in Figure G.For the tool locker on the back of theshed, we bought two simple prehung30-in. steel doors: a left-hand swing and aright (about 100 each). We pulled thefactory-installed trim off the doors andscrewed the jambs together to form adouble door. To stiffen the assembly, wescrewed a 4-in.-wide strip of 1/2-in. plywood across the top of the jambs. Thenwe installed our double door backward,so it swings out rather than inward (seep. 35).The corner boards on the back side ofthe shed act as the door casing, so youmost “rot-resistant” woods. As abonus, compositecosts less than goodquality wood boards (about 13 for a 16-ft. 1x6).Composites aren’t perfect; they’reheavy and floppy, so they’re moredifficult to install solo. Cutting orrouting churns up a thick, powderydust cloud, so I always wear a dustmask and do my cutting outdoors.The material is harder than woodand difficult to nail by hand.Manufacturers recommend using aframing nailer or predrilling andhand nailing. Predrilling is slow andframing nails leave big, ugly nailcan’t install them until the doors are inplace. Don’t round over the edges of theseback corner boards. To complete the backdoor casing, install a composite 1x6 abovethe doors.Primer and caulkfor a lasting paint jobPrime the wood and fiber cement withhigh-quality acrylic primer. The composite trim is factory-primed, but you’ll haveto prime any exposed cut ends and all therouted profiles. Be sure to prime the bottom ends of the corner boards and battensso they don’t absorb moisture. The primerwill raise wood fibers in the exposed composite, leaving a rough surface. Removethese “whiskers” by lightly sanding with100-grit sandpaper.Careful, thorough caulking is essentialfor a lasting paint job because it preventsmoisture from penetrating the cementpanels and trim. Fill all the nail holes andseal any gaps between and along the trimparts with acrylic caulk. Also caulk thetwo short cement panel joints above thedoor. After the caulk cures, apply twocoats of high-quality acrylic paint.Art Direction MARCIA WRIGHT ROEPKEPhotography BILL ZUEHLKETechnical Art FRANK ROHRBACH III46JUNE 20 06 THE FAMILY HANDYMANheads tocover up. So Iuse a brad naileralong with plenty ofexterior-grade construction adhesive. Bradsalone don’t have enoughholding power, but they hold thetrim in place until the adhesive sets.Composite trim is available atlumberyards and some home centers. The composite we chose forthis shed is PrimeTrim(www.gp.com/build). Another widely available product is MiraTec(www.cmicompany.com).Materials ListITEM2x6 x 12' treated2x4 x 8' (2 treated, 28 untreated)QTY.4302x4 x 10'62x4 x 12'42x4 x 14'12x4 x 16'23/4" treated plywood21/2" CDX plywood5MDO plywood21x6 x 16' composite trim144 x 8' fiber cement panels510' metal drip edge430" doors236" door1Doorknobs31 square of shingles30' of ridge shinglesConstruction adhesive4 tubesAcrylic caulk2 tubesL-brackets83" exterior screws1 lb.2-1/2" exterior screws1 lb.1-5/8" exterior screws1 lb.1-1/4" exterior screws1 lb.8d galvanized nails5 lbs.16d galvanized nails5 lbs.1" roofing nails5 lbs.1-1/4" brads1-3/4" bradsPea gravel (50-lb. bags)10The 22-in.-tall copper roof finial is availableat www.weathervanesofmaine.com, (207) 5480050. Item No. 702, 125 plus shipping.
36 JUNE 2006 THE FAMILY HANDYMAN 2 Cut the truss parts and assemble them with 1/2-in. plywood gussets and 1-1/4-in. screws. Screw 1/2-in. spacers to the bottom chord on the main truss. 1 Frame the walls and floor following Figures A and B. Cover the floor with 3/4-in. plywood, the walls