Transcription
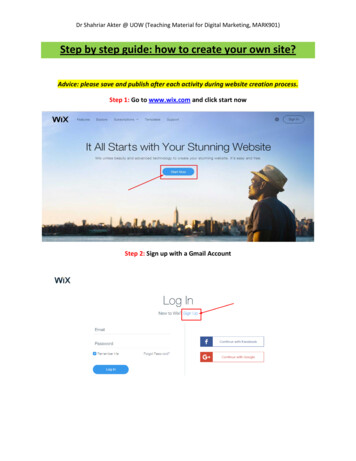
Dr Shahriar Akter @ UOW (Teaching Material for Digital Marketing, MARK901)Step by step guide: how to create your own site?Advice: please save and publish after each activity during website creation process.Step 1: Go to www.wix.com and click start nowStep 2: Sign up with a Gmail Account
Dr Shahriar Akter @ UOW (Teaching Material for Digital Marketing, MARK901)Step 3: Your email ID would be used as the domain name of the site. Please use an IDMARK901UOW rainbow/oceanblue/cuckaboora/etc.Step 4: Blog is selected in the following step because it is mainly for outlining yourexperiences at UOW. Other types can also be selected based on the nature of the business.
Dr Shahriar Akter @ UOW (Teaching Material for Digital Marketing, MARK901)Step 5: Option 1: Website is created automatically based on few questions answered basedon your needs. Option 2: You can select a template manually and drag/drop all contents.Step 6: Two options: You can go for either a free one or a paid one. Let’s click the free one.
Dr Shahriar Akter @ UOW (Teaching Material for Digital Marketing, MARK901)Step 7: Click, add text, drag and dropStep 8: Manage posts: You can change the photo and text. Add new post: you can delete theexisting content and create new contents.
Dr Shahriar Akter @ UOW (Teaching Material for Digital Marketing, MARK901)Step 9: After clicking “manage post”, you will get this page in which you can edit existing postor create new post.Step 10: After clicking “Edit Post”, we can do all the editing of the text and photos here. Youcan also create a hyperlink.
Dr Shahriar Akter @ UOW (Teaching Material for Digital Marketing, MARK901)Step 11: how to add an image to a post is shown in the following slide. Click add an image fromyour PC and update post.Step 12: Web customization is finished in the last step. Now you will have to take steps to increasevisibility of the website in the Google Search Results. Go to Site and click on “Get found on Google”.
Dr Shahriar Akter @ UOW (Teaching Material for Digital Marketing, MARK901)Step 13: You will receive the SEO page and click on “Start now”.
Dr Shahriar Akter @ UOW (Teaching Material for Digital Marketing, MARK901)Step 14: The following step will ask you providing “key words” that will optimize your search ranking inthe Google search. Click on “Create SEO plan”.
Dr Shahriar Akter @ UOW (Teaching Material for Digital Marketing, MARK901)Step 15: Click on “Site Manager” and then “SEO”.
Dr Shahriar Akter @ UOW (Teaching Material for Digital Marketing, MARK901)Step 16: click on the SEO tab to create “Meta Tags” for Google/ Bing web master tool. In orderto create this, you will have to go to webmaster.google.com and sign in with a Google account.Click on “add a property”, insert your site name (e.g., my one ing.) and click Add.
Dr Shahriar Akter @ UOW (Teaching Material for Digital Marketing, MARK901)Step 17: Select alternate methods and click html tag optionStep 18: Copy this Meta tag.
Dr Shahriar Akter @ UOW (Teaching Material for Digital Marketing, MARK901)Step 19: Go to your Wix site. Click on site then site manager. Then click SEO and paste this meta tag inmeta box.Step 20: After pasting code in the above box, please click verify button
Dr Shahriar Akter @ UOW (Teaching Material for Digital Marketing, MARK901)Step 21: If this message doesn’t show up, then check your link in the above box one more time.Few important ow-to-create-website-step-by-step-guide/
Dr Shahriar Akter @ UOW (Teaching Material for Digital Marketing, MARK901) Step 11: how to add an image to a post is shown in the following slide.Click add an image from your PC and update post. Step 12: Web customization is finished in t