Transcription
Installation and Upgrade Guide forPrimavera Portfolio Management 9.1
Primavera Portfolio Management Installation and Upgrade GuideCopyright 1999-2014, Oracle and/or its affiliates.The Programs (which include both the software and documentation) contain proprietary information;they are provided under a license agreement containing restrictions on use and disclosure and arealso protected by copyright, patent, and other intellectual and industrial property laws. Reverseengineering, disassembly, or decompilation of the Programs, except to the extent required to obtaininteroperability with other independently created software or as specified by law, is prohibited.The information contained in this document is subject to change without notice. If you find anyproblems in the documentation, please report them to us in writing. This document is not warrantedto be error-free. Except as may be expressly permitted in your license agreement for thesePrograms, no part of these Programs may be reproduced or transmitted in any form or by anymeans, electronic or mechanical, for any purpose.If the Programs are delivered to the United States Government or anyone licensing or using thePrograms on behalf of the United States Government, the following notice is applicable:U.S. GOVERNMENT RIGHTS Programs, software, databases, and related documentation andtechnical data delivered to U.S. Government customers are "commercial computer software" or"commercial technical data" pursuant to the applicable Federal Acquisition Regulation and agencyspecific supplemental regulations. As such, use, duplication, disclosure, modification, and adaptationof the Programs, including documentation and technical data, shall be subject to the licensingrestrictions set forth in the applicable Oracle license agreement, and, to the extent applicable, theadditional rights set forth in FAR 52.227-19, Commercial Computer Software--Restricted Rights(June 1987). Oracle USA, Inc., 500 Oracle Parkway, Redwood City, CA 94065.The Programs are not intended for use in any nuclear, aviation, mass transit, medical, or otherinherently dangerous applications. It shall be the licensee's responsibility to take all appropriate failsafe, backup, redundancy and other measures to ensure the safe use of such applications if thePrograms are used for such purposes, and we disclaim liability for any damages caused by such useof the Programs.Oracle is a registered trademark of Oracle Corporation and/or its affiliates. Other names may betrademarks of their respective owners.The Programs may provide links to Web sites and access to content, products, and services fromthird parties. Oracle is not responsible for the availability of, or any content provided on, third-partyWeb sites. You bear all risks associated with the use of such content. If you choose to purchase anyproducts or services from a third party, the relationship is directly between you and the third party.Oracle is not responsible for: (a) the quality of third-party products or services; or (b) fulfilling any ofthe terms of the agreement with the third party, including delivery of products or services andwarranty obligations related to purchased products or services. Oracle is not responsible for any lossor damage of any sort that you may incur from dealing with any third party.2
Primavera Portfolio Management Installation and Upgrade GuideTypes of installationThis document describes the installation of Primavera Portfolio Management . There are two typesof installations, each with their own installation steps: New InstallationA New Installation is an installation in which you are installing Primavera PortfolioManagement on a server which does not and did not have any version of Primavera Portfolio Management (formerly Primavera ProSight ) installed on it.For this type of installation, follow these steps: 1.Verify the prerequisites. See below.2.Login to your server with administrative privileges.3.Install Primavera Portfolio Management . Refer to the instructions in Chapter 2.4.Configure a database. In this step you will either create a new Primavera PortfolioManagement database, or connect to an existing Primavera Portfolio Managementdatabase (from Primavera Portfolio Management (formerly Primavera ProSight )5.0 SP3 and later versions). Refer to the instructions in Chapter 3.5.Configure the SMTP Server Smart Host. Follow the instructions in Chapter 4.6.Verify the installation, as per the instructions in Chapter 5.Upgrade from Primavera Portfolio Management (formerly Primavera ProSight ) 5.0 andlaterAn Upgrade from Primavera Portfolio Management (formerly Primavera ProSight ) 5.0and later is an installation in which you are installing Primavera Portfolio Management 9.1over an existing installation of any version of Primavera Portfolio Management (formerlyPrimavera ProSight ) 5.0 and later (including for example installing a Primavera Portfolio Management 9.1 Service Pack).For this type of installation, follow these steps:1.Verify the prerequisites. See below.2.Login to your server with administrative privileges.3.Install Primavera Portfolio Management without uninstalling the older version ofPrimavera Portfolio Management (formerly Primavera ProSight ). Refer to theinstructions in Chapter 2.4.The database will be automatically upgraded during the install. The instructions inChapter 3 can therefore be skipped.5.Configure the SMTP Server Smart Host if necessary. Follow the instructions in Chapter4.6.Verify the installation, as per the instructions in Chapter 5.3
Primavera Portfolio Management Installation and Upgrade GuideNote on Application PoolsNote that the settings of the ProSightApplicationPool in IIS changed in Primavera PortfolioManagement (formerly Primavera ProSight ) 9.1 compared to earlier versions of Primavera Portfolio Management (formerly Primavera ProSight ). Any application pools that were created bycloning the ProSightApplicationPool should be deleted and created again by cloning the Primavera Portfolio Management 9.1 ProSightApplicationPool.4
Primavera Portfolio Management Installation and Upgrade GuideConfigurationsPrimavera Portfolio Management can be installed in varying configurations, depending on yourrequirements.As a minimum, every installation of Primavera Portfolio Management must consist of one and onlyone instance of the Primavera Portfolio Management Primary Back-End, one or more instances ofthe Primavera Portfolio Management Front-End, and one database server.Common configurations supported are: One machine, running the Primavera Portfolio Management Primary Back-End and thePrimavera Portfolio Management Front-End, as well as the database server. An environment comprised of two machines, one of which hosts the Primavera PortfolioManagement Primary Back-End and the Primavera Portfolio Management Front-End, the otherhosting the database server. An environment comprised of two machines, one of which hosts the Primavera PortfolioManagement Front-End, the other hosting the database server and the Primavera PortfolioManagement Primary Back-End. An environment comprised of three machines, one of which hosts the Primavera PortfolioManagement Front-End, another hosting the Primavera Portfolio Management Primary BackEnd, and the third machine hosting the database server. An environment comprised of more machines, one of which hosts the Primavera PortfolioManagement Primary Back-End, several machines hosting the Primavera PortfolioManagement Secondary Back-End, several machines hosting the Primavera PortfolioManagement Front-End and participating in a Network Load Balancing (NLB) cluster, and onemachine hosting the database server.For all configurations, make sure all servers are in compliance with the prerequisites as listed below.5
Primavera Portfolio Management Installation and Upgrade GuidePrerequisitesFor detailed prerequisite information including version numbers, please refer to the Primavera Portfolio Management Platform Requirements in the Readme document.A Primavera Portfolio Management server must be configured with:1. Microsoft Windows 2003 or 2008 Server. This server must be set up as an applicationserver. Use the “Configure Your Server Wizard” in Administrative Tools to accomplish this.2. All Critical Updates for Windows 2003 or 2008, delivered via Automatic Update or installedfrom the Microsoft Windows Update site.3. On Windows 2003: Microsoft Internet Information Services (IIS) 6.0, which is part ofWindows 2003. On Windows 2008: Microsoft Internet Information Services (IIS) 7.0, whichis part of Windows 2008. To use Primavera Portfolio Management Collaboration features,you will also need to install SMTP; on Windows 2003 this is the SMTP Service part of IIS,while on Windows 2008 this is referred to as the SMTP Server.4. Microsoft Transaction Server (MTS), which is part of Windows 2003 or 2008.5. Microsoft Distributed Transaction Coordinator (MSDTC), which is part of Windows 2003 or2008.6. Client access software for your database server of choice, as follows:a. If the database server resides on the same physical machine as the applicationserver:i. If the database server software is Microsoft SQL Server 2005 or 2008:The necessary software is installed when you installed the database server.No further action is needed.ii. If the database server is Oracle 10g Release 2 or Oracle 11 Release 2:The necessary client software (Oracle InstantClient) is installed by thePrimavera Portfolio Management installer. No further action is needed.b. If the database server resides on another physical machine:i. If the database server software is Microsoft SQL Server 2005 or 2008:Install Microsoft SQL Server 2005 or 2008 Client Access software on theapplication server.ii. If the database server is Oracle 10g Release 2 or Oracle 11 Release 2:The necessary client software (Oracle InstantClient) is installed by thePrimavera Portfolio Management installer. No further action is needed.7. The person running the Primavera Portfolio Management installer needs to have fulladministrative privileges on the server. On Windows 2008 this requires logging in using thelocal administrator account, or disabling User Account Control (UAC), or starting the installby right-clicking the install executable and selecting “Run as administrator”. Note that onWindows 2008, if the install was not performed using the local administrator account, the“Change” option in the Control Panel’s Software Explorer will not work; however, you will beable to change the list of installed features by running the original install from its sourcelocation by right-clicking the install executable and selecting “Run as administrator”.8. If Microsoft SharePoint Portal Server 2003 is to be installed on the application server, itsinstallation, including “Extending” any web sites, should be completed before installingPrimavera Portfolio Management. If SharePoint Portal Server 2003 is installed afterPrimavera Portfolio Management has already been installed, the instructions included in6
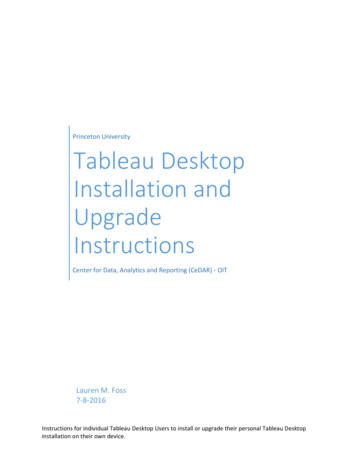
Primavera Portfolio Management Installation and Upgrade GuideMicrosoft Knowledge Base article 828810 (see http://support.microsoft.com/?id 828810)should be followed.Please note that Primavera Portfolio Management should not be installed into a web sitemanaged by SharePoint.When installing Primavera Portfolio Management on Windows 2003, please follow theinstructions provided in steps 9-12. When installing Primavera Portfolio Management onWindows 2008, please skip these instructions and instead follow the instructions provided insteps 13-15.On Windows 2003:9. After installing the above prerequisites, click Start, then Settings, then Control Panel,then Add or Remove Programs, then click Add/Remove Windows Components, thenselect Application Server and click the Details button. Verify that components areselected as shown in figure 1:Figure 110. Select Internet Information Services (IIS), and then click the Details button. Verifythat at least the following components are selected:a.b.c.d.Common FilesInternet Information Services ManagerSMTP ServiceWorld Wide Web Service (gray)11. Select World Wide Web Service, and then click the Details button. Verify that at leastthe World Wide Web Service is selected.7
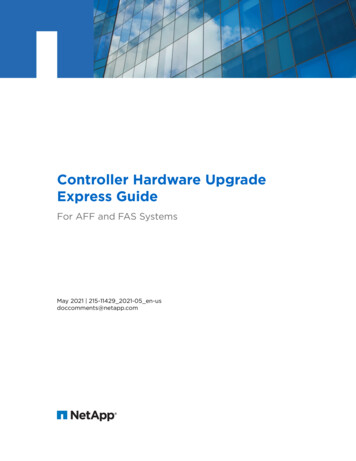
Primavera Portfolio Management Installation and Upgrade Guide12. On all servers (including the database server), if Service Pack 1 or later of MicrosoftWindows 2003 Server is installed, click Start, then Programs, then AdministrativeTools, then Component Services. In the tree on the left, click on the plus sign next tothe Component Services node to open up the tree, then click on the Computers node,then click on the plus sign next to the Computers node to open it up, and then right-clickthe My Computer node underneath. Select Properties. In the resulting tabbed dialog box,click on the MSDTC tab. On this tab, click on the Security Configuration button. Youwill see the dialog box shown in figure 2:Figure 2Verify that all settings are as shown above. In particular, pay attention to the checkbox nextto Network DTC Access (which is checked), the checkboxes entitled Allow Inbound andAllow Outbound (which are checked), and the radio button which selects NoAuthentication Required.If you made any changes, click OK to accept them. A dialog box will inform you that MSDTCwill be restarted. Click Yes, then click OK in the notification message box that states thatMSDTC has been restarted, then click OK again to close the tabbed dialog box. CloseComponent Services.8
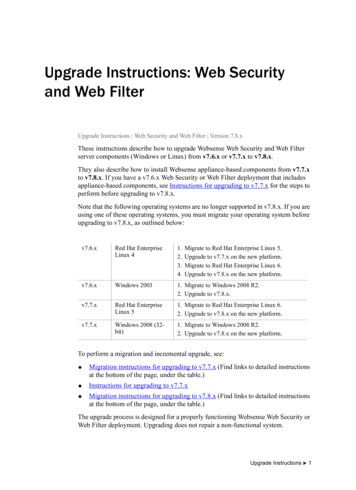
Primavera Portfolio Management Installation and Upgrade GuideOn Windows 2008:13. After installing the above prerequisites, click Start, then Control Panel, then Programsand Features, then click Turn Windows features on or off, then select Roles and scrolldown until the Role Services section. Verify that Role Services are installed as shown infigure 3:Figure 39
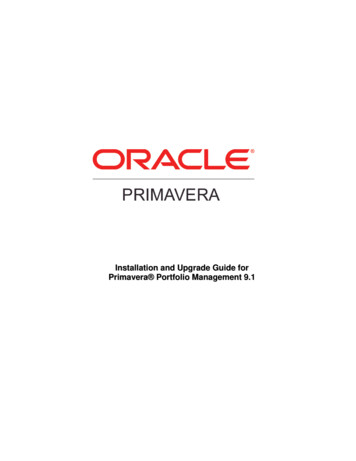
Primavera Portfolio Management Installation and Upgrade Guide14. Scroll further down until the Web Server (IIS) section and find the next Role Servicessection. Verify that Role Services for the Web Server are installed as shown in figure 4:Figure 415. On all servers (including the database server), click Start, then Administrative Tools,then Component Services. In the tree on the left, click on the plus sign next to theComponent Services node to open up the tree, then click on the Computers node, thenclick on the plus sign next to the Computers node to open it up, then click on the MyComputer node, then click on the plus sign next to the My Computer node to open it up,then click on the plus sign next to Distributed Transaction Coordinator to open it up,then right-click on Local DTC. Select Properties. In the resulting tabbed dialog box, clickon the Security tab. You will see the dialog box shown in figure 5:10
Primavera Portfolio Management Installation and Upgrade GuideFigure 5Verify that all settings are as shown above. In particular, pay attention to the checkbox nextto Network DTC Access (which is checked), the checkboxes entitled Allow Inbound andAllow Outbound (which are checked), and the radio button which selects NoAuthentication Required.If you made any changes, click OK to accept them. A dialog box will inform you that MSDTCwill be restarted. Click Yes, then click OK in the notification message box that states thatMSDTC has been restarted. Close Component Services.Note that the Microsoft .NET Framework 2.0 and 3.5, as well as ASP.NET, are automatically installedduring the installation of Primavera Portfolio Management Previous versions of the .NETFramework will remain installed and fully functional.Note that Primavera Portfolio Management does not require a Java Runtime Environment (JRE) orJava Virtual Machine (JVM) on client workstations or servers, and is indifferent to a JRE or JVM ifinstalled.11
Primavera Portfolio Management Installation and Upgrade Guide2. Primavera Portfolio Management InstallationTo install Primavera Portfolio Management (PPM) follow these steps:2.1Insert the Primavera PortfolioManagement optical media intothe optical drive of the server.The following install screen willbe displayed.If for some reason this screendoes not appear, open WindowsExplorer, highlight the driveletter containing thePrimavera PortfolioManagement CD, and doubleclick “startup.hta”.Click the link “Install PPM 9.1”.You may also double-click“setup.exe” to start the installwithout displaying this firstscreen.To start the install on 64-bit servers, double-click “setup.exe” – do not click the link.2.2On Windows 2008, if UserAccount Control is enabled, thisdialog box is displayed.Click2.3.The Choose Setup Languagedialog box is displayed.Select the desired language inwhich the installation screenswill be displayed, and click OK.Note that this does not influencethe language in which the UserInterface of Primavera Portfolio Management itself willbe displayed.12
Primavera Portfolio Management Installation and Upgrade Guide2.4If this is not the first time youinstall Primavera PortfolioManagement on this computer,you will see the screen depictedin step 2.6.If this is the first time you installPrimavera PortfolioManagement on this computer,the screen depicted here will bedisplayed.Note that the exact list ofprerequisites displayed dependson the platform and the state ofthe server.Click2.5to continue.The screen will indicate that thepre-requisite requirements listedare being installed.Please wait.2.6The following screen will bedisplayed.Please wait.The following screen may bedisplayed briefly.Please wait.13
Primavera Portfolio Management Installation and Upgrade Guide2.7The Welcome screen isdisplayed.Click2.8to continue.The Customer Informationscreen is displayed.The fields “User Name” and“Organization” are bydefault filled out withdefault values from thecomputer installation. Youmay accept these values orcorrect them.Click2.9to continue.The Destination Folderscreen is displayed.If you wish to change thefolder into whichPrimavera PortfolioManagement will be.installed, clickIf the displayed folder istoacceptable, clickcontinue with step 2.11.14
Primavera Portfolio Management Installation and Upgrade Guide2.10If you clickedonthe previous screen, theChange Current DestinationFolder screen is displayed.Browse to or type inanother folder to install into,or create a new folder.When done, clickto return to the screenshown in step 2.9.2.11The Select Default UserInterface Settings screen isdisplayed.Select the desired DefaultUser Interface Skin: OracleBlue or ProSight Classic.Note that individual userscannot change the UserInterface Skin selection.2.12Select the desired DefaultUser Interface Language.Note that each user canlater individually change thisdefault language selection.Clickto continue.15
Primavera Portfolio Management Installation and Upgrade Guide2.13The Feature Selectionscreen is displayed.Each instance ofPrimavera PortfolioManagement must includeone and only oneinstallation of the PortfolioManagement Primary BackEnd, and at least oneinstallation of the PortfolioManagement Front-End.These may be installed onthe same or on separatephysical servers.For the simplest installation of all required features of Primavera Portfolio Managementon one server, make sure that Portfolio Management Front-End and Portfolio ManagementPrimary Back-End are both selected to be installed (as shown here).To install optional features, select the optional feature(s) you desire to install: If you wish to use the legacy SOAP RPC interface, select the “SOAP RPCinterface”. If you wish to use the Web Services interface, select the “Web Services interface”. If you wish to use Propose, select “Propose”. After the install, follow theinstructions in Chapter 7 to configure Propose. If you wish to use the Bridge for Project Management systems, select the “Bridgefor Primaver
An Upgrade from Primavera Portfolio Management (formerly Primavera ProSight ) 5.0 and later is an installation in which you are installing Primavera Portfolio Management 9.1 over an existing installation of any version of Primavera Portfolio Management (formerly