Transcription
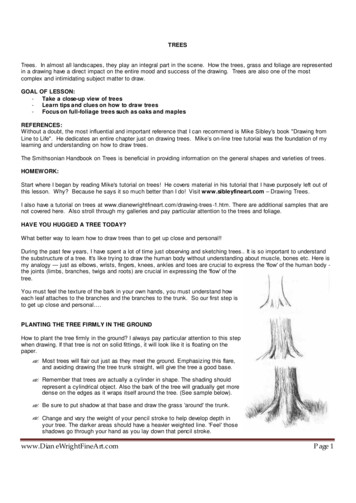
TREESTrees. In almost all landscapes, they play an integral part in the scene. How the trees, grass and foliage are representedin a drawing have a direct impact on the entire mood and success of the drawing. Trees are also one of the mostcomplex and intimidating subject matter to draw.GOAL-OF LESSON:Take a close-up view of treesLearn tips and clues on how to draw treesFocus on full-foliage trees such as oaks and maplesREFERENCES:Without a doubt, the most influential and important reference that I can recommend is Mike Sibley's book "Drawing fromLine to Life". He dedicates an entire chapter just on drawing trees. Mike’s on-line tree tutorial was the foundation of mylearning and understanding on how to draw trees.The Smithsonian Handbook on Trees is beneficial in providing information on the general shapes and varieties of trees.HOMEWORK:Start where I began by reading Mike's tutorial on trees! He covers material in his tutorial that I have purposely left out ofthis lesson. Why? Because he says it so much better than I do! Visit www.sibleyfineart.com – Drawing Trees.I also have a tutorial on trees at www.dianewrightfineart.com/drawing-trees-1.htm. There are additional samples that arenot covered here. Also stroll through my galleries and pay particular attention to the trees and foliage.HAVE YOU HUGGED A TREE TODAY?What better way to learn how to draw trees than to get up close and personal!!During the past few years, I have spent a lot of time just observing and sketching trees. It is so important to understandthe substructure of a tree. It's like trying to draw the human body without understanding about muscle, bones etc. Here ismy analogy — just as elbows, wrists, fingers, knees, ankles and toes are crucial to express the 'flow' of the human body the joints (limbs, branches, twigs and roots) are crucial in expressing the 'flow' of thetree.You must feel the texture of the bark in your own hands, you must understand howeach leaf attaches to the branches and the branches to the trunk. So our first step isto get up close and personal .PLANTING THE TREE FIRMLY IN THE GROUNDHow to plant the tree firmly in the ground? I always pay particular attention to this stepwhen drawing. If that tree is not on solid fittings, it will look like it is floating on thepaper.? Most trees will flair out just as they meet the ground. Emphasizing this flare,and avoiding drawing the tree trunk straight, will give the tree a good base.? Remember that trees are actually a cylinder in shape. The shading shouldrepresent a cylindrical object. Also the bark of the tree will gradually get moredense on the edges as it wraps itself around the tree. (See sample below).? Be sure to put shadow at that base and draw the grass 'around' the trunk.? Change and vary the weight of your pencil stroke to help develop depth inyour tree. The darker areas should have a heavier weighted line. 'Feel' thoseshadows go through your hand as you lay down that pencil stroke.www.Dia n e W rig htFine A rt.c omPage 1
ASSIGNMENT #1 ROOTS:Roots - What better way to understand the structure of a tree than to get to the root of the issue! These reference photosoffer us an opportunity to draw some interesting and unique tree roots. After drawing these, I guarantee you won't draw astraight line out of the ground to represent a tree p?photo 69861www.Dia n e W rig htFine A rt.c omPage 2
BARK and BranchesThe texture of the tree trunk can vary greatly. Here are a few trees that I have drawn.The level of detail depends how close the tree is in the scene.Trees are three-dimensional forms, cylindrical in nature that 'branch" off into smallercylinders. Here is a illustration of a tree branch dissected into cylindrical tubes. Theshading should represent a cylindrical object. Also the bark of the tree will graduallyget denser on the edges as it wraps itself around the tree.The texture of the trunk is much more pronounced than on the branches as well.? Pay particular attention to the 'points of articulation'. This means the point ofwhere every limb attaches to the trunk, every branch to limb and every twig tothe branch. This is what helps identifies the type of tree it is. Drawing thecorrect proportions and angles of these points is what 'creates' the tree.? A common mistake is drawing the branches too straight. Try to identify thoseknots and kinks, and those bends in the branches. This gives 'life' to the tree.To help see these, it is helpful to observe the negative space between the branches instead of looking just at thebranch.ASSIGNMENT #2 BARK & BRANCHES:The purpose of this assignment is to work on the 3-d form. Concentrate on the finding and identifying the elbows andkinks in the branches. Look at the negative spaces (area between the branches) to help with placement. Also,experiment and work on pencil strokes to represent the ?photo 24481&cat 553www.Dia n e W rig htFine A rt.c omPage 3
www.Dia n e W rig htFine A rt.c omPage 4
Winter Tree:Tips for drawing a winter tree? Another common mistake is making the branches too thick or toothin for the tree type? One more tip.watch the angle of the joints. The angles betweenthe branches should be wider at the bottom of the tree andgradually become tighter at the top of the tree.ASSIGNMENT #3 – Winter TreesThe intent of this assignment is to give you an opportunity to look at the substructure of trees. Here are a variety of ‘naked’trees for you to practice on.Don’t feel overwhelmed at all those little branches .you don’t have to draweach and every one. Instead draw enough to give the impression andcapture the essence of the species. The oak trees have thicker branchesthan the other varieties.www.Dia n e W rig htFine A rt.c omPage 5
www.Dia n e W rig htFine A rt.c omPage 6
LEAVES – Up-closeASSIGNMENT #4: LeavesStudy and sketch the leaves, fruit and branches of trees. The purpose ofthis exercise is to develop an understanding the shape of the leaves,identify characteristics that make it unusual and how they form the leafbundles. This understanding will assist you in drawing the tree as awhole.These can be just sketches or completed drawings - the choice is yours.I have attached a few samples of sketches that I have done. I have alsoattached reference photos from WC Image Library and some of my ownimages.www.Dia n e W rig htFine A rt.c omPage 7
Full-Foliage TreesWhen I draw a tree with leaves, I don't think about drawing each leaf.Instead I am thinking of what kind of 'texture' or pencil stroke I can use torepresent that bundle of leaves.With each variety of tree, the pencil stroke and texture seem to change toaccommodate the different leaf variety and how the leaf bundles lay.Tips for drawing a summer tree? The distance of the tree - background, midground, foreground or upclose - determines the size of the texture and detail placed on thetree.? Always, be aware of where your light source is coming from. Thiswill impact how those leaves will look and how the bundles will beshaded.? Identify those ‘almost’hidden branches and draw them in for key placement.? The open spaces between the branches are important to allow the sky to show through.? Use a minimum of 4 tonal values.? The inside branches will always be darker and can create a lot of depth to your tree.www.Dia n e W rig htFine A rt.c omPage 8
Underhand pencil grip:So just how do I draw the foliage on a tree? I use an under-handpencil grip when drawing foliage. I keep my wrist straight and usefull-arm motion. I do not rest my hand on the paper. This will takesome practice to control your pencil strokes, but once learned, youwill discover your pencil strokes will have more fluidity to them.I also use .5 mm mechanical pencils, as the tip is just the right size.For up-close leaves or larger areas – I will use a clutch pencil with achisel point.Pencil stroke:The pencil stroke that I use is a scribble stroke. Usingthe under-hand position, I create a scribble or a shortrandom stroke to create the leaves. I build up the areasto create texture that will represent the leaf bundles.In the shadowed areas I press harder creating darkerareas.A tree is never outlined or solid. Those outside leavesand branches are critical to the shaping of the treeI keep the trees airy – leaving more openings than thereference photos show.I use a battery-operated eraser to restore the lightestleaves or to give sun-kissed highlights to a tree.www.Dia n e W rig htFine A rt.c omPage 9
Assignment 5:Practice the scribble pencil stroke using the under-hand pencil grip. Draw the branches first to give you a sense of whereyou are. Save the white spaces (sky showing through). In these areas notice that the leaves are actually darker. Theinner branches will be darker than the outer branches.ASSIGNMENT #6 – Full-Foliage TreesSelect one or more of these trees to draw. Two of these trees are also in the winter tree photos. Can you match themup?www.Dia n e W rig htFine A rt.c omP a g e 10
www.Dia n e W rig htFine A rt.c omP a g e 11
He dedicates an entire chapter just on drawing trees. Mike’ s on -line tree tutorial was the foundation of my learning and understanding on how to draw trees. The Smithsonian Handbook on Trees is beneficial in providing information on the general shapes and varieties of trees. HOMEWORK: Start where I be