Transcription
Managing Employee Timecards in ADP Time & AttendanceRecording Worked TimeRecord worked time when employees forget to clock in and out.Recording Non-Worked TimeRecord non-worked time when employees take time off.Assigning DepartmentsRecord departments to indicate when employees work a different departmentthan usual, if applicable.Adding and Copying RowsAdd and copy rows to alter timecard data.Deleting RowsDelete rows to remove incorrect timecard data.Add notes for recordkeeping.Adding NotesViewing Transaction DetailsView transaction details for additional time pair information.1ADP Time & Attendance Visual Guide - Managing Employee Timecards in ADP Time & AttendanceRev 20151023 Copyright 2015 by ADP, LLC ALL RIGHTS RESERVED
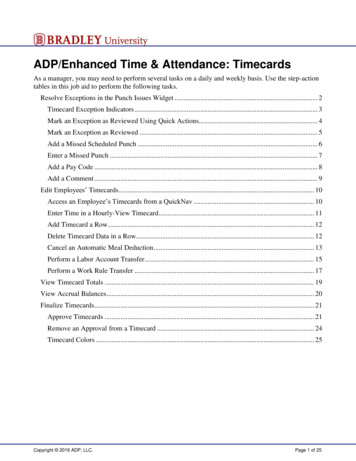
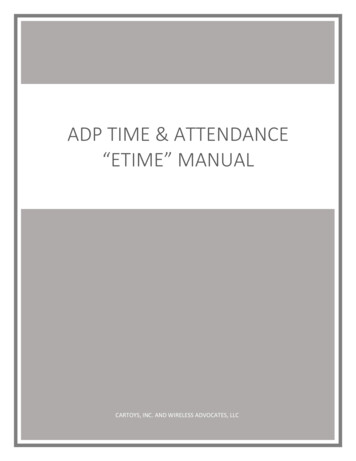
Recording Worked Time1. From the ADP Time & Attendance Home page, click the Individual Timecard icon.2. In the In field of the row you want to edit, type the in-punch time.3. In the Out field of the row you want to edit, type the out-punch time.2ADP Time & Attendance Visual Guide - Managing Employee Timecards in ADP Time & AttendanceRev 20151023 Copyright 2015 by ADP, LLC ALL RIGHTS RESERVED
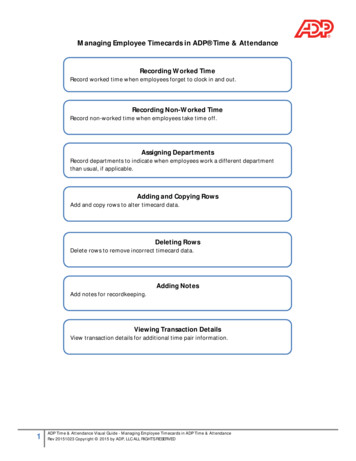
4. Click Save. An Operation Successful message displays when complete.3ADP Time & Attendance Visual Guide - Managing Employee Timecards in ADP Time & AttendanceRev 20151023 Copyright 2015 by ADP, LLC ALL RIGHTS RESERVED
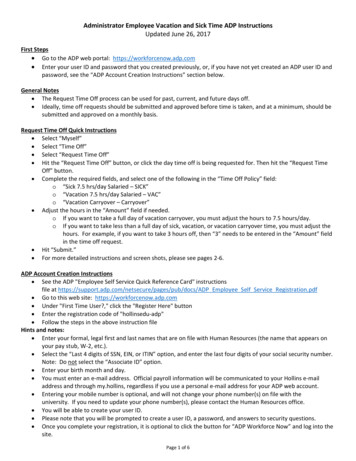
Recording Non-Worked Time1. From the Home page, click the Individual Timecard icon.2. In the Hours field of the row you want to edit, type the number of hours.3. From the Pay Code list, select the desired Pay Code.4ADP Time & Attendance Visual Guide - Managing Employee Timecards in ADP Time & AttendanceRev 20151023 Copyright 2015 by ADP, LLC ALL RIGHTS RESERVED
4. Click Save. An Operation Successful message displays when complete.5ADP Time & Attendance Visual Guide - Managing Employee Timecards in ADP Time & AttendanceRev 20151023 Copyright 2015 by ADP, LLC ALL RIGHTS RESERVED
Assigning Departments1. From the Home page, click the Individual Timecard icon.2. From the Department list of the row you want to edit, select the desired Department.3. Click Save. An Operation Successful message displays when complete.6ADP Time & Attendance Visual Guide - Managing Employee Timecards in ADP Time & AttendanceRev 20151023 Copyright 2015 by ADP, LLC ALL RIGHTS RESERVED
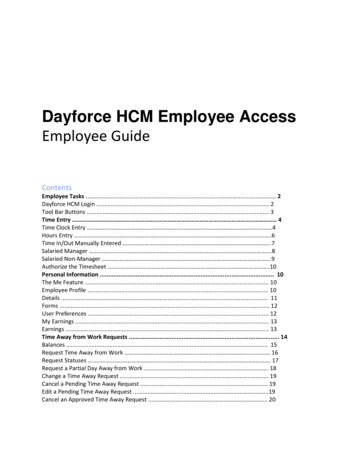
Adding and Copying RowsNote: To permanently display two or more rows for each day: in the bottom-right of any Individual Timecard page,from the Preferences list, select the number of Rows Per Day.1. From the Home page, click the Individual Timecard icon.2. Click the Action icon in the row you want to edit.3. To add a row to that date, click Add Blank Row. To add an identical row, click Copy Row.7ADP Time & Attendance Visual Guide - Managing Employee Timecards in ADP Time & AttendanceRev 20151023 Copyright 2015 by ADP, LLC ALL RIGHTS RESERVED
4. Complete the new row and click Save. An Operation Successful message displays when complete.8ADP Time & Attendance Visual Guide - Managing Employee Timecards in ADP Time & AttendanceRev 20151023 Copyright 2015 by ADP, LLC ALL RIGHTS RESERVED
Deleting Rows1. From the Home page, click the Individual Timecard icon.2. Click the Action icon in the row you want to delete.3. Click Delete Row.9ADP Time & Attendance Visual Guide - Managing Employee Timecards in ADP Time & AttendanceRev 20151023 Copyright 2015 by ADP, LLC ALL RIGHTS RESERVED
4. Click Save. An Operation Successful message displays when complete.10ADP Time & Attendance Visual Guide - Managing Employee Timecards in ADP Time & AttendanceRev 20151023 Copyright 2015 by ADP, LLC ALL RIGHTS RESERVED
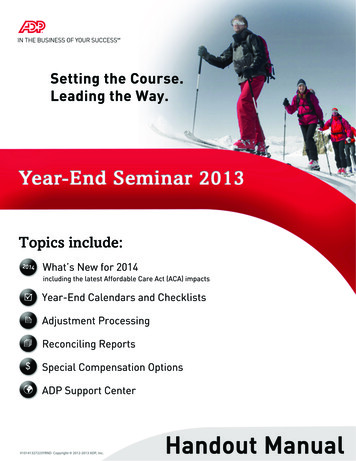
Adding Notes1. From the Home page, click the Individual Timecard icon.2. Click the Action icon in the row you want.3. Click Add Note.11ADP Time & Attendance Visual Guide - Managing Employee Timecards in ADP Time & AttendanceRev 20151023 Copyright 2015 by ADP, LLC ALL RIGHTS RESERVED
4. In the blank field, type the note.5. From the Apply Note To list, select the Timecard field to which you want the note to apply.6. From the Reason list, select the purpose for this note.12ADP Time & Attendance Visual Guide - Managing Employee Timecards in ADP Time & AttendanceRev 20151023 Copyright 2015 by ADP, LLC ALL RIGHTS RESERVED
7. Click OK. A Note icon appears in the affected field.8. Click Save. An Operation Successful message and yellow note icon display when complete.13ADP Time & Attendance Visual Guide - Managing Employee Timecards in ADP Time & AttendanceRev 20151023 Copyright 2015 by ADP, LLC ALL RIGHTS RESERVED
Viewing Transaction Details1. From the Home page, click the Individual Timecard icon.2. Click the Action icon in the row you want.3. Click View Transaction Details. A View Transaction Details page displays.14ADP Time & Attendance Visual Guide - Managing Employee Timecards in ADP Time & AttendanceRev 20151023 Copyright 2015 by ADP, LLC ALL RIGHTS RESERVED
4. Click Cancel to close the View Transaction Details page.15ADP Time & Attendance Visual Guide - Managing Employee Timecards in ADP Time & AttendanceRev 20151023 Copyright 2015 by ADP, LLC ALL RIGHTS RESERVEDThe ADP logo and ADP are registered trademarks of ADP, LLC.ADP provides this publication 'as is' without warranty of any kind, either express or implied, including, but not limited to, the implied warranties ofmerchantability or fitness for a particular purpose. ADP is not responsible for any technical inaccuracies or typographical errors which may be containedin this publication. Changes are periodically made to the information herein, and such changes will be incorporated in new editions of this publication.ADP may make improvements and/or changes in the product and/or the programs described in this publication at any time without notice.
In the In field of the row you want to edit, type the in-punch time. 3. In the Out field of the row you want to edit, type the out-punch time. . ADP may make improvements and/or changes in the product and/or the programs des