Transcription
FRC Process to Write JAVA code for a Command Based Robot(June 17, 2020)Purpose:This document provides describes how to write JAVA code for a WPI(v2) 2020 Robot in VSCodeGoal:At the end of this document, you should have a robot that drives under control of a joystick andcan autonomously drive in a square. An LED Strip is incorporated into the project.The goal of this document is to build code and understand the purpose of most of the code. Thefull code is provided at the end of the document for support but recommend you walk through theinstructions and assemble the code one function at a time.Supersedes: This document supersedes the previous team 1895 document which describe how to write codeusing RobotBuilder. This document is constantly changing as FRC constantly evolves fromNetbeans, Eclipse, VSCode and now, the WPI2.Description: This document will follow the guidance provided by the Lead mentor on Team 6637 whichcreated an excellent set of videos walking through the development process with the WPI 2019code. This document supports the WPI2 library. This version has new items such as the “RobotContainer” and “Constants” files.Resources:Thank you to BetaWolves - Team 6637 (Eric Janofski - ejanofski@gmail.com)Learn the basics of how a Command Based Robot Project works as we begin a series on how toget a robot to drive in its simplest form.Resources: https://betawolves.org/resources/Watch Part 1: https://youtu.be/wW djLkD1B8Watch Part 2: https://youtu.be/9MpJgUUsLZwWatch Part 3: https://youtu.be/5Zr7K 2mnrwWatch Part 4: https://youtu.be/YNluD TNj5EWatch Part 5: https://youtu.be/oGMy4FJLKy4Changes in WPI2 from WPIa. Constants.java replaced RobotMap.javab. Subsystems are instantiated in the RobotContainer class and not the Robot classc. Commands are bound to Buttons in the RobotContainer ConfigButtonBindings methodRequire Resources:To follow this document, you need the following items:1) A computer with VSCode enhanced with the FRC 2020 code (WPI2 library) and the drivers stationinstalled.2) The laptop must have access to the internet (to download the third party libraries)3) The laptop should have the standardized path of c:\ robotics\2019-2020 to hold the new code or whatthe current path is.4) A Gamepad5) A Team 1985 practice robot. This is a simple two motor, drop center 6 wheel drive robot with thefollowing configuration:a. The left motor is at CAN Talon address of 5b. The right motor CAN Talon address of 3c. An analog range finder (Maxbotix MaxSonar type) on port 0d. LED Strip on PWM port 0df20200405 FRC Process to Code Robot in Java VSCode WPI2 v12.docx6/17/2020 8:57 PM1 of 39
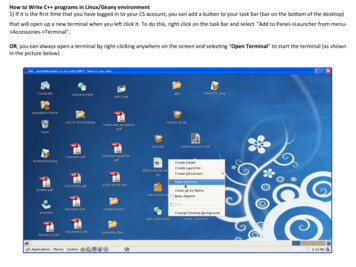
FRC Process to Write JAVA code for a Command Based Robot(June 17, 2020)Status:This document is nearly complete. The instructions have were tested on a RoboRIO, two talons and a singlemotor. The instructions need to be verified on an actual robot before they are ready for a new programmingstudent. I’ll retest once we’re allowed back in the school in Fall 2020.Process:1) Logon to the laptop.2) Double-click on the “FRC VS Code 2020” icon on the desktop.3) Click on the WPI Icon (Red hex with a white letter W in the center).4) Enter “Create a new project” and press enter.5) Click on “Select a project type” and select Template.6) Select the language of java.7) Select “Command Robot”.df20200405 FRC Process to Code Robot in Java VSCode WPI2 v12.docx6/17/2020 8:57 PM2 of 39
FRC Process to Write JAVA code for a Command Based Robot(June 17, 2020)8) Select the button “Select a new project folder” and browse to c:\ robotics\2020-2021 or whatever yourdesired path is and select “Select Folder” button to close the dialog box.9) Leave the “Create new folder? ” checkbox checked.10) Under “Enter a project name” enter Robot1 (or what every you want to call your robot such as Johnny5).11) Under “Enter a team number” enter 1895.12) Select the “Generate Project” button.13) Select “Yes (New Window)” in the dialog box.14) Maximize the new window.Install Third Party (TALON) Libraries15) Select the WPI Icon (W) and enter “Manage Vendor Libraries” and press enter.This should present 5 options.16) Select “Install new libraries (online)”.17) Enter the following string (copy and paste works best) and select ease/com/ctre/phoenix/Phoenix-latest.json18) Select Yes to rebuilding code.19) In the left window, expand the “src” folder by selecting the arrow “ ”.20) Expand out java folder.21) Observe the command and subsystem folders and four java files (Constants, Main, Robot, RobotContainer).22) Expand out the commands folder and observe the ExampleCommand java file. (no action required)df20200405 FRC Process to Code Robot in Java VSCode WPI2 v12.docx6/17/2020 8:57 PM3 of 39
FRC Process to Write JAVA code for a Command Based Robot(June 17, 2020)23) Expand out the subsystems folder and observe the ExampleSubsystem java file. (no action required)24) Highlight the ExampleCommand file, right click and select delete. Confirm the deletion (Move to recycle bin).25) Highlight the ExampleSubsystem file, right click and select delete. Confirm the deletion (Move to recycle bin).26) Double-click on the Constants java file. This file defines JAVA constant variables used to hold values thatwill not change.The term public means it can be accessed from any other classThe term static means there is a single instance of this variableThe term final means it will not changeThe term int means the value is a whole number.Constant variable names are typed in all upper case lettersThe leading // means the text following it is comment and not codeEnter the following code within the “Constants” class between the code braces { }.IT IS RECOMMENDED THAT YOU CUT AND PASTE ALL OF THE CODE IN THIS DOCUMENT.// Operator Interfacepublic static final int DRIVER REMOTE PORTpublic static final int DRIVER RIGHT AXISpublic static final int DRIVER LEFT AXIS 0; 4; 1;// Talonspublic static final int LEFT TALON LEADERpublic static final int RIGHT TALON LEADER 5; 3;27) The JAVA code can be reformatted to set correct indentations and code braces by selecting Shift-Alt F.28) Select File Save to save the changes to the current code.Create the DriveTrain subsystem and motor controllers29) In the left window, locate and select the folder called “ V subsystems”, right-click and select (at the bottomof the list) “Create a new class/command”.30) Scroll down in the list and select “Subsystem (New)” and enter the name DriveTrainSubsystem andpress Enter.31) Place your cursor near line 15 after the “ */ “ and select the Enter key three time to add space to create newcode. (The */ ends a comment block).32) Define variables which will become the motor controllers.Purpose: (These line declare variables of the type WPI TalonSRX)(The private means the variable cannot be accessed. WPI TalonSRX is a class within the Third Party Library)(The differential drive train provides the core functionality of the drive train)At line 17 enter the following code:private final WPI TalonSRX m rightLeader;// Declare motor controllers variablesprivate final WPI TalonSRX m leftLeader;private final DifferentialDrive m safety drive; // Declare drive train core function33) Select Control-Shift-P and type “Organize Imports”.( You can also select Alt-Shift O )Purpose: (This command create an import statement at the top of the file to link in the TalonSRX library)df20200405 FRC Process to Code Robot in Java VSCode WPI2 v12.docx6/17/2020 8:57 PM4 of 39
FRC Process to Write JAVA code for a Command Based Robot(June 17, 2020)34) On line 10 (after the line starting with package frc.robot.subsystems), enter the following statement. This linemakes all of the defined constants available.import static frc.robot.Constants.*;35) Locate the Constructor of the DriveTrainSubsystem.This is the line that starts with:public DriveTrainSubsystem() {36) Enter the following code on the next line within the constructor to instantiate the motor controllers.m rightLeader new WPI TalonSRX(RIGHT TALON LEADER);m leftLeader new WPI TalonSRX(LEFT TALON LEADER);// Instantiate motor controllers37) We now create the Differential Drive train object within the constructor. This is the heart of the drive trainfunctionality. Enter the following code within the constructor:m safety drive new DifferentialDrive(m leftLeader, m rightLeader);38) Create a Class method which allows Commands (which you will write later) to access to drivetrain of therobot. This statement creates a method which a command can call to drive the robot given a parameterwhich defines the forward speed called “move” and a parameter that defines the robot turn rate. Enter thefollowing code BELOW the Constructor (and outside of the close bracket “}” ):public void manualDrive (double move, double turn){m safety drive.arcadeDrive(move, turn);m safety drive.feed();}39) The JAVA code can be reformatted by selecting Shift-Alt F.40) Select File Save to save the changes to the current code.Create the Drive Command41) In the left window, locate the folder called “ V commands” and select it, right-click and select (at the bottomof the list) “Create a new class/command”.df20200405 FRC Process to Code Robot in Java VSCode WPI2 v12.docx6/17/2020 8:57 PM5 of 39
FRC Process to Write JAVA code for a Command Based Robot(June 17, 2020)42) Scroll down and select Command (new) and enter the command name of DriveManuallyCommand.43) Update the DriveManuallyCommand constructor to accept two parameters. These are the drivetrain objectand the gamepad object. Add the following parameters within the parenthesis of the constructor. Locatethe constructor by identifying a method with the same name as the command but does not have a returnvalue of void.public DriveManuallyCommand(DriveTrainSubsystem driveTrain, XboxController driverController) {44) Within the constructor add the following two lines to assign the drivetrain and XboxController objects passedin as parameters to the objects used within the class:m driveTrain driveTrain;m driverController driverController;45) Identify which subsystem this command will be using. This information is placed within the classconstructor. Add the following command at the bottom of the class constructor (Around line 22):addRequirements(m driveTrain);46) Define the DriveTrain and XboxController object variables within this command by entering the following twolines of code at the top of the class. (Just before the constructor, between the current line 17 and 18):// Reference to the constructed drive train from RobotContainer to be// used to drive our robotprivate final DriveTrainSubsystem m driveTrain;private final XboxController m driverController;47) The execute method execute() is run 50 times per second. This is the code where we will pass thejoystick positions to the drive train. The upper case variables are constants defined in the Constants.java file.Add the following code to the execute method:// Axis are inverted, negate them so positive is forwarddouble turn m driverController.getRawAxis(DRIVER RIGHT AXIS); // Right Xdouble move -m driverController.getRawAxis(DRIVER LEFT AXIS); // Left Ym driveTrain.manualDrive(move, turn);48) Need to update the import files again. Select Control-Shift-P and type “Organize Imports”.49) Manually add the following import statement to pick-up the Constants near the top of the class below theexisting import statements. (Not sure why this is not done automatically):import static frc.robot.Constants.*;50) The JAVA code can be reformatted by selecting Shift-Alt F.51) Save your work. Select File Save All.df20200405 FRC Process to Code Robot in Java VSCode WPI2 v12.docx6/17/2020 8:57 PM6 of 39
FRC Process to Write JAVA code for a Command Based Robot(June 17, 2020)Update the RobotContainer file52) In the left window, locate and open the RobotContainer.java file. This is a very important file within theproject.53) Manually add the following import statement to pick-up the Constants near the top of the class below theexisting import statements. (Not sure why this is not done automatically):import static frc.robot.Constants.*;54) Locate the two lines which instantiate the ExampleSubsystem and ExampleCommand. They likely havered lines under them. They start with “private” and include “ new “ in the middle. (Near line 25).(No action required.)55) Create code to instantiate the XboxController. Enter the following code below the line of code:private final XboxController m driver controller new XboxController(DRIVER REMOTE PORT);56) Create a new line of code to instantiate the new subsystem called DriveTrainSubsystem. Enter thefollowing line right below the exampleCommand”private final DriveTrainSubsystem m driveTrainSubsystem new DriveTrainSubsystem();57) Create a new line of code to instantiate the new command called DriveManuallyCommand.Notice that driveTrain and XboxController object parameters are passed into commands.Enter the following line right below the exampleCommand”private final DriveManuallyCommand m DriveManuallyCommand new DriveManuallyCommand(m driveTrainSubsystem, m driver controller);58) Locate the Constructor of the RobotContainer.This is the line that contains:public RobotContainer() {59) After the “configureButtonBindings();”, enter the following command to set the “DriveManuallyCommand” as thedefault command. This means the “DriveManuallyCommand” command will run when no other command has beencalled (scheduled).m driveTrainSubsystem.setDefaultCommand(new DriveManuallyCommand(m driveTrainSubsystem, m driver controller));60) Locate and delete the two lines which instantiate the ExampleSubsystem and ExampleCommand. Theylikely have red lines under them. (Near lines 25-29)61) Select Control-Shift-P and type “Organize Imports”.( You can also select Alt-Shift O )62) Locate the method called getAutonomousCommand() near line 60. This statement tells the drivetrainsubsystem to run the m DriveManuallyCommand command in autonomous mode.Update the return statement to the following code:return m DriveManuallyCommand;df20200405 FRC Process to Code Robot in Java VSCode WPI2 v12.docx6/17/2020 8:57 PM7 of 39
FRC Process to Write JAVA code for a Command Based Robot(June 17, 2020)First Build of Code and Robot TestNOTE:The workstation must be connected to the internet for the first build to allow Gradle to bedownloaded63) The JAVA code can be reformatted by selecting Shift-Alt F.64) Select File Save to save the Java Project.65) Place the robot on blocks so the wheels are not touching the ground or desktop.66) Power on the Robot.67) Connect the Workstation to the Robot using either a USB cable between the workstation and the RoboRIO or with thewireless WIFI connection.68) Connect a Gamepad to the workstation.69) Select the WPI Icon (W). Enter “Deploy Robot Code” and select Enter.70) Start the FRC Drivers Station application on the desktop of the workstation.71) Select TeleOperated Mode.72) Select Enable on the Drivers station to start the Robot.(THINK SAFETY: Be sure everyone is clear of the Robot)73) Test the code by moving the joysticks. (Left joystick is forward and reverse, right joystick is rotate left and right)Expand the Robot Code to have a button based commandThe robot motors run at 50% speed when the button is pressed.Overview of the process to add a button based command: Create Command (to run the motors at 50%) Link to Button (When the button is press, the command is called)74) In the left window, locate the folder called “ V commands” and select it, right-click and select (at the bottomof the list) “Create a new class/command”.75) Scroll down and select Command (new) and enter the command name of DriveForward50.76) Update the DriveForward50 constructor to accept one parameter. This is the drive train object.following parameter within the parenthesis of the constructor:Add thepublic DriveManuallyCommand(DriveTrainSubsystem driveTrain) {77) Within the constructor add the following line to assign the input parameter drivetrain object to the drivetrainobject used within this command:m driveTrain driveTrain;df20200405 FRC Process to Code Robot in Java VSCode WPI2 v12.docx6/17/2020 8:57 PM8 of 39
FRC Process to Write JAVA code for a Command Based Robot(June 17, 2020)78) Identify which subsystem this command will be using. This information is placed within the classconstructor. Add the following command at the bottom of the class constructor (Around line 18):addRequirements(m driveTrain);79) Define the DriveTrain object within this command by entering the following code at the top of the class justbefore the constructor:// Reference to the constructed drive train from RobotContainer to be// used to drive our robotprivate final DriveTrainSubsystem m driveTrain;80) The execute() method runs 50 times per second. For this command, we will set the forward motion to 50%and the rotation motion to zero. Update the execute method with the code to drive the robot:public void execute() {m driveTrain.manualDrive (0.5,0);}// Drive straight forward at 50%81) The end() method is run when the command completes. This is when the button is released. Update theend method with the code to stop the robot:public void end(boolean interrupted) {m driveTrain.manualDrive (0,0);}82) Need to update the import files again. Select Control-Shift-P and type “Organize Imports”.83) Open up the RobotContainer.java file.84) Add a joystick button object to the code. Add the following line near the top of the RobotContainer Class justbelow the instantiation of the XboxController and DriveTrainSubsystem objects and the DriveManuallyCommand:private JoystickButton driver X;85) Within the RobotContainer file, locate the “configureButtonBindings()” method. Add the following two lineswhich instantiate the button and bind the “X Button” to the command “DriveForward50”driver X new JoystickButton(m driver controller, XboxController.Button.kX.value);driver X.whileHeld(new DriveForward50( m driveTrainSubsystem));86) Need to update the import files again. Select Control-Shift-P and type “Organize Imports”.87) The JAVA code can be reformatted by selecting Shift-Alt F.88) Save your work. Select File Save All.89) Download the code to the Robot by selecting the WPI Icon and typing Deploy Robot Code.90) Start the FRC Drivers Station application on the desktop of the workstation.91) Select TeleOperated Mode.92) Select Enable on the Drivers station to start the Robot.(THINK SAFETY: Be sure everyone is clear of the Robot)df20200405 FRC Process to Code Robot in Java VSCode WPI2 v12.docx6/17/2020 8:57 PM9 of 39
FRC Process to Write JAVA code for a Command Based Robot(June 17, 2020)93) Test the code by pressing the X button on the Joystick and observing the robot drive forward and 50% speed.Displaying Data for TroubleshootingAs the robot code get more complex, we will need methods to troubleshoot code. To troubleshoot code, weneed to see what values variables are taking on. There are two options to see values. The second option isbetter.A. Putting print statements in the code which writes values (for example: joystick positions, motor speed, ) tothe robot driver-station console.Implement this approach by just adding print statements in the code as follows:System.out.printf (“Text to display: %5.2f %n”, variableName);B. Shuffleboard. This is a graphical display that can display values, graphs, diagrams, Booleans and muchmore. You can also run commands from the shuffleboard. The next section discusses how to use code toadd items to the shuffleboard. (There are other manual approaches to add items to the shuffleboard, theseare provided later in this document).The following instructions will cause the code to programmatically add a new tab on the Shuffleboard called“DriveTrainDisplay” and add the values of the joystick axis and a button to run the DriveForward50command. You can use similar code to add other v
FRC Process to Write JAVA code for a Command Based Robot (June 17, 2020) . The instructions need to be verified on an actual robot before they are ready for a new programming student. I’ll retest onc