Transcription
2008SuperSalonInstall ManualDraftCopyright 2008 Rogers Software Development Inc1292 Sadler Way, Suite 335Fairbanks, AK 99701For support call 888.458.1001Email support@rogerspos.com
Sales & Management Software for the Salon & Spa IndustrySuperSalonInstall Manual
SuperSalon Install ManualPhone: 888-458-1001:For Support Press 1/For Paper & Hardware Orders Press 2/For Sales Press 3For Accounting Press 4/For Directory Press 5/For Fax, Email & Postal Address Press 6Email: n & Rogers POS Copyright Rogers Software Development Inc., 2003-2008
ROGERS SOFTWARE DEVELOPMENT INC.SuperSalon v 5.xInstall ManualCopyright 2008 Rogers Software Development Inc.1292 Sadler Way, Suite 335Fairbanks, AK 99701The information in this document is subject to change without notice and does not represent acommitment on the part of Rogers Software Development Inc. This software may only be usedor copied in accordance with the terms of the software license agreement. It is against the lawto copy the software through any means except as specifically allowed in the software licenseagreement. No part of this document may be reproduced or transmitted in any form or by anymeans, electronic or mechanical, including photocopying and recording for any purpose withoutthe express written consent of Rogers Software Development Inc.
SuperSalon Version 5 Install ManualTable of ContentsSection 1 – Introduction . 1SuperSalon Point of Sale System . 1Section 2 – Setup . 2Slave/Master . 2Kiosk Setup . 3Configuring Static IP Addresses . 5Complete Setup on Brand New Computer . 9Zebra Label Printers . 12Section 3 – Data Import . 14Mize Conversion Process. 14Guest Vision Conversion Process . 18Section 4 – Network/Remote Access. 19Broadband Setup Process . 19Port Forwarding/Backdoor Setup/VNC Setup. 21Logmein Setup . 22Section 5 – PCCharge Installation and Setup . 25Payment Processor. 25PC Charge Serial Numbers. 42PC Charge FAQ. 43Section 6 – Setting Up Gift Cards/Types . 58Creating an SVS Payment Method . 58Creating an SVS Payment Method . 59Setting Up SVS Gift Card Integration . 60Entering SVS Settings . 61Section 7 – Miscellaneous . 63Subject 1 . 63Section 8 – FAQs/Troubleshooting . 64Peripheral Issues . 64
SuperSalon Version 5 Install ManualSoftware Issues . 68Section 9 – Checklists. 72Subject 1 . 72Help . 73Software License Agreement . 74
SuperSalon Version 5 Install ManualSection 1 – IntroductionSuperSalon Point of Sale SystemThis manual is intended to be used to help with various SuperSalon installations andsetups. Please feel free to contact us if further help is needed.Technical Support is available Monday through Friday 6 am to 9:30 pm PST,Saturday 6 am to 7 pm PST, Sunday 7 am to 7 pm.Voice: 907-458-1001 or 888-458-1001Support Fax: 907-374-0977Email: support@rogerspos.comInternet: http://www.supersalon.comThank you,The SuperSalon Team1
SuperSalon Version 5 Install ManualSection 2 – SetupSlave/MasterMake sure the system power is off and unplug the systemBy default, most drives usually come with their jumpers in the master position.Each drive manufacturer has its own jumper configuration, so check thedocumentation to see how to set up the jumpers. Some drives have thisinformation on the drive itself. Move the jumpers by pulling them out with pliersor tweezers.Note: To avoid electrostatic discharge, ground yourself when working inside thecomputer, by touching something metal or wear an electrostatic bracelet. Also,do not touch the circuitry on the drives.If you are putting the second drive on the same connector as the original drive,see if the cable has an additional plug so the two drives can both plug into it andthe motherboard. If it doesn’t have an additional plug, replace the cable with onethat came with the new drive or plug the new drive into the second connector.(Trace the first drive back to where it plugs into the PC, the second connectorshould be near). In most cases the red edge on the cable should line up with the#1 pin on the drive.Attach the drive to the PC’s power supply. You may need to purchase a Y splitter,if there are no available power cables.Put the drive in an available drive bay and secure it.2
SuperSalon Version 5 Install ManualKiosk Setup3
SuperSalon Version 5 Install ManualTo view the Kiosk, set the address to http://localhost/app/?controller scheckinThere are two ways to enter the setup screen1. In SuperSalon go to Setup tab Software Settings Kiosk Launch KioskConfiguration2. Navigate tohttp://localhost/app/index.php?controller scheckin&action configuration4
SuperSalon Version 5 Install ManualConfiguring Static IP AddressesGo to Start Control PanelClick on the Network Connections link5
SuperSalon Version 5 Install ManualYou should see a Local Area Connections linkRight click the link and select “Properties”6
SuperSalon Version 5 Install ManualYou should see a connection properties boxDouble click “Internet Protocol”7
SuperSalon Version 5 Install ManualAt this point you should see windows similar to belowSelect “Use the following IP address”Input the numbers you see in the image for the “IP address” and “Subnet mask”o Note: The portion of the image highlighted in red needs to be a uniquenumber for each system. This number should be between 100 and 200Once the information is input, click “Ok” on all of the open windowsAfter you perform this task on both systems, they should be able to communicatewith each other over a network8
SuperSalon Version 5 Install ManualComplete Setup on Brand New ComputerBoot Process and Windows SetupBoot Process: Press any key until you get to your Windows screeno Follow through each screenComputer name – Name of Salon you are working witho Who will be using the computer? SalonTurn OFF Windows Firewall (Do not connect to the Internet until SuperSalonFirewall is installedo Control panel – Change to “Classic View”o Task Bar – Change to “Classic View”o Security Center – Firewall OFFo Change the way Security Center Alerts me Unclick Check Markso Turn off automatic updateso Check time & dateRight click on the bottom Tool Baro Propertieso Check all but “Quick Launch”o Classic Viewo Screen Resolution: Version3x 800x600/Version 4x and higher 1024x768Power Settingso Turn off monitor – After 2 hourso Hard Disk – Nevero System Standby – Nevero Hibernates – NeverDelete games – Right click on games and deleteInstall ELO Touch Screen – Check USB porto Calibrate touch screeno Change mode tab – Click on touch9
SuperSalon Version 5 Install ManualInstall SuperSalonAlways install the full versionComponents to installo SuperSalon and SS ExtrasCompleting SuperSalon setup wizardo Unclick Run SuperSalonBrowser SettingsTurn off Status Baro View Status BarTurn off Bookmarks Toolbaro View Toolbars Bookmarks ToolbarHide Navigation Toolbar (Address Bar)o View Toolbars Navigation ToolbarSuperSalon SetupCreate salon database in back-officePerform initial setup Admin Siteo Go to the account, on the right side press “Initial Setup”o Select the account that you wish to copy. This will begin the process ofcopying all the information into the new account you are working with.Setup database name in local machineo Setup Internet Setup Office Upload Assigned Store NameEnter database name (example: US CAIN90210 BB3) Upload AddressUpload.supersalon.comRegister salon software with back officeo Admin Site Go to the account and then the store Go to the registration link and follow the stepso In the POS go to Setup Tab Owner Password Click “Recover Password”10
SuperSalon Version 5 Install Manualooooo Copy the Software Key at the topIn the Admin site select tools Paste Software Key into the “Software key” fieldA Registration Key will be generated – copy this key into the POS side forpassword changesClick the hyperlink for “Complete the Registration”Set the Owner Password to “Cut” unless otherwise instructedRegistration is completeUpdate to current versionAdmin Siteo Find the account and then the storeo Navigate to “Update to Version” dropdown box and select the rightversiono Select the “Update store” button to savePerform an Upload on the POS computero Manager Tab UploadVersion Is updated11
SuperSalon Version 5 Install ManualZebra Label PrintersSetup for Zebra 2824 USBZebra printer’s Windows Installation1. Install the drivers from the disk (Preferred) or download file by running the setupfile (Located atftp://rsdsuppo@rsdsupport.net/Beauty r.zip (Contact RSD support for password)2. The printer is the ZebraEPL LP28243. Label size should be 1.2 x .854. Make sure you select USB as the port during installation5. Everything else is default6. When finished copy the files onto the computer from the disk for later techsupport troubleshooting. These are also available on the FTP link above.Sharing the Zebra Printer1. To use the Zebra printer you must share the printer: In windows go toStart Settings Printers and Faxes2. Right click on the Zebra printer icon and select “sharing ” from the context menu3. This will take you to the Share tab of the Zebra Properties window. Select “Sharethis Printer”, Set the printer share name to “ZebraLP2”Setting the Zebra Printer Port in the Properties Window1. In the Zebra printer Properties window, click on the Port tab.2. Select USB Port as your Option. Make sure the Zebra printer name is listed. Thisensures your driver is installed properly. If no name is listed, reinstall. (See abovefor installation instructions)3. To send communication to the Zebra printer, click on the printer tab. ClickAdvanced. Click Tools.4. In the field named “Direct Command for Printer“ type “ default command”without quotes. Then click send.12
SuperSalon Version 5 Install ManualPlacing .bat File in Startup Folder1. Download the following .bat file and place into the C:/Supersalon directory.ftp://rsdsuppo@rsdsupport.net/Beauty er.bat (Contact RSD support for password)2. Create a shortcut to this file and place the shortcut in the startup folderAligning the Labels and Printing a Test Page1. Load the labels according the manual or Quick reference guideftp://rsdsuppo@rsdsupport.net/Beauty First/06.Documentation/ZebraPrinterInfo/Zebra LP2824 Quick Reference Guide.pdfftp://rsdsuppo@rsdsupport.net/Beauty First/06.Documentation/ZebraPrinterInfo/Zebra LP2824 Users Guide.pdf (Contact RSD support for password)2. Turn printer off. Hold down the feed button. Turn the printer back on whileholding the feed button. When the light blinks, let go of the feed button. This willprint some words onto the labels.3. Press the feed button once more. This should print one more word and centerthe label.4. In windows, go to Start Settings Printers and Faxes. Right click on the Zebra iconand go to properties5. Click on the General tab6. Click “Print Test Page”, this sends a test page to the printer. The printer is nowready to printSuperSalon Configuration1. Go to Setup Label Printer2. Change the printer to the proper port (LPT1 if you used the USB configuration)3. In the command window enter “ @”. This will change the way the test buttonworks. When you press test, it should make the power button blink on the printerif there is a proper connection.13
SuperSalon Version 5 Install ManualSection 3 – Data ImportMize Conversion ProcessInformation That Gets Imported from Mize ABE to SuperSalonSales and transaction historyCustomer historyCustomer perm, color, and cut recordsABE customer pointsEmployees and timecardsUpdate the system you are working with to the most recent version of SuperSalonUpdate to current versionAsk the customer if there is another store owned by them they would like to bringSuperSalon data over from. If yes, you will need to perform an initial setup in the Adminsite. Any data brought over from an initial setup will only be overwritten by the import ifit is data the import brings in. If that data is not converted by the import, the system willnot overwrite what was initially in the system. An example of this would be Commissionplans, pay periods, or permissions.Update the system to the “Import-Utilities” patch. Restart apache after using this patch.From the Command lineo Net stop apacheo Net start apache14
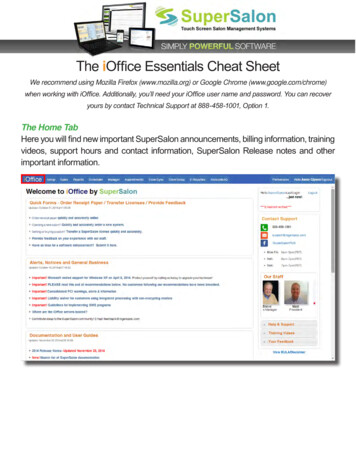
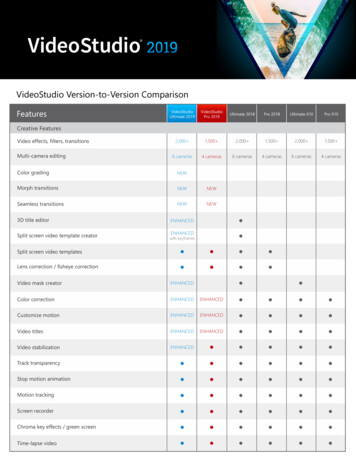
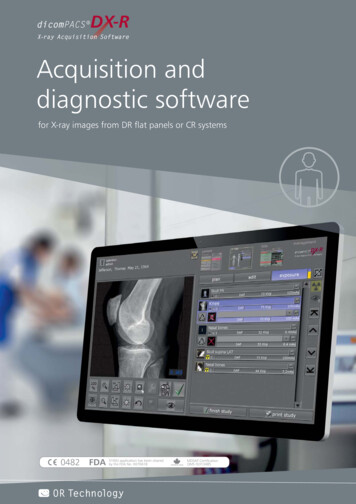
SuperSalon Version 5 Install ManualRetrieving dataMize Abe directories from the original system need tobe placed somewhere on the machine you areworking with. It is suggested to use a flash USB thumbdrive or an IDE to USB converter tool.Removing the Old Hard DriveFigure 1 – Old system, new systemand IDE to USB converterMake sure the old system is disconnected from the power sourceRemove the PC’s cover and locate the hard driveDisconnect the power cable and IDE cable from the hard driveRemove the hard drive from the computer. Some hard drives have fixing screwson each side of the hard drive that must be removed firstPower cableIDE cableHard driveFigure 3 - Power cable and hard driveFigure 2 - IDE cable15
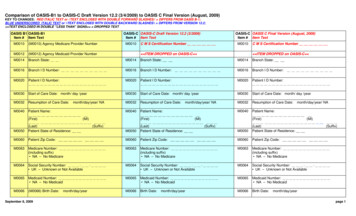
SuperSalon Version 5 Install ManualUsing an IDE to USB Converter ToolConnect the IDE adapter to the old hard driveConnect the power to the old hard driveConnect the adapter’s USB plug to the new PC’s USB socketFigure 5 – Connect the IDE adapterFigure 4 – Connect the powerEnsure the adapter is plugged into an electrical outletCopy FilesCopy the Abesta, Abesys, and Menu directories from the root directory of the oldhard drive to the root directory of the new computerDisconnect the adapterSuperSalon Data ImportNavigate to SuperSalon Setup Tab Utilities Import DataFigure 6 – Connect to USB socket16
SuperSalon Version 5 Install Manualo Select Mize from the “Select Import” drop down listo In the “Import data from field” enter the path to the Abesys folder youcopied from the original systemo Select “Clear existing SuperSalon data”o Select “Setup Import Files”o Select the “Run Import” button This process can take several minutes before you see any activityChecking the DataCheck that customers exist in the system and have historyCustomers have perm and color records in the systemProduct, services, and discounts appear in the system correctlyTickets are in the system and have service product and payment items on thethemRun some reports in the system to confirm the financial data looks appropriatefor two years pastEdit the payment methods imported to display correct textDelete any time clock positions imported by Mize that should appear on the timeclockPerform a Full UploadNote: Do nothing in the system while it is uploadingAfter the full upload is complete, verify the back office data looks the same as thedata on the storeDo a standard upload and confirm nothing drastic happened to the data after it iscompleteRegister the system and continue with general setup of the POS17
SuperSalon Version 5 Install ManualGuest Vision Conversion ProcessEnsure SuperSalon in on the correct version and initial setups have been done,if neededThrough the admin site, download the patch called GVImportAfter the download completes, open up the file C:\SuperSalon\PHP\php.iniFind the line below and remove the ”;”o ;extension php mssql.dll Making it look likeextension php mssql.dllOpen up a command prompt and type “cmd”o Start Run cmdExecute the following commandso Net stop apacheo Net start apacheIn SuperSalon go to Setup Utilities and select the Import Data buttono Select Guest Vision from the drop down listo Leave the default option as is in the Import Data From fieldo Available options Clear Existing SuperSalon DataThis will delete everything in the system prior to the importstarting Setup Import FilesThis will create the CSV filesUncheck this only if the import has timed out and you aretrying againo Once options are set as desired, press the Run Import button18
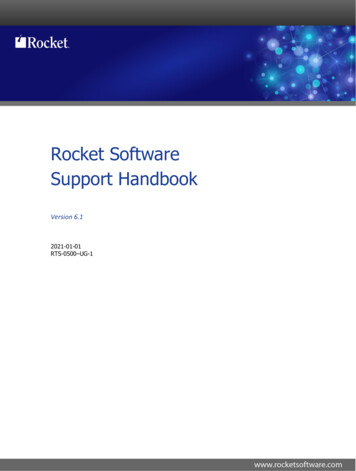
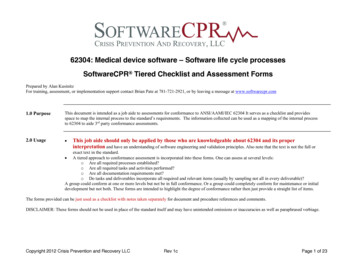
SuperSalon Version 5 Install ManualSection 4 – Network/Remote AccessBroadband Setup ProcessMost broadband setups involve two computers, a router, and a cable or DSL modem.Computers can be hardwired into the network or often they have wireless connectivity.Routers typically provide the computers plugged into it with the IP addressesautomatically. Broadband Internet requires the VNC (Port 5900) and HTTP (Port 80)ports to be forwarded to the computer system so that we may still access it.A typical broadband setup can look similar to the one below.Figure 7 - Typical broadband setup19
SuperSalon Version 5 Install ManualStep 1You will need to plug a cat5 cable from the computer systems ethernet ad
SuperSalon Point of Sale System This manual is intended to be used to help with various SuperSalon installation