Transcription
Configuring SIP TrunksPhase 5.5 and aboveVersion 1.1 / March 2011 2011 Presence Management LLC. All Rights Reserved
Configuring Accessline SIP TrunksConfiguring Accessline SIP TrunksThe following information details the process to install and activate SIP connectionsfrom Accessline.You should have the configuration information from Accessline before you start theinstall. This information will provide settings for the SIP connection(s).The information you will receive from Accessline will be composed of the followinginformation. Your order will be different from this information:SIP Trunk ID: dgw5197776Password: ZegxHOEtSBC DNS Name: usbc.accessline.comSBC IP Address: 64:28:113.10SBC Port: 5060Call processing has been setup to allow up to 4 simultaneous calls.The following new numbers and routing have been provisioned in our systems to routevia the SIP trunks to the PBX. Please ensure they are programmed in the customer’sphone equipment to route appropriately and advise the customer of these new numbers:614555121261455512136145551214(your order will reflect the total number of lines ordered)The following 911 callback number has been configured in our network as the default forthis location; please make sure it routes appropriately at the customer’s site.61455512121. Log into the MFIM Admin tool2. Open System ID and Numbering Plan and choose System and Device IP (PGM102-103)Look up the sequence number of the VOIP Gateway. If you are using the builtin VOIP ports, the sequence number will be 1. If you are using a VOIM24, thesequence number will be assigned by the MFIM. You will need this sequencenumber for programming the SIP trunks.Page 2 of 7
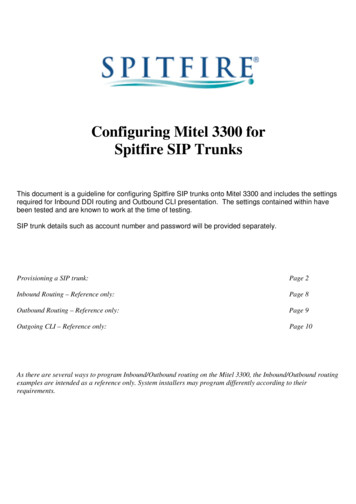
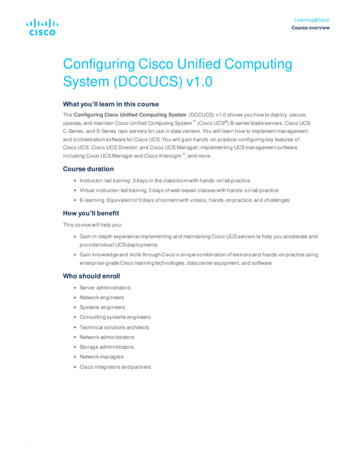
Configuring Accessline SIP Trunks3. With the introduction of Phase 5.5 the programming sections for SIP havebeen consolidated into a single section titled SIP Data4. Open SIP Data and choose SIP Common AttributesEnter the Primary and Secondary DNS addresses in the appropriate Valuefields.Verify that the Local Server TCP and UDP ports are set to port 5060. Thestatus of the SIP Stack is provided at the bottom of the screen. If the statusis not OK, contact Presence Management Technical Support for assistance.Click SAVE to save your settings.Page 3 of 7
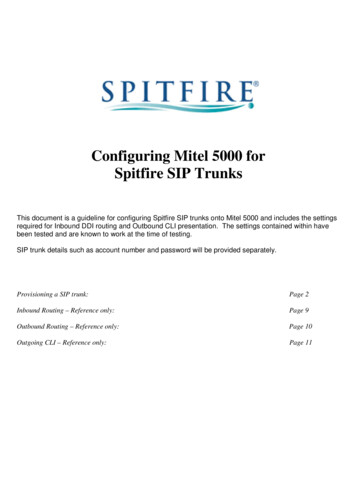
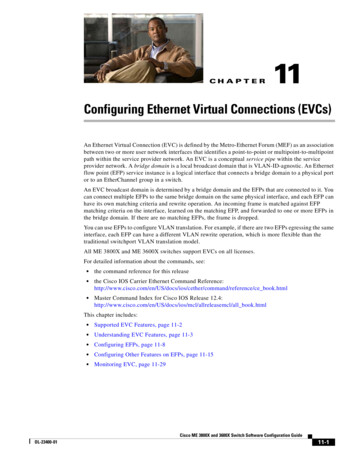
Configuring Accessline SIP Trunks5. Open SIP Data and Choose SIP CO AttributesEnter the CO Range for the SIP trunks to be installed. You will see thefollowing screen (for this document, the entire screen is not displayed).Enter the SIP Registration Hostname/proxy address provided in the set up email into theProxy Server Address and Domain Values fields.Set the Registration UID Range to a minimum of 1 for both the beginning andending data values. The User ID value is assigned in the Station Data Attributesand allows a station to access the SIP CO trunks. If this value is not set here or inStation Attributes, the station will not be able to make SIP calls. Furtherinformation on the Registration UID settings and programming can be found inthe iPECS Programming Manual.Set the DTMF type to RFC 2833.Set the SIP User ID Table Index to 1.Page 4 of 7
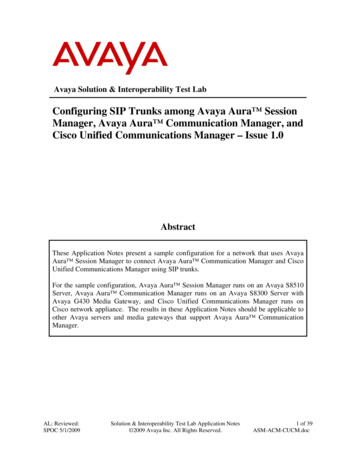
Configuring Accessline SIP TrunksSAVE your data then click on Register to Register the SIP Trunks to the network.6.Open SIP Data and choose SIP User ID AttributesEnter the SIP User ID Index Number you assigned in SIP CO Attributes andclick LOAD.You will see the following tableEnter the Registration User ID. This value will be the SIP User Name with theFlexIP Network domain appended to it. In this example the value would be:Dgw5197776@usbc.accessline.comEnter the Authentication UsernameEnter the Authentication PasswordPage 5 of 7
Configuring Accessline SIP TrunksSet the User ID Register to “Register”Set the User ID Usage to “On”Set Authorized Representative ID Table Index to “1”Set the Ring Route Type to “DID Conversion”Set the DID Conversion Type to “Modify Using Flexible Conversion Table”Save your data.7. Verify the Trunks are registered by opening Station Data StationSIP Attributes and clicking on the Status button. A new window will open showingthe Registration User ID and the SIP Status for each VoIP/SIP Index registered.8. Open Station Data and Choose Station Attributes (Pgm 111-113)The SIP User Table Index must match the SIP Table Index you programmedin Board Base Data Section and SIP Gateway Attributes in the first step of thisdocument. Set this value for any stations that will access the SIP trunks. Ifthis value is not set, the station will not be able to access the SIP trunk.Page 6 of 7
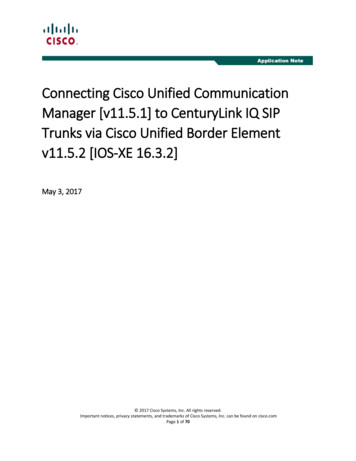
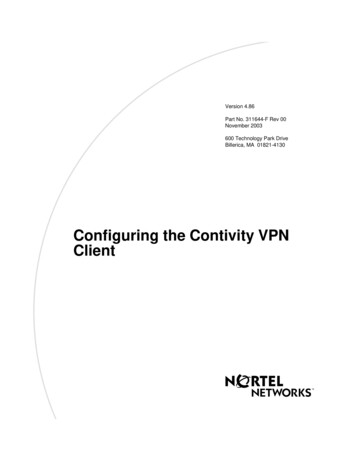
Configuring Accessline SIP Trunks9. Open CO Line Data and choose ISDN CO Line Attributes (143, 151)You will see the following screen:Make sure your settings match the configuration shown in the screen.10. Open CO Line Data and choose CO/IP Attributes (Pgm 140, 142)Make sure the setting for CO VoIP Mode is set to COMMON.If you have any questions or require assistance, contact Presence ManagementTechnical Support atsupport@presencemanagement.com614.652.6500 option 3Page 7 of 7
The SIP User Table Index must match the SIP Table Index you programmed in Board Base Data Section and SIP Gateway Attributes in the first step of this document. Set this value for any stations that will access the SIP trunks. If this value is not set, the station will not be able to access the SIP trunk.