Transcription
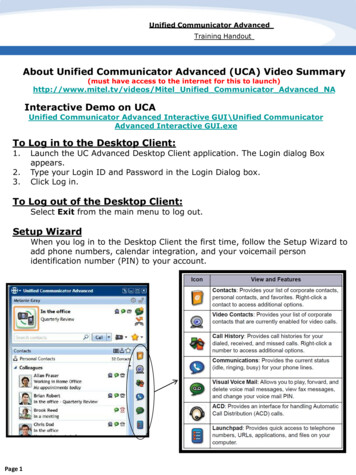
Unified Communicator AdvancedTraining HandoutAbout Unified Communicator Advanced (UCA) Video Summary(must have access to the internet for this to launch)http://www.mitel.tv/videos/Mitel Unified Communicator Advanced NAInteractive Demo on UCAUnified Communicator Advanced Interactive GUI\Unified CommunicatorAdvanced Interactive GUI.exeTo Log in to the Desktop Client:1.2.3.Launch the UC Advanced Desktop Client application. The Login dialog Boxappears.Type your Login ID and Password in the Login Dialog box.Click Log in.To Log out of the Desktop Client:Select Exit from the main menu to log out.Setup WizardWhen you log in to the Desktop Client the first time, follow the Setup Wizard toadd phone numbers, calendar integration, and your voicemail personidentification number (PIN) to your account.Page 1
General Information about UCAMain Menu, Features Overview, and Customizing your ViewsMain Menu-The main menu on the Desktopclient provides access to the following options:Configuration – Provides options to configure featuressuch as call notification, calendar integration, softphone settings, teleworker settings, and USBdevices.My Account – Provides a way to add contact information, upload a photo, and configure additionalaspects of your UC Advanced account.Dynamic Status- Allows you to create and delete Dynamic Statuses and edit Dynamic Statuselements such as call routing and presence information.Detailed Call History - Provides access to detailed historical data for calls.Collaboration - Provides access to audio, video, and Web conferencing, and related collaborationfeatures.Import Contacts - Imports contacts to UC Advanced from your Microsoft Outlook, IBM Lotus Notes,or Sage Software ACT! Personal Information Manager (PIM).Features–The Desktop Client includes the following communication management features:Presence Management – Provides real-time telephony, video, and chat/IM availability informationfor the contacts you are currently monitoring.Contact Management– Provides access to corporate contacts, and allows you to import andorganize personal contacts. Right-click any contact to access associated communication optionsfor that contact.Call Management- Provides call control capabilities from the Call window. The Call window displayscontact presence information and provides additional communication options.Video Call Management-Provides video broadcasting capabilities, view options, and camera-relatedsettings from the Video window.Chat Management – Chat configuration options allow you to customize chat settings and alerts.The Chat dialog box provides access to multi-party chat, emoticons, file transfer, and chathistory features.Calendar Integration- Provides automatic updates to your Dynamic Status based on your dailyOutlook or Lotus Notes calendar entries.Knowledge Management - Provides indexing and search functions to associate files and e-mailmessages with your contacts.Move and Re-size ViewsTo customize the appearance of UC Advanced, you can do the following: Re-size the Desktop Client or Run theDesktop Client in Compact ModeTo rearrange the view icons: view Icons "Grab" a view icon and drag it up or down to a new location on the view panel.To drag a view from the Desktop Client interface: Click the view icon for the view you want to move and dragit to another location on your computer desktop. The view appears in a separate window outside of the DesktopClient interface. You can move each view independently on your computer desktop.To move an external view window: "Grab" anywhere on the title bar of the external view window and move itto a new location on your desktop.To re-size an external view window: Hover your mouse over any edge of the view window. When the arrowappears, press down on the left mouse button and "drag" the window to re-size it.To dock an external view window to the Desktop Client:"Grab" anywhere on the window title bar and dragthe view so that the edge of the external view is close to the edge of the Desktop Client. The view snaps into placeon the Desktop Client. Once an external view has been docked, the Desktop Client and docked view move as one.To undock an external view window from the Desktop Client: "Grab" anywhere on the title bar of the viewwindow and move it away from the Desktop Client. Once a view has been undocked from the Desktop Client bothcomponents move separately.To close an external view window: Click the view icon on the Desktop Client interface or Click the close buttonin the external view window. Your customized appearance settings are maintained when you close and re-open theapplication.NOTE: The Dynamic Status view and RSS Window are in fixed locations on the Desktop Client and cannot be moved.Page 2
UC Advanced Tray Icon and MenuStatus Icons and Navigating through UCAUC Advanced Tray Icon and MenuWhen the UC Advanced Desktop Client is running, an icon, indicating your telephony and messagepresence, is displayed for your account in the Windows notification area (also known as thesystem tray).This area is in the lower right area of your desktop, left of the displayed time.If you close the main interface by clicking “x” the in the title bar, the presence icon indicates thatUC Advanced is still running in the background.Windows notification icons change to reflect your telephony and message presence:Right-click the icon in the Windows notification area to access the following options:Show Unified Communicator Advanced - Opens the Desktop Client interface.Upgrade - Starts the Desktop Client upgrade process (this option only appears if a softwareupgrade is available).Set Status - Allows you to change your Dynamic Status from the sub-menu.Line Status - Provides the status for each line for your phone. (This is dimmed if you have justone line.)Voice Mail - Provides the following options to retrieve voice mail and FAX messages:Manage Voice Mail Message: New voice mail messages are listed at the top of the VoiceMail sub-menu and include caller name and number (if known), date, and time. Click amessage from the sub-menu to open the Visual Voice Mail view where you can manageyour voice mail message.Show Visual Voice Mail: Opens the Visual Voice Mail view where you can manage yourvoice mail message.Call Voice Mail: Places a call to your voice mail system. You can then log in to yourmailbox to retrieve messages.Missed CallsProvides the following options for missed calls:View and/or return missed call: Missed calls are listed at the top of the menu andinclude caller name and number (if known), date, and time. Click a missed call from themenu to immediately place a call to the associated number.Show Call History: Opens the Call History view.Acknowledge Missed Calls: Clears the missed call icon from the tray ()and DynamicStatus View () and resets the control used to identify recently missed calls.Do-Not-Disturb - Enables or disables Do-not-disturb mode, which temporarily routes your callsto voice mail.Log In - Allows you to log in to UC Advanced. (This option is dimmed unless you are alreadylogged in on another computer.)ExitPage 3
UC Advanced Tray Icon and MenuPresence Icons and Status UCAContact PresenceYour UC Advanced system uses one of the following presence modes:Universal Presence: You automatically see presence information for all of your corporate contacts.On-Demand Presence: Presence for all contacts is disabled by default. However, you can show andhide presence for individual corporate contacts from the Contacts ContextThe Status unknown message indicates that the contact has not logged in to UC Advanced.When presence is enabled, the following information is displayed for UC Advanced contacts:Page 4
Dynamic Status – Main MenuYour Presence Settings and Call HandlingDynamic StatusFrom the Dynamic Status dialog box you can add and edit Dynamic Statuses. You can access the Dynamic Statusdialog box from the Main Menu or the Dynamic Status view. Dynamic Status elements include:Dynamic Status Name: Provides a simple description for the Dynamic Status.DynamicDefault message: Provides additional information for the Dynamic Status.StatusMake my calls from: Specifies which device to use for outgoing calls for the Dynamic Status.ViewSend my calls to: Specifies how your calls are handled for the Dynamic Status.Video calls: Specifies your availability for video calls for the Dynamic Status.Instant Messages: Specifies your IM availability and an auto-reply for the Dynamic Status.More Options: The following additional options are available:Preferential Contacts: Allows you to configure special routing instructions for incoming calls from certain contactswhich override the routing instructions specified by your Dynamic Status. Click here to see an example.Phone Settings: Includes call forwarding, Do-Not-Disturb, and Auto Answer settings, which override the routinginstructions specified by your Dynamic Status.NOTE: The options you configure on the Preferential Contacts and Phone Settings tabs override the routing you configure in theSend my calls to field. Make sure you understand how your calls will be routed when you configureConfigure Basic Options for Dynamic StatusBasic Options appear at the top of the Dynamic Status dialog box. Basic options include:Dynamic Status name ; Default message; Outgoing call device; Incoming call routing; Video presence; IM presenceTo add or edit basic options for Dynamic Status:From the Dynamic Status dialog box, do one of the following:To add a Dynamic Status: Click New, and then type a brief description to use as the Dynamic Status name.To edit a Dynamic Status: Select the Dynamic Status from the list and edit the existing Dynamic Status name.(Optional) Click the Enter a default message for this status link to add a default message to the new DynamicStatus.Then Select from the Following Options Select an option for the Make my calls from field. Options include:Use Current Setting: Select Use Current Setting if you want to use the device you have currently specified in theDynamic Status view to make all outgoing calls when the associated Dynamic Status is active.Desk Phone: Select Desk Phone if you want to make all outgoing calls from your desk phone when the associatedDynamic Status is active.Softphone: Select Softphone if you want to make all outgoing calls from your softphone when the associatedDynamic Status is active.Select an option for the Send my calls to field. Options include:My Ring Group: This includes the group of devices that your administrator has configured for you on thecommunications platform. When you select My Ring Group, the available devices appear below the list box. Selectwhich devices you want your calls to go to when the new Dynamic Status is active.Voice Mail (extension): Select Voice Mail if you want your incoming calls to go to voice mail for a specific DynamicStatus. When calls are routed directly to voice mail, UC Advanced does not receive the call. Therefore, routing forPreferential Contacts will not work for those Dynamic Statuses that have the Send my calls to field set to VoiceMail.Phone number (value): If you configured another extension for yourself (such as a mobile or home number), oranother user's extension (such as your assistant's number) using the My Account dialog box, you can select thenumber here.Select Accept or Appear Offline for video calls when the Dynamic Status is active.Select Accept or Appear Offline for instant messages when the Dynamic Status is active.(Optional) If you selected Accept for IM, click the Enter an IM Auto-Reply link to add a brief message to bedisplayed when a contact sends you an IM.Click Save to apply your changes and close the Dynamic Status dialog box.To delete a Dynamic Status:From the Dynamic Status dialog box, select a Dynamic Status from the list.Click Delete then Click Save to apply your changes and close the Dynamic Status dialog box. You can alsoconfigure Preferential Contacts and Phone Settings for each Dynamic Status under More Options.Page 5
CommunicationsCall Control for Desk and Soft PhonesIncoming call popup windowWhen you are logged in to the Desktop Client and you receive a call, the incoming call popup window appears(unless you have disabled it in the Call Notification area of the Configuration dialog box).The incoming call popup window displays the following information (if known) for the call and caller: The subject for the call (Call with info option) If the call is high priority, the title bar is red (Call with info option) Caller name, number, photo, and presence information The phone number or extension the call is ringing Options to respond to the call. See the Receive a Call topic for incoming call popup window options.Page 6
ContactsIntegrating Managing, and Communicatingwith your ContactsPersonal Contact InformationWhen you import a contact from your PIM (Personal Information Manager) to the Desktop Client,contact details that originated in the PIM cannot be edited. However, you can do the following from theDesktop Client: Create new personal contacts. Edit an imported contact by adding company name,phone numbers, e-mail addresses, and IM logins. Edit the contact in your PIM.To manually create or edit a personal contact:From the Contacts view, click the Personal Contacts icon. Do one of the following: To create a new contact, right-click in the Personal Contacts window and select Add PersonalContact. The Contact Information dialog box appears. To edit an existing contact, right-click the contact and select Contact Information. The ContactInformation dialog box appears. Type a Name for the contact.(Optional) Type a Company Name for the contact.(Optional) Select the Favorite option to specify the contact as a favorite.(Optional-Corporate contacts only) Select the Notify on Log in option to receive a log innotification popup window when the contact logs in. (Optional) Add communication information for the contact. Click OK to save your changes and close the Contact Information dialog box.To edit a contact from your PIM: From the Contacts view, click the Personal Contacts icon. Right-click a contact and select Contact Information. The Contact Information dialog boxappears. Click Edit in PIM. Your PIM application opens to the contact card. Make the changes to the contact, save the changes and close the PIM.You can import Personal contacts from your PIM as follows:Drag and drop from your Outlook and Lotus Notes PIM.Export contacts from ACT! to UC Advanced.Batch import contacts from any PIM using the Import Contacts dialog box.Contacts Context MenuThe Contacts context menu provides options for contacts. Note that not all of the options listedbelow are available for every contact. Contacts context options include:Add New GroupTo add a new group:Right-click in the Personal Contacts window and select Add New Group. The new groupappears at the top of the window.Type a name for the group, and then press the Enter key on your keyboard.Add Personal ContactTo add a personal contact:Right-click in the Personal Contacts area and select Add Personal Contact. The ContactInformation dialog box appears. See the Personal Contact Information topic for additionalinformation and instructions.Add to FavoritesFavorites are the Corporate and Personal contacts that you assign to your Favorites list. You canaccess Favorites options from the Dynamic Status view or the Favorites list in the Contactsview.To add a contact to your Favorites list.Right-click the contact and select Add to Favorites. The contact is added to your Favorites listin the Contacts view and also to the Favorites menu in the Dynamic Status view.NOTE: When you add contacts to your Favorites list in the Contacts view, presence isautomatically enabled for the contactPage 7
ContactsIntegrating, Managing, and Communicatingwith your Contacts - continutedAdd to Personal ContactsTo add a Corporate contact to your Personal contacts: Right-click the contact, select Add toPersonal Contacts, and then do one of the following: If you have not created any Personal contact groups, select Main Group. This is the defaultPersonal contact group. If you have created Personal contact groups, select the group to add the contact to.CallTo call a contact: Right-click the contact, select Call, and then select the device to call. The Callwindow appears and UC Advanced places a call to the number. The contact you called receives anincoming call popup window if he or she has screen pop enabled for incoming calls.NOTE: You can also click the contact's name to immediately place a call to the contact.Call with InfoThis option allows you to provide a subject and specify priority for a call. The subject and priority arecommunicated to the contact from the incoming call popup window if he or she has screen pop enabledfor incoming calls.To call a contact with information:Right-click the contact, select Call with Info, and then select the device to call. The CallInformation dialog box appears.Type a subject to include with your call.(Optional) Select High Priority for important calls.Click Place Call.ChatTo initiate a Chat session: Right click the contact and select Chat. The Chat dialog box opens. Seethe Chat topic for detailed information about chat.NOTE: You can also click the contact's online chat icon to initiate a chat session.Chat HistoryIf you have previously chatted with a contact, you can view your chat history.To view chat history for a contact:Right-click the contact and select Chat History. The Chat History dialog box appears.NOTE: You can also access the Chat History dialog box from the main menu in the Chat dialog box .Contact InformationTo access information for a contact:Right click the contact and select Contact Information. The Contact Information dialog box appears.See the Corporate Contact Information or Personal Contact Information topic for detailed information.Delete A Contact or GroupTo delete a Personal contact: Right-click the contact and select Delete. The contact is deleted fromyour Personal contacts.To delete a group (and the contacts in the group): Right-click the group at the top of the PersonalContacts window and select Delete Group. The group is deleted.Detailed Call InformationTo access detailed call information for the contact: Right-click the contact, and then selectDetailed Call Information. The Detailed Call History dialog box appears.To disable log in notification: Right-click the contact and select Disable Log in Notify.You can also disable this option as follows:Click Disable Login Notify in the log in notification popup window.Disable the Notify on Login option in the Contact Information dialog box.E-mailTo send an e-mail: Right click the contact and select E-mail. Your e-mail client opens a new messagewindow. The contact's name is included in the To: field. Complete the e-mail message and send it.Enable Login NotifyWhen you select this option for a contact, you receive a notification popup window when a contact logsin to UC Advanced.To enable log in notification: Right-click the contact and select Enable Login Notify.Page 8
Chat Using ContactsChat Overview and OptionsChatUsing the UC Advanced chat function, you can initiate a chat session with other UC Advanced usersor with a federated contact.The Chat dialog box includes the following UI elements:Chat MenuThe following options are available from the chat menu:Chat History: Opens the Chat History dialog box.Invite Participants: Allows you to invite other user's into the current chat session. You can have upto 15 participants in a single UC chat session. Chat sessions with federated contacts are point-topoint only.Start Collaboration: Allows you to start a collaboration session with all chat participants.Files: Includes the following file-related options:Send One or More Files: Allows you to browse to a file and send it to all participants. When youtransfer a file, participants receive a prompt asking if they want to receive the
UC Advanced is still running in the background. Windows notification icons change to reflect your telephony and message presence: Right-click the icon in the Windows notification area to access the following options: Show Unified Communicator Advanced - Opens the Desktop Client interface.