Transcription
fxTrade Platform User Guide
Table Of ContentsIntroducing fxTrade. 1The fxTrade Main Window . 1What Is fxTrade?. 2System Requirements. 2Getting Started. 3Quick Start . 3Log In, Log Out, Disconnect, Lock. 8Managing Accounts . 10Issue Market or Limit Orders. 11Modify Trades and Orders . 19Add Trailing Stops. 23Close a Trade, Order, Position, or Exposure. 26Use Box Options . 29Customize the Interface . 35Set Up Multiple Profiles. 37Keyboard Shortcuts . 41Using Graph Features . 42What Do Currency Graphs Show?. 42Currency Graph Quick Start. 43Trading Activity Symbols. 48Draw Trendlines . 51Use Overlay and Indicator Studies . 54fxTrade Interface. 57Action Buttons . 57Account Summary. 58Quote List and Quote Panel. 61Pull-Down Menus . 63Transaction History Window . 68User Preferences Window . 71Tables . 79ii
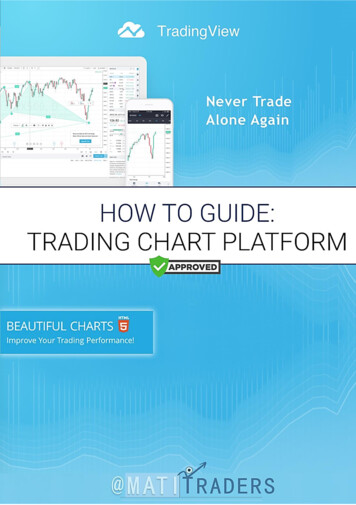
Introducing fxTradeThis user guide describes how to use the user interface for OANDA's fxTrade and fxTradePractice (formerly fxGame). If you're not familiar with currency markets and currency tradingterminology, consult the Learn section of the fxTrade web site.The fxTrade Main WindowfxTrade Main WindowThe fxTrade platform window is divided into a number of sections: Action Buttons: The vertical panel located on the left side of the platform contains a set ofaction buttons that allows you to perform operations or access additional information.Pull-Down Menus: The pull-down menus across the top provide additional functionality.Tables: The area located across the top of the fxTrade platform displays various types ofactivity information in tabular format. Click on a tab to view particular information about youraccount, such as currently held trades, current open positions, exposure to particularcurrencies, or the recent Activity Log.Account Summary: The area in the middle left of the Platform gives a summary of youraccount.Quote List and Panel: The area at the bottom left displays the currency rates of yourchoice, continuously updated in real time.1
fxTrade Platform User Guide Graph: Taking up the large part of the window at the bottom-right, the graph displayscurrency rates over time. It is updated in real time with the latest rates at your chosengranularity. Click over the graph to choose buy/sell positions, modify existing trades, drawbox options, or view trendlines or studies.What Is fxTrade?The fxTrade platform lets you interact with the OANDA fxTrade system. Use it to analyzechanges in currency exchange rates, review current currency positions, review past transactions,or issue buy and sell requests.Some of the key benefits of this platform include: It can be run on any of the popular web browsers connected to the Internet (or directly fromany computer desktop connected to the Internet).Currency exchange rates are continuously updated and displayed in real time.All pertinent information appears in one window.All interaction with the server occurs over fully encrypted Internet connections.fxTrade Practice is the demo version of fxTrade. You can use it to trade under real marketconditions with real prices and spreads at no financial risk, for as long as you want.System RequirementsThe fxTrade platform can run on most browsers connected to the Web. For detailed hardwareand software requirements, go to the technical requirements web page.2
Getting StartedQuick StartThis page is for those who don't have the time or patience to wade through an entire usermanual. It provides the quickest way to do something (not all the ways).Work with the Correct AccountIf you set up multiple subaccounts, you mustmake sure you are using the correct accountbefore you start trading:1.Select Account Change Account andchoose the correct account from thesubmenu.2.You can see the current account in thewindow title.(Managing Accounts)Place a Trade1.From the Quote Panel, click the buy or sellside of the currency you're interested in.An order window appears pre-filled with thecorrect buy/sell button and the currencypair.2.Choose market or limit order.3.Type the number of units you'd like.4.For limit orders, specify your targetexchange rate and the length of time beforethe order expires.5.Optionally, specify upper and/or lowerbounds, stop loss and/or take profit levels.6.Click Submit.(Placing a Trade—Details.)Customize Your Quote List1.Click theList box.icon just above the Quotes2.Add all pairs, or just the pair you want.3.Click Save.4.Select Tools Save Current Profile (tosave your layout for future sessions).(Quotes Tab—Details.)3
fxTrade Platform User GuideClose a Trade1.In the Trades table, click the trade youwant to close.The trade ticket window appears. (Thissame window is used for closing andmodifying trades. By default, it is set toclose trades.)2.Click Submit.(To close all trades, select Account Close All Close All Trades.)(Closing a Trade—Details.)Modify a Trade1.In the Trades table, click the trade youwant to modify. The trade ticket windowappears.2.Click the Modify radio button.3.Add stop loss and/or take profit levels orchange existing levels.4.Click Submit.(Modifying a Trade—Details.)Set a Trailing Stop1.Place (or modify) a trade.2.Click the Trailing Stop button.3.Use the default value (in price or pips), ortype in your own value.4.Click Submit.(Trailing Stops.)Cancel an Order(An open order is a request that a trade shouldbe opened automatically if the exchange rate ofthe currency pair reaches a specified threshold.)1.In the Orders table, click on the order.The order's Ticket window appears, whichis used for canceling and modifying openorders. By default, it is set to cancel orders.2.Ensure the Cancel button is clicked, thenclick Submit.(Canceling an Order—Details.)4
Getting StartedModify an Order1.In the Orders table, click on the order. Theorder's Ticket window appears.2.Click the Modify radio button.3.Change any of the units, exchange rate,lower bound, upper bound, stop loss, takeprofit, or duration values.4.Click Submit.(Modifying an Order—Details.)Change Graph Type1.Locate the three pull-down menus abovethe graph.2.Click the third one.3.Select the graph type you want.Note: To change which values are shown on thegraph—ask price, bid price, and so on—click onbutton above the graph,the Chart Optionsthe third icon from the right.(Changing Graph Type—Details.)Draw Trendlines1.Click the Draw Trendlines button located above thegraph, the second icon from the right. A menuappears listing simple and advanced trendlines.2.Select the type of trendline you want to draw. (Fordetails, see the section on Trendlines.)3.Place the cursor where you would like the trendline tobegin, and click. (For horizontal and verticaltrendlines, simply click once to place the line.)4.Move the cursor where you would like the trendline toend, and click.Observe Market Sentiment1.From the Resources menu, select OpenOrders Statistics, Open TradesStatistics, or Long-Short Ratios.These tools provide instructions showingyou how to interpret these statistics. Youcan also access these tools directly fromthe web by visiting the fxTrade News andAnalysis web page.5
fxTrade Platform User GuideSee Your Total Risk to Each Currency1.Click on the Exposure tab.The overall long or short positions areshown for each currency you haveexposure to.(Exposure Table)Check the Interest Rates Charged by OANDA1.Select Resources Interest Rates.2.Select the date(s) and the currency you’reinterested in.The interest rates appear with the BID(borrowing) and ASK (lending) rates. Youreceive the BID rate on the base currencyyou long and pay the ASK rate on the basecurrency you short, and vice versa for thecounter currency.OANDA Interest Rate Calculation—Details (webpage)Check Your Account History1.Click on the History action button. The FullTransaction window appears in yourbrowser.2.To narrow your search, select whetheryou’d like transactions for a specific date ora range of dates.3.Click the Filter button to filter your results.(Transaction History—Details.)View the Leverage for your Accounts1.Select Account Account Details. (Awindow appears.)2.The current margin ratio (called "MarginRate") is listed for each of your accounts.3.If you want to change the leverage for oneor more accounts and go to the next task.6
Getting StartedChange Current Leverage for an Account1.Select Account Change Leverage. (Awindow appears.)2.Type your user name, password, and theaccount number.3.Select the new leverage amount you’d like.4.Click Submit (and go back to step 4 for theother accounts you want to change).7
fxTrade Platform User GuideLog In, Log Out, Disconnect, LockIn This Section Log InLog OutDisconnectLockLog In1. Before you can log in to fxTrade or fxTrade Practice,you must be a registered user and obtain a username and password. (Register for a free fxTradeaccount or open a free fxTrade Practice practiceaccount.)2. Log in from a Web browser (for fxTrade or fxTradePractice).Logging in requires that you provide a username andpassword. Both the username and password arecase sensitive.(If you've forgotten your password or are havingother problems, go to the troubleshooting page.)3. If you enter the username and password correctly, asmall window appears indicating that the fxTradePlatform is loading (see the image to the right).Do not close this small window or it will close thefxTrade platform. However, you can minimize it soit's not in your way.4. After a short time, the main fxTrade window appears.Log OutYou can log out of the fxTrade platform in several ways: From the platform's menu, select Connection Quit. This disconnects you from the serverand closes the application completely.Close the small pop-up window that appeared when you first opened the platform, or clickits Logout button. This disconnects you from the server and closes the applicationcompletely.DisconnectYou can disconnect the fxTrade platform from the OANDA fxTrade server to reduce computer ornetwork resources. The main platform window stays open so you can stay logged in and quicklyreconnect later.8
Getting StartedTo disconnect, select Connection Disconnect from the platform menus, or click on theconnection meter at the bottom left of the fxTrade window:LockFor your privacy or security, you may want to lock the fxTrade platform. If you do so, you willneed to type your password to access it later.To lock the fxTrade platform immediately, select Connection Lock.To set up the platform so it locks automatically after a certain period of inactivity, go to the Misctab of the User Preferences window.9
fxTrade Platform User GuideManaging AccountsWhy Use Multiple Accounts?You may choose to open any number of accounts in addition to your primary account. You cancreate accounts in your primary currency, or in other supported currencies.You may want to open additional accounts for a variety of reasons: To keep your funds in a currency other than the currency of your primary account forhedging or personal needs. To test trading strategies using a small amount of funds without affecting your primaryaccount To allocate funds to your investment manager for your FXManager accountFor more information on opening multiple accounts, see the Multicurrency Accounts web page.Add AccountsTo add an account, select Account Create Account. A web page appears where you canprovide a name for the account, and designate the currency and leverage.(You will not be able to change the name or currency later, but will be able to change leverage byselecting Account Change Leverage.)Important! Make Sure You are Trading with the Correct AccountWhen working with multiple accounts, you must make sure you are using the correct accountbefore you start trading:1.Select Account Change Account and choose the correct account from the submenu.2.You can see the current account in the window title.Add or Withdraw Funds from AccountsFor fxTrade users:1. Log in to the Cash Management System. (Select Account Transfer Funds from thefxTrade interface.)2. Select the Transfer Funds option.For fxTrade Practice users:1. Select the account you want to fund from your primary account, or from which you wantto withdraw funds to return to your primary account.2. Select Account Add or Remove Funds. A web page appears where you can choosefrom various amounts of funds to add to the account (the positive values) or deduct fromit (the negative values).10
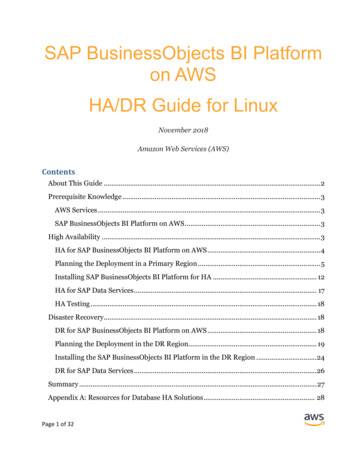
Getting StartedIssue Market or Limit OrdersIn this section: Types of Orders Open the Buy/Sell Window to Place Orders Place a Market Order Place a Market Order with One Click Place a Limit OrderTypes of OrdersFor important information on how orders are processed on the fxTrade Platform, please reviewthe online tutorial, particularly the section, Buying and Selling Currency Pairs.Market Orders are executed when they are submitted and become trades to buy or sell based onthe market exchange rates in effect when the order is executed. Market Orders can be closed atany time (with the difference between execution rates and current market rates paid or charged).Market Orders can have Take Profit or Stop Loss Orders attached to them so they're closedautomatically when certain criteria are reached, and upper and lower bounds to ensure they'reexecuted at a rate close to the one in effect when the Order was submitted.Limit Orders are executed (become a trade) only when certain criteria are met. For example,when the exchange rate reaches a specified threshold before a specified expiry time. Limitorders, if executed, become trades to buy or sell based on the exchange rate at the time ofexecution.Open the Buy/Sell Window to Place OrdersYou issue Market Orders or Limit Orders for either buy or sell trades from the Buy/Sell window.(You can select the type of order by clicking the window's tabs. A Market Order is the defaulttype.)You can open the Buy/Sell window in a variety of ways: Choose Buy or Sell under the Account menu.Click on the Buy/Sell Action button.Click on the bid or ask price in the Quote List or Quote Panel.Press the keyboard shortcuts: F2 (Buy Market), F3 (Sell Market), F4 (Buy Limit), or F5 (SellLimit).Click the graph at the value you want and select the order type from the menu that appears.The Buy/Sell pop-up window appears once you've made your selection.Click the Buy button or the Sell button above the graph at the top right.11
fxTrade Platform User GuideAccess the Buy/Sell window in various waysDefault FieldsThe fields of the Buy/Sell window are filled in depending on how you open the window or whichpreferences you've set up. You can preset the default number of units, upper/lower bounds, andstop loss/take profit values in the Trading tab of the User Preferences window. (Select Tools User Preferences.)Place a Market OrderMarket orders are executed when they are submitted. They are executed at the current marketprice, unless it's outside of upper and lower bounds optionally set by the user.12
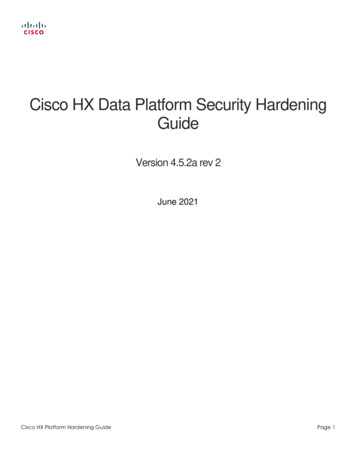
Getting StartedTo place a market order:1. Open the Buy/Sell window (shown to the right)using any of the methods listed above.Note: If the window title is "Limit Order", click theMarket Order tab to change it.2. Define the bid or offer, including the position(Buy/Sell), the market (currency pair), and thenumber of units.(See below for a complete description of all theoptions. You can click the arrow above the Submitbutton to reduce or expand the number of optionsavailable.)By default, the upper bound, lower bound, takeprofit, stop loss or trailing stop are not set. To setthem, click the corresponding check box. Theirinitial default values are determined by thesettings in the Trading tab of the UserPreferences.Change the field values using thebuttons, or by typing a new value. (Clickthe radio buttons above these values to view themby quoted price or by difference in pips.)Buy/Sell Window for a Market Order3. Check the information provided at the bottom ofthe window to verify your order.4. When you are ready, click the Submit button.If the order is successful and a trade occurs, thenan acknowledgement window appears with aticket number that you can use for futurereference.(You can disable or enable trading confirmationwindows in the Trading tab of the UserPreferences window.)5. The Trades and Activity tables are updated andthe aggregated effects from this new trade arereflected in the Positions and Exposures tables.Important NoteIf an order is successful and a trade is executed, the exchange rate obtained for the trade willcorrespond to the most current exchange rate maintained at the OANDA fxTrade servers and notnecessarily the rate you saw in the Buy/Sell Market Order window. This is because the rat
Close a Trade 1. In the Trades table, click the trade you want to close. The trade ticket window appears. (This same window is used for closing and modifying trades. By default, it is set to close trades.) 2. Click Submit. (To close all trades, select Account Close All Close All Trades.) (Closing a Tra