Transcription
ProxySG on AWS MarketplaceBYOLDeployment GuideVersion 6.7.xGuide Revision: 10/7/2019SGOS for AWS MarketplaceDeployment Guide
Symantec SGOS on AWS Deployment Guide 6.7.xLegal NoticeCopyright 2019 Symantec Corp. All rights reserved. Symantec, the Symantec Logo, the Checkmark Logo, Blue Coat, andthe Blue Coat logo are trademarks or registered trademarks of Symantec Corp. or its affiliates in the U.S. and other countries.Other names may be trademarks of their respective owners. This document is provided for informational purposes only and isnot intended as advertising. All warranties relating to the information in this document, either express or implied, are disclaimedto the maximum extent allowed by law. The information in this document is subject to change without notice.THE DOCUMENTATION IS PROVIDED "AS IS" AND ALL EXPRESS OR IMPLIED CONDITIONS, REPRESENTATIONSAND WARRANTIES, INCLUDING ANY IMPLIED WARRANTY OF MERCHANTABILITY, FITNESS FOR APARTICULAR PURPOSE OR NON-INFRINGEMENT, ARE DISCLAIMED, EXCEPT TO THE EXTENT THAT SUCHDISCLAIMERS ARE HELD TO BE LEGALLY INVALID. SYMANTEC CORPORATION SHALL NOT BE LIABLE FORINCIDENTAL OR CONSEQUENTIAL DAMAGES IN CONNECTION WITH THE FURNISHING, PERFORMANCE, ORUSE OF THIS DOCUMENTATION. THE INFORMATION CONTAINED IN THIS DOCUMENTATION IS SUBJECT TOCHANGE WITHOUT NOTICE. SYMANTEC CORPORATION PRODUCTS, TECHNICAL SERVICES, AND ANY OTHERTECHNICAL DATA REFERENCED IN THIS DOCUMENT ARE SUBJECT TO U.S. EXPORT CONTROL ANDSANCTIONS LAWS, REGULATIONS AND REQUIREMENTS, AND MAY BE SUBJECT TO EXPORT OR IMPORTREGULATIONS IN OTHER COUNTRIES. YOU AGREE TO COMPLY STRICTLY WITH THESE LAWS, REGULATIONSAND REQUIREMENTS, AND ACKNOWLEDGE THAT YOU HAVE THE RESPONSIBILITY TO OBTAIN ANY LICENSES,PERMITS OR OTHER APPROVALS THAT MAY BE REQUIRED IN ORDER TO EXPORT, RE-EXPORT, TRANSFER INCOUNTRY OR IMPORT AFTER DELIVERY TO YOU.Symantec Corporation350 Ellis StreetMountain View, CA 94043www.symantec.com10/7/20192 of 27
TOCTable of ContentsAbout the ProxySG on AWS4Important Details about the ProxySG on AWS4Step 1: Complete Prerequisite Tasks5Step 2: Deploy the Instance6Step 3: Verify the Instance9Step 4: Install the License11Step 5: (Optional) Configure Elastic Load Balancing12Configure a Listener12Configure Health Checks13Back Up and Restore an Instance of the ProxySG14Create a Snapshot to Back Up Your ProxySG Instance14Restore an Instance of the ProxySG from a Snapshot15Create an AMI from a Snapshot of a ProxySG InstanceDeploy the Newly Registered AMI1516Troubleshoot the ProxySG on AWS17General Troubleshooting Steps17Troubleshoot Licensing Errors19Appendix A: Supported Configurations21Supported Instance Types21Storage and Network Settings22Appendix B: Metadata Reference23AWS Metadata23Appendix C: Additional Steps for Generating User Data25Generate User Data Files for Automatic Deployment of Instances25Supply User Data File While Deploying the Instance26About AWS User Data26AWS User Data Security273 of 27
Symantec SGOS on AWS Deployment Guide 6.7.xAbout the ProxySG on AWSThis guide provides instructions for deploying a ProxySG virtual appliance (Secure Web Gateway edition, SGOS version 6.7.x)running in Amazon Web Services (AWS) Marketplace. A ProxySG on AWS permits the same features and functionality as theSecure Web Gateway Virtual Appliance (SWG VA).This document guides you through the process of setting up a ProxySG on AWS. Deployment consists of the following steps:Deployment StepDocument ReferenceMake sure you have the required resources andfiles to deploy a ProxySG on AWS."Step 1: Complete Prerequisite Tasks" on page 5Launch the Amazon Machine Image (AMI) from theMarketplace, and configure it."Step 2: Deploy the Instance " on page 6Verify that you can access the instance throughSSH and the ProxySG Management Console."Step 3: Verify the Instance " on page 9Install the ProxySG license through the ProxySGManagement Console."Step 4: Install the License" on page 11Configure an AWS Elastic Load Balancer (ELB) formultiple ProxySG instances. This is an optionalstep."Step 5: (Optional) Configure Elastic Load Balancing" on page 12Create snapshots in AWS to capture the contents of "Back Up and Restore an Instance of the ProxySG" on page 14an Elastic Block Store (EBS) volume at specificpoints in time. This is a recommended step.Review the known issues in this release.SGOS Release Notes at MySymantecIf you encounter any issues while the ProxySG on AWS instance is running, refer to "Troubleshoot the ProxySG on AWS" onpage 17 in this guide for assistance.Note: For details beyond the scope of ProxySG documentation, refer to AWS /Important Details about the ProxySG on AWSFor the ProxySG on AWS, you can manage ProxySG instances through:nSSH to the CLInManagement ConsoleYou cannot access or manage a serial or VGA console to a virtual machine.4 of 27
Step 1: Complete Prerequisite TasksStep 1: Complete Prerequisite TasksBefore deploying the ProxySG on AWS, complete the following tasks:1. Prepare and verify your environment, including firewall configuration, Amazon Virtual Private Cloud (VPC)configuration, and security groups for the VPC. Refer to the Amazon documentation for . Allow the ProxySG instances access to the following Symantec vices.bluecoat.comYou need to allow these servers through any firewalls and security controls, such as Security Groups and NetworkAccess Control Lists (NACLs).You require access to these servers in order to retrieve and install the ProxySG license.3. Verify system requirements for the virtual appliance. See "Appendix A: Supported Configurations" on page 21.4. (Optional) Confirm that you are able to access the SSH private key (PEM file) that matches the public key you wantAWS to register with the EC2 instance.5. (If you intend to use load balancing) Understand how ELBs are deployed in AWS. Refer to AWS documentation cing.html5 of 27
Step 2: Deploy the InstanceStep 2: Deploy the InstanceDeploy the instance through the AWS Management Console.1. Log in to the AWS Management Console:a. Open a web browser window/tab.b. Go to the following URL: https://console.aws.amazon.com.The browser displays the AWS Management Console.2. In the AWS Management Console, select Services EC2.The browser displays the EC2 Dashboard.3. In the Create Instance section, click Launch Instance.The browser opens a wizard to guide you through the launch process.4. On the left menu on the EC2 dashboard, select AWS Marketplace.a. Step 1: Search for the AMI you want to launch and click Select.b. Step 2: Choose a supported instance type based on the license type you plan to deploy. Refer to "Appendix A:Supported Configurations" on page 21. The following are supported instance .10xlargeClick Next: Configure Instance Details.c. Step 3: Select the appropriate VPC and subnet, and (if required by your license) specify CPU options.nThe default number of CPUs for the instance type might be greater than the number of CPUs yourProxySG license allows, which can cause your license to be suspended when launching your ProxySGon AWS.To avoid your license being suspended, specify the number of CPUs your license requires. To specify thenumber of CPUs, select Specify CPU options. In Core count, enter the number of cores your license6 of 27
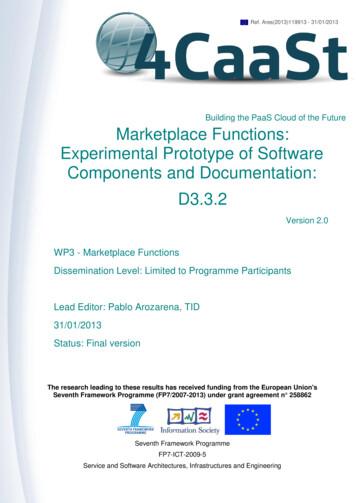
Symantec SGOS on AWS Deployment Guide 6.7.xallows (the number of cores you license allows is the number that follows the "C" in your license type,such as SG-VA-C1S has one core or SG-VA-C16L has 16 cores). In Threads per core, enter 1.Click Next: Add Storage.d. Step 4: Verify the storage settings are correct for your instance. For all supported instance types, the followingstorage settings are correct:nFor the Root volume, 8 GB of General Purpose SSDnFor each Data disk EBS volume, 100 GB of General Purpose SSD with 300 IOPS configuredFor the Data disk EBS volumes, ensure the correct number of virtual disks exist for your instance type.For more information, see "Appendix A: Supported Configurations" on page 21.Click Next: Add Tags.e. Step 5: (Optional) Create one or more tags for your instance by defining key-value pairs. Symantec recommendsat least assigning your instance a name (Key type is Name) so that you can easily identify it in the console.Click Next: Configure Security Group.f. Step 6: Create a new security group or select an existing one. Security groups allow you to control the inboundconnections to and outbound connections from your EC2 instance.Click Review and Launch.g. Step 7: Review the instance settings. Make corrections as needed.5. Launch the instance:a. In the AWS Management Console, click Launch.b. Either choose an existing keypair, create a new keypair,or proceed without a keypair.c. Accept the acknowledgment, and click Launch Instances.The browser displays the Launch Status page.6. In the "Your instances are now launching" message box, click the link to the instance.The browser displays the Instances page.7. Under Instance State, look for a status icon and an indication of the number of checks passed. If the instance launched7 of 27
Step 2: Deploy the Instancesuccessfully, you should see a green icon and "2/2 checks passed".If fewer than two checks passed (as follows), refer to the tabs at the bottom of the page.Click Status Checks to determine which check(s) failed and troubleshoot the problem(s). In the following example, theInstance Status Checks report a failure and provide a link for troubleshooting.8. Connect to your instance and complete the initial connection wizard:a. Open your preferred SSH client and connect to your instance with either the private or public IP addressassociated with the instance.b. Log in with the username config and one of the following:nThe private SSH key file that you associated with the instance during the launch processnThe initial password which is the instance ID (under the Description tab, you can copy and paste theInstance ID)c. Enter the serial number of the appliance.d. Enter the console username.e. Enter the console password and enter it again to verify it.f. Enter the enable password and enter it again to verify it.The appliance restarts to apply the new settings. The next time you access either the serial console orManagement Console, use the console username and password you entered to log in.9. Repeat the previous steps as needed to set up additional instances.Note: For multiple instances, you might want to set up a load balancer. If you do set up aload balancer, do so after you have verified the connectivity and license validity for allinstances. For ELB setup instructions, see "Step 5: (Optional) Configure Elastic LoadBalancing" on page 12.8 of 27
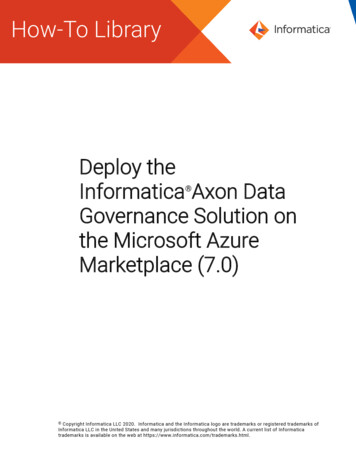
Step 3: Verify the InstanceStep 3: Verify the InstanceAfter you create the instance, verify that you can access it through SSH and the ProxySG Management Console.Note: To complete this step, you need the private key (PEM file) and/or the login credentialsthat you used to generate the user data file.1. Under Instances, select Instances. Locate the instance.2. Make sure that the Instance State says "running" and that Status Checks says "2/2 checks passed".If fewer than two checks passed, refer to the Status Checks tab to determine which checks failed, and troubleshootthe problems as suggested.3. Select the instance, right-click, and click Connect.Connect to the instance using a standalone SSH client, such as PuTTY. Follow the instructions on the dialog:Note: When connecting to your instance, use the console username you created and notthe ec2-user username.9 of 27
Symantec SGOS on AWS Deployment Guide 6.7.x4. Access the ProxySG Management Console using the instance's AWS-assigned private IP or public IP address(depending on your security group settings) and your login credentials. With the instance selected, click theDescription tab to determine the AWS-assigned network settings. To access the ProxySG Management Console, in abrowser, enter the address for your instance in the following format:https://private or public IP address:8082Ensure that the port for the ProxySG Management Console (8082) is defined in the Security Group associated with yourinstance. If not, select Network & Security Security Groups and add the port.10 of 27
Step 4: Install the LicenseStep 4: Install the LicenseAfter you verify that you can access the instance, install and verify your license. The ProxySG on AWS license contains datathat is used to uniquely identify the virtual appliance.1. In the ProxySG Management Console, select Maintenance Licensing Install.2. Click Retrieve. The console displays a dialog.3. In the dialog:a. Enter your MySymantec credentials.b. Click Request License. The console displays a Confirm License Install dialog.c. Click OK to begin license retrieval.4. (Optional) Click Show results to verify a successful retrieval. If any errors occur, verify that you are connected to theInternet.5. Click Close. Verify that there are no license errors.If the license is invalid, select the instance in the EC2 Dashboard and look at the Description tab. If the selectedinstance type is not one that the ProxySG on AWS supports, perform step 5 of "Make sure that a supported instancetype is selected." on page 19. See "Appendix A: Supported Configurations" on page 21 to determine the supportedinstance types.If the license is suspended, check that the number of CPUs specified is supported by your ProxySG license. See"Appendix A: Supported Configurations" on page 21 to determine the number of CPUs your license supports and seethe "Troubleshoot License Errors" table in "Troubleshoot the ProxySG on AWS" on page 17.After you validate the license installation, you do not have to reboot or shut down the appliance.11 of 27
Step 5: (Optional) Configure Elastic Load BalancingStep 5: (Optional) Configure Elastic Load BalancingThis section assumes an understanding of AWS Elastic Load Balancers (ELBs). Refer to AWS documentation for g.htmlTo deploy a load balancer in front of multiple ProxySG instances:1. In the AWS Management Console, under Load Balancing, select Load Balancers.2. Click Create Load Balancer.3. Under Classic Load Balancer, click Create.4. The console displays a setup wizard. Specify the following:nStep 1: Define Load Balancer - Enter the appropriate details. For listener configuration, see "Configure aListener" below.nStep 2: Assign Security Groups - This is an optional step; specify groups as required for your deployment.nStep 3: Configure Security Settings - Skip this step; it is not applicable in this release.nStep 4: Configure Health Check - Enter the appropriate details. See "Configure Health Checks" on the nextpage.nStep 5: Add EC2 Instances - Select the instances for the load balancer.nStep 6: Add Tags - This is an optional step; add tags as needed for your deployment.nStep 7: Review - Review the load balancer settings. Make any required changes, and then click Create tocreate the load balancer.Configure a ListenerYou can configure a load balancer to perform layer 4 load balancing and pass traffic through to the ProxySG instances. Specifythe protocol and port on which the instances are configured to intercept traffic. For example, if you enabled explicit interceptionon port 80, use the following settings:nLoad Balancer Protocol: TCPnLoad Balancer Port: 80 (same as instance port)nInstance Protocol: TCP; this is automatically selected when you specify TCP for the load balancer protocolnInstance Port: 8012 of 27
Symantec SGOS on AWS Deployment Guide 6.7.xConfigure Health ChecksFor the load balancer to monitor the health of the ProxySG instances, configure it to TCP ping a socket to which the instancesrespond. The Instance Port that is configured for load balancer listener can serve as this listening socket. The example in"Configure a Listener" on the previous page uses TCP port 8080 for the load balancing listener; thus, in this case, use thefollowing settings:nPing Protocol: TCPnPing Port: 80You do not have to change the default settings under Advanced Details.13 of 27
Back Up and Restore an Instance of the ProxySGBack Up and Restore an Instance of the ProxySGIn case you need to revert or restore your ProxySG instance to an earlier state, you should create a snapshot of your ProxySGinstance. When you create a snapshot in an AWS environment, the AWS environment saves the snapshot to S3, which backsup the contents of your Amazon Elastic Block Store (EBS) volume.Caution: Snapshots are incremental; that is, subsequent snapshots include only contents thatdiffer from previous snapshots.Create a Snapshot to Back Up Your ProxySG InstanceThis section provides steps for creating a snapshot of your ProxySG instance using your AWS console or preferred remotelogin tool for accessing the ProxySG CLI.To create a snapshot of your ProxySG instance from your AWS console:1. Under Elastic Block Store, select Snapshots.2. Click Create Snapshot.3. In the Create Snapshot dialog:a. Select the volume for which you want to create the snapshot.b. Enter a name and description for the snapshot.c. Click Create Snapshot.To create a snapshot using your preferred remote login tool:nIn the EC2 CLI: ec2-create-snapshotFor details, refer to ineReference/ec2-clt.pdf.nIn the AWS CLI: create-snapshotFor details, refer to e/ebs-creating-snapshot.html.nUsing AWS Tools for Windows PowerShell: New-EC2SnapshotFor details, refer to rence/items/Amazon Elastic ComputeCloud cmdlets.html.14 of 27
Symantec SGOS on AWS Deployment Guide 6.7.xRestore an Instance of the ProxySG from a SnapshotThis section provides the steps for reverting or restoring an instance from a snapshot using your AWS console or preferredremote login tool.To revert or restore an instance:1. Create an AMI from a snapshot of a ProxySG instance.2. Deploy the newly registered AMI.Create an AMI from a Snapshot of a ProxySG InstanceThis section provides steps for creating an AMI from a snapshot using your AWS console or preferred remote login tool.To create an AMI from a snapshot from your AWS console:1. Under Elastic Block Store, click Snapshots.2. In the list of snapshots, select the snapshot you want to create an AMI from.3. Click Actions Create Image.4. In the Create Image from EBS Snapshot dialog, enter information in the following fields:a. Architecture: Select x86 64 for 64-bit.b. Root device name: Enter the name for the root volume.c. RAM disk ID: Use the default.d. Virtualization type: Select Hardware-assisted virtualization.e. Kernel ID: Use the default.f. (Optional) Block Device Mappings: You can add new volumes or expand the size of the root volume for yourAMI.15 of 27
Back Up and Restore an Instance of the ProxySG5. Click Create.To create an AMI from a snapshot using your preferred remote login tool:nIn the EC2 CLI: ec2-create-imageFor details, refer to ineReference/ec2-clt.pdf.nIn the AWS CLI: create-imageFor details, refer to c2/create-image.html.nUsing AWS Tools for Windows PowerShell: New-EC2ImageFor details, refer to rence/items/New-EC2Image.html.Deploy the Newly Registered AMIYou deploy snapshots the same way that you deploy new instances. For the full steps on deploying an instance, see "Step 2:Deploy the Instance " on page 6.16 of 27
Troubleshoot the ProxySG on AWSTroubleshoot the ProxySG on AWSIf you ex
Oct 07, 2019 · SGOS forAWSMarketplace DeploymentGuide ProxySGonAWS Marketplace