Transcription
featuring SISUFREEPATTERNCOLLECTIONBYAGF STUDIO
Q U I LT D E S I G N E D B YFABRICS DESIGNEDBY AGF StudioSSU-10050SCHOOL OF SISU ESSENCESSU-10057THE MOTTO HIGHLIGHTEDSSU-10051THINGAMAJIGS GIGGLINGSSU-10058SPACE BUBBLES FIZZSSU-10053WILLFUL BUDS 55PAPER PLANE HOPESSSU-20057THE MOTTO 9COUNTDOWN AND POW! 2020 Courtesy of Art Gallery Quilts LLC. All Rights Reserved.
Six (6) 4½’’ squares from fabric D. Ten (10) 8½’’ squares from fabric E. Eight (8) 4½’’ squares from fabric E. Six (6) 8½’’ squares from fabrics F, G.FINISHED SIZE 68" 80" Five (5) 4½’’ squares from fabrics F, G. Four (4) 8½’’ x 4½’’ rectangles from fabric H.FA B R I C R E Q U I R E M E N T S Twenty Four (24) 8½’’ x 4½’’ rectangles from fabric I. Fourty three (43) 8½’’ x 4½’’ rectangles from fabric J.Fabric ASSU-10051¼ yd.Fabric BSSU-20056⅜ yd.Fabric CSSU-10057⁷ yd.Fabric DSSU-10053⅝ yd. There are thirteen (13) different rows in this quilt.Fabric ESSU-10055⁷ yd.Fabric FSSU-10058½ yd. Start constructing the rows following thediagrams below.Fabric GSSU-10050½ yd.Fabric HSSU-10056¼ yd.Fabric ISSU-20057⅞ yd.Fabric JSSU-200591½ yd.BACKING FABRICSSU-20059 5 yds (Suggested)BINDING FABRICFabric C SSU-10057 (Included)CONSTRUCTIONSew all rights sides together with ¼"seam allowance.Row #1 Take one (1) 8½’’ square from fabrics A, B, C,D, E & F, one (1) 8½’’ x 4½’’ rectangle fromfabric H and two (2) 8½’’ x 4½’’ rectanglesfrom fabrics I & J. Attach them in the order A-H-B-I-C-J-D-I-EJ-F. Press and set aside.AHBICJDIEJFDIAGRAM 1CUTTING DIRECTIONS¼" seam allowances are included.WOF means width of fabric. Two (2) 8½’’ squares from fabric A.Row #2 Take one (1) 4½’’ square from fabrics B, C, D, E& F, one (1) 8½’’ x 4½’’ rectangle from fabric H,two (2) 8½’’ x 4½’’ rectangles from fabric I andthree (3) 8½’’ x 4½’’ rectangles from fabric J. Four (4) 8½’’ squares from fabric B. Attach them in the order H-B-I-C-J-D-I-E-JF-J. Two (2) 4½’’ squares from fabric B. Press and set aside. Four (4) 4½’’ squares from fabric C.HBICJDIEJFJ Six (6) 8½’’ squares from fabric C. Eight (8) 8½’’ squares from fabric D.a r t g a l l e r y f a b r i c s. c o mDIAGRAM 2
Row #3 Take one (1) 8½’’ square from fabrics B, C, D, F& G. two (2) 8½’’ x 4½’’ rectangles from fabric Iand three (3) 8½’’ x 4½’’ rectangles from fabricJ. Attach them in the order J-D-I-E-J-F-J-G-JE-I. Press and set aside.JDIEJFJG Attach them in the order B-I-C-J-D-I-E-J-FJ-G.ICJDIEJFJG Take one (1) 8½’’ square from fabrics F & G,two (2) 8½’’ squares from fabrics D & E, two (2)8½’’ x 4½’’ rectangles from fabric I and three(3) 8½’’ x 4½’’ rectangles from fabric J. Attach them in the order D-I-E-J-F-J-G-J-EI-D.Row #4 Take one (1) 4½’’ square from fabrics C, D, E, F& G, two (2) 8½’’ x 4½’’ rectangles from fabricI and four (4) 8½’’ x 4½’’ rectangles from fabricJ. Press and set aside.DIEJFJGJ Attach them in the order I-C-J-D-I-E-J-F-JG-J.JDIEJJFGJRow #5 Take one (1) 8½’’ square from fabrics C, D, F &G, two (2) 8½’’ squares from fabric E, one (1)8½’’ x 4½’’ rectangle from fabric I and four (4)8½’’ x 4½’’ rectangles from fabric J. Attach them in the order C-J-D-I-E-J-F-J-GJ-E.DIDEJFJGJ Take one (1) 4½’’ square from fabrics D, F & G,two (2) 4½’’ squares from fabric E, two (2) 8½’’x 4½’’ rectangles from fabric I and four (4) 8½’’x 4½’’ rectangles from fabric J. Attach them in the order I-E-J-F-J-G-J-E-ID-J. Press and set aside.IEJFJGJEIDJDIAGRAM 8Row #9 Press and set aside.JIRow #8DIAGRAM 4CEDIAGRAM 7 Press and set aside.CIRow #7DIAGRAM 3IEDIAGRAM 6 Press and set aside.BJEDIAGRAM 5Row #6 Take one (1) 4½’’ square from fabrics D, F & G,two (2) 4½’’ square from fabric E, two (2) 8½’’ x4½’’ rectangles from fabric I and four (4) 8½’’ x4½’’ rectangles from fabric J. Take one (1) 8½’’ square from fabrics C, D, F& G, two (2) 8½’’ squares from fabric E, one (1)8½’’ x 4½’’ rectangle from fabric I and four (4)8½’’ x 4½’’ rectangles from fabric J. Attach them in the order E-J-F-J-G-J-E-I-DJ-C. Press and set aside.EJFJGJEID JCDIAGRAM 9a r t g a l l e r y f a b r i c s. c o m
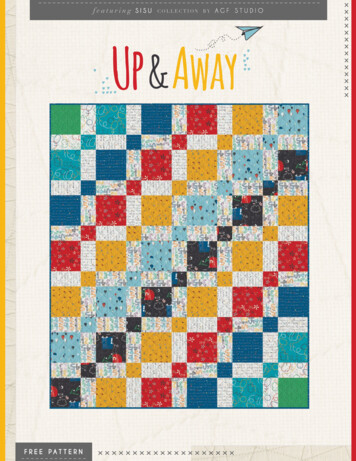
Row #10GJEIDJCIB Take one (1) 4½’’ square from fabrics C, D, F &G, two (2) 8½’’ x 4½’’ rectangles from fabric Iand four (4) 8½’’ x 4½’’ rectangles from fabricJ. Attach them in the order J-F-J-G-J-E-I-D-JC-I.FJGJEIDJCADIAGRAM 13A S S E M B L I N G T H E TO P Press and set aside.JHISew all rights sides together with ¼"seamallowance. Press open. Attach the rows from Row #1- Row #13 together.DIAGRAM 10Row #11Row #1 Take one (1) 8½’’ square from fabrics B, C, D, F &G. two (2) 8½’’ x 4½’’ rectangles from fabric I andthree (3) 8½’’ x 4½’’ rectangles from fabric J. Attach them in the order F-J-G-J-E-I-D-J-C-I-B. Press and set aside.F Refer to diagram below or cover picture.JGJ EIDJCIBRow #2Row #3Row #4Row #5DIAGRAM 11Row #12 Take one (1) 4½’’ square from fabrics B, C, D, E &G, one (1) 8½’’ x 4½’’ rectangle from fabric H, two(2) 8½’’ x 4½’’ rectangles from fabric I and three (3)8½’’ x 4½’’ rectangles from fabric J. Attach them in the order J-G-J-E-I-D-J-C-I-B-H. Press and set aside.JGJEIDJCIBHDIAGRAM 12Row #13 Take one (1) 8½’’ square from fabrics A, B, C, D, E & G,one (1) 8½’’ x 4½’’ rectangle from fabric H and two (2)8½’’ x 4½’’ rectangles from fabrics I & J. Attach them in the order G-J-E-I-D-J-C-I-B-H-A. Press and set aside.a r t g a l l e r y f a b r i c s. c o mRow #6Row #7Row #8Row #9Row #10Row #11Row #12Row #13
Q U I LT A S S E M B LYSew rights sides together. Place BACKING FABRIC on a large surface wrongside up. Stretch it with masking tape against thatsurface. Place BATTING on top of backing fabric. Place TOP on top of the batting with right sidefacing up. Smooth away wrinkles using your hands. Pin all layers together and baste with bastingthread, using long stitches. You can also use safetypins to join the layers. Machine or hand quilt starting at the center andworking towards the corners. Remember thatquilting motifs are a matter of personal preference.Have fun choosing yours! After you finished, trim excess of any fabric orbatting, squaring the quilt to proceed to bind it.BINDINGSew rights sides together. Cut enough strips 1½" wide by the width of thefabric C to make a final strip 306" long. Startsewing the binding strip in the middle of one ofthe sides of the quilt, placing the strip right sidedown and leaving an approximated 5" tail. Sewwith ¼" seam allowance (using straight stitch),aligning the strip’s raw edge with the quilt top’sraw edge. Stop stitching ¼" before the edge of the quilt(DIAGRAM B 1). Clip the threads. Remove thequilt from under the machine presser foot. Foldthe strip in a motion of 45 and upward, pressingwith your fingers (DIAGRAM B2). Hold this foldwith your finger, bring the strip down in line withthe next edge, making a horizontal fold thataligns with the top edge of the quilt (DIAGRAMB3). Start sewing at ¼" of the border, stitching allthe layers. Do the same in the four corners of thequilt.a r t g a l l e r y f a b r i c s. c o m Stop stitching before you reach the last 5 or 6inches. Cut the threads and remove the quiltfrom under the machine presser foot. Lay theloose ends of the binding flat along the quiltedge, folding the ends back on themselveswhere they meet. Press them together to forma crease. Using this crease as the stitching line,sew the two open ends of the binding with rightsides together (you can help yourself markingwith a pencil if the crease is difficult to see). Trim seam to ¼" and press open. Complete thesewing. Turn binding to back of the quilt, turnraw edge inside and stitch by hand using blindstitch.Stop stitching hereDIAGRAM B1DIAGRAM B2DIAGRAM B3BINDINGfold45
a r t g a l l e r y f a b r i c s. c o mNOTE: While all possible care has been taken to ensurethe accuracy of this pattern, We are not responsible forprinting errors or the way in which individual work varies.Please read instructions carefully before starting theconstruction of this quilt. If desired, wash and iron yourfabrics before starting to cut. 2020 Courtesy of Art Gallery Quilts LLC. All Rights Reserved.a r t g a l l e r y f a b r i c s. c o m
artgalleryfabrics.com FINISHED SIZE 68" 80" FABRIC REQUIREMENTS CUTTING DIRECTIONS Fabric A SSU-10051 ¼ yd. Fabric B SSU-20056 ⅜ yd. Fabric C SSU-10057 ⁷ yd. Fabric D SSU-10053 ⅝ yd. Fabric E SSU-10055 ⁷ yd. Fabric F SSU-10058 ½ yd. Fabric G SSU-10050 ½ yd. Fabric H SSU-10056 ¼ yd.