Transcription
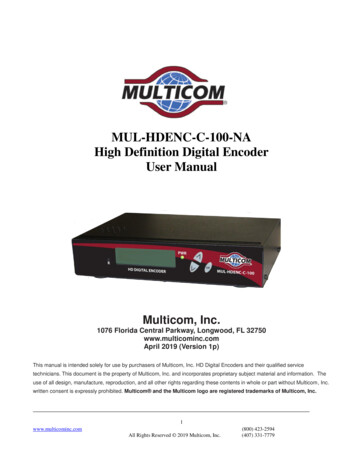
MUL-HDENC-C-100-NAHigh Definition Digital EncoderUser ManualMulticom, Inc.1076 Florida Central Parkway, Longwood, FL 32750www.multicominc.comApril 2019 (Version 1p)This manual is intended solely for use by purchasers of Multicom, Inc. HD Digital Encoders and their qualified servicetechnicians. This document is the property of Multicom, Inc. and incorporates proprietary subject material and information. Theuse of all design, manufacture, reproduction, and all other rights regarding these contents in whole or part without Multicom, Inc.written consent is expressly prohibited. Multicom and the Multicom logo are registered trademarks of Multicom, Inc.1www.multicominc.comAll Rights Reserved 2019 Multicom, Inc.(800) 423-2594(407) 331-7779
Multicom MUL-HDENC-C-100-NA User ManualSafety PrecautionsThe presence of this symbol is to alert the installer and user to the presence of uninsulated potentiallydangerous voltages within the product’s enclosure that may be of sufficient magnitude to produce a risk ofelectric shock.TO REDUCE THE RISK OF FIRE OR ELECTRIC SHOCK, DO NOT EXPOSE THIS DEVICETO RAIN OR MOISTURE. DO NOT OPEN THE UNIT. REFER SERVICING TO QUALIFIEDAUTHORIZED PERSONNEL ONLY. DO NOT terminate, change or uninstall any wiring without first disconnecting the unit’s poweradapter from the device. This device is supplied with the appropriately rated power supply. The use of any other power supplycould cause damage and invalidate the manufacturer’s warranty. DO NOT connect the power cord to the device if the power cord or unit is damaged. DO NOT cut the power cord. DO NOT plug the power cord into an AC outlet until all cables and connections to the device havebeen properly connected. The device should be installed in an environment consistent with its operating temperaturespecifications. Placement next to heating devices and ducts is to be avoided as doing so may causedamage. The device should not be placed in areas of high humidity. DO NOT cover any of the device’s ventilation openings. If the device has been in a cold environment allow it to warm to room temperature for at least 2 hoursbefore connecting to an AC outlet.IMPORTANT ALWAYS remove any network/ethernet connection from the HD Encoder after configuring it toinsure its security and highest performance Use high quality cables and connectors and insure all connections are tight Test the coaxial cable RF output at the TV to insure the levels are well within the TV input range Use Google Chrome, Microsoft Edge, or Mozilla Firefox as the web browser when configuring theHD Encoder. Google Chrome is preferred. During the web browser Admin Reboot process, use a new Google Chrome “Incognito Window” toeliminate caching-related confusion and issues. The factory Default is for J.83B RF output. If ATSC output is desired (example: for LATAMinstallation) then the RF Setup Menu Channel Type must be changed to ATSC, etc.The hardware and software product trademarks are the property of their respective owners, includingGoogle Chrome, Microsoft Edge, and Mozilla Firefox.2www.multicominc.comAll Rights Reserved 2019 Multicom, Inc.(800) 423-2594(407) 331-7779
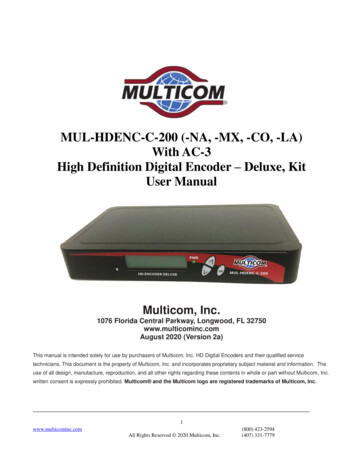
Multicom MUL-HDENC-C-100-NA User Manual1.0 HD Encoder IntroductionThe Multicom MUL-HDENC-C-100-NA is a High Definition Agile Digital Encoder/Modulator for NorthAmerica (USA and Canada) used to convert a single unencrypted HDMI input of up to 1080i/1080p into aJ.83B QAM 64/QAM 256 RF or ATSC (8VSB) output. The Multicom MUL-HDENC-C-100-NA isfeature rich, very flexible, powerful, user friendly, and is easy to use for both Residential and Commercialapplications. The high quality HD performance allows action packed movies and sports channels on anyHDTV.FRONT VIEW:LCD DisplayPower LEDUP ArrowDOWN ArrowReset (use pin/paperclip)OKREAR VIEW:RF OutputHDMI InputLAN Port (Web Management Port)AC AdapterGain (Attenuation)3www.multicominc.comAll Rights Reserved 2019 Multicom, Inc.(800) 423-2594(407) 331-7779
Multicom MUL-HDENC-C-100-NA User Manual2.0 SpecificationsVideo / Audio InputHDMI 1.4Video / Audio Encoding ProfileVideoConnectorsAudioVideo CodecsBitrate (Adjustable)SingleEmbedded PCMOutputQAMStandardConnectorRF ModeChannel TypeFrequency RangeInterleaverOutput LevelFlatness Across FullBandMERConstellation(Output Bitrate)Output ImpedanceRF Output ReturnLossVCNJ.83 Annex BATSC-8VSB1 x “F” FemaleNormal / InvertedJ.83B: STD / HRC / IRC;ATSC-8VSBJ.83 Annex B: 57 – 861 MHz(Ch2 – Ch135)ATSC-8VSB: 57-803 MHz(Ch2 to CH69)I 128, J 138 dBmV Typical(With 20dB Range ManuallyAdjustable) 2dB Typical39 dB TypicalJ.83 Annex B:64-QAM (26.970Mbps) /256-QAM (38.810Mbps)ATSC-8VSB:8VSB (19.390Mbps)75 ohm10 dB TypicalResolution OutputMPEG-2 VBRJ.83 Annex B:HD: 12.0 – 24.0 MbpsSD: 1.0 – 9.0 MbpsATSC-8VSB:HD: 12.0 - 18.0 MbpsSD: 1.0 – 9.0 MbpsSame as input except:1080p60 in, 1080p30 out1080p50 in, 1080p25 out1080p30 in, 1080p30 out1080i60 in, 1080p30 out1080i50 in, 1080p25 out1080i30 in, 1080p30 outAudioAudio CodecsMPEG1 Layer II / MPEG4 AACGeneralLocal MonitoringWeb GUI SupportedPassword ProtectedPower SupplyConsumptionOperationalTemperatureStorage TemperatureDimensionsWeightLanguageLCDFirefox, Chrome, Safari, EdgeGUI: User Settable12 VDC 1.5A5 Watts0c - 55c-20c - 70c188mm x 130mm x 37.2mm0.95 kgEnglishAuto (Major & Minor) /Manual (Major & Minor) /Manual (One Part)*Subject to change without notification4www.multicominc.comAll Rights Reserved 2019 Multicom, Inc.(800) 423-2594(407) 331-7779
Multicom MUL-HDENC-C-100-NA User Manual3.0 HD Encoder Programming/SetupTo setup and program the MULTICOM HD Digital Encoder you can use either the device’s LCD FrontPanel and buttons or the Web Interface. The programming of the settings is easiest by using the WebInterface in Section 3.3.3.1 Using the HD Encoder Front Panel:Press UP/DOWN ARROW buttons to scroll through the display information. Main Menu: Input information and Output Name Short and long name, Bitrate Main Menu: VCN information VCN, Channel, and Frequency Main Menu: Management IP IP Address3.2 Using the HD Encoder Front Panel for Setup:When the unit is powered up it will first go through an internal booting and short self-test and then beready for operation or initial setup. The factory Default is for J.83B:STD output. If ATSC RF outputis desired (example: for Mexico installation) then the RF Setup Menu Channel Type must bechanged to ATSC, etc.Press “OK” Button to enter the setup MAIN MENU system.The front panel LCD password is: 0000Enter the password by adjusting each digit by using the UP/DOWN ARROW buttons – then press “OK”when the digit is correct. Press “OK” to enter Main Menu. For security purposes the HD Encoder willtimeout and return to a password protected mode if no buttons are pressed for about 10 seconds.FRONT PANEL:Login: Press “OK” buttonEnter Password Use UP/DOWN arrows to change digit, Press OK to set it and go to next until all 4 digits areentered – the unit will now be in setup MAIN MENU. Pressing the UP/DOWN ARROWS will scrollthrough the menus/settings. Pressing the OK will select/execute the Menu Item or Setting.Press UP/DOWN ARROW to scroll through MAIN MENU and use OK to select a Menu: Main Menu: RF Setup Main Menu: Encoder Setup Main Menu: Network Setup Main Menu: Change Password Main Menu: Reset to Default Main Menu: Exit5www.multicominc.comAll Rights Reserved 2019 Multicom, Inc.(800) 423-2594(407) 331-7779
Multicom MUL-HDENC-C-100-NA User Manual#1. Press UP ARROW to scroll through RF SETUP MENU: RF Setup Menu: ChannelFactory Default: J.83B:STD: CH 2 Range 2 - 135 RF Setup Menu: TSIDFactory Default: 1 RF Setup Menu: Regional NameFactory Default: USA RF Setup Menu: RFFactory Default: Normal RF Setup Menu: Channel TypeFactory Default: J.83B:STD ATSC or J.83B RF Setup Menu: ConstellationFactory Default: 256 QAM RF Setup Menu: Exit#2. Press UP ARROW to scroll through ENCODER SETUP MENU: Encoder Setup Menu: VCNFactory Default: 2.1 Encoder Setup Menu: VCN ModeFactory Default: Auto(two-part) VCN Notes below Encoder Setup Menu: Short NameFactory Default: DTV1 Up to 7 Char Encoder Setup Menu: Long NameFactory Default: ATSC-DTV1 Up to 16 Char Encoder Setup Menu: HD BitrateFactory Default: 18Mbps Range 12 – 24 Mbps Encoder Setup Menu: SD BitrateFactory Default: 4Mbps Range 1 – 9 Mbps Encoder Setup Menu: ProgramNumberFactory Default: 101 Range 1 - 65534 Encoder Setup Menu: Audio Output Factory Default: MPEG1 Layer 2 Or MPEG4 AAC Encoder Setup Menu: Source IDFactory Default: 101 Range 1 - 65535 Encoder Setup Menu: Exit#3. Press UP ARROW to scroll through NETWORK SETUP MENU: Network Setup Menu: Host NameFactory Default: HDENC-271616 Network Setup Menu: IP SetupFactory Default: DHCP Disable Enable Factory Default: IP Address: 192.168.1.9 Factory Default: Subnet Mask: 255.255.255.0 Factory Default: Default Gateway: 000.000.000.000 Network Setup Menu: ExitNote that the HD Encoder will reboot after using the NETWORK SETUP MENU.#4. Press UP ARROW to MAIN MENU: CHANGE PASSWORD#5. Press UP ARROW to MAIN MENU: RESET TO DEFAULTNote that the HD Encoder will reboot after using the RESET TO DEFAULT MENU.#6. Press UP ARROW to MAIN MENU: EXITAfter Selecting the desired Menu – Change Parameter Settings Use UP/DOWN arrows to move and select the desired parameter, Press OK to start editing theparameter using the UP/DOWN arrows. After changing the setting, pressing the OK will set theparameter.6www.multicominc.comAll Rights Reserved 2019 Multicom, Inc.(800) 423-2594(407) 331-7779
Multicom MUL-HDENC-C-100-NA User Manual3.2.1 VCN RELATED NOTES:VCN is the Channel number to be shown by the TV. The VCN Modes which will be available depend onwhether the output is selected as J.83B or as ATSC.VCN Mode: Auto (two-part) - VCN will be set based on the Channel output selected in “RF OutputMenu: RF”.Example: Output Channel set to 2. VCN for device will be set at 2.1This is automatically set by the CH output set in the RF Setup section.VCN Mode (Manual two-part) - VCN Manual 2-part- will allow the installer to control VCN channelregardless of the CH/freq. selected on the RF Output Setup page of the device.Examples:RF CH57101VCN Channel55.1101.2VCN Mode: Manual (one-part) - Use ‘VCN (one part) Menu’ to set VCN channel.Example: VCN can be set to a range 1-999.VCN Mode (Manual one-part) -VCN Manual 1-part- will allow the installer to control VCN channelregardless of the CH/freq. selected on the Output Setup page of the device.Examples:RF CHVCN Channel5721011051341337www.multicominc.comAll Rights Reserved 2019 Multicom, Inc.(800) 423-2594(407) 331-7779
Multicom MUL-HDENC-C-100-NA User Manual3.3 Using the HD Encoder Web Interface:3.3.1 Overview of the ProcessProduct Factory Default IP: 192.168.1.9 and with DHCP - Disabled1. Connect an Ethernet cable directly (no Cross Over cable required) to the Web ManagementPort on the rear panel of the HD Digital Encoder or connect the device’s Ethernet cable to anEthernet switch. Connect Ethernet Cable to your PC/Laptop.2. Modify your PC/Laptop IP address to static address 192.168.1.103. Enter ‘192.168.1.9’ into your web browser to access the Web Interface of the HD Encoder.4. Enter the Web Interface and make any required device changes.5. Save all changes as required and then reboot the device.6. Verify parameters have changed and then end your web session.As an alternative, the HD ENCODER static IP Address may be configured (or DHCP enabled) on thefront panel and then the Web Browser can be used for all other configuration changes by using the IPAddress which will be displayed on the LCD. BE VERY CAREFUL WHEN USING THE DEFAULT IPADDRESS AND CONNECTING TO AN EXISTING NETWORK – THERE MAY BE CONFLICTWITH EXISTING INSTALLED HARDWARE – THIS MUST ALWAYS BE AVOIDED.3.3.2 Configuring Use Google Chrome, Microsoft Edge, or Mozilla Firefox as the web browser when configuring theHD Encoder. Google Chrome is preferred. During the web browser Admin Reboot process, use a new Google Chrome “Incognito Window” toeliminate caching-related confusion and issues.Step 1: LoginUse the PC web browser - type in the IP AddressStep 2: Web Interface Login and Password:Default User Name: adminDefault Password: Admin123IMPORTANT NOTE: Save all changes before leaving each setup page8www.multicominc.comAll Rights Reserved 2019 Multicom, Inc.(800) 423-2594(407) 331-7779
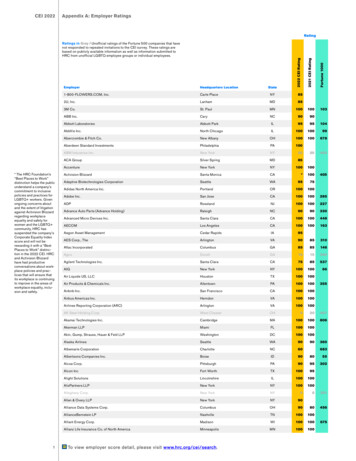
Multicom MUL-HDENC-C-100-NA User ManualStep 3: Overview TabView the current settings, MAC address, Firmware version, etc.The other tabs (Encoder Setup, RF Output Setup, Network Setup, and Administration) are used to changethe HD Encoder settings and operating parameters.It is HIGHLY recommended that after all other tabs have been configured that the HD Encoder berebooted using the REBOOT button on the ADMINISTRATION tab.9www.multicominc.comAll Rights Reserved 2019 Multicom, Inc.(800) 423-2594(407) 331-7779
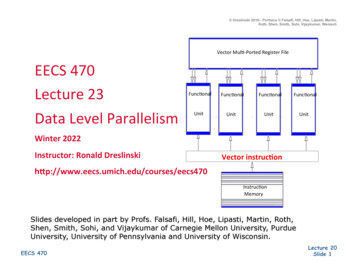
Multicom MUL-HDENC-C-100-NA User ManualStep 4: Encoder Setup TabSelect the Encoder Setup tab to program desired parameters such as VCN settings, Bitrates, and more.Save changesThe ENCODER SETUP MENU: Encoder Setup Menu: VCNFactory Default: 2.1 Encoder Setup Menu: VCN ModeFactory Default: Auto(two-part) VCN Notes below Encoder Setup Menu: Short NameFactory Default: DTV1 Up to 7 Char Encoder Setup Menu: Long NameFactory Default: ATSC-DTV1 Up to 16 Char Encoder Setup Menu: HD BitrateFactory Default: 12Mbps Range 12 – 24 Mbps Encoder Setup Menu: SD BitrateFactory Default: 4Mbps Range 1 – 9 Mbps Encoder Setup Menu: ProgramNumberFactory Default: 101 Range 1 - 65534 Encoder Setup Menu: Audio Output Factory Default: MPEG1 Layer 2 Or MPEG4 AAC Encoder Setup Menu: Source IDFactory Default: 101 Range 1 - 6553510www.multicominc.comAll Rights Reserved 2019 Multicom, Inc.(800) 423-2594(407) 331-7779
Multicom MUL-HDENC-C-100-NA User ManualVCN RELATED NOTES:VCN is the Channel number to be shown by the TV. The VCN Modes which will be available depend onwhether the output is selected as J.83B QAM or as ATSC.VCN Mode: Auto (two-part) - VCN will be set based on the Channel output selected in “RF OutputMenu: RF”.Example: Output Channel set to 2. VCN for device will be set at 2.1This is automatically set by the CH output set in the RF Setup section.VCN Mode (Manual two-part) - VCN Manual 2-part- will allow the installer to control VCN channelregardless of the CH/freq. selected on the RF Output Setup page of the device.Examples:RF CHVCN Channel5755.1101101.2VCN Mode: Manual (one-part) - Use ‘VCN (one part) Menu’ to set VCN channel.Example: VCN can be set to a range 1-999.VCN Mode (Manual one-part) -VCN Manual 1-part- will allow the installer to control VCN channelregardless of the CH/freq. selected on the Output Setup page of the device.Examples:RF CHVCN Channel57210110513413311www.multicominc.comAll Rights Reserved 2019 Multicom, Inc.(800) 423-2594(407) 331-7779
Multicom MUL-HDENC-C-100-NA User ManualStep 5: RF Output Setup TabSelect any desired changes, including type of RF output: J.83B or ATSC.Save any changes made.The RF SETUP MENU: RF Setup Menu: TSID RF Setup Menu: Regional Name RF Setup Menu: RF RF Setup Menu: Channel Type RF Setup Menu: CH/Freq. RF Setup Menu: ConstellationFactory Default: 1Factory Default: USAFactory Default: Normal Or InvertedFactory Default: J.83B:STD ATSC or J.83BFactory Default: J.83B:STD: CH2 Range 2 - 135Factory Default: 256 QAMStep 6: Network Setup TabSet the IP Address, select static or dynamic IP (DHCP), etc.Save changes.12www.multicominc.comAll Rights Reserved 2019 Multicom, Inc.(800) 423-2594(407) 331-7779
Multicom MUL-HDENC-C-100-NA User ManualThe NETWORK SETUP MENU: Network Setup Menu: Host NameFactory Default: HDENC-271616 Network Setup Menu: IP SetupFactory Default: DHCP Disable Enable Factory Default: IP Address: 192.168.1.9 Factory Default: Subnet Mask: 255.255.255.0 Factory Default: Default Gateway: 000.000.000.000Step 7: AdministrationIt is HIGHLY recommended that after all other tabs have been configured that the HD Encoder berebooted using the REBOOT button on the ADMINISTRATION tab.The HD Encoder can be reset to factory default using this menu.The BACKUP function will save the HD Encoder’s current parameter configuration in a file for backuppurposes or so that it may be used to easily configure another HD Encoder (or restore this HD Encoder)using the UPLOAD button.13www.multicominc.comAll Rights Reserved 2019 Multicom, Inc.(800) 423-2594(407) 331-7779
Multicom MUL-HDENC-C-100-NA User ManualStep 8: Changing PasswordStep 9: Hardware Installation and ConnectionsIt is highly recommended that the highest quality cables and connectors be used for all video and audiosource connections.1.Ensure the video Source has output.2.Connect the HDMI cable to the HD Encoder from the Source.3.Connect the included AC power adapter cord to the HD Encoder’s 12VDC Power receptacle at therear.4.Connect the AC adapter to an appropriately rated AC power outlet.5.Test the RF output with a CATV meter to ensure that it is within the input range of the connectedTV’s6.Connect to the coaxial distribution using the “F” connector at the rear of the HD Encoder. Use ahigh quality 75Ω coaxial cable with compression-type “F” connectors from the HD Encoder’s RFOutput. Ensure that all connections are tight.7.When the HD Encoder configuration is complete – disconnect the HD Encoder from thenetwork/Ethernet to insure its security and highest performance14www.multicominc.comAll Rights Reserved 2019 Multicom, Inc.(800) 423-2594(407) 331-7779
Multicom MUL-HDENC-C-100-NA User ManualStep 10: Use the TV’s AutoScan to add the new modulated channel(s) to the availableTV channels1.Make sure the correct input type is selected from the TV menu: J.83B requires the TV to be set to“Cable”. ATSC requires the TV to be set to “Antenna” or “Air”.2.Perform a full channel scan from the TV menu to detect all HD Encoders4. Frequently Asked Questions (FAQ)/TroubleshootingMost issues can be resolved by insuring the cabling is correctly and tightly connected and that the correctparameter settings are selected in the HD Encoder and the TVs.No Display on TVHD Encoder or TV not setup 1. Ensure the source and the HDcompletely or not correctlyEncoder are powered on2. Ensure that there is outputfrom the video source (directconnect the source with aHDMI to a TV)3. Ensure that there is outputfrom the HD Encoder –output bit rate should beshown on LCD4. Ensure that the correct HDEncoder output is selected inRF OUTPUT SETUP, i.e.J.83B or ATSC.5. Ensure that the TV is set onthe correct input type: J.83BQAM requires “CABLE”.ATSC requires “ANTENNA”or “AIR”.6. Ensure that the RF level at thecoax cable is within the TVinput range7. Ensure that the TV hasperformed the full Channelscan to detect and setup thenew HD Encoder channels.8. Ensure the TV has been tunedto the correct channeldetected from HD Encoder15www.multicominc.comAll Rights Reserved 2019 Multicom, Inc.(800) 423-2594(407) 331-7779
No Display on TV/Only ColorBars/Error MessageNo Display/Error Message onTV with DVD/ Blu-Ray PlayerNoise on TVRebootingMulticom MUL-HDENC-C-100-NA User Manual9. Ensure that the ENCODERSETUP specifies a validProgram Number.Encrypted HDMI is being input1. The HD Encoder can onlyfrom encrypted DVD/Bluaccept unencrypted HDMIRay/Satellite Receiver/Etcinput, i.e. user generatedvideo files which do not haverestricted content with HDCPprotectionOccasionally “No Input”1. See note above about HDCPmessage will appear on TV. HDcontent restrictionsEncoder output will stop output2. Player output will stop whenif no Player input is availableit is overly slow to read data(old/dirty player)3. Make sure the DVD/Blu-Raymedia is clean, no scratches,no fingerprints, etcOccasionally compression1. Ensure that the source isartifacts appearwithout noise andcompression artifacts2. Ensure that the RF inputlevels to the TV are withinrangeOccasionally HD Encoder1. Ensure that the HD encoder isrebootsdisconnected from theethernet cable to insure it issecure from the internet,hackers, viruses, traffic, etc16www.multicominc.comAll Rights Reserved 2019 Multicom, Inc.(800) 423-2594(407) 331-7779
Multicom MUL-HDENC-C-100-NA User Manual5. After-Sales Service1.2.If the equipment malfunctions, immediately contact your local in-country dealer or distributor ordirectly call our MULTICOM Technical Support Hotline 1 800-423-2594.The onsite installation, maintenance, and operation of equipment must be performed by trainedprofessional technicians to avoid damage.Special notice: If the equipment has been installed, maintained, and/or changed by end users, and isdamaged, MULTICOM will not be responsible for free maintenance or free replacements.6. DisclaimerMULTICOM reserves the right to change any products described herein at any time, and without priornotice. MULTICOM assumes no responsibility or liability arising from the use of the products describedherein, except as expressly agreed to in writing by MULTICOM. The use and purchase of this product doesnot convey a license under any patent rights, copyrights, trademark rights, or any intellectual property rights.Nothing hereunder constitutes a representation or warranty that using any products in the manner describedherein will not infringe any patents of third parties.The contents of this manual are subject to change and/or update without notice.17www.multicominc.comAll Rights Reserved 2019 Multicom, Inc.(800) 423-2594(407) 331-7779
Channel Type J.83B: STD / HRC / IRC; ATSC-8VSB Frequency Range J.83 Annex B: 57 - 861 MHz (Ch2 - Ch135) ATSC-8VSB: 57-803 MHz (Ch2 to CH69) Interleaver I 128, J 1 Output Level 38 dBmV Typical (With 20dB Range Manually Adjustable) Flatness Across Full Band 2dB Typical MER 39 dB Typical Constellation (Output Bitrate) J.83 Annex B: