Transcription
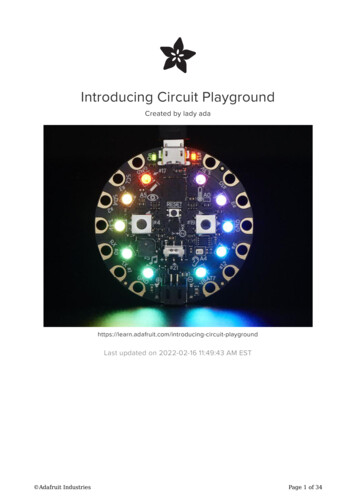
Introducing Circuit PlaygroundCreated by lady adaLast updated on 2016-08-27 02:46:58 AM UTC
Guide ContentsGuide ContentsOverviewPinoutsGPIO Capacitive Touch PadsNeoPixelsPushbuttonsSlide SwitchLight SensorTemperature SensorSpeaker BuzzerMicrophone Audio SensorTriple-Axis AccelerometerWindows Driver InstallationArduino 1.6.x IDESuper Easy Installation (Recommended)Add the Adafruit Board Support package!Manage Board SupportEasy InstallationManual InstallationHELP!LibrariesInstalling Via Library ManagerDownload Adafruit CircuitPlayground 'Manually'Run the DemoSelect the Circuit Playground BoardSelect the matching PortLoad the Demo ProgramCompile/Verify the DemoUpload DemoDownloadsWindows Driver SoftwareSource Adafruit 6272727282828292930333333Page 2 of 35
SchematicFabrication Print Adafruit ng-circuit-playgroundPage 3 of 35
OverviewWould you like to learn electronics, with an all-in-one board that has sensors and LEDs builtin? Circuit Playground is here, and it's the best way to practice programming on realhardware. No soldering or sewing required!Circuit Playground features an ATmega32u4 micro-processor, just like our popular Flora. Italso is round and has alligator-clip pads around it. You can power it from USB, a AAAbattery pack, or Lipoly (for advanced users). Program your code into it, then take it on thego.ATmega32u4 Processor, running at 3.3V and 8MHzMicroUSB port for programming and debugging with Arduino IDEUSB port can act like serial port, keyboard, mouse, joystick or MIDI Adafruit ircuit-playgroundPage 4 of 35
Circuit Playground has built-in USB support. Built in USB means you plug it in to program it,it just shows up - all you need is a Micro-B USB cable, no additional purchases are needed!With the new 1.6.4 Arduino IDE, it takes only a few seconds to addsupport (http://adafru.it/nb4). The Circuit Playground has USB HID support, so it can act likea mouse or keyboard to attach directly to computers.Here's some of the great goodies baked in:10 x mini NeoPixels, each one can display any rainbow color1 x Motion sensor (LIS3DH triple-axis accelerometer with tap detection, free-falldetection)1 x Temperature sensor (thermistor)1 x Light sensor (phototransistor)1 x Sound sensor (MEMS microphone)1 x Mini speaker (magnetic buzzer)2 x Push buttons, left and right1 x Slide switch8 x alligator-clip friendly input/output pins Adafruit ircuit-playgroundPage 5 of 35
Includes I2C, UART, and 4 pins that can do analog inputs/PWM outputAll 8 pads can act as capacitive touch inputsGreen "ON" LED so you know its poweredRed "#13" LED for basic blinkingReset buttonWe've started out with a Developer Edition of Circuit Playground. This version is designedfor people who have a little experience with Arduino already, who want to help build &document projects. There might be minor hardware or software bugs. Once we feel like thedesign is really solid we'll revise/re-release it into a universal edition for anyone to use! Adafruit ircuit-playgroundPage 6 of 35
PinoutsCircuit Playground is chock-full of blinkies, sensors and electronic goodies. Since there's alot going on, we're going to look at each piece one by one and talk about what it is and howto use it. This is a technically-oriented description for the Developer Edition and the peoplewho are planning on writing code for Circuit PlaygroundGPIO Capacitive Touch Pads Adafruit ircuit-playgroundPage 7 of 35
All 8 non-power pads around the circuit playground have the ability to act as capacitivetouch pads. Each pad has a 1Mohm resistor between it and digital pin #30. You can togglethis pin to control whether the resistor is a pullup or pulldown or floating. Note that thismeans that all the pads have a 2Mohm resistance between them.You can also of course just use those pads for GPIO, we expose the hardware Serial (TX RX), hardware I2C (SDA SCL) and 4 gpio pins that can also do analog readings. Theyare the same exact pins as those on the Flora Adafruit ircuit-playgroundPage 8 of 35
NeoPixelsEach Circuit Playground comes with 10 'NeoPixels' (technically, SK6812-3535 chips).These are connected to digital pin #17 and are powered by the 3.3V regulator. This istechnically undervolting but we test them at this voltage and they work fine, if slightly tintedPushbuttons Adafruit ircuit-playgroundPage 9 of 35
There are three tactile pushbutton switches. One is the Reset button. Press this buttononce to reset, double-click to enter the bootloader manually.The other two buttons are the Left and Right buttons, connected to digital #4 (Left) and#19 (Right) each. These have pull-down resistors installed so are, by default, LOW andwhen pressed read HIGH. This is to make if-then logic a little easier to read for beginnersSlide Switch Adafruit ircuit-playgroundPage 10 of 35
There is a single slide switch near the center of the Circuit Playground. It is connected todigital #21 and will read LOW when slid to the left, and HIGH when in the right handpositionLight Sensor Adafruit ircuit-playgroundPage 11 of 35
There is an analog light sensor, part number ALS-PT19, in the top left part of the board.This can be used to detect ambient light, with similar spectral response to the human eye.This sensor is connect to analog pin #A5 and will read between 0 and 1023 with highervalues corresponding to higher light levels. A reading of about 300 is common for mostindoor light levels.Temperature Sensor Adafruit ircuit-playgroundPage 12 of 35
There is an NTC thermistor (Murata NCP15XH103F03RC) that we use for temperaturesensing. While it isn't an all-in-one temperature sensor, with linear output, it's easy tocalculate the temperature based on the analog voltage on analog pin #A0. There's a 10Kresistor connected to it as a pull down.Speaker Buzzer Adafruit ircuit-playgroundPage 13 of 35
You can make your circuit playground sing with the built in buzzer. This is a miniaturemagnetic speaker connected to digital pin #5 with a transistor driver. You can use PWM atvarying frequencies to make basic tones.Microphone Audio Sensor Adafruit ircuit-playgroundPage 14 of 35
A MEMS microphone can be used to detect audio levels and even perform basic FFTfunctions. You can read the analog voltage corresponding to the audio on analog pin #A4.Note that this is the raw analog audio waveform! When it's silent there will be a reading of 330 and when loud the audio will read between 0 and 800 or so. Averaging andsmoothing must be done to convert this to sound-pressure-level.Triple-Axis Accelerometer Adafruit ircuit-playgroundPage 15 of 35
A LIS3DH 3-axis XYZ accelerometer is in the dead center of the board and you can use itto detect tilt, gravity, motion, as well as 'tap' and 'double tap' strikes on the board. TheLIS3DH is connected to the hardware SPI pins (to leave the I2C pins free) and has the CSpin on digital pin #8 and an optional interrupt output on digital pin #7 (also known as IRQ#4) Adafruit ircuit-playgroundPage 16 of 35
Windows Driver InstallationMac and Linux do not require drivers, only Windows folks need to do this stepBefore you plug in your board, you'll need to possibly install a driver!Click below to download our Driver InstallerDownload Adafruit Windows Driver Installerhttp://adafru.it/maiDownload and run the installerRun the installer! Since we bundle the SiLabs and FTDI drivers as well, you'll need to clickthrough the license Adafruit ircuit-playgroundPage 17 of 35
Select which drivers you want to install:By default, we install the Feather 32u4 , Feather M0, Flora and Trinket / Pro Trinket /Gemma / USBtinyISP drivers.You can also, optionally, install the Arduino Gemma (different than the Adafruit Gemma!),Huzzah and Metro driversClick Install to do the installin' Adafruit ircuit-playgroundPage 18 of 35
Adafruit ircuit-playgroundPage 19 of 35
Arduino 1.6.x IDEThe Arduino IDE version 1.6.x is the latest version of Arduino and recommended for mostusers. Follow the steps on this page to learn how to install a version of the Arduino 1.6.xIDE with support for Adafruit's boards.Super Easy Installation (Recommended)With the Arduino IDE version 1.6.4 and greater you can now add 3rd party boards directlyfrom the stock IDE! The first thing you will need to do is to download the latest release ofthe Arduino IDE. You will need to be using version 1.6.4 or higher:Latest Arduino IDE Downloadhttp://adafru.it/f1PAfter you have downloaded and installed the latest version (remember it must be 1.6.4 orhigher), you will need to start the IDE and navigate to the Preferences menu. You canaccess it from the File menu in Windows or Linux, or the Arduino menu on OS X.A dialog will pop up just like the one shown below. Adafruit ircuit-playgroundPage 20 of 35
We will be adding a URL to the newAdditional Boards Manager URLs option. The list ofURLs is comma separated, and you will only have to add each URL once. New Adafruitboards and updates to existing boards will automatically be picked up by the BoardManager each time it is opened. The URLs point to index files that the Board Manager usesto build the list of available & installed boards.To find the most up to date list of URLs you can add, you can visit the list of third partyboard URLs on the Arduino IDE wiki (http://adafru.it/f7U). We will only need to add one URLto the IDE in this example, but you can add multiple URLS by separating them withcommas. Copy and paste the link below into the Additional Boards Manager URLs optionin the Arduino IDE preferences.Add the Adafruit Board Support package! Adafruit ircuit-playgroundPage 21 of 35
x/package adafruit index.jsonInto the "Additional Board Managers URLS" boxMake sure you remove the apt.adafruit.com proxy setting from the Arduino preferences ifyou have previously added it.Click OK to save the new preference settings. Next we will look at installing boards with theBoard Manager.Manage Board SupportAdding the link to the Adafruit board support package does not actually install anything, itonly tells the Arduino IDE where to find the software.Now that you have added the appropriate URLs to the Arduino IDE preferences, you canopen the Boards Manager by navigating to the Tools- Board menu.Once the Board Manager opens, click on the category drop down menu on the top left handside of the window and select Contributed. You will then be able to select and install theboards supplied by the URLs added to the prefrences. In the example below, we areinstalling support for Adafruit AVR Boards, but the same applies to all boards installedwith the Board Manager. Adafruit ircuit-playgroundPage 22 of 35
Next, quit and reopen the Arduino IDE to ensure that all of the boards are properlyinstalled. You should now be able to see the new boards listed in the Tools- Board menu.Finally follow the steps below for your platform to finish the installation - basically installingdrivers and permissions managementWindows Setup (http://adafru.it/jAa)Mac OSX Setup (http://adafru.it/mak)Linux Setup (http://adafru.it/iOE)Also check out the troubleshooting section (http://adafru.it/mal) for some advice on commonerrors. Have fun using Adafruit's boards!Easy InstallationIf you have trouble using the super easy installation method above another way to installsupport for Adafruit's boards is with the following preconfigured Arduino IDE downloads.Just grab the right file for your platform and use it like the normal Arduino IDE. Adafruit'sboards like Trinket, Pro Trinket, Gemma, and Flora are configured to show up in the boardlist automatically!Arduino 1.6.4 with Adafruit Boards for Windowshttp://adafru.it/f83Arduino 1.6.4 with Adafruit Boards for Mac OSX (10.7 )http://adafru.it/f84 Adafruit ircuit-playgroundPage 23 of 35
Arduino 1.6.4 with Adafruit Boards for Linux (32-bit)http://adafru.it/f85Arduino 1.6.4 with Adafruit Boards for Linux (64-bit)http://adafru.it/f86Once you've downloaded and installed the IDE follow the steps below for your platform tofinish the installation:Windows Setup (http://adafru.it/jAa)Mac OSX Setup (http://adafru.it/mak)Linux Setup (http://adafru.it/iOE)Also check out the troubleshooting section (http://adafru.it/mal) for some advice on commonerrors. Have fun using Adafruit's boards!Manual InstallationIf you have your own version of the Arduino IDE or would like to install the Adafruit boardsyourself then follow the steps below. However it is highly recommended that most usersstick to the easy install downloads above!With the 1.6.x version of the Arduino IDE the process of adding support for new boards ismuch simpler than previous versions. First start by downloading a version of the Arduino1.6.x IDE and installing it as normal. Note that these instructions are only tested towork against the Arduino 1.6.4 IDE, earlier or later versions may or may not work!Once you've installed the stock Arduino IDE download and unzip the following file whichcontains Adafruit's board definitions (http://adafru.it/eTY):Adafruit Board Definitionshttp://adafru.it/eTZUnzip the file and navigate inside the Adafruit Arduino Boards folder to find ahardware subfolder with a small hiearchy of files, and adrivers folder with Flora driversspecific to Windows.Next find your installed Arduino IDE's hardware subfolder. For Windows and Linux thehardware subfolder should be directly beneath the folder where Arduino's IDE wasinstalled.For Mac OSX the folder is hidden inside the application bundle. Right click on the Arduinoapplication and click 'Show Package Contents', then navigate to the Content - Resources - Java folder to find the hardware subfolder. Adafruit ircuit-playgroundPage 24 of 35
Once you've found Arduino's hardware subfolder carefully merge in the contents of thehardware folder from Adafruit's board definitions, being sure to overwrite any file thatconflicts (only avrdude.conf should conflict). When you're done the Arduino hardwarefolder should have the following hiearchy:hardwareadafruitavrThe contents of the hardware/adafruit/avr folder from Adafruit'sboard definitions. There will be a boards.txt, platform.txtand variants subfolder.arduinoNo changes to this hiearchy, it is exactly as provided by the Arduino IDE.toolsavretcavrdude.conf - This version of avrdude.conf should be fromAdafruit's board definitions and completely overwrites theversion provided by the Arduino IDE. all other files as provided by the Arduino IDE. all other files as provided by the Arduino IDE.Finally on Windows only, copy the contents of the drivers folder from the board definitionsdownload into the Arduino IDE's drivers folder (it's a sibling of the hardware folder youfound earlier).That's all you need to do to manually install Adafruit's boards with the 1.6.x version ofArduino! Now follow the steps below for your platform to finish the installation:Windows Setup (http://adafru.it/jAa)Mac OSX Setup (http://adafru.it/mak)Linux Setup (http://adafru.it/iOE)Also check out the troubleshooting section (http://adafru.it/mal) for some advice on commonerrors. Have fun using Adafruit's boards! Adafruit ircuit-playgroundPage 25 of 35
HELP!I just plugged it in and I can't seem to connect to my Circuit Playground with Arduino!99% of initial problems with circuit playground are due to having charge USB cablesinstead of sync cables. Do not use a cable you've only used for charging a phone. Makesure its a cable that can pass data as well as power. Lately, there's been a lot of productsshipped with charging only cables and it's very confusing because the Circuit Playgroundlights up but does not show up in the Arduino IDE!So, please, try multiple USB cables, and if you find a charge-only cable, cut it in half andthrow it away so you will not make the mistake again! Adafruit ircuit-playgroundPage 26 of 35
LibrariesWe wrapped up everything you need to run Arduino code on your Circuit Playground iswrapped up into a tidy library that integrates all the sensing and lighting.Installing Via Library ManagerThe Circuit Playground library is available on the Adafruit GitHubwebsite (http://adafru.it/naF). The library is installed in versions of the Arduino IDE greaterthan 1.6.7 as follows:In the menu click "Sketch", then "Include Library"At the top, click "Manage Libraries. . ."Type "Circuit Playground" in the search box. You should see Adafruit CircuitPlayground listed.Download Adafruit CircuitPlayground'Manually'To begin working with Circuit Playground, you will need to downloadAdafruit CircuitPlayground from our github repository (http://adafru.it/naF. You can do thatby visiting the github repo and manually downloading or, easier, just click this button todownload the zipDownload Adafruit CircuitPlayground Libraryhttp://adafru.it/naBRename the uncompressed folder Adafruit CircuitPlayground and check thatthe Adafruit CircuitPlayground folder contains Adafruit CircuitPlayground.cpp andAdafruit CircuitPlayground.hPlace the Adafruit CircuitPlayground folder your arduinosketchfolder/libraries/ folder.You may need to create the libraries subfolder if its your first library. Restart the IDE.We also have a great tutorial on Arduino library installation duino-libraries-install-use (http://adafru.it/aYM Adafruit ircuit-playgroundPage 27 of 35
Run the DemoPlug in your Circuit Playground. Under Windows you'll need to make sure you haveinstalled the driver package (http://adafru.it/naC). Do that if you haven't!Next, you'll also need to make sure you have installed the Adafruit Board Support package.That's required no matter what computer you're using.Select the Circuit Playground BoardUnder the Tools - Board submenu, scroll down to Adafruit Boards and pick AdafruitCircuit PlaygroundSelect the matching PortUnder Tools- Port select the port that is labed (Circuit Plaground) Adafruit ircuit-playgroundPage 28 of 35
Load the Demo ProgramOK you're now ready to load the demo. Under File- Examples locateAdafruit CircuitPlayground and then select the demo program.Compile/Verify the DemoClick the Verify button (also the Sketch- Verify menu item) to compile/verify the demo. Adafruit ircuit-playgroundPage 29 of 35
Make sure you get "Done compiling." and no errorsUpload DemoClick the Upload button to upload the code Adafruit ircuit-playgroundPage 30 of 35
You should get a Done uploading. message in the blue statusbarYou can now run the serial console to get data output: Adafruit ircuit-playgroundPage 31 of 35
You'll get information such as:"Capacitive touch" readings for all 8 outer pads (under 50 means not touched, over100 usually means the pads are touched)Slide switch location (left or right)If the Right and Left buttons are pressedLight sensor readings, higher values mean more lightSound sensor readingsX, Y and Z accelerometer readingsTemperature in Celcius Adafruit ircuit-playgroundPage 32 of 35
DownloadsWindows Driver SoftwareAvailable here (http://adafru.it/naC)SourceArduino Circuit Playground interfacing library (http://adafru.it/naF)Adafruit Board Support Pkg (Should be installed via the BoardManager!) (http://adafru.it/eTY)PCB Files in EagleCAD format (http://adafru.it/nb5)Schematic Adafruit ircuit-playgroundPage 33 of 35
Fabrication PrintDims in inches Adafruit ircuit-playgroundPage 34 of 35
Adafruit IndustriesLast Updated: 2016-08-27 02:46:57 AM UTCPage 35 of 35
Circuit Playground has built-in USB support. Built in USB means you plug it in to program it, it just shows up - all you need is a Micro-B USB cable, no additional purchases are needed!