Transcription
oitScreencasting with Camtasia Studio 8June 2015Screencasting with Camtasia Studio2Process Overview3Record the Screen with the Camtasia Recorder4-7Record with the Camtasia PowerPoint Add-In8-10Edit your Recording in Camtasia Studio11-17Produce your Screencast in a Shareable Format18Share your Screencast19Appendices Production & Publishing Best Practices20 Software and Hosting Alternatives21UMass Amherst Information TechnologyAcademic eduCamtasia Studio v. 8.5.2
Screencasting with Camtasia Studio 8Screencasting with Camtasia StudioWhat is a Screencast?While a screenshot is a still picture of a computer screen, a screencast is a recording of a screen overtime, often with accompanying narration, that is distributed, typically, online. Screencasts are popular forcapturing PowerPoint presentations, creating tutorials on how to use software, and for demonstratinghow to locate resources on the Web.Camtasia Studio is one of several tools for creating screencasts available for Microsoft Windows. Otheroptions include Adobe Captivate ( ) and Techsmith’s Jing (free, and similar to Camtasia Recorder, butwith a 5 minute limit per video). You can download a full-featured 30-day trial version of CamtasiaStudio from www.techsmith.com. UMass Amherst does not provide university-wide licensing for thisproduct.Instructors can either record “live” in a classroom, or in the privacy of their office, or, are welcome toreserve our recording room and laptop for recording or editing.What Do I Need to Create a Screencast?Camtasia Studio provides the software for recording, editing and publishing screencasts.In addition to Camtasia you will need A microphone to record narration. A webcam to record video of the narrator/presenter that can appear in a corner of the screencastwindow. A way to share your screencast movie, such as a Moodle course, a Google account, a blog, oranother sort of Web site.Screencasting is sometimes combined with “inking” technology, for instance using a Tablet PC, toannotate PowerPoint or OneNote slides. With the right apps installed, you can record from a phone ortablet.Two Ways to Create Screencasts in Camtasia StudioCamtasia Studio provides two primary methods for recording screencasts; you can record any area of thescreen and any activity that takes place in that area, or you can record within PowerPoint.Screen recordingThe Record all activity on the screen, or a selected area of the screen. Record within a single applicationwindow, or across any software in use.This is the preferred method for creating screencasts of most computer activities such as softwaredemonstration or guide to finding resources on a website.PowerPoint Add-inCamtasia Studio includes a PowerPoint Add-in that facilitates creating screencasts of PowerPointpresentations. This is the preferred method for capturing screencasts of PowerPoint presentations, as longas the presentation does not include links that take you out of PowerPoint, for instance, if yourpresentation has a link that opens a web page in a web browser.UMass Amherst IT, Academic Computinghttp:/it.umass.edu/instruct150624 mt2
Screencasting with Camtasia Studio 8Process OverviewThere are three distinct steps to creating a screencast in Camtasia, with different file types for each step.1. RecordThe first step is to create your recording in Camtasia.This creates a .trec file.2. EditThe .trec file is edited in Camtasia Studio in a new project.The project file is saved in the editable .camproj format.3. Produce & ShareYou can’t post a .cmrec or .cmproj file on the Web. They only work in Camtasia. Before you shareyour screencast, it must be exported to a file format your audience can play in a standard video player,for instance, in a Web browser or by downloading to play.If you publish to a Google Drive, YouTube, orScreencast.com (Techsmith’s hosting service),Camtasia will not save local files, but will upload video directly to the hosting service.To host your screencast on Moodle or UDrive, produce as MP4 – with smart player, and be sure toupload all the files to your site, then link to the .html file.Note: Files created in Camtasia Studio for Windows and Camtasia Mac are not completelyinterchangeable. The recording files (.trec) can be used in the Camtasia Editors on both Windows andMac, but Windows .camproj files cannot be edited on the Mac, and Mac .cmprj files can’t be edited inCamtasia Studio for Windows.Before you StartPrepare your narrationIt is useful to have an outline or notes to work from when recording narration for a screencast.Depending on your needs and personal style, a well-organized outline may be as useful as a detailedscript in ensuring that you cover the relevant material and still sound natural and engaging.Set up your computer screen and recording environmentDo you need to record the entire computer screen, including application menus, or just the inside of adocument window or browser window? Will your computer’s desktop show in the demo? Do you needto clean it up?Are you recording a software or Web site demo? If so, avoid custom settings or add-ons in yourapplication or browser that your audience may not have on their own computers.Don’t forget to silence your cell phone, close the door if you are recording in your office, turn off fansor other background noise.Check your recording hardwareThere’s nothing worse than going to start your lecture only to discover your audio/video hardware is notconnected. Make sure your microphone is plugged in to your computer. If you will record video, make sure your camera is plugged in to your computer.UMass Amherst IT, Academic Computinghttp:/it.umass.edu/instruct150624 mt3
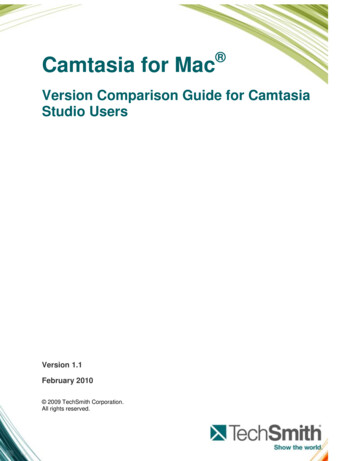
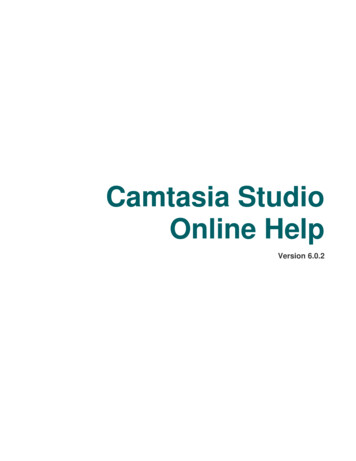
Screencasting with Camtasia Studio 8Record an Area of the Screen with the Camtasia RecorderSet up the recording1. Arrange the open application windows to show what will be onscreen at the beginning of yourrecording.2. Launch Camtasia Studio. The first time Camtasia Studio opens, a Getting Started projectappears.Go to File New Project to close the Getting Started project and begin a new one. You do notwant to record into the Getting Started demonstration project! After the first time you useCamtasia, only the Welcome Screen will open.3.On the Welcome Screen, or, if Camtasia is already open, in the Camtasia Studio Task Bar(at top), click Record the Screen,.The Welcome Screen provides an easy way to get started with thedifferent ways of creating screencasts, such as recording thescreen, or importing images for a slide show (Import Media).The Camtasia Recorder panel will open.4. On the Camtasia Recorder panel:a.Set the area to record:To record the entire screen, click Full Screen.To record a selected are of the screen use the Dimensions pop-out to choose a presetsize, either Wide Screen or Standard aspect ratio (proportions).Tip: This step sets thedimensions for therecording area. Later,after you finish recording,you can reduce the dimensions.Recording at larger dimensionsthan you will produce the finalvideo will allow you to use Camtasia’szooming features to zoom in and makedetails easier to see (e.g., record at1024 x 768, then produce at 640 x 480).UMass Amherst IT, Academic Computinghttp:/it.umass.edu/instruct150624 mt4
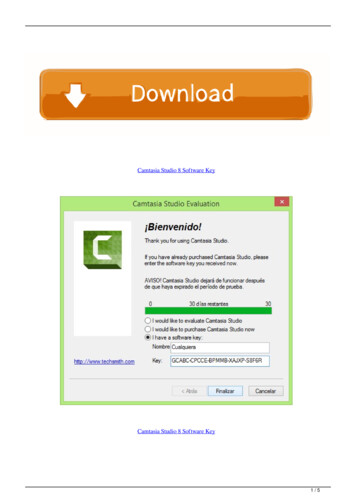
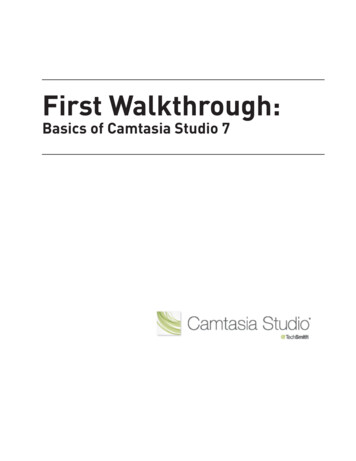
Screencasting with Camtasia Studio 8b. Arrange the windows or capture area:Because you are not recording yet, you can still fine-tune the capture area:- Rearrange the windows on the screen to fit inside the capture area.- Relocate the capture area by dragging the crosshairs at its center.- Enlarge or reduce the capture area by dragging a handle at its edge.c. Select and adjust video input devices:Choose whether to include camera video in your recording by clicking the Webcambutton to toggle video on and off the camera (by default, camera input is set to off).Use the camera pop-out menu to select the video source (for example, a built inWebcam, or a camera you have attached to your computer to record).When the camera is on, a preview imagewill display if you roll the cursor over thetiny thumbnail next to the camera button.d. Select audio input:To choose whether to record narration along with the screen, click the Audio button totoggle on and off any mic connected to your computer (by default, audio is set to on.)Use the audio pop-out menu to select your audio source. A portable mic or headset maynot be automatically recognized by your computer. You may need to select one from theaudio menu.UMass Amherst IT, Academic Computinghttp:/it.umass.edu/instruct150624 mt5
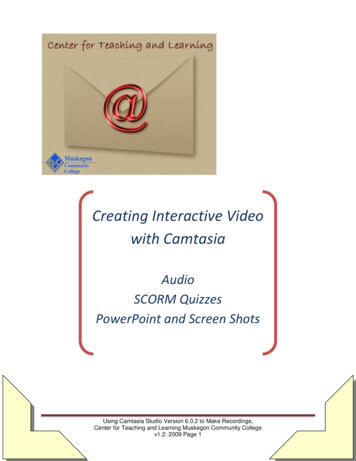
Screencasting with Camtasia Studio 8e. Perform an audio test by speaking into the mic:You should see a fluctuating green-to-yellow bar under the Audio Input slider.- If the color under the slider is orange-to-red, slide the volume control to the leftto lower the volume.Audio Input TestWhen you speak, you shouldsee a fluctuating green barhere.Use the slider to adjust thevolume- If you do not see any fluctuating color under the Audio Input slider:1. Check that your mic is plugged in.2. Confirm in the audio pop-out menu that your mic is selected.3. If audio input is still not registering, open your computer’ssystem Control Panel and go to Sound Recording and select your mic.Make and Save the recording1. Start Recording:When you are ready to begin recording, click the large, red rec button (or hotkey F9).TIP: Count to 5 before you start to speak or navigate around the screen; this will avoid clipping offthe beginning of your presentation.2. Pause, Resume & Stop Recording:You can use the controller, or you can use keyboardcommands, to pause, resume, or stop recording:-To pause recording click the Pause button (or F9).-To resume recording, click the Resume button (or F9 again).-To stop recording, click the Stop button (or F10).If you don't see the recording controller, you can click the Camtasia Recorder iconin the Windows Taskbar.When you have finished recording, click the Stop button on the recording controller (or hotkey F10).Camtasia Studio will generate a preview of the screencast in the Camtasia Recorder Previewwindow.Click View at 100% to preview the full resolutionquality of your video.3. Preview and Save:Under the preview window is a playbackcontroller, and buttons to save or delete therecording. You can produce the recording straightto a shareable format, but we recommend insteadthat you save the recording so that it can be editedin Camtasia Studio.UMass Amherst IT, Academic Computinghttp:/it.umass.edu/instructClick Shrink to Fit to fit the entire recording inthe preview window (display quality may suffer inthe Preview, but the recorder should look fine).150624 mt6
Screencasting with Camtasia Studio 8Click Save & Edit. A Save dialog box will open.4. Name and Locate the Recording File:Choose a filename and a location to save the recording.By default, files will be saved in My Documents in the Camtasia Studio folder (or the last locationwhere you saved Camtasia files). You can change the location, but regardless, we suggest youcreate a new folder in which to store the files for each screencasting project.Click Save. The file will have a .camrec extension (e.g., myscreecast.camrec), and Camtasia Studiowill open in Camtasia with the screen capture, audio, and web cam video (if you recorded it) each init’s own track on the timeline.Note: If you used the Webcam feature, the video will appear to bottom-right of the screen recording.You can change the position of the Web cam video later.5. Choose a Size for the Produced Video:In the Camtasia Studio Task Bar (at top), click the Dimensions button to open the EditingDimensions dialog.From the Dimensions drop-down, select the size foryour produced video: A good choice for hosting on YouTube or otheronline services is 720p HD. For embedding on a course web site, smallerdimensions may be better, for instance 480p SD ifyour recording area had Wide dimensions (16:9aspect ratio), or a Custom setting of 640 x 480when the recorded area is Standard (4:3 aspectratio).Click OK.6. Save the Project File:Go to File Save Project to save the project as an editable .camproj file.To learn how to edit and produce your project, see Edit Your Recording, below.UMass Amherst IT, Academic Computinghttp:/it.umass.edu/instruct150624 mt7
Screencasting with Camtasia Studio 8Record with the Camtasia PowerPoint Add-InTIP: The PowerPoint Add-In is only useful if your entire presentation takes place within PowerPoint.If your presentation includes links to Web pages or other applications, use the Record Screen method.Prepare PowerPoint Presentations for ScreencastingVisual Design for ScreencastingScreencasts of PowerPoint will be improved by facilitating the readability of your PowerPoint slides: Use large type (32pt for example).Your screencast movie will be much smaller thanthe full screen presentation. Use Sans serif fonts. (Arial, Verdana, Tahoma, etc.) Use high contrast text and background combination Use a simple backgrounds with minimaltexture (this will also reduce file sizes) Minimize use of slide transitionsPowerPoint features that Camtasia can use Presenter Notes for PowerPoint slides can be imported into your screencasts as captions.Importing notes improves accessibility for all audiences. Slide Titles can be used by Camtasia to create a table of contents for your screencast.Recording the PresentationYou may wish to print out notes or an outline for your PowerPoint slideshow in preparation for recordinga screencast of your slides. If you have two screens, or are attached to a projector, you can usePowerPoint in Presentation mode to be able to read your notes and record the projection/2nd screen.1. Close Camtasia, if open. This will ensure you start a new project.2. Launch PowerPoint. Note: The first time you use PowerPoint with the Camtasia Add-In enabled,you will see a welcome screen and screencast on getting started with the Add-In. On subsequent usesthis screen will not appear.You can also initiate a Camtasia PowerPoint recording from the Camtasia Studio Welcome screen, orfrom a new Camtasia project, in which case PowerPoint will launch and ask you to locate yourPowerPoint presentation file.3.In PowerPoint, click the Add-Ins tab.Add-Ins TabRecording optionsA series of recording buttons for Camtasia should appears at the left side of the PowerPoint ribbon.4. Click the Recording Options button. For Audio Source, select your mic. Perform a sound check byspeaking into your mic. You should see a fluctuating green bar. Adjust the volume as needed (thecolored bar should stay in the green-to-yellow range, and should not go into the orange-to-red range).UMass Amherst IT, Academic Computinghttp:/it.umass.edu/instruct150624 mt8
Screencasting with Camtasia Studio 8Troubleshooting: If audio does not register, go to your System Control Panels, and to the Soundsettings and confirm your Mic is selected for audio input.To capture both microphone and system audio when your presentation includes embedded audioor video, on the Add-Ins tab under Recording Options, check Record System Audio.Note: Some soundcards may not accommodate recording both mic and system audio. For atroubleshooting guide see: m-audio.aspTo record video from a Web cam, under Picture in Picture check Record from camera.Important: Click OK before leaving the Recording Options window.5. Click Record.PowerPoint will launch in presentation mode, overlaid by a box sayingCamtasia Recording is paused. You have one more chance for a soundcheck here.6. Click Click to Begin Recording.If you are recording on a large screen, you may see a warning:Because PowerPoint presentation mode is full-screened, it commands a lot of computing resources torecord. Click Close to close the warning and attempt to record your presentation. If your computeris performing poorly, follow the suggestions in the onscreen tip to improve performance.7. Advance through the PowerPoint slides as normal, narrating into the microphone. To pause/resume recording: press CNTRL SHIFT F9 on your keyboard. To exit the presentation and stop recording: press the ESC key (or CNTRL SHIFT F10).Or, at the end of the presentation, Camtasia will give you the option to Stop recording.8. You will be prompted to choose a filename and a location to save your recording as a .camrec file.9. Choose to either Edit in Camtasia, or Publish without editing.When you choose Edit, Camtasia will ask if you wish to Include Notes. If you have included notesin your presentation file, they will be used for closed-captioning. When editing, you can setup thecaptions to appear only if the user clicks a CC button (see Editing section of this handout).Note: Closed-captioning is recommended for universal access to course materials (see tips below forClosed Caption controls)UMass Amherst IT, Academic Computinghttp:/it.umass.edu/instruct150624 mt9
Screencasting with Camtasia Studio 8After choosing Edit, the video will open in the Camtasia Studio Editor, with the screen capture,audio, and if you recorded it, Web Cam video--each in their own tracks on the timeline.10. In the Camtasia Studio Task Bar (at top), click the Dimensions button to open the EditingDimensions dialog.Pop-out the Dimensions drop down to select a size for yourproduced video. Because PowerPoints have a Standardaspect ratio, you may wish to A good choice for hosting on YouTube or otheronline services is 720p HD. To match PowerPoint’s Standard (4:3 aspectratio), choose a Custom setting of 640 x 480,or 1024 x 768.Click OK. Next, you’ll edit and produce your project.UMass Amherst IT, Academic Computinghttp:/it.umass.edu/instruct150624 mt10
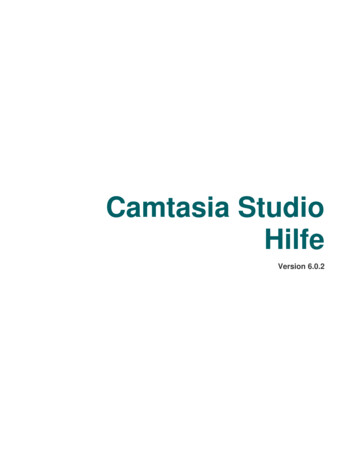
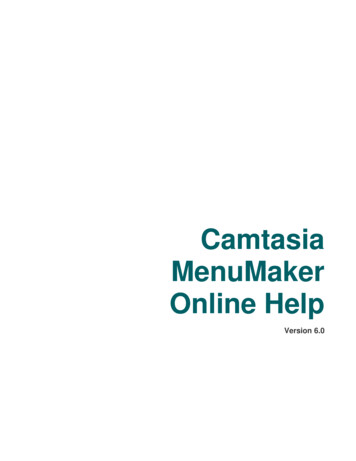
Screencasting with Camtasia Studio 8Edit Your Recording in Camtasia StudioWhy edit? At minimum, you may want to trim off noise at the beginning and end of your screencast.Camtasia Studio also lets you combine recordings, overdub audio, add titles, and create effects such astransitions between segments.The Editing InterfaceAfter recording, if you choose to Edit, or if you open a .camrec, or .camproj file from your desktop,you’ll be taken to Camtasia Studio, where you can edit and produce your recording. Once an editingproject is underway, save a working copy as a .camproj file. When you are finished editing, you’ll exporta sharable movie file to post online or burn to a CD.Workflow stepsPreview windowRecord, Import, Produce.Shows a preview of your screencast.Task tabs &Editing optionsClick the tabs below to select a task.This area will display the optionsavailable for each task.Preview controllerPowerPoint notes, imported asCaptions make your video accessible.Playhead & In and out pointsTimeline & TracksOn the timeline you can cut recordings into clips,delete sections, rearrange sections, and control whento add effects.Each kind of content (audio, video, call outs, captions,markers, transitions, etc.) is on its own horizontal trackin the timeline. Gray, center slider shows location in movie.Green, left slider marks in point, and red, rightmarker marks out point.Highlighted blue area between markers isselected to edit (cut, copy, process audio, etc.).Note: Editing material on the timeline, does not affect corresponding clips in the bin. Clips in the ClipBin retain the original recording. If you need to start over you can highlight and delete everything fromthe timeline, then drag a new instance of your recording onto the timeline.UMass Amherst IT, Academic Computinghttp:/it.umass.edu/instruct150624 mt11
Screencasting with Camtasia Studio 8Different Ways to Open Files for EditingImmediately after recording 1. When you choose to edit at the end of a recording session, Camtasia Studio your recording willbe automatically placed in the timeline.2. Save the project as a .camproj.Import a saved .trec (or .camrec) fileYou can add a saved .trec recording (or .camrec recording file, the legacy file format from previousversion of Camtasia Studio) to a new project:1. Launch Camtasia, skip past the Welcome screen, and go to File New Project.2. Click the Import Media button on the Workflow bar (at top) and select the .camrec file. Therecording will appear in the Clip bin. (Or just drag the recording file from your Desktop windowinto the Bin in Camtasia.)3. Drag the thumbnail for the recording from the Bin onto the Timeline.4. Save the project as a .camproj.Open a saved .camproj ProjectTo work on a project you have already saved, double-click on a .camproj file from the desktop, or launchCamtasia, skip past the Welcome screen, and go to File Open Project.IMPORTANT! For each project, keep .camrec and .camproj files in the same folder.In order for a .camproj file to open, the .camrec file must be present along with any other media filesyou'll include in your production (such as background audio or still images).If you make a copy or move a .camproj file out of it's folder without also copying the .trec(s) to the sameplace, you will not be able to open the project for editing.Note: Your final product will be a .mp4, or other sharable movie file, and cannot be edited in Camtasia.To make changes to a movie you must reopen the .camproj project, then export (produce) the movieagain.UMass Amherst IT, Academic Computinghttp:/it.umass.edu/instruct150624 mt12
Screencasting with Camtasia Studio 8Basic EditingPlayback Your VideoUse the Preview Controller to play the recording.RewindPlay / PauseFrame-by-frame playbackPreview Playhead locationTo fine-tune the playhead location, use the frame-by-frame buttons on the controller, or keyboardhotkeys: SPACEBAR - play and pause playback. CNTRL RIGHT ARROW - forward one frame CNTRL LEFT ARROW - back one frameInsert MarkersBefore you make edits to a recording, it can be helpful to playthrough the video and mark locations on the timeline whereyou will make a cut, adjust the audio, insert a title slide, etc.Markers can also used to create a Table of Contents in yourproduced video.Hide/showMarker trackTimeline MarkerNote: When you record with the PowerPoint add-in, Camtasiaautomatically adds a marker between each slide.1. When the Preview playhead reaches a frame where youwill make an edit, press M to insert a Marker in thetimeline. A small green pointer will appear above the Time ruler.If the Marker track is showing, a thumbnail of the frame appears in the Marker track.2. Enter a short but informative name for the marker.3. Click on a Marker in the Timeline to move the playhead to that location, and then make your edit.Trim off the beginning or end of a recordingHere’s a convenient method for removing unwanted frames from the beginning or end of a recording:1. Hover the mouse over the very beginning or end of a track: youshould see a double-arrow cursor. — 2. To trim the beginning of the recording, hold down the mousebutton and drag the cursor to the right. To trim the end, drag tothe left.3. When you release the mouse, the material before the cursor (ifediting the beginning of the recording) or after the cursor (ifediting the end of the recording), will be removed.4. If there is more than one track in your recording, for example if you recorded system audio, be surethe also trim other tracks to match so that everything stays in sync. As you trim each subsequenttrack, an orange vertical line indicates you have matched the previous trim.UMass Amherst IT, Academic Computinghttp:/it.umass.edu/instruct150624 mt13
Screencasting with Camtasia Studio 85. When trimming off the beginning of a recording, for each track, right-click on the track name (atleft) and choose Select all media on track, then drag the highlighted media to the left, to thebeginning of the timeline.Select a section of the timeline to edit1. Click in the Time Ruler, or on a Marker where you want the selectionto begin. The playhead will relocate.Double-click to deselectIn pointOut point2. Drag the Out point slider through the Time Ruler, releasing where youwant the selection to end. (It will snap to Markers)The area between the green In point and the Red Out point will behighlighted blue indicating all tracks under the highlighted area areselected.3. To fine-tune your selection, drag the In or Out markers.Selected footageIs highlighted blue4. You can now edit the selection: Cut- Cut deletes the content from all tracks, snaps them closedto remove the gap, and "stiches" the cut so that you can apply effects to the segment in onecommand. To unstitch the cut, right-click on the zippered cut line and select Unstitch. Edit audio - See Edit Audio, below to adjust volume, insert silence, etc. in the selected area. Zoom - To zoom in on the selected area, see Smart Focus, below.5. To deselect a selection, double-click the gray Playhead.Split a clip into segmentsSplitting a clip lets you to add transitions between segments, or delete a segment of a track.1.Split buttonClick in the Time Ruler, or on a Marker, at the top of the timeline, or use thePreview controller to move the play head to the spot where you wish to make adivision.2. In the toolbar above the timeline, click the Split button, or press S on thekeyboard.Once the split is made, you'll see a vertical line across all the tracks in the timeline.Note: If you split the timeline while a selection is made, the split will be made at the Out point.Delete a segment from the timelineOnce a recording is split into segments, you can delete sections of a track.Use this method carefully, as it affects only one track at a time. (See Cut (above) to remove selectedfootage from all tracks from a section of the timeline).Right-click on the segment of a track that you want to delete and choose Remove From Timeline.(Audio for that clip will also be removed if audio and video are combined.)UMass Amherst IT, Academic Computinghttp:/it.umass.edu/instruct150624 mt14
Screencasting with Camtasia Studio 8Add transitionsYou can only apply transitions between clips, and if a clip is tooshort, you won't be able to apply a transition.1. If needed, split the track (see above), where you wish to applythe transition.2. Click the Transitions tab. (If the tab doesn’t show, click theMore tab and choose Transitions.) The Transitions panel willopen.3. Drag-and-drop the icon for a transition style onto the split (orbeginning or end) of a track. A turquoise block representingthe transition appears on the track.4. To adjust the duration of the transition, drag the sides of theturquoise block on the timeline.Use a Callout to add titles to your presentationTo add an opening or closing title, or a title between segments:1. For an opening title, select everything on the timeline (CNTRL A) and slide it to the right to makeroom for an opening title slide.2. Move the playhead to the point where you wish to add a title.3. Click the Callouts tab. The Callouts panel opens.4. In the Callouts panel, click the Shapesdrop-down, then click a shape with text.(Simple Rectangle works well for fullscreen titles.)The screen will change to show a texteditor in the Callout panel, and a previewof in the Preview area.5. In the preview area, click and drag theshape to reposition, or drag from its edgesto resize the box, for example, if you wantit to cover the entire screen.Choose shapePreview Window:resize andposition the shapehereChoosefill colorType hereAdjust duration, add transitions6. Choose a fill color for the box (at left,under Shape, in the Callout panel).7. In the entry box (at left), enter your text. A preview of the text box will show in the Preview Window(at right).8. Format the text size, font, alignment, and color as needed.9. Adjust the duration of the clip on the timeline by dragging its beginning or end.Note Callouts will sit on their own track above your video and audio tracks.Use an image in a title clip:1. Click the Import Media button above the Media Bin, and choose and import an image file to yourproject. A thumbnail of the imported image will appear in the Media Bin.2. Drag the thumbnail icon onto the top (empty) track of the timeline.3. To add text over the image add a callout (as described above) and make the fill color for the boxNo fill.UMass Amherst IT, Academic Computinghttp:/it.umass.edu/instruct150624 mt15
Screencasting with Camtasia Studio 8Apply and Edit SmartFocusWhile you are recording the screen, Camtasia tracks the location of every mouse click and keyboardentry. When SmartFocus is applied to a clip on the timeline in Camtasia Studio, the movie will zoom into wherever mouse or keyboard activity was tracked.SmartFocus can make menus and text entry boxes or details of an image easier to see, but too muchzooming and panning will make your audience sea sick!Note: SmartFocus can only be applied when the recorded video is larger in dimensions than theproduced video.1. Click the Zoom-n-Pan tab. If the tab doesn’t show, click the More tab and choose Zoom-n-Pan.2. To apply SmartFocus to the entire timeline, click Apply SmartFocus to Timeline.To apply SmartFocus to just a segment of the timeline, make splits (see above), then click ApplySmartFocus to Clip.3. To fine-tune the position of the zoom area, the magnification of the zoom, or it’s duration,click on a zoom-n-pan key frame in the timeline. You can then reposition or resize the zoom box inthe preview in the Zoom-n-Pan tab. You can also edit values for duration of the zoom.Click to openanimation trayRemove SmartFocus from timelineIf SmartFocus or Cursor animations were added automatically to your project whenyou brought the recording into Camtasia Studio, and you do not want them, you canremove them all at once.1. Make sure you can see the Animation view. Click the smalltriangular icon under the recording track, if needed.2. Right-click on any blue animation bubble, and chooseDelete all visual animations on media.Right-click blue bubblefor context menuEdit Audio1. Click the Audio tab. (If the tab doesn’t show, click the More tab and choose Audio.)2. Th
2. Launch Camtasia Studio. The first time Camtasia Studio opens, a Getting Started project appears. Go to File New Project to close the Getting Started project and begin a new one. You do not want to record into the Getting Started demonstration project! After the first time you use Camtasia, only the Welcome Screen will open. 3.