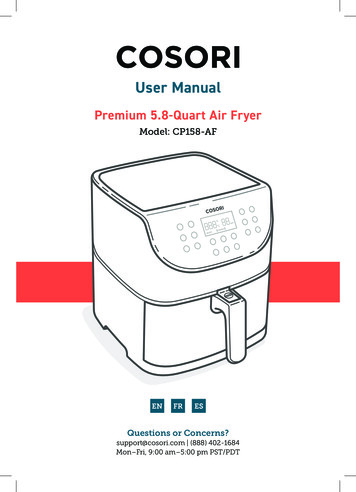
Transcription
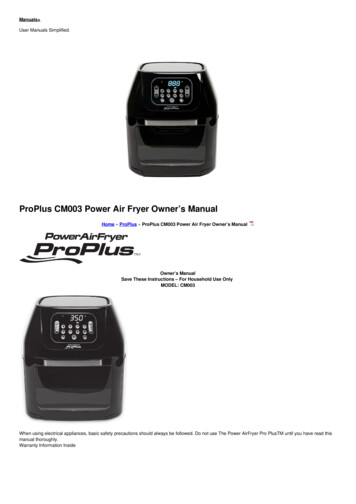
Manuals User Manuals Simplified.ProPlus CM003 Power Air Fryer Owner’s ManualHome » ProPlus » ProPlus CM003 Power Air Fryer Owner’s ManualOwner’s ManualSave These Instructions – For Household Use OnlyMODEL: CM003When using electrical appliances, basic safety precautions should always be followed. Do not use The Power AirFryer Pro PlusTM until you have read thismanual thoroughly.Warranty Information Inside
Contents [ hide1 AirFryer, Rotisserie, Dehydrator &More2 IMPORTANT SAFEGUARDS3 Parts & Accessories4 Unit Specifications5 Using the Accessories6 Rotisserie Shaft & Skewers Racks7 Using the Accessories8 Using the Control Panel9 Cooking Presets10 General Operating Instructions11 Cooking Chart12 Cleaning & Storage13 Troubleshooting14 Frequently Asked Questions15 File Downloads16 Related ManualsAirFryer, Rotisserie, Dehydrator & MoreBefore You BeginIt is very important that you read this entire manual, making certain that you are totally familiar with the Unit’s operation and precautions.The Power AirFryer Pro PlusNot only cooks your favorite fried foods but also broils and bakes many other favorites like air-fried burgers, calzones, and doughnuts. It couldn’t be easier;eight one-touch presets set the time and temperature for some of your favorites like crispy shrimp, fries, and southern-style chicken. Plus a Rotisserie presetand a Dehydrator preset that preserves fresh fruits and other foods for future use.You and your family will enjoy many years of great-tasting food and snacks with the Power AirFryer Pro PlusTM.We All Love Fried FoodCrispy fried chicken, French fries, coconut shrimp, chicken Parmesan, spicy hot wings–the list goes on and on. Those tasty delights have become part ofour everyday diet. Until now, it was impossible to get that great, crispy-fried crunch and flavor without frying in deep fat or oil.Good News!The Power AirFryer Pro PlusTM has changed everything. Our culinary design team has perfected a cooking system that virtually eliminates the oil from theprocess. Messy, unhealthy oil is replaced with Turbo Cyclonic Air that surrounds your food, cooking it to crisp and juicy perfection.IMPORTANT SAFEGUARDSWhen using electrical appliances, basic safety precautions should always be followed, including:NEVER IMMERSE the Main Unit Housing, which contains electrical components and heating elements, in water. Do not rinse under the tap.TO AVOID ELECTRICAL SHOCK, DO NOT put liquid of any kind into the Main Unit Housing containing the electrical components.This appliance has a polarized plug (one blade is wider than the other). To REDUCE THE RISK OF ELECTRIC SHOCK, this plug is intended to fit intoa polarized outlet only one way. If the plug does not fit fully into the outlet, reverse the plug. If it still does not fit, contact a qualified electrician. DO NOTATTEMPT to modify the plugin anyway.MAKE SURE the appliance is plugged into a wall socket. Always make sure that the plug is inserted into the wall socket properly.To prevent food contact with the interior upper screen and heat element, DO NOT OVERFILL the Rotating Mesh Basket.DO NOT COVER the Air Intake Vent or Air Outlet Vent while the Power AirFryer Pro Plus is operating. Doing so will prevent even cooking and maydamage the unit or cause it to overheat.NEVER POUR oil into the Rotating Mesh Basket. Fire and personal injury could result.While cooking, the internal temperature of the Unit reaches several hundred degrees Fahrenheit. TO AVOID PERSONAL INJURY, never place handsinside the Unit unless it is thoroughly cooled.
This appliance is NOT INTENDED FOR USE by persons with reduced physical, sensory, or mental capabilities or a lack of experience and knowledgeunless they are UNDER THE SUPERVISION of a responsible person or have been given proper instruction in using the appliance. This appliance isNOT INTENDED FOR USE by children.When cooking, DO NOT PLACE the appliance against a wall or against other appliances. Leave at least 5 in. free space on the back and sides andabove the appliance. Do not place anything on top of the appliance.DO NOT USE this Unit if the plug, the power cord, or the appliance itself is damaged in any way.DO NOT PLACE The Unit on stovetop surfaces.If the power cord is damaged, YOU MUST HAVE IT REPLACED by the manufacturer, its service agent, or a similarly qualified person in order to avoida hazard.Keep the appliance and its power cord OUT OF THE REACH of children when it is in operation or in the cooling process.KEEP THE POWER CORD AWAY from hot surfaces. DO NOT PLUG in the power cord or operate the Unit controls with wet hands.NEVER CONNECT this appliance to an external timer switch or separate remote-control system.NEVER USE this appliance with an extension cord of any kind.DO NOT OPERATE the appliance on or near combustible materials, such as tablecloths and curtains.DO NOT USE the Power AirFryer Pro Plus for any purpose other than described in this manual.NEVER OPERATE the appliance unattended.When in operation, the air is released through the Air Outlet Vent. KEEP YOUR HANDS AND FACE at a safe distance from the Air Outlet Vent. Also,avoid the air while removing the Rotating Mesh Basket from the appliance.The Unit’s outer surfaces may become hot during use. The Rotating Mesh Basket WILL BE HOT. WEAR OVEN MITTS or use the Fetch Tool whenhandling hot components. Wear oven mitts when handling hot surfaces.Should the Unit emit black smoke, UNPLUG IMMEDIATELY and wait for smoking to stop before removing oven contents.When the time has run out, cooking will stop but the fan WILL CONTINUE RUNNING for 20 secs. to cool down the Unit.Always operate the appliance on a horizontal surface that is level, stable, and noncombustible.ImportantBefore initial use and after subsequent use, hand washes the Rotating Mesh Basket and other cooking accessories. Then, wipe the outside and insideof the Unit with a warm moist cloth and mild detergent. Finally, preheat the AirFryer for a few minutes to burn off any residue.Overheating ProtectionShould the inner temperature control system fail, the overheating protection system will be activated and the Unit will not function. Should this happen,unplug the power cord. Allow time for the Unit to cool completely before restarting or storing.Automatic Shut-OffThe appliance has a built-in shut-off device, that will automatically shut down the unit when the Timer LED reaches zero. You can manually switch off theappliance by selecting the Power Button. The fan will continue running for 20 secs. to cool down the unit.This appliance is intended for normal household use only. It is not intended for use in commercial or retail environments.If the Power AirFryer Pro Plus is used improperly or for professional or semi-professional purposes or if it is not used according to the instructions inthe user manual, the warranty becomes invalid and the manufacturer will not be held liable for damages.Always unplug the appliance after use. · Let the appliance cool down for approximately30 mins. before handling, cleaning or storing. · Make sure the ingredients prepared in this Unitcome out cooked to a golden-yellow color rather than dark or brown. Remove burnt remnants.The cooktop may smoke the first time it is used. It is not defective and the smoke will burn off within a few minutes.Electric PowerIf the electrical circuit is overloaded with other appliances, your new Unit may not operate properly. It should be operated on a dedicated electrical circuit.Electromagnetic FieldsThis appliance complies with all standards regarding electromagnetic fields. If handled properly and according to the instructions in this user manual, theappliance is safe to use based on scientific evidence available today.SAVE THESE INSTRUCTIONS – FOR HOUSEHOLD USE ONLY.Parts & AccessoriesNOTE: Unpack all listed contents from packaging. Varies by model. Please remove any clear or blue protective film on the components.1. Main Unit2. Control Panel3. Air Intake Vents4. Hot Air Outlet Vents5. Air Flow Racks6. Rotating Mesh Basket7. Drip Tray8a*. Skewers (10)8b*. Adjustable SkewersRacks (2)9. Rotisserie Shaft, Forks& Set Screws10. Rotisserie Fetch Tool11. Rotisserie Stand
5. Air Flow RacksCan be used not only for dehydration but also to cook crispy snacks or reheat items like pizza.6. Rotating Mesh BasketGreat for fries, roasted nuts, and other snacks. Use Rotisserie Fetch Tool to place basket into Unit.7. Drip TrayCook with the Drip Pan in place for easy clean-up.8a. Skewers (*Optional)Great for all your kabob recipes, meat, fish, or veggies.8b. Adjustable Skewer Racks (*Optional)Used when making kabobs. Skewer Racks fit over Shaft and lock in place with Set Screws.9. Rotisserie Shaft, Forks & Set ScrewsUse for roasts and whole chicken. Force Shaft lengthwise through meat and center. Slide Forks onto the shaft from either end into meat, then lock in placewith Set Screws. There are indentations on the shaft for the set screws. You can adjust the screws closer to the middle if needed but never but neveroutward towards the ends. NOTE: Make sure roast or chicken is not too large to rotate freely within the Unit. Maximum Chicken or Roast, 3.5 4 lb.10. Rotisserie Fetch ToolUse to remove cooked roasts and chicken that have been prepared using the rotisserie or skewer methods. Place under Rotisserie Shaft and lift (left sidefirst) then gently extract the food.11. Rotisserie Stand (*Optional)Use for placing the Rotisserie Shaft when removing hot food from the Unit.ImportantPlease make sure that your Power AirFryer Pro Plus has been shipped with the components that you ordered (some accessories may be sold separately).Check everything carefully before use. If any part is missing or damaged, do not use this product. Contact shipper using the customer service numberlocated in the back of the owner’s manual.NOTE: Some accessories may not be included with the purchase.WarningForks, Skewers, and other metal parts with this unit are sharp and will get extremely hot during use. Great care should be taken to avoid personal injury.Wear protective oven mitts or gloves.Unit SpecificationsModel NumberSupply PowerRated PowerCapacityTemperatureDisplayCM003AC 120V 60Hz1700W600 cubic in.(0.347 cu. ft.)150 F–400 F (65 C–200 C)LED DisplayUsing the AccessoriesPlacing Air Flow Racks into Unit
1. Insert Drip Tray into the bottom of the Unit.2. Place Air Flow Racks into Unit by sliding through the side grooves and onto the back lip (FIG. A).3. Place Air Flow Racks closer to the top heating element for faster cooking and added crisp (FIG. B).4. Rotate the Air Flow Racks mid-cycle for even cooking.ComponentsRotisserie Shaft & Skewers Racks1. Place the two Skewer Racks at each end of the Rotisserie Shaft. Make sure the Set Screws are on the outer side of the Rotisserie Shaft.2. Slightly tighten Set Screws. Do not overtighten as you may need to adjust the tightness after you insert the Skewers.3. Carefully poke Skewers through food.
Using the AccessoriesRotisserie Spit Assembly1. Insert each Skewer point through holes on the left Skewer Rack (FIG. C).2. Squeeze the clip end of each Skewer as you insert it into the opposite Skewer Rack slot to secure.3. Release clip to securely rest in the slot as shown (FIG. D).4. Repeat steps 3 6 in a uniform manner around the Skewer Rack. Make sure Skewers are evenly spaced.5. Tighten the Set Screws to make sure they are securely in place.6. Use caution while inserting the Spit into the Unit to prevent getting poked by the Skewer ends.Placing Rotisserie Spit or Rotating Mesh Basket into Unit1. Insert the left side of the assembled Spit or Basket first into the Rotisserie Shaft socket. Be sure the Rotisserie Shaft is in place to engage rotation (FIG.E).2. Place the right side onto the hanger (FIG. F).
IMPORTANT: See the Final Assembly diagram (page 8) to help identify the left and right sides of the Rotisserie Shaft before placing it in the Unit. The rightside has two notches, and the left has one.Removing Rotisserie Spit or Rotating Basket from Unit1. Open Unit door to pause cooking cycle or turn the unit off by pressing the Power Button.2. Insert Rotisserie Fetch Tool beneath the Rotisserie Shaft.3. Lift the right side of the Rotisserie Fetch Tool at a slight angle to clear the bracket, then shifts to the right until the left side of the Shaft slides out of theRotisserie Shaft socket.4. Carefully remove the rotisserie food from the Unit.Using the Control Panel1. Power/Start-Stop Button – Once the Unitis plugged in, the Power Button will light up. Selecting the Power Button once will cause the full panel to be illuminated. Selecting the Power Button a secondtime will activate the cooking process at the default temperature of 370 F (190 C) and time of 15 mins. Selecting the Power Button at any time during thecooking process will shut down the Unit, causing the display to go dark immediately the running light to go dark within 20 secs. The fan will continue runningfor 20 secs. to cool down the Unit.2. Internal Light – Selecting this button will help you check cooking progress while the Unit is in operation. NOTE: Opening the door during the cookingprocess will pause the Unit. Internal light will illuminate if doors open.3. Rotation Button – Select this button when cooking anything using the Rotisserie Mode. The function can be used with any preset. The icon will blinkwhile in use.4. Temperature Control Buttons – These buttons enable you to raise or lower cooking temperature by 5 F (2.7 C) intervals ranging from 150 F (65 C)to 400 F (200 C). Dehydration ranges from 90 F (30 C) to 170 F (75 C).5. Time Control Buttons – These buttons enable you to select an exact cooking time to the minute, from 1 min. to 60 mins. in all modes except whendehydrating, which uses 30-min. intervals and an operating time of 2 24 hrs.6. LED Digital Display – The Digital Numeric Display will switch between Temperature and Time Remaining during the cooking process.7 – 14. Cooking Presets – Selecting any of these will set Time and Temperature to a default setting for that particular food. You may override these presetswith Time and Temperature Buttons. View presets on the next page.15. Running Lights – These lights will blinkin sequence while cooking is in progress and continue blinking up to 20 secs. once you shut the Unit down.Cooking PresetsPreset Button Cooking Chart* Cooking time for whole roasted chicken will vary with weight. Use a meat thermometer to check the internal temperature as per the chart below.
Preset ButtonTemperatureTime7. French Fries400 F (200 C)15 mins.8. Steaks/Chops370 F (185 C)25 mins.9. Fish390 F (200 C)15 mins.10. Shrimp320 F (160 C)12 mins.11. Chicken370 F (185 C)40 mins.12. Baking350 F (175 C)30 mins.13. Rotisserie400 F (200 C)30 mins.*14. Dehydrator*90 F (30 C)4 hrs. (*2–24 hrs.)Using the Power AirFryer Pro Plus Without PresetsOnce you are familiar with the Power AirFryer Pro Plus, you may want to experiment with your own cooking times and temperatures.WarningNever use a cooking vessel filled with cooking oil or any other liquid with this unit! Fire hazard or personal injury could result.Internal Temperature Meat ChartThis chart should be used to check the internal temperature of cooked meats. USDA Food Safety Standards.FoodTypeInternal TemperatureBeef & VealGroundSteaks roasts: mediumSteaks roasts: rare160 F (70 C)160 F (70 C)145 F (63 C)Chicken & TurkeyBreastsGround, stuffedWhole bird, legs, thighs, wings165 F (75 C)165 F (75 C)165 F (75 C)Fish & ShellfishAny type145 F (63 C)LambGroundSteaks roasts: mediumSteaks roasts: rare160 F (70 C)160 F (70 C)145 F (63 C)PorkChops, ground, ribs, roastsFully cooked ham160 F (70 C)140 F (60 C)General Operating InstructionsBefore using the Power AirFryer Pro Plus for the first time1.2.3.4.Read all material, warning stickers, and labels.Remove all packing materials, labels, and stickers.Wash all parts and accessories used in the cooking process with warm soapy water.NOTE: Only the accessories are dishwasher safe.Wipe the inside and outside of the cooking Unit with a clean, moist cloth.NOTE: Never wash or submerge the cooking Unit in water.NOTE: When using this unit, never fill any cooking vessel with oil or liquid of any kind. This Unit cooks with hot air only.Preparing for Use1. Place the appliance on a stable, level, horizontal, and heat-resistant surface.2. Select the cooking accessory for your recipe.A Versatile ApplianceThe Power AirFryer Pro Plus is designed to cook a wide variety of your favorite foods. The charts and tables provided within this manual and the RecipeGuide will help you get great results. Please refer to this information for proper time/temperature settings and proper food quantities.WarningNEVER put anything on top of the appliance.NEVER cover the air vents on the top and back of the cooking Unit.NEVER fill any cooking vessel with oil or liquid of any kind. This Unit cooks with hot air only.NEVER use the Door as a place to rest a hot Fry Basket filled with food. The Hot Fry Basket could damage the Door or cause the Unit to tip. Personalinjury could result.ALWAYS use oven mitts when removing hot Air Flow Racks.Cooking with the Power AirFryer Pro Plus1.2.3.4.Place the ingredients on an Air Flow Rack, on one of the Rotisserie accessories, or in the Rotating Mesh Basket.Put the Air Flow Rack, Rotating Mesh Basket, or Rotisserie Spit into the unit and shut the door. Plug the power cord into a 110V dedicated outlet.When Rotating Mesh Basket or Rotisserie and food is in place, press the Power Button once (page 10, FIG. G1).Select a preset function (page 10, FIG. G7-14) or manually set the Temperature and then the Time (page 10, FIG. 45). Refer to the detailed ControlPanel instructions on page 10.
5. The Unit will automatically start the cooking cycle a few seconds after a preset function is selected or the Time and/or Temperature are adjustedmanually. Alternatively, you can press the Power Button to begin the cooking cycle immediately once the desired cooking time and temperature havebeen selected.NOTE: You may open the door to view the rotisserie at any time during the process to check the progress.NOTE: Consult the Charts in this manual or the Recipe Books to determine the correct settings.TipsFoods that are smaller in size usually require a slightly shorter cooking time than larger ones.Large quantities of food only require a slightly longer cooking time than smaller quantities.Flipping or turning smaller-sized foods halfway through the cooking process ensures that all the pieces are evenly fried.Misting a bit of vegetable oil on fresh potatoes is suggested for a crispier result. When adding a little oil, do so just before cooking.Snacks normally cooked in an oven can also be cooked in the Power AirFryer Pro Plus.Use premade dough to prepare filled snacks quickly and easily. Premade dough also requires a shorter cooking time than homemade dough.Place a baking tin or dish in the Power AirFryer Pro Plus when baking a cake or quiche. A tin or dish is also suggested when cooking fragile or filledfoods.You can use the Power AirFryer Pro Plus to reheat foods. Simply set the temperature to 300 F (150 C) for up to 10 mins.ImportantRemoving Cooked or Hot FoodWhen removing cooked or hot food use the Rotisserie Fetch Tool (FIG. H) or oven mitts. The Fetch Tool can also be used with Rotisserie Spit.Warning· During the cooking process, the Rotating Mesh Basket and other accessories will become very hot. When you remove it to check on the progress, makesure you have a trivet or a heat-resistant surface nearby to set it down on. NEVER place the Rotating Mesh Basket directly on a counter top or table.· Cooking accessories will get hot during the air frying process. Wear oven mitts and handle with care to AVOID INJURY.Cooking Chart
Food ItemMin–MaxTimeTemperatureCommentsThin Frozen Fries1 1/4–3 cups15–16 mins.400 F (200 C)Thick Frozen Fries1 1/4–3 cups15–20 mins.400 F (200 C)Homemade Fries1 1/4–3 1/4 cups10–16 mins.400 F (200 C)Add 1/2 tbsp. oilHomemade Potato Wedges1 1/4–3 1/4 cups18–22 mins.360 F (182 C)Add 1/2 tbsp. oilHomemade Potato Cubes1 1/4–3 cups12–18 mins.360 F (182 C)Add 1/2 tbsp. oilHash Browns1 cup15–18 mins.360 F (182 C)Potato Gratin2 cup15–18 mins.400 F (200 C)Steak1/4–1.1 lb8–12 mins.360 F (182 C)Pork Chops1/4–1.1 lb10–14 mins.360 F (182 C)Hamburger1/4–1.1 lb7–14 mins.360 F (182 C)Sausage Roll1/4–1.1 lb13–15 mins.400 F (200 C)Chicken Drumsticks1/4–1.1 lb18–22 mins.360 F (182 C)Chicken Breast1/4–1.1 lb10–15 mins.360 F (182 C)Spring Rolls1/4–3/4 lb15–20 mins.400 F (200 C)Use oven-readyFrozen Chicken Nuggets1/4–1.1 lb10–15 mins.400 F (200 C)Use oven-readyFrozen Fish Sticks1/4–1.1 lb6–10 mins.400 F (200 C)Use oven-readyMozzarella Sticks1/4–1.1 lb8–10 mins.360 F (182 C)Use oven-readyStuffed Vegetables1/4–1.1 lb10 mins.320 F (160 C)Cake1 1/4 cups20–25 mins.320 F (160 C)Use baking tinQuiche1 1/2 cups20–22 mins.360 F (182 C)Use baking tin/oven dishMuffins1 1/4 cups15–18 mins.400 F (200 C)Use baking tinSweet Snacks1 1/2 cups20 mins.320 F (160 C)Use baking tin/oven dishFrozen Onion Rings1 lb15 mins.400 F (200 C)SettingsThe table on page 14 will help you select the correct temperature and time for best results. As you become more familiar with the Power AirFryer Pro Pluscooking process, you may adjust these settings to suit your own personal tastes.NOTE: Keep in mind that these settings are indications. Since ingredients differ in origin, size, shape, and brand, we cannot guarantee the best settings foryour ingredients.TipsSet the Timer to half the time needed for the recipe and the Timer bell will alert you when it’s time to flip your food. When you hear the timer bell, thepreset preparation time has elapsed.Add 3 mins. to cooking time when starting with a cold appliance.Cleaning & StorageCleaningClean the Power AirFryer Pro Plus after each use. The Rotating Mesh Basket and other accessories are made of durable stainless steel and are dishwashersafe. Never use abrasive cleaning materials or utensils on these surfaces. Caked-on food should be soaked for easy removal in warm, soapy water.Remove the power cord from the wall socket and be certain the appliance is thoroughly cooled before cleaning.1. Wipe the outside of the appliance with a warm, moist cloth and mild detergent.2. To clean the door, remove it by lifting it to a 45 angle while gently pulling it upward. Clean both sides with warm, soapy water on a damp cloth. Do notsoak or submerge the door in water or wash in the dishwasher.3. Clean the inside of the appliance with hot water, a mild detergent, and a non-abrasive sponge.4. If necessary, remove unwanted food residue from the upper screen with a cleaning brush.Storage1. Unplug the appliance and let it cool thoroughly.2. Make sure all components are clean and dry.3. Place the appliance in a clean, dry place.Troubleshooting
ProblemPossible CauseSolutionThe Power AirFryer ProPlus does not work1. The appliance is not plugged in.2. You have not turned the Unit onby setting the preparation timeand temperature1. Plug the power cord into a wall socket.2. With basket in place, set the temperatureand time. Check that door is closed.Food not cooked1. The Rotating Mesh Basket is overloaded.2. The temperature is set too low.1. Use smaller batches for more even frying.2. Raise the temperature and continue cooking.Food is not fried evenly1. Some foods need to be turned in during thecooking process.1. See General Operations in this manual on page 12.White smoke coming fromUnit1. Oil is being used.2. Accessories have excess greaseresidue from previous cooking.1. Wipe down to remove excess oil.2. Clean the Rotating Mesh Basket after each use.French fries arenot fried evenly1. Wrong type of potato being used.2. Potatoes not rinsed properly duringpreparation.1. Use fresh, firm potatoes.2. Use cut sticks and pat dry to remove excess starch.Fries are not crispy1. Raw fries have too much water.1. Dry potato sticks properly before misting oil.Cut sticks smaller. Add a bit more oil.1. Door came off the hinge.1. 1. As the door is slightly open (about 1 in./2.5 cm from theclosed position),align the hinge so the joints fall into the slots. Then, close thedoor.Door came offError CodesDisplay ShownE1E2Possible CauseBroken circuit of the thermal sensorShort circuit of the thermal sensorSolutionCall Customer ServiceCall Customer ServiceFrequently Asked Questions1. Can I prepare foods other than fried dishes with my Power AirFryer Pro Plus?You can prepare a variety of dishes, including steaks, chops, burgers, and baked goods. See the Power AirFryer Pro Plus Recipe Guide.2. Is the Power AirFryer Pro Plus good for making or reheating soups and sauces?Never cook or reheat liquids in the Power AirFryer Pro Plus.3. What do I do if the Unit shuts down while cooking?As a safety feature, the Power AirFryer Pro Plus has an Auto Shut-Off device that prevents damage from overheating. Unplug and allow the Unit tocool down. Plug back in and restart with the Power Button.4. Does the Unit need time to heat up?Preheating is needed when you are cooking from a cold start, add 3 mins. to the cooking time to compensate.5. Is it possible to shut off the unit at any time?Press the Power Button once or open the door.6. Can I check the food during the cooking process?You can remove the Rotating Mesh Basket at any time while cooking is in progress. During this time, you can flip the contents on the Air Flow Racks ifneeded to ensure even cooking. Time and temperature will resume where you left off.7. Is the Power AirFryer Pro Plus dishwasher safe?Only the accessories are dishwasher safe. The Unit itself containing the heating coil and electronics should never be submerged in liquid of any kind orcleaned with anything more than a hot, moist cloth or nonabrasive sponge with a small amount of mild detergent.8. What happens if the Unit still does not work after I have tried all the troubleshooting suggestions?Never attempt a home repair. Contact the manufacturer and follow the procedures set forth by the warranty. Failure to do so could render yourwarranty null and void.9. Can the door come off?Yes, it can. Open the door slightly (about 1 in./2.5 cm from the closed position), and gently lift up on the door hinge. The joints will slide out. You mayclean the unit and windows more easily. To put the door back on, have the door slightly open as before, then align the hinge so the joints fall into theslots. Then, close the door.
60-Day Money-Back GuaranteeIf you decide that you don’t love this product, your order is covered by our 60-Day MoneyBack Guarantee. You have 60 days from the day you receive yourproduct to request a replacement product or refund of the purchase price minus processing and handling fees. To receive a refund or replacement, youmust return the product to us at your expense. To return the product, call customer service at 1-973-287-5197 and request a return merchandiseauthorization number. Pack the product carefully and include in the package a note with (1) your name, (2) mailing address, (3) phone number, (4) emailaddress, (5) reason for return, and (6) proof of purchase or order number, and (7) specify on the note whether you are requesting a refund or replacement.Write the return merchandise authorization number on the outside of the package.Send the product to the following return address:Power AirFryer Pro PlusTristar Products500 Returns RoadWallingford, CT 06495We are very proud of the design and quality of our Power AirFryer Pro PlusTM.This product has been manufactured to the highest standards. Should you have any questions, our friendly customer servicestaff is here to help you.973-287-5197Distributed by: Tristar Products, Inc. Fairfield, NJ 07004 2018 Tristar Products, Inc.Made in ChinaPAFPP-6QT UL IB WMT ENG V1 181113File DownloadsProPlus Owner's Manual Download [optimized]CM003, Power Air Fryer DownloadRelated Manuals1.2.3.4.5.6.Power XL Grill Air Fryer Combo Instruction Manual Power XL Grill Air Fryer Combo Instruction Manual – Optimized.Clean Air Wood Heaters Owners Manual Clean Air Wood Heaters Owners Manual FIRST THINGS FIRST Congratulations.Power K49732 Air Fryer User Guide Fry Basket Using the Fry Basket With the latch off.Innsky Air Fryer Instruction Manual INNSKY AIR FRYER INSTRUCTION MANUAL READ THIS MANUAL THOROUGHLY BEFORE.DmofwHi Air Fryer User Manual AIR FRYER Designed, manufactured only for warmer Home incessantly RECIPE.Instant Pot Air Fryer Lid Manual Instant Pot Air Fryer Lid Manual – Optimized PDF Instant.
Place Air Flow Racks closer to the top heating element for faster cooking and added crisp (FIG. B). 4. Rotate the Air Flow Racks mid-cycle for even cooking. Components, Rotisserie Shaft & Skewers Racks, 1. Place the two Skewer Racks at each end of the Rotisserie Shaft. Make sure the Set Screws are on the outer side of the Rotisserie Shaft. 2.