Transcription
Models 151151531015510
SAFETY PRECAUTIONSWARNING: To help prevent personal injury,Wear goggles when working with refrigerants. Contact withrefrigerants may cause injury.Incorrect use or connections may cause electrical shock hazards.Read and follow the instructions carefully, and take precautions toavoid electrical shock hazards. Confirm that all associated devicesare grounded correctly before energizing circuits.Normal operating temperature will cause certain external portionsof the pump to be hot to the touch. Do not touch the pump housingor motor during operation.CAUTION: To reduce the risk of electric shock, do not expose torain. Store machine indoors.For use on A/C-R systems using CFCs, HCFCs, and HFCs in conjunctionwith mineral oil, ester oil, alkylbenzene oil, and PAG oil as lubricants.Not for use with ammonia or lithium bromide systems. Not for use withflammable refrigerants.
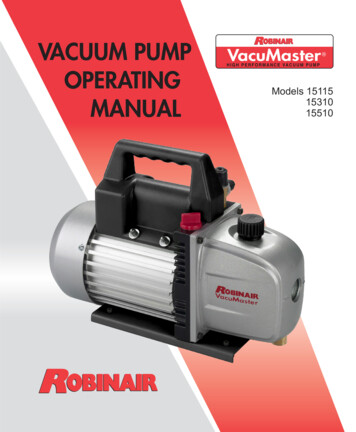
VacuMaster High Performance Vacuum PumpsCongratulations on purchasing one of Robinair’s top quality VacuMaster vacuum pumps.Your pump has been engineered specifically for air conditioning and refrigeration service,and is built for fast, thorough evacuation.You’ll appreciate these key features . . .HighVacuumRatingThe one-stage rotary vane design provides powerful, quiet, high vacuumcapability and ensures moisture removal, while the high pumpingcapacity reduces evacuation time.LifetimeFiltrationThe intake screen prevents foreign matter from entering the pumpingchamber, and an internal exhaust filter separates oil vapor from theexhaust flow.CompactDesignAluminum housing and rotary vanes keep the pump weight low, making iteasy to carry.ON/OFFSwitchInlet FittingExhaust Fitting&Oil Fill PlugSight GlassExhaustFittingModel 15115OilDrainFittingOil Fill PlugModel 15310 or 155101
Before using your vacuum pump . . .Motor Voltage Connections:Motors are designed for operating voltages 10% of the normal rating (see PumpSpecifications). Single voltage motors are supplied fully connected and ready to operate.1. Confirm the voltage and frequency at the outlet match the specifications onthe pump motor decal.2. Confirm the ON-OFF switch is in the OFF position before you plug the pumpinto an outlet.3. The pump is shipped without oil in the reservoir. Before starting the pump, fillit with oil.a. 15115: Remove the EXHAUST FITTING, and add oil until oil appearsin the bottom of the sight glass. For oil capacities, refer to PumpSpecifications in this manual. Replace the EXHAUST FITTING.b. 15310 and 15510: Remove the OIL FILL cap (red plastic plug at the frontof the handle), and add oil until oil appears in the bottom of the sightglass. For oil capacities, refer to Pump Specifications in this manual.Replace the OIL FILL cap.4. Remove the cap from one of the inlet ports.5. Turn the motor switch to ON.6. When the pump runs smoothly, replace the cap on the inlet port. This maytake from two to 30 seconds, depending on the ambient temperature.7. After the pump has run for approximately one minute, check the sight glassfor the correct oil level — oil should be even with the sight glass OIL LEVELline. With the pump off, add oil if necessary.Note: When the pump is running, the oil level should be even with theline on the sight glass. Underfilling the pump will result in poor vacuumperformance; overfilling can result in oil blowing from the exhaust.The pump is ready to evacuate air conditioning and refrigeration systems. Follow normalservice procedures and A/C-R manufacturer’s instructions for connections to the system.CAUTION: Before connecting the vacuum pump to an A/C-R system, removerefrigerant from the system in an accepted manner. Damage to thepump may occur if evacuation is started while the system is underhigh pressure. Robinair recommends the use of its RefrigerantRecovery and Recycling equipment.2
To shut down the pump after use . . .To help prolong pump life and promote easy starting, follow these procedures forshutdown:1. Close the manifold valve between the pump and the system.2. Remove the hose from the pump inlet.3. Cap the inlet port to prevent any contamination or loose particles fromentering the port.To maintain your high vacuum pump . . .VacuumPump OilFor maximum performance, Robinair recommends changing vacuumpump oil after each use.The condition and type of oil used in any high vacuum pump areextremely important in determining the ultimate attainable vacuum.Robinair recommends the use of its Premium High Vacuum Pump Oil.This oil has been specifically blended to maintain maximum viscosity atnormal running temperatures and to improve cold weather starts.Robinair Premium High Vacuum Pump Oil is available as follows for yourconvenience. Please order by part number:13119 — Pint (shipped 12 pints per case)13203 — Quart (shipped 12 quarts per case)13204 — Gallon (shipped 4 gallons per case)1. Run the pump for approximately one minute to warm the oil.OilChange2. Remove the OIL DRAIN plug. Drain contaminated oil into a suitableProcedurecontainer, and dispose of it according to local, state, and federalregulations.3. When the flow of oil has stopped, tilt the pump forward to drainresidual oil.4. Replace the OIL DRAIN plug.3
5. Remove the OIL FILL CAP (Model 15310 or 15510) or EXHAUSTOilFITTING (Model 15115), and fill the reservoir with new vacuum pump oilChangeuntil the oil appears at the bottom of the sight glass. For oil capacities,Procedurerefer to Pump Specifications in this manual.contd.6. Verify the inlet ports are capped; then turn ON the pump. Allow it torun for one minute, and check the oil level. If the oil is below the sightglass OIL LEVEL line, add oil slowly (with the pump running) until theoil reaches the OIL LEVEL line. Replace the OIL FILL CAP / EXHAUSTFITTING, and confirm the inlet is capped and the drain cap is tight.7. a) If the oil is badly contaminated with the sludge that forms when wateris allowed to collect in oil, you may need to remove the oil reservoircover and wipe it out.b) Another method of dealing with heavily contaminated oil is to force theoil from the pump reservoir. To do this, allow the pump to run until it iswarmed up. While the pump is still running, remove the oil drain cap.Slightly restrict the exhaust. This will back-pressure the oil reservoirand force the oil from it, carrying more contaminants. When the oilceases to flow, turn off the pump.Repeat this procedure as required until the contamination is removed.Replace the OIL DRAIN cap, and refill the reservoir until fresh oilappears at the bottom of the sight glass.Cleaningthe PumpClean the pump with soap and water only. Do not use commercialcleaners that contain degreasing agents.Grounding This product must be grounded. In the event of an electrical short,Instructions grounding reduces the risk of electrical shock by providing an escapewire for the electric current. This product is equipped with a power cordhaving a grounding wire with an appropriate grounding plug. The outletused must be correctly installed and grounded according to local codesand ordinances.WARNING : Incorrect installation of the grounding plugwill result in electrical shock. When repair or replacementof the power cord or plug is required, do NOT connect thegrounding wire to either flat blade terminal. The wire withgreen insulation (with or without yellow stripes) is thegrounding wire.4
Grounding Consult a qualified electrician when grounding instructions are notInstructions understood, or when in doubt regarding whether the product is correctlygrounded. Do not modify the plug provided; if the plug does not fit thecontd.outlet, have an appropriate outlet installed by a qualified electrician.This product is for use on a nominal 120V circuit. A temporary adaptermay be used to connect this plug to a 2-pole receptacle when a correctlygrounded outlet is not available. The temporary adapter shall be usedonly until a correctly grounded outlet is installed. The green colored rigidear, lug, or similar part extending from the adapter must be connectedto a permanent ground, such as a correctly grounded outlet box cover.Whenever the adapter is used, it must be held in place by a metal screw.GroundedOutletGrounding PinExtensionCordsAdapterMetalScrewGroundedOutlet BoxTab forGroundingScrewUse only a 3-wire extension cord that has a 3-blade grounding plug,and a 3-slot receptacle that accepts the plug on the product. Verify theextension cord is not damaged. When using an extension cord, use onethat is heavy enough to carry the current the product draws. For lengthsless than 25 ft., use 18 AWG extension cords. An undersized cord resultsin a drop in line voltage, loss of power, and overheating.5
Troubleshooting GuideYour VacuMaster pump has been designed for dependable use and longlife. If something should go wrong, however, the following guide will help youget the pump back into service as quickly as possible.If disassembly of the pump is required, check your warranty. The warrantymay be voided by misuse or customer tampering that results in the pumpbeing inoperable.FailureTo Start1. Check line voltage. Robinair VacuMaster pumps are designed to startat 10% line voltage (loaded) at 41o F (5 C). At extremes, however,switching between the start and run windings may occur.OilLeakage1. Verify the oil is not a residual accumulation from spillage, etc.FailureTo PullA GoodVacuum1. Confirm the vacuum gauge and all connections are in good conditionand leak-free. You can confirm leakage by monitoring the vacuum witha thermistor gauge while applying vacuum pump oil at connections orsuspected leak points. The vacuum will improve briefly while the oil issealing the leak.2. If leakage exists in the area of the oil drain plug, you may need to resealthe plug using a commercial pipe thread sealer.2. Verify the pump oil is clean. A badly contaminated pump may requireseveral oil flushes. See OIL CHANGE PROCEDURE.Note: Use only high vacuum pump oil such as Robinair’s Premium HighVacuum Pump Oil. Other oils will prevent pull-down to a deep vacuum.3. Verify the oil is at the correct level. For maximum pump operation, the oilmust be even with the OIL LEVEL line on the sight glass when the pumpis running. See OIL CHANGE PROCEDURE. Do not overfill — operatingtemperatures will cause the oil to expand, so it will appear at a higherlevel than when the pump is not running. To check the oil level, start thepump with the inlet capped. Check the oil level in the sight glass. Add oilif necessary.If these procedures do not correct the problem, contact your nearestWhen YouRobinair distributor, or call Robinair’s toll-free service line for furtherNeed Helpinformation: 1-800-822-5561.6
VacuMaster 1-Stage Pump Specifications151151531015510120V / 60 Hz120V / 60 Hz120V / 60 Hz1.5 CFM3.0 CFM5.0 CFM115 microns75 microns75 micronsStages111Motor1/4 HP1/3 HP1/3 HPVoltageFree Air DisplacementUltimate VacuumIntake Ports1/4 in. flare & 1/2 in. ACMEOil Capacity300 ml (10 oz.)250 ml (8.5 oz.)300 ml (10 oz.)6 ft.6 ft.6 ft.Power Cord LengthDimensionsNet WeightCertification1/4 in. flare & 1/2 in. ACME 1/4 in. flare & 1/2 in. ACME286 mm x 124 mm x 228 mm 318 mm x 124 mm x 235 mm 338 mm x 138 mm x 246 mm6.9 kg8.2 kg9.7 kgCSACSACSA7
Robinair Limited Warranty StatementRev. November 1, 2005This product is warranted to be free from defects in workmanship,materials, and components for a period of one year from date ofpurchase. All parts and labor required to repair defective productscovered under the warranty will be at no charge. The followingrestrictions apply:1. The limited warranty applies to the original purchaser only.2. The warranty applies to the product in normal usage situations only, asdescribed in the Operating Manual. The product must be serviced andmaintained as specified.3. If the product fails, it will be repaired or replaced at the option of themanufacturer.4. Transportation charges for warranty service will be reimbursed by thefactory upon verification of the warranty claim and submission of a freightbill for normal ground service.5. Warranty service claims are subject to authorized inspection for productdefect(s).6. The manufacturer shall not be responsible for any additional costsassociated with a product failure including, but not limited to, loss of worktime, loss of refrigerant, and unauthorized shipping and/or labor charges.7. All warranty service claims must be made within the specified warrantyperiod. Proof-of-purchase date must be supplied to the manufacturer.Out ofWarrantyThis Limited Warranty does NOT apply if: The product, or product part, is broken by accident. The product is misused, tampered with, or modified.8
Notes
Modelo 151151531015510
PRECAUCIONES DE SEGURIDAD¡ADVERTENCIA! Para evitar que ocurra una lesión personal,Use gafas cuando trabaje con refrigerantes. El contacto con elrefrigerante puede ocasionar lesiones.El uso o las conexiones incorrectas pueden causar riesgos dedescarga eléctrica. Lea y siga las instrucciones cuidadosamente,y tome precauciones para evitar riesgos de descarga eléctrica.Confirme que todos los dispositivos asociados estén conectadosa tierra correctamente antes de activar los circuitos.La temperatura normal de funcionamiento causará que ciertaspartes externas de la bomba estén calientes al tacto. No toque lacaja de la bomba o el motor durante su funcionamiento.PRECAUCIÓN: para reducir el riesgo de descarga eléctrica, noexponer a la lluvia. Almacene la máquina en interiores.Para el uso en sistemas de A/C-R que utilicen CFC, HCFC, y HFC juntocon aceite mineral, aceite éster, aceite alquilbenceno, y aceite PAG comolubricantes.No utilizar con sistemas con amoníaco o bromuro de litio. No utilizar conrefrigerantes inflamables.
VacuMaster Bombas de vacío de alto rendimientoFelicitaciones por comprar una de las bombas de vacío VacuMaster de primeracalidad de Robinair. La bomba ha sido diseñada específicamente para el servicio deaire acondicionado y refrigeración, y está construida para brindar un vaciado rápido ycompleto.Apreciará estas características clave . . .Capacidad El diseño del álabe rotatorio de una plataforma provee una capacidadde vacío alta de vacío alta, poderosa y silenciosa, y asegura la eliminación de lahumedad, mientras que la alta capacidad de bombeo reduce el tiempode vaciado.Filtracióndurante lavida útilLa pantalla de entrada evita que material externo ingrese a la cámara debombeo, y un filtro interno de escape separa el vapor de aceite del flujode escape.DiseñocompactoLa cubierta de aluminio y los álabes rotatorios mantienen bajo el peso dela bomba, facilitando su carga.Interruptor deencendido yapagadoAdaptador de entradaAdaptador de escape &Tapón de llenado del aceiteVidrio visorAdaptador deescapeModelo 15115Conector dedrenajede aceiteTapón de llenadodel aceiteModelo 15310 ó 155101
Antes de utilizar su bomba de vacío. . .Conexiones de voltaje del motor:Los motores están diseñados para funcionar con voltajes 10% al grado normal (verEspecificaciones de la bomba). Los motores de voltaje simple se proveen completamenteconectados y listos para su funcionamiento.1. Verifique que el voltaje y la frecuencia del tomacorriente coincidan con lasespecificaciones de la calcomanía del motor de la bomba.2. Verifique que el interruptor ON-OFF (de encendido y apagado) se encuentre en laposición OFF (de apagado) antes de conectar la bomba a un tomacorriente.3. La bomba se envía sin aceite en el depósito. Antes de encender la bomba, llénelacon aceite.a. 15115: Retire el ADAPTADOR DE ESCAPE, y agregue aceite hasta que se visualiceen la parte inferior del vidrio visor. Para las capacidades de aceite, consulte lasEspecificaciones de la bomba en este manual. Vuelva a colocar el ADAPTADOR DEESCAPE.b. 15310 y 15510: Quite el tapón de LLENADO DE ACEITE (tapón de plástico rojoque se encuentra en la parte delantera de la manija), y agregue aceite hasta que sevisualice en la parte inferior del vidrio visor. Para las capacidades de aceite, consultelas Especificaciones de la bomba en este manual. Vuelva a colocar el tapón deLLENADO DE ACEITE.4. Quite el tapón de uno de los puertos de entrada.5. Encienda el interruptor del motor.6. Cuando la bomba funcione eficientemente, vuelva a colocar el tapón en el puerto deentrada. Esto puede demorar de dos a 30 segundos, dependiendo de la temperaturaambiente.7. Después de que la bomba haya funcionado aproximadamente por un minuto,verifique el vidrio visor para corroborar que el nivel del aceite sea correcto — elaceite debe estar a la misma altura de la línea OIL LEVEL (nivel del aceite) del vidriovisor. Con la bomba apagada, agregue el aceite necesario.Nota: Cuando la bomba está funcionando, el nivel de aceite debe estar al mismonivel de la línea en el vidrio visor. No llenar la bomba lo suficiente provocará el bajorendimiento del vacío; el llenado excesivo puede provocar que el aceite se desbordedel escape.La bomba está lista para vaciar sistemas de aire acondicionado y refrigeración. Siga losprocedimientos normales del servicio y las instrucciones del fabricante de A/C-R paraconexiones al sistema.PRECAUCIÓN: Antes de conectar la bomba de vacío a un sistema de A/C-R, quite elrefrigerante del sistema adecuadamente. La bomba se puede dañarsi se comienza el vaciado cuando el sistema está bajo alta presión.Robinair recomienda el uso de su equipo de Recuperación y Reciclajede Refrigerante.2
Para apagar la bomba después del uso. . .Para ayudar a prolongar la vida útil de la bomba y promover un encendido sencillo,siga estos procedimientos para el apagado:1. Cierre la válvula del colector entre la bomba y el sistema.2. Retire la manguera de la entrada de la bomba.3. Tape el puerto de entrada para impedir que cualquier contaminacióno partículas sueltas ingresen al puerto.Para el mantenimiento de su bomba de alto vacío. . .Aceite parabomba devacíoPara lograr un rendimiento máximo, Robinair recomienda cambiar elaceite de la bomba de vacío después de cada uso.La condición y tipo del aceite utilizado en cualquier bomba de alto vacíoson extremadamente importantes en la determinación del máximovacío posible. Robinair recomienda el uso de su aceite Premium parabomba de alto vacío. Este aceite ha sido específicamente mezclado paramantener una viscosidad máxima a temperaturas de uso normales ypara mejorar el arranque en días fríos.El aceite Premium para bomba de alto vacío de Robinair está disponiblede la siguiente manera para su conveniencia. Ordenar por número departe:13119 — Pintas (se envían 12 pintas por caja)13203 — Cuarto (se envían 12 cuartos por caja)13204 — Galones (se envían 4 galones por caja)Procedimientopara elcambiode aceite1. Ponga en funcionamiento la bomba durante aproximadamente un minutopara calentar el aceite.2. Retire el tapón del DRENAJE DE ACEITE. Deseche el aceitecontaminado en un recipiente adecuado, conforme a las regulacioneslocales, estatales y federales.3. Cuando el fluido de aceite haya terminado, incline la bomba haciaadelante para drenar el aceite residual.4. Vuelva a colocar el tapón del DRENAJE DE ACEITE.3
5. Quite el TAPÓN del LLENADO DE ACEITE (Modelo 15310 ó 15510) o elProcedimiento para ADAPTADOR DE ESCAPE (Modelo 15115), y llene el depósito con aceite nuevoel cambiopara la bomba de vacío hasta que pueda visualizar el aceite en la parte inferiorde aceitedel vidrio visor. Para las capacidades del aceite, consulte las Especificaciones decontinuación la bomba en este manual.6. Verifique que los puertos de entrada estén tapados, después encienda la bomba.Permita que funcione por un minuto, y revise el nivel del aceite. Si el aceite estápor debajo de la línea de NIVEL DE ACEITE del vidrio visor, agregue aceitelentamente (con la bomba en funcionamiento) hasta que el aceite alcance lalínea de NIVEL DE ACEITE. Vuelva a colocar el TAPÓN DE LLENADO DEACEITE / ADAPTADOR DE ESCAPE, y verifique que la entrada esté tapada yque la tapa del drenaje esté ajustada.7. a) Si el aceite está muy contaminado con el lodo que se forma cuando el aguase mezcla con el aceite, tendrá que retirar la tapa del depósito de aceite ylimpiarlo.b) Otro método de ocuparse del aceite contaminado es forzar hacia afuera elaceite del depósito de la bomba. Para hacer esto, deje que la bomba funcionehasta que se caliente. Con la bomba todavía en funcionamiento, quite el tapónde drenaje de aceite. Restrinja ligeramente el escape. Esto generará presión enla reserva de aceite y lo forzará a salir, cargando más contaminantes. Cuandoel aceite deje de fluir, apague la bomba.Repita este procedimiento según se requiera hasta que se quite lacontaminación. Vuelva a colocar el tapón de LLENADO DE ACEITE, y llene lareserva hasta que el aceite nuevo aparezca en la parte inferior del vidrio visor.Limpie la bomba únicamente con jabón y agua. No utilice limpiadoresLimpiezade la bomba comerciales que contengan agentes desengrasantes.Instrucciones Este producto debe ser conectado a tierra. En el caso de un cortocircuito, lade conexión conexión a tierra reduce el riesgo de una descarga eléctrica proveyendo un cablede escape para la corriente eléctrica. Este producto está equipado con un cablea tierrade electricidad que tiene un cable a tierra con una conexión apropiada a tierra. Eltomacorriente que se utilice debe estar correctamente instalado y conectado atierra conforme a los códigos y ordenanzas locales.ADVERTENCIA: La instalación incorrecta del enchufe conconexión a tierra puede provocar una descarga eléctrica. Cuandosea necesario reparar o reemplazar el cable o enchufe de electricidad, NOconecte el cable a tierra a ninguna terminal plana. El cable con aislamientoverde (con o sin rayas amarillas) es el cable a tierra.4
Instruccionesde conexióna tierracontinuaciónConsulte a un electricista calificado si no comprende las instruccionesde la conexión a tierra, o si tiene dudas sobre si el producto estácorrectamente conectado a tierra. No modifique el enchufe provisto; si elenchufe no cabe en el tomacorriente, haga que un electricista calificadoinstale un tomacorriente apropiado.Este producto debe usarse en un circuito nominal de 120V. Se puedeutilizar un adaptador provisional para conectar este enchufe a unreceptáculo de 2 polos cuando no se dispone de un tomacorrientecorrectamente conectado a tierra. El adaptador provisional debe utilizarsesólo hasta que se instale un tomacorriente correctamente conectado atierra. La oreja rígida, lóbulo o parte similar de color verde que se extiendedel adaptador debe tener una conexión a tierra permanente, como unacubierta de caja de tomacorriente correctamente conectada a tierra. Cadavez que se utilice el adaptador, debe sujetarlo firmemente con un tornillode metal.Tomacorrienteconectado a tierraPatilla deconexión a tierraCables deextensiónAdaptadorTornillometálicoCaja detomacorrienteconectada a tierraLengüeta parael tornillo deconexión a tierraUtilice únicamente una extensión de 3 cables que tenga un enchufecon conexión a tierra de tres patas, y un receptáculo de 3 ranuras quepermita la conexión del producto al enchufe. Verifique que el cable deextensión no esté dañado. Cuando utilice un cable de extensión, utiliceuno lo suficientemente fuerte para poder transportar la corriente delproducto. Para longitudes menores a 25 pies (7 metros) utilice cablesde extensión de 18 AWG. Un cable de menor tamaño resultará en unacaída del voltaje de la línea, pérdida de potencia y sobrecalentamiento.5
Guía para la solución de problemasSu bomba VacuMaster ha sido diseñada para un uso confiable y larga vida útil. Siocurriera algún error, sin embargo, la siguiente guía lo ayudará a tener a su bombanuevamente en condiciones óptimas tan rápido como sea posible.Si se requiere el desmontaje de la bomba, verifique su garantía. La garantíapuede invalidarse por el uso inadecuado o por alteración del cliente queprovoque que la bomba deje de funcionar.Dificultad 1. Revise el voltaje de línea. Las bombas VacuMaster de Robinair estánen eldiseñadas para empezar a un voltaje de línea de 10% (cargado) a 41 Farranque(5 C). A grados extremos, sin embargo, pueden ocurrir cambios entre losbobinados de arranque y de marcha.Fugas deaceite1. Verifique que el aceite no sea una acumulación residual de derrames, etc.2. Si existe una fuga en el área del tapón de drenaje del aceite, es posible quedeba volver a sellar el tapón utilizando un sellador comercial de roscas paratubos.Dificultad 1. Confirme que el calibrador de vacío y todas las conexiones estén en buenasparacondiciones y sin fugas. Puede confirmar la existencia de fugas monitoreandoobtenerel vacío con un calibrador termistor y aplicando a la vez aceite para la bombaun vaciado de vacío en las conexiones o los puntos donde se sospecha que está la fuga.eficazEl vacío mejorará brevemente mientras el aceite esté sellando la fuga.2. Verifique que el aceite de la bomba esté limpio. Una bomba muy contaminadapuede requerir varios drenajes de aceite. Vea el PROCEDIMIENTO DECAMBIO DE ACEITE.Nota: Utilice sólo aceite para la bomba de alto vacío como el aceite Premiumpara bomba de alto vacío de Robinair. Otros aceites le impedirán alcanzar unvacío profundo.3. Verifique que el aceite esté en el nivel correcto. Para lograr un rendimientomáximo de la bomba, el aceite debe estar al mismo nivel que la línea del NIVELDE ACEITE del vidrio visor, cuando la bomba esté en funcionamiento. Veael PROCEDIMIENTO DE CAMBIO DE ACEITE. No lo llene en exceso — lastemperaturas de funcionamiento harán que el aceite se expanda, por lo tantoaparecerá a un nivel más alto que cuando la bomba no estaba funcionando.Para revisar el nivel de aceite, encienda la bomba con la entrada tapada. Reviseel nivel de aceite en el vidrio visor. Agregue aceite de ser necesario.Si estos procedimientos no solucionan el problema, contáctese con elCuandodistribuidor Robinair más cercano, o llame sin costo a la línea de servicio denecesitaRobinair para obtener más información: 1-800-822-5561.ayuda6
Especificaciones de la bombaVacuMaster de una plataformaVoltajeDesplazamiento deaire libreVacío máximoFasesMotorPuertos de entradaCapacidad del aceiteLongitud del cablede energíaDimensionesPeso netoCertificación151151531015510120V / 60 Hz120V / 60 Hz120V / 60 Hz1.5 CFM3.0 CFM5.0 CFM115 micrones75 micrones75 micrones1111/4 HP1/3 HP1/3 HP0,6 cm x 1,3 cm(1/4 in. flare & 1/2 in. ACME)0,6 cm x 1,3 cm(1/4 in. flare & 1/2 in. ACME)0,6 cm x 1,3 cm(1/4 in. flare & 1/2 in. ACME)300 ml (10 oz.)250 ml (8,5 oz.)300 ml (10 oz.)1,83 metros (6 pies)1,83 metros (6 pies)1,83 metros (6 pies)286 mm x 124 mm x 228 mm 318 mm x 124 mm x 235 mm 338 mm x 138 mm x 246 mm6,9 kg8,2 kg9,7 kgCSACSACSA7
Declaración de garantía limitada RobinairRevisión del 1 de noviembre de 2005Se garantiza que este producto no posee defectos de mano de obra,materiales y componentes por el período de un año a partir de la fechade la compra. No se cobrará por aquellas partes y mano de obra que serequiera para reparar productos defectuosos cubiertos por la garantía.Aplican las siguientes restricciones:1. La garantía limitada aplica al comprador original únicamente.2. La garantía aplica al producto en situaciones de uso normal únicamente,como lo indica el Manual de funcionamiento. El producto debe contarcon un servicio y mantenimiento según lo especificado.3. Si falla el producto, se reparará o reemplazará a discreción delfabricante.4. Los cargos de transporte de servicio de garantía serán reembolsadospor la fábrica al verificar el reclamo de garantía y presentar una boletade flete por servicio terrestre regular.5. Los reclamos de servicio de garantía están sujetos a inspección dedefectos del producto.6. El fabricante no es responsable de los costos adicionales relacionadoscon fallas en el producto, que incluyen pero no se limitan a: tiempoimproductivo, pérdida de refrigerante o envío no autorizado y/o cargospor mano de obra.7. Todo reclamo de servicio de garantía se debe hacer dentro del períodode garantía establecido. Se debe proporcionar la fecha de la prueba decompra al fabricante.Fuera degarantíaEsta garantía limitada NO aplica si: El producto, o parte de éste, se rompe accidentalmente. El producto se usa incorrectamente, se adultera o modifica.8
Notes
Modèles 151151531015510
CONSIGNES DE SÉCURITÉAVERTISSEMENT ! Pour éviter toute blessure corporelle :Portez des lunettes de protection lorsque vous travaillez avec desfluides frigorigènes. Le contact avec les fluides frigorigènes peutcauser des blessures.Une mauvaise utilisation ou des raccords défaillants peuventcauser des risques de choc électrique. Lisez et suivezattentivement les directives et prenez toutes les précautionsnécessaires pour éviter les risques de choc électrique. Assurezvous que tous les dispositifs connexes sont mis à la terrecorrectement avant d’alimenter les circuits.Certaines parties externes de la pompe risquent d’être chaudes autoucher sous des températures de fonctionnement normales. Netouchez pas au boîtier de la pompe ou au moteur lorsque l’appareilest en marche.ATTENTION: pour réduire le risque de choc électrique, nel’exposez pas à la pluie. Stockez la machine à l’intérieur.À utiliser sur des systèmes de climatisation avec CFC, HCFC et HFC encombinaison avec de l’huile minérale, d’ester, d’alkylbenzène et de glycolde polyoxyalkylène comme lubrifiant.N’utilisez pas sur des systèmes à l’ammoniac ou au bromure de lithium.N’utilisez pas avec des fluides frigorigènes inflammables.
Pompes à vide haute performance VacuMaster Félicitations pour l’achat d’une des pompes à vide VacuMaster de qualité supérieureoffertes par Robinair. Votre pompe a été conçue spécialement pour les systèmes declimatisation et de réfrigération à des fins d’évacuation rapide et complète.Vous apprécierez ces principales caractéristiques . . .La conception à palettes rotatives à étage unique offre une capacitéValeursnominales à d’évacuation élevée, puissante et silencieuse et garantit la suppressio
Specifications in this manual. Replace the EXHAUST FITTING. b.15310 and 15510: Remove the OIL FILL cap (red plastic plug at the front of the handle), and add oil until oil appears in the bottom of the sight glass. For oil capacities, refer to Pump Specifications in this manual. Replace the OIL FILL cap. 4. Remove the cap from one of the inlet .