Transcription
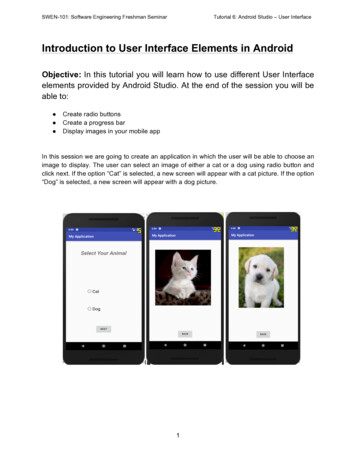
SWEN-101: Software Engineering Freshman SeminarTutorial 6: Android Studio – User InterfaceIntroduction to User Interface Elements in AndroidObjective: In this tutorial you will learn how to use different User Interfaceelements provided by Android Studio. At the end of the session you will beable to: Create radio buttonsCreate a progress barDisplay images in your mobile appIn this session we are going to create an application in which the user will be able to choose animage to display. The user can select an image of either a cat or a dog using radio button andclick next. If the option “Cat” is selected, a new screen will appear with a cat picture. If the option“Dog” is selected, a new screen will appear with a dog picture.l1
SWEN-101: Software Engineering Freshman SeminarTutorial 6: Android Studio – User InterfacePart 1: Adding Images in Android Project1. Your first task is to find and download two images, one of a cat and the other is a dog.Each image should be less than 500kb in size.2. Rename the images to ‘cat.jpg’ and ‘dog.jpg’ respectively.3. Copy the images from where they are stored on your computer.4. Open the project you have worked with in previous tutorial. The images of your projectwill be stored in a folder named 'drawable' which is located inside 'res' folder. Expand itin project window.5. Right click on 'drawable' folder and click on paste.2
SWEN-101: Software Engineering Freshman SeminarTutorial 6: Android Studio – User Interface6. Click OK on next windows. Now you will be able to see the image names listed indrawable folder. Refer to the below images.#End of Part 13
SWEN-101: Software Engineering Freshman SeminarTutorial 6: Android Studio – User InterfacePart 2: Create Radio Buttons1. Open activity youruserid1.2. Change the text to ‘Select your Animal’ and change it’s position and size accordingly.3. Select the ‘RadioGroup’ from Palette - Buttons.4. Adjust the size and position of RadioGroup. Remember, this area will contain both radiobuttons.5. Change the ID of RadioGroup to ‘radioGroupId’ as shown in the above screenshot.6. Add two radio buttons and position them as shown in image.4
SWEN-101: Software Engineering Freshman SeminarTutorial 6: Android Studio – User Interface7. Change the text, ID and textSize of ‘cat’ radiobutton as shown in the image below.8. Make the same changes for ‘dog’ radio button.#End of Part 25
SWEN-101: Software Engineering Freshman SeminarTutorial 6: Android Studio – User InterfacePart 3: Adding the Functionality of Radio Button1. Activity Youruserid1.java code initially, is shown in the screenshot below.2. Let’s add the code step by step now. To use radiogroup, import statements are used toinvoke the packages which contains RadioGroup widget.A RadioGroup class is used fora set of radio buttons. If we check one radio button that belongs to a radio group, itautomatically unchecks any previously checked radio button within the same group.6
SWEN-101: Software Engineering Freshman SeminarTutorial 6: Android Studio – User Interface3. Declare a variable of type RadioGroup. It is initialized to the value of ‘radioGroupId’ thatwe included in our layout file (Part 2, Step 5). A variable ‘id’ of String type is created.4. Add the following code. The setOnCheckedChangeListener() method will get triggeredwhenever the user selects one of the radio buttons. The onCheckedChange() methodwill handle the operations to be done when the radiobutton is selected. If radiobutton1which is of ‘cat’ is selected then ‘id’ is initialized to 1. If radiobutton2 which is of ‘dog’ isselected then ‘id’ is initialized to 2.Note:The Java switch statement is a control statement which executes one statementfrom multiple conditions.7
SWEN-101: Software Engineering Freshman SeminarTutorial 6: Android Studio – User Interface5. The final code should look like this.6. Now, open the text tab and make the following changes in the xml file.#End Of Part 38
SWEN-101: Software Engineering Freshman SeminarTutorial 6: Android Studio – User InterfacePart 4: Create A Progress Bar1. Create a button and change its label to ‘Next’.2. Add a circular progressbar from ‘widgets’. Make sure it covers more space than the radiogroup as shown in the image. Give it ID as ‘simpleProgressBar’.3. Now, open the text tab and make the following changes in the xml file.#End of Part49
SWEN-101: Software Engineering Freshman SeminarTutorial 6: Android Studio – User InterfacePart 5: Adding the Functionality of Progress Bar1. To use progressbar, import statements are used to invoke the packages which containsProgressBar widget.2. ProgressBar type variable ‘simpleProgressBar’ is initiated with the ID of progressbarused in the layout file. Since we want to see the progressbar while the second screen isbeing loaded, we are setting it to ‘visible’ state using setVisibility() method in onClick()function. Activity Youruserid2.java is the class responsible to display the image. Thedecision to select an image to display depends on the value of ‘id’ variable. But thisvariable is in Activity Youruserid1.java. Activity Youruserid2.java will have to use thisvariable which is not present in its scope, to do so putExtra() method is used where ‘id’can be sent to next activity which is Activity Youruserid2.java in this case. Here ‘id’ isjust renamed to ‘SelectedRadioButton’.10
SWEN-101: Software Engineering Freshman SeminarTutorial 6: Android Studio – User InterfaceNow we need to make changes in code of Activity Youruserid2.java. The code looks like theone in the screenshot below initially.#End Of Part511
SWEN-101: Software Engineering Freshman SeminarTutorial 6: Android Studio – User InterfacePart 6: Create An Image View1. Now, go to your second activity ‘activity youruserid2’.2. Go to Palette - Common.3. Drag and drop the 'ImageView' on the page. You will be asked to select a resource.4. To select the resource, expand 'Project'.5. Select image of cat or dog.6. Click ok.12
SWEN-101: Software Engineering Freshman SeminarTutorial 6: Android Studio – User Interface7. Resize it appropriately and set ID as 'imageView'.#End Of Part 6Part 7: Adding the Functionality of Image View13
SWEN-101: Software Engineering Freshman SeminarTutorial 6: Android Studio – User Interface1. Now we add the import statement‘imageViewPhoto’ of its type is declared.forImageViewpackageandvariable2. The variable ‘imageViewPhoto’ is storing the id of ‘imageView2’ which we used in theActivity Youruserid2 layout file. To use any variable from calling activity(Activity Youruserid2), we need to use getIntent() and getExtra() methods. Variable‘extras’ is of type ‘Bundle’ which is used to pass information between activities and otherapplication components. Variable message stores the value of ‘SelectedRadioButton’.Here, switch statement sets the image resource for the imageView which depends onthe value of selected radio button. You can see that photo of cat or dog is selected from‘drawable’ folder in setImageResource() method.14
SWEN-101: Software Engineering Freshman SeminarTutorial 6: Android Studio – User Interface3. Now check the IDs of imageView, radio button and progress bar by looking up at theelement name in all the “findViewByID(R.id.’elementid’)” statements and the height andwidth of them and make sure all the changes are saved.4. Run the application and check the application functionality.5. Push the changes to your Github’s respective repository.#End Of Part 7#End Of Tutorial 615
SWEN-101: Software Engineering Freshman Seminar Tutorial 6: Android Studio - User Interface 15 3. Now check the IDs of imageView, radio button and progress bar by looking up at the element name in all the "findViewByID(R.id.'elementid')" statements and the height and width of them and make sure all the changes are saved. .