Transcription
USER MANUALElo Touch SolutionsET1517L and ET1717L TouchmonitorsSW601708 Rev GElo Touch Solutions 670 N. McCarthy Blvd., Suite 100 Milpitas, CA 95035 800 ELO TOUCH 1 408 597 8000 www.elotouch.com
Copyright 2018 Elo Touch Solutions, Inc. All Rights Reserved.No part of this publication may be reproduced, transmitted, transcribed, stored in a retrievalsystem, or translated into any language or computer language, in any form or by any means,including, but not limited to, electronic, magnetic, optical, chemical, manual, or otherwisewithout prior written permission of Elo Touch Solutions, Inc.DisclaimerThe information in this document is subject to change without notice. Elo Touch Solutions, Inc.and its Affiliates (collectively "Elo") makes no representations or warranties with respect to thecontents herein, and specifically disclaims any implied warranties of merchantability or fitnessfor a particular purpose. Elo reserves the right to revise this publication and to make changesfrom time to time in the content hereof without obligation of Elo to notify any person of suchrevisions or changes.Trademark AcknowledgmentsAccuTouch, CarrollTouch, Elo, Elo (logo), Elo Touch, Elo Touch Solutions, Elo TouchSystems,IntelliTouch, iTouch, SecureTouch, TouchTools and VuPoint are trademarks of Elo and itsAffiliates. Windows is a trademark of Microsoft Corporation.Elo Touch Solutions 670 N. McCarthy Blvd., Suite 100 Milpitas, CA 95035 800 ELO TOUCH 1 408 597 8000 www.elotouch.com
Table of ContentsChapter 1: Introduction . 4Chapter 2: Installation . 5Chapter 3: Mounting . 7Chapter 4: Operation . 13Chapter 5: Technical Support . 18Chapter 6: Safety & Maintenance . 20Chapter 7: Regulatory Information . 22Chapter 8: Warranty Information . 28Elo Touch Solutions 670 N. McCarthy Blvd., Suite 100 Milpitas, CA 95035 800 ELO TOUCH 1 408 597 8000 www.elotouch.com
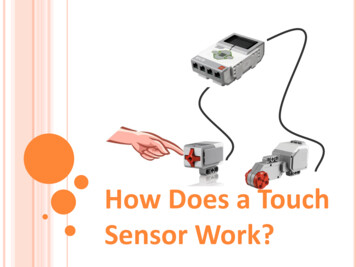
Chapter 1: IntroductionProduct DescriptionYour new touchmonitor combines the reliable performance of Elo Touch Solutions touchproducts with the latest developments in touch technology and display design. This combinationof features creates a natural flow of information between the user and the touchmonitor.This touchmonitor incorporates a 16.2M color, active matrix thin-film-transistor LCD panel toprovide high quality display performance. Its LED backlight significantly reduces powerconsumption and eliminates mercury (compared to CCFL-backlit panels). Other features thatenhance this LCD monitor’s performance are Plug & Play compatibility, on-screen display(OSD) controls, and an optional magnetic stripe reader (MSR).PrecautionsFollow all warnings, precautions and maintenance as recommended in this user manual tomaximize the life of your unit, to ensure user safety, and to prevent risks. See the Safety &Maintenance chapter for more information.This manual contains information that is important for the proper setup and maintenance of theunit. Before setting up and powering on your new touchmonitor, read through this manual,especially the Installation, Mounting, and Operation chapters.Elo Touch Solutions 670 N. McCarthy Blvd., Suite 100 Milpitas, CA 95035 800 ELO TOUCH 1 408 597 8000 www.elotouch.com
Chapter 2: InstallationUnpacking the TouchmonitorOpen the carton and verify that the following items are present: Touchmonitor with protective sheet over touchscreen User Manuals CD Japanese language regulatory information pamphlet Quick Install Guide VGA cable USB cable North American power cable European power cable Filler plate (White or Black, depends on the monitor color)Elo Touch Solutions 670 N. McCarthy Blvd., Suite 100 Milpitas, CA 95035 800 ELO TOUCH 1 408 597 8000 www.elotouch.com
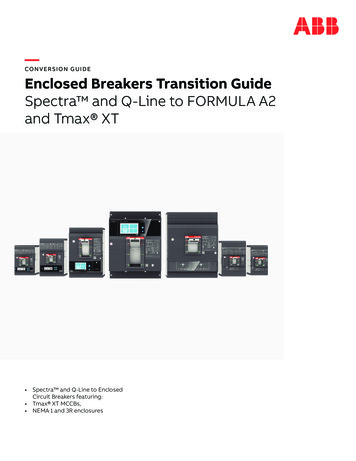
Connector Panel & InterfacesTouchmonitor Connections1. Connect the VGA video cables between the monitor’s VGA input connectors and your VGAvideo source, respectively. Tighten the video cable’s screws for best performance.2. Connect the USB/serial touch cable between the monitor’s USB/serial connector and yourPC’s USB/serial port.3. Select the correct power cable for your region. Connect the power cable between the ACpower source and the monitor’s AC input power jack.4. Alternatively, if you have purchased an optional power adapter and elected to use it, connectthe cable between the AC power source and the optional power adapter’s input connector.Connect the power adapter’s DC output connector to the monitor’s DC input power jack.5. The touchmonitor ships in an OFF state. Press the power button to turn it on.Elo Touch Solutions 670 N. McCarthy Blvd., Suite 100 Milpitas, CA 95035 800 ELO TOUCH 1 408 597 8000 www.elotouch.com
Installing the Touch Technology Software DriversSome software installation is required for your touchmonitor to work with your computer. Noadditional drivers are required for your projected-capacitive touchmonitor, it uses Windows HIDdrivers.To download latest touch drivers1. Visit wnload/Default.aspx2. Select the operating system from “Operating System” dropdown menu.3. Select the technology from “Technologies” dropdown menu.4. Click on the driver version required for your touchmonitor.5. Click “Accept” once you are directed to the “Driver License Agreement” page.6. Enter you email address, Click on “Next Step”. Your driver download will start automatically.7. If you are a new user, fill in the required information and Click on “Register”. Your driverdownload will start automatically.Elo Touch Solutions 670 N. McCarthy Blvd., Suite 100 Milpitas, CA 95035 800 ELO TOUCH 1 408 597 8000 www.elotouch.com
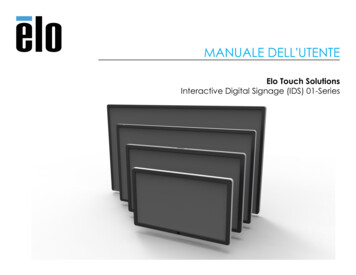
Chapter 3: MountingRear VESA MountFor the 15 inch touchmonitor, a four-hole 75x75mm mounting pattern for M4 screws is provided onthe rear of the monitor. Remove the stand using a Phillips screwdriver to access this mountinginterface. The VESA FDMI-compliant counting is coded: VESA MIS-B, 75, C.For the 17 inch touchmonitor, a four-hole 75x75mm mounting pattern for M4 screws is providedon the rear of the monitor. Remove the stand using a Phillips screwdriver to access thisElo Touch Solutions 670 N. McCarthy Blvd., Suite 100 Milpitas, CA 95035 800 ELO TOUCH 1 408 597 8000 www.elotouch.com
mounting interface. The VESA FDMI-compliant counting is coded: VESA MIS-B, 75, C.Elo Touch Solutions 670 N. McCarthy Blvd., Suite 100 Milpitas, CA 95035 800 ELO TOUCH 1 408 597 8000 www.elotouch.com
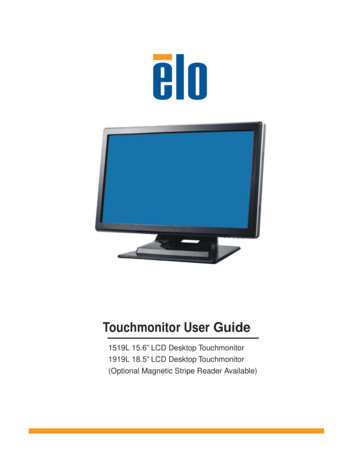
Base MountFor the 15 inch touchmonitor, a threaded three-hole mounting pattern for M4 screws is providedon the bottom of stand base for mounting or securing. An additional two-hole pattern is availableunder small caps on the top of the base. See page 15 for instructions on how to access holes.For the 17 inch touchmonitor, a threaded three-hole mounting pattern for M4 screws is providedon the bottom of stand base for mounting or securing. An additional two-hole pattern is availableunder small caps on the top of the base. See page 15 for instructions on how to access holes.Elo Touch Solutions 670 N. McCarthy Blvd., Suite 100 Milpitas, CA 95035 800 ELO TOUCH 1 408 597 8000 www.elotouch.com
Both the 15” and 17” touchmonitors have covered mounting holes for securing the stand to aflat surface using M4 flathead screws. To utilize these mounting holes, unsnap the accesscovers from the outside, install the screws into the holes and then snap the cover back intoplace.Elo Touch Solutions 670 N. McCarthy Blvd., Suite 100 Milpitas, CA 95035 800 ELO TOUCH 1 408 597 8000 www.elotouch.com
Elo Touch Solutions 670 N. McCarthy Blvd., Suite 100 Milpitas, CA 95035 800 ELO TOUCH 1 408 597 8000 www.elotouch.com
Chapter 4: OperationPowerTo turn the touchmonitor on or off, press the touchmonitor power button once.The Power Status LED on the bottom of the touchmonitor functions according to the followingtable:Touchmonitor statusLED statusOFFOFFSLEEPPULSINGONONThe system consumes low power when in SLEEP and OFF modes. For detailed powerconsumption specifications, refer to the technical specifications available on the Elo websitewww.elotouch.com.Touching the screen will bring the attached host PC out of SLEEP mode (similar to moving themouse or pressing a keyboard key).To improve reliability and reduce wasteful power consumption, disconnect the power adapterwhen long periods of disuse are planned.TouchYour touchmonitor is factory-calibrated and should not need manual calibration (unless theinput video is not fully scaled to the native resolution, or the touch experience needs to becalibrated to a specific user).Elo Touch Solutions 670 N. McCarthy Blvd., Suite 100 Milpitas, CA 95035 800 ELO TOUCH 1 408 597 8000 www.elotouch.com
VideoA display’s native resolution is its width and height measured in number of pixels. Generally, forbest performance, an image displayed on this monitor will look best when your computer’soutput resolution matches this monitor’s native resolution, which is 1024 x 768 for the 15 inch,or 1280 x 1024 for the 17 inch.For computer output resolutions at non-native resolutions, the monitor will scale the video to itspanel’s native resolution. This involves stretching or compressing the input image as needed inthe X- and Y-dimensions to fit the display’s native resolution. An unavoidable byproduct of thescaling algorithms is a loss of fidelity when the computer’s output video image is scaled by themonitor to fit the display. This loss of fidelity is most apparent when viewing feature-rich imagesat close distances (for example images containing small-font text).Your touchmonitor will likely not require video adjustments. However, for analog VGA video,variations in video graphic card outputs may require user adjustments through the OSD tooptimize the quality of the touchmonitor’s displayed image. These adjustments are“remembered” by the touchmonitor. Also, to reduce the need for adjustments for different videomode timings, the monitor correctly scales and displays some of the video industry’s mostcommon video timing modes. Refer to the technical specifications for this monitor athttp://www.elotouch.com for a list of these Preset Video Modes.On-Screen Display (OSD)Four OSD buttons are on the bottom of the monitor. These can be used to adjust variousdisplay parameters.The buttons and their functionality are:Elo Touch Solutions 670 N. McCarthy Blvd., Suite 100 Milpitas, CA 95035 800 ELO TOUCH 1 408 597 8000 www.elotouch.com
ButtonMenuFunction when OSD is not displayed:Display OSD main menuDisplay OSD Brightness submenuDisplay OSD Contrast submenuSelectAuto AdjustFunction when OSD is displayed:Return to previous OSD menuDecrease value of selected parameter /select previous menu itemIncrease value of selected parameter /select next menu itemSelect parameter for adjustment /select submenu to enterElo Touch Solutions 670 N. McCarthy Blvd., Suite 100 Milpitas, CA 95035 800 ELO TOUCH 1 408 597 8000 www.elotouch.com
The OSD buttons control an on-screen graphical user interface, which displays on top of yourinput video. This allows for intuitive adjustment of the following display to eOSD TimeoutOSD LanguageRecall DefaultsVideo SourceAvailable AdjustmentIncrease/decrease monitor brightnessDefault: MaximumIncrease/decrease monitor contrastDefault: Best gray-shade performanceAllows fine adjustments of the panel’s pixel dot clockOnly applicable for VGA input videoAllows fine adjustments of the panel’s pixel dot clock phaseOnly applicable for VGA input videoAutomatically adjusts the system clock to the input analog VGA videosignal, affecting the H-position, V-position, Clock, and Phase menu itemsOnly applicable for VGA input videoMoves the image horizontally on the display in single-pixel incrementsDefault: CenteredOnly applicable for VGA input videoMoves the image vertically on the display in single-pixel incrementsDefault: CenteredOnly applicable for VGA input videoAdjusts sharpness of the displayed imagesDefault: No sharpness adjustmentOnly applicable at non-native input video resolutionsSelects the display’s color temperature. The available color temperaturesare 9300K, 7500K, 6500K, 5500K, and User Defined. If the User Definedoption is selected, the user can change the color temperature by changingindividual R, G, and B gains on a scale from 0 to 100.Default: User Defined with R, G, and B all set to 100Adjusts how long a period of OSD button inactivity the touchmonitor willwait before closing the OSD. The adjustable range is between 5 and 60seconds.Default: 15 secondsSelects which language the OSD information is displayed in. The availablelanguages are: English, French, Italian, German, Spanish, SimplifiedChinese, Traditional Chinese, and JapaneseDefault: EnglishSelecting “Recall Defaults” restores all factory default settings forOSD-adjustable parameters (except OSD Language) and for Preset VideoMode timings.The monitor continually scans for active video on the VGA and DVIconnectors. This adjustment selects which of those input ports should begiven priority to be displayed.The options are: VGA Priority, DVI PriorityDefault: DVI PriorityElo Touch Solutions 670 N. McCarthy Blvd., Suite 100 Milpitas, CA 95035 800 ELO TOUCH 1 408 597 8000 www.elotouch.com
All touchmonitor adjustments made through the OSD are automatically memorized as soon asthey are entered. This feature saves you from having to reset your choices every time thetouchmonitor is unplugged or powered off and on. If there is a power failure, the touchmonitorsettings will not default to the factory specifications.OSD and Power LockoutsPress and hold the “Menu” and “Down” buttons for two seconds to enable/disable the OSDLocking feature. When the OSD Locking is enabled, pressing any of the Menu, Up, Down, orSelect keys will have no effect on the system.Press and hold the “Menu” and “Up” buttons for two seconds to enable/disable the PowerLocking feature. When the Power Locking is enabled, pressing the power switch will have noeffect on the system.Elo Touch Solutions 670 N. McCarthy Blvd., Suite 100 Milpitas, CA 95035 800 ELO TOUCH 1 408 597 8000 www.elotouch.com
Chapter 5: Technical SupportIf you are experiencing trouble with your touchmonitor, refer to the following suggestions.If the problem persists, please contact your local dealer or contact Elo Touch SolutionsCustomer Service.Solutions to Common ProblemsProblemSuggested TroubleshootingCheck that the DC power adaptor is properlyThe touchmonitor does not respond whenconnectedturning on the systemVerify the DC power adaptor is functioningUse the OSD to increase the brightnessMonitor display is dimUse the OSD to increase the contrastIf the Power Status LED is blinking, the monitor maybe in SLEEP mode. Press any key / move the mouse/ touch the Touchscreen to see if the imageMonitor display is blankreappearsCheck that the signal source device is turned onCheck that that there are no loose cable connectionsAdjust your computer’s resolution/timing mode to beMonitor displays an “Out Of Range”within the allowable timing ranges specified for yourmessagetouchmonitor (see website for specifications)Adjust your computer’s resolution/timing mode to bewithin the allowable timing ranges specified for yourMonitor display image looks abnormaltouchmonitor (see website for specifications)Use the Auto Adjust function in the OSDVerify your PC has the latest Elo drivers installedTouch functionality doesn’t workPerform the calibration routine provided with thelatest Elo driversThe OSD buttons or power button does not Check to see if the OSD lock or power lock functionsrespond when pressedare onElo Touch Solutions 670 N. McCarthy Blvd., Suite 100 Milpitas, CA 95035 800 ELO TOUCH 1 408 597 8000 www.elotouch.com
Technical AssistanceVisit www.elotouch.com/products for technical specifications for this deviceVisit www.elotouch.com/go/websupport for online self-help.Visit www.elotouch.com/go/contactsupport for technical support.See this user manual’s last page for worldwide technical support phone numbers.Elo Touch Solutions 670 N. McCarthy Blvd., Suite 100 Milpitas, CA 95035 800 ELO TOUCH 1 408 597 8000 www.elotouch.com
Chapter 6: Safety & MaintenanceSafetyTo avoid risk of electric shock, follow all safety notices and do not disassemble thetouchmonitor. They are not user-serviceable.Ensure that your installation is equipped to maintain the specified environmental conditionslisted in the Technical Specifications chapter.Care and HandlingThe following tips will help keep your touchmonitor functioning at an optimal level: Disconnect the AC power cable before cleaning. To clean the display unit cabinet, use a clean cloth lightly dampened with a mild detergent. It is important that your unit remains dry. Do not get liquids on or inside the unit. If liquiddoes get inside, have a qualified service technician check it before you power it on again. Do not wipe the screen with a cloth or sponge that could scratch the surface. To clean the touchscreen, use window or glass cleaner applied to a clean cloth or sponge.Never apply the cleaner directly to the touchscreen. Do not use alcohol (methyl, ethyl orisopropyl), thinner, benzene, or other abrasive cleaners.Elo Touch Solutions 670 N. McCarthy Blvd., Suite 100 Milpitas, CA 95035 800 ELO TOUCH 1 408 597 8000 www.elotouch.com
Waste Electrical & Electronic Equipment Directive (WEEE)This product should not be disposed of with household waste. It should bedeposited at a facility that enables recovery and recycling. Ensure that product isdisposed at the end of its useful life according to local laws and regulation.Elo has put in place recycling arrangements in certain parts of the world. Forinformation on how you can access these arrangements, please am/.Elo Touch Solutions 670 N. McCarthy Blvd., Suite 100 Milpitas, CA 95035 800 ELO TOUCH 1 408 597 8000 www.elotouch.com
Chapter 7: Regulatory InformationI. Electrical Safety Information:Compliance is required with respect to the voltage, frequency, and current requirementsindicated on the manufacturer’s label. Connection to a different power source than thosespecified herein will likely result in improper operation, damage to the equipment or pose a firehazard if the limitations are not followed.There are no operator serviceable parts inside this equipment. There are hazardous voltagesgenerated by this equipment which constitute a safety hazard. Service should be provided onlyby a qualified service technician.Contact a qualified electrician or the manufacturer if there are questions about the installationprior to connecting the equipment to mains power.II. Emissions and Immunity InformationNotice to Users in the United States:This equipment has been tested and found to comply with the limits for a Class B digital device,pursuant to Part 15 of the FCC Rules. These limits are designed to provide reasonable protectionagainst harmful interference in a residential installation. This equipment generates, uses and canradiate radio frequency energy and, if not installed and used in accordance with the instructions, maycause harmful interference to radio communications. However, there is no guarantee that interferencewill not occur in a particular installation. If this equipment does cause harmful interference to radio ortelevision reception, which can be determined by turning the equipment off and on, the user isencouraged to try to correct the interference by one or more of the following measures:-- Reorient or relocate the receiving antenna.-- Increase the separation between the equipment and receiver.-- Connect the equipment into an outlet on a circuit different from that to which the receiver isconnected.-- Consult the dealer or an experienced radio/TV technician for help.Notice to Users in Canada:This equipment complies with the Class B limits for radio noise emissions from digitalapparatus as established by the Radio Interference Regulations of Industrial Canada.Elo Touch Solutions 670 N. McCarthy Blvd., Suite 100 Milpitas, CA 95035 800 ELO TOUCH 1 408 597 8000 www.elotouch.com
CAN ICES3(B)/NMB3(B)This device complies with Industry Canada’s license-exempt RSSs. Operation is subject to thefollowing two conditions:(1) This device may not cause interference; and(2) This device must accept any interference, including interference that may cause undesiredoperation of the device.Le présent appareil est conforme aux CNR d’Industrie Canada applicables aux appareils radioexempts de licence. L’exploitation est autorisée aux deux conditions suivantes :(1) l’appareil ne doit pas produire de brouillage;et(2) l’utilisateur de l’appareil doit accepter tout brouillage radioélectrique subi, même si lebrouillage est susceptible d’en compromettre le fonctionnement.Notice to Users in the European Union: Use only the provided power cords andinterconnecting cabling provided with the equipment. Substitution of provided cords and cablingmay compromise electrical safety or CE Mark Certification for emissions or immunity asrequired by the following standards:This Information Technology Equipment (ITE) is required to have a CE Mark on theManufacturer’s label which means that the equipment has been tested to the followingDirectives and Standards: This equipment has been tested to the requirements for the CE Markas required by EMC Directive 2014/30/EU as indicated in European Standard EN 55032 ClassB and the Low Voltage Directive 2014/35/EU as indicated in European Standard EN 60950-1.General Information to all Users: This equipment generates, uses and can radiate radiofrequency energy. If not installed and used according to this manual the equipment may causeinterference with radio and television communications. There is, however, no guarantee thatinterference will not occur in any particular installation due to site-specific factors.1) In order to meet emission and immunity requirements, the user must observe the following:a) Use only the provided I/O cables to connect this digital device with any computer.b) To ensure compliance, use only the provided manufacturer’s approved line cord.c) The user is cautioned that changes or modifications to the equipment not expresslyapproved by the party responsible for compliance could void the user’s authority to operatethe equipment.2) If this equipment appears to cause interference with radio or television reception, or anyother device:Elo Touch Solutions 670 N. McCarthy Blvd., Suite 100 Milpitas, CA 95035 800 ELO TOUCH 1 408 597 8000 www.elotouch.com
a) Verify as an emission source by turning the equipment off and on.If you determine that this equipment is causing the interference, try to correct the interferenceby using one or more of the following measures:i) Move the digital device away from the affected receiver.ii) Reposition (turn) the digital device with respect to the affected receiver.iii) Reorient the affected receiver’s antenna.iv) Plug the digital device into a different AC outlet so the digital device and the receiver areon different branch circuits.v) Disconnect and remove any I/O cables that the digital device does not use.(UnterminatedI/O cables are a potential source of high RF emission levels.)vi) Plug the digital device into only a grounded outlet receptacle. Do not use AC adapterplugs. (Removing or cutting the line cord ground may in crease RF emission levels and mayalso present a lethal shock hazard to the user.)If you need additional help, consult your dealer, manufacturer, or an experienced radio ortelevision technician.Elo Touch Solutions 670 N. McCarthy Blvd., Suite 100 Milpitas, CA 95035 800 ELO TOUCH 1 408 597 8000 www.elotouch.com
2 November 2018FCC Declaration of ConformityPer FCC 47 CFR FCC Part15 subpart B Section 2.1077(a)In accordance with FCC Rules and RegulationsModel Number: ET1515L/ET1715L/ET1915L SeriesEquipment Category: Information Technology and Telecommunications EquipmentEquipment Class: Commercial and Light IndustrialProduct Name: MonitorManufacturer:Elo Touch Solutions, Inc.670 N. McCarthy Blvd.Suite 100Milpitas, CA 95035www.elotouch.comTrademark:Declaration:This device complies with Part 15 of the FCC Rules. Operation is subject to the following two conditions:(1) This device may not cause harmful interference, and (2) this device must accept any interference received, includinginterference that may cause undesired operationKevin HuangDirector, Systems EngineeringElo Touch Solutions, Inc.Elo Touch Solutions 670 N. McCarthy Blvd., Suite 100 Milpitas, CA 95035 800 ELO TOUCH 1 408 597 8000 www.elotouch.com
III. Agency CertificationsThe following certifications and marks have been issued or declared for this monitor:Australia RCMJapan VCCICanada CUL, ICKorea KCChina CCCMexico CoCEurope CETaiwan BSMIUnited States FCC,ULIV. China RoHSIn accordance to Chinese law (Administration on the Control of Pollution Caused by ElectronicInformation Products), the section below lists out the name and amount of the toxic and/orhazardous materials that this product may contain.Toxic or Hazardous Substances and ElementsHexavalent Polybrominated PolybrominatedComponent Name Lead Mercury CadmiumChromiumBiphenylsDiphenyl Ethers(Pb) (Hg)(Cd)(Cr6 )(PBB)(PBDE)Plastic PartsOOOOOOMetal PartsXOOOOOWire and CableXOOOOOAssemblyLCD PanelXOOOOOTouch ScreenXOOOOOPanelPCBAXOOOOOSoftware (CD, etc.) OOOOOOO: Indicates that this toxic or hazardous substance contained in all of the homogeneousmaterials for this component is below the limit requirement in SJ/T11363-2006.X: Indicates that this toxic or hazardous substance contained in at least one of thehomogeneous materials used for this component is above the limit requirement inSJ/T11363-2006. For items marked with X, exemptions were taken according to EU RoHS.Explanation of Markings(1). In accordance with the SJ/T11364-2006 requirement, the electronic information productsare marked with the following pollution control logo. The Environment-Friendly Use Period forthis product is 10 years. The product will not leak or mutate under normal operating conditionslisted below, so that the use of this electronic information product will not result in any severeenvironmental pollution, any bodily injury, or damage to any assets.Operating Temperature:0-40 / Humidity:20%-80% (non-condensing).
Storage Temperature:-20 60 / Humidity:10% 90% (non-condensing).(2). It is encouraged and recommended that this product be recycled and reused according tolocal laws. The product should not be thrown away casually.V. Power Adapter SpecificationsElectrical Ratings:Input: 100-240VAC, 50/60HzOutput: 12VDC, minimum 4.16A, LPSVI. Monitor SpecificationsElectrical Ratings:Input 1517L: 100-240VAC, 50/60Hz, 0.3A or 12VDC, 2.5AInput 1717L: 100-240VAC, 50/60Hz, 0.5A or 12VDC, 2.5AOperating Conditions:Temperature: 0 C - 40 CHumidity: 20% to 80% (non-condensing)Altitude: 0 to 3,048mStorage Conditions:Temperature: -20 C - 60 CHumidity: 10% to 90% (non-condensing)Altitude: 0 to 12,192mUser Manual: 1517L, 1717LSW601708 Rev F, Page 27 of 29
Chapter 8: Warranty InformationSee http://www.elotouch.com/Support/warranty.asp for more informationUser Manual: 1517L, 1717LSW601708 Rev F, Page 28 of 29
Check out Our Website!www.elotouch.comGet the latest. Product Information Specifications Upcoming events Press releases Software driversGetting in Touch with usTo find out more about the extensive range of Elo touch solutions, visit our website atwww.elotouch.com, or simply call the office nearest you:North AmericaTel 1 408 597 8000Fax 1 408 597 8001customerservice@elotouch.comEuropeTel 32 (0)16 70 45 00Fax 32 (0)16 70 45 49elosales@elotouch.comAsia-PacificTel 86 (21) 3329 1385Fax 86 (21) 33291400www.elotouch.com.cnLatin AmericaTel 786-923-0251Fax 305-931-0124www.elotouch.comCopyright 2017 Elo Touch Solutions, Inc. All rights reserved.User Manual: 1517L, 1717LSW601708 Rev F, Page 29 of 29
Elo Touch Solutions 670 N. McCarthy Blvd., Suite 100 Milpitas, CA 95035 800 ELO TOUCH 1 408 597 8000 www.elotouch.com Chapter 1: Introduction Product Description Your new touchmonitor combines the reliable performance of Elo Touch Solutions touch products with the latest developments in touch technology and display design. This .