Transcription
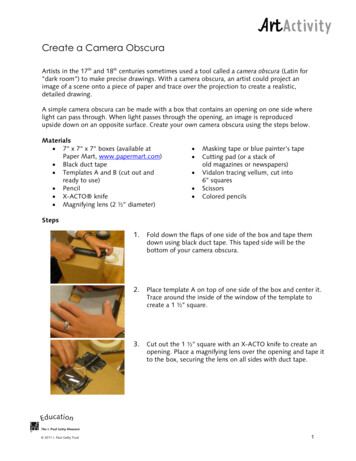
Create a Camera ObscuraArtists in the 17th and 18th centuries sometimes used a tool called a camera obscura (Latin for“dark room”) to make precise drawings. With a camera obscura, an artist could project animage of a scene onto a piece of paper and trace over the projection to create a realistic,detailed drawing.A simple camera obscura can be made with a box that contains an opening on one side wherelight can pass through. When light passes through the opening, an image is reproducedupside down on an opposite surface. Create your own camera obscura using the steps below.Materials 7" x 7" x 7" boxes (available atPaper Mart, www.papermart.com) Black duct tape Templates A and B (cut out andready to use) Pencil X-ACTO knife Magnifying lens (2 ½” diameter) Masking tape or blue painter’s tapeCutting pad (or a stack ofold magazines or newspapers)Vidalon tracing vellum, cut into6” squaresScissorsColored pencilsSteps 2011 J. Paul Getty Trust1.Fold down the flaps of one side of the box and tape themdown using black duct tape. This taped side will be thebottom of your camera obscura.2.Place template A on top of one side of the box and center it.Trace around the inside of the window of the template tocreate a 1 ½” square.3.Cut out the 1 ½” square with an X-ACTO knife to create anopening. Place a magnifying lens over the opening and tape itto the box, securing the lens on all sides with duct tape.1
Create a Camera Obscura4. Use template A again by placing it on top of the side of thebox that is opposite the lens. Trace around the outer squarewith a pencil. Cut out the square with an X-ACTO knife,following the lines of the square you drew. You should nowhave a cardboard square that is about 6 7/8 inches. If needed,reinforce the sides and corners of your box with duct tape.5. Place template B on top of the cardboard square you cut outin step 4 and center it. Trace around the template to create a5” square. Use an X-ACTO knife to cut out the 5” square. Youshould now have a cardboard frame with a 5” square opening.6. Take a 6” square of vellum and center it on top of thecardboard frame. Tape the vellum to the cardboard frame onall four sides using masking tape or blue painter’s tape.7. Place the framed vellum within the box with the vellum sidefacing away from the lens. Bring your camera obscura to awindow and point the lens out the window. An image willappear on the vellum! Adjust the cardboard frame’s positionuntil the image on the vellum is focused.8. Use a pencil to mark the best placement of the framed vellum.Make your marks close to the top of the edge on either side ofthe inside of the box.9. Using your pencil marks as reference points, use scissors to cutslits in each of the side flaps towards the pencil marks. Youshould now have a total of six flaps. 2011 J. Paul Getty Trust2
Create a Camera Obscura10. Push down the flaps closest to the lens and rest the cardboardframe against the edges of the flaps. Make sure that thevellum side is facing away from the lens.11. Double check to make sure the image appearing on thevellum appears focused. Adjust as necessary and tape theframed vellum to the flaps with masking tape or blue painter’stape.12. Tape down all remaining flaps with masking tape or bluepainter’s tape. Only use as much tape as necessary to keep theflaps closed. You will want to open the camera obscura laterto remove the framed vellum. Your framed vellum may haveshifted, so adjust as necessary.Your camera obscura is now ready for use. Look out of awindow and through the vellum. Trace what you see throughthe screen onto the paper, paying particular attention to thelines and shapes found within the image.13. After tracing the lines and shapes, remove the framed vellum.Carefully remove the piece of vellum from its cardboard frameand add details to your drawing with colored pencils. 2011 J. Paul Getty Trust3
Create a Camera Obscura(Template A)Cut out the template below, including the small square window. 2011 J. Paul Getty Trust4
Create a Camera Obscura(Template B)Cut out the template below. 2011 J. Paul Getty Trust5
Create a Camera Obscura 2011 J. Paul Getty Trust 3 10. Push down the flaps closest to the lens and rest the cardboard frame against the edges of the flaps.
