Transcription
Version 3.0Installation GuideforSQL Server 2005 Express EditionCopyright 2007 Teclink Development Ltd. All rights reserved.Last update: 23-AUG-07
IP-guard v3.0 Installation Guide for SQL Server Express 2005P.2Table of contentsPageSection 1 Introduction .3Section 2 Setup Microsoft SQL Server 2005 Express Edition 4Section 3 Setup SQL Server 2005 Express Edition with Advanced Services SP2 12Section 4 SQL Server Configuration 20Copyright 2007 Teclink Development Ltd. All rights reserved.Last update: 23-AUG-07
Section 1 IntroductionP.3Section 1 IntroductionPrior to IP-guard v3.0 installation, database must be installed on the IP-guard server. IP-guard v3.0supports SQL Server 2000 SP4 or later, SQL Server 2005 SP1 or later for database.The free version of Microsoft SQL Server 2005 Express Edition is available for download, thelimitation of this free version is the data capacity is 4GB. Please refer to official a718378.aspxYou are recommended to download following components:1. Microsoft SQL Server 2005 Express Edition (36.5 MB)2. Microsoft SQL Server 2005 Express Edition with Advanced Services (234 MB)3. SQL Server Management Studio Express (43.1 MB)Copyright 2007 Teclink Development Ltd. All rights reserved.Last update: 23-AUG-07
Section 2 Setup Microsoft SQL Server 2005 Express EditionP.4Section 2 Setup Microsoft SQL Server 2005 Express Edition1. Double click the SQLEXPR32.EXE, click the Execute button to start the installation (see Figure2.1)Figure 2.12. Tick in the checkbox to agree the En User License Agreement (see Figure 2.2)Figure 2.2Copyright 2007 Teclink Development Ltd. All rights reserved.Last update: 23-AUG-07
Section 2 Setup Microsoft SQL Server 2005 Express EditionP.53. Click Install to continue (see Figure 2.3a and 2.3b)Figure 2.3aFigure 2.3bCopyright 2007 Teclink Development Ltd. All rights reserved.Last update: 23-AUG-07
Section 2 Setup Microsoft SQL Server 2005 Express EditionP.64. click Next to continue in the welcome windows (see Figure 2.4)Figure 2.45. Click Next to continue after the System Configuration Check is done (see Figure 2.5)Figure 2.5Copyright 2007 Teclink Development Ltd. All rights reserved.Last update: 23-AUG-07
Section 2 Setup Microsoft SQL Server 2005 Express EditionP.76. Click Next to continue until all preparation is done (see Figure 2.6)Figure 2.67. Click Next to continue after input your name and company (see Figure 2.7)Figure 2.7Copyright 2007 Teclink Development Ltd. All rights reserved.Last update: 23-AUG-07
Section 2 Setup Microsoft SQL Server 2005 Express EditionP.88. In the Feature Selection, it is recommended to install all on local hard drive except the softwareDevelopment kit. Use the default installation path.Figure 2.89. Select the Windows Authentication Mode, click Next to continue (see Figure 2.9)Figure 2.9Copyright 2007 Teclink Development Ltd. All rights reserved.Last update: 23-AUG-07
Section 2 Setup Microsoft SQL Server 2005 Express EditionP.910. Use the default settings in Configuration Options, click Next to continue (see Figure 2.10)Figure 2.1011. No selections (by default) in Error and Usage Report Settings, click Next to continue (seeFigure 2.11)Figure 2.11Copyright 2007 Teclink Development Ltd. All rights reserved.Last update: 23-AUG-07
Section 2 Setup Microsoft SQL Server 2005 Express EditionP.1012. Click Next to continue in Ready to Install (see Figure 2.12)Figure 2.1213. After all selected components are installed, click Next to continue (see Figure 2.13)Figure 2.13Copyright 2007 Teclink Development Ltd. All rights reserved.Last update: 23-AUG-07
Section 2 Setup Microsoft SQL Server 2005 Express EditionP.1114. Click Finish to complete the installation (see Figure 2.14)Figure 2.1Copyright 2007 Teclink Development Ltd. All rights reserved.Last update: 23-AUG-07
Section 3 Setup Microsoft SQL Server 2005 Express Edition with Advanced Services SP2P.12Section 3 Setup SQL Server 2005 Express Edition with Advanced Services SP21. Double click the SQLEXPR ADV.EXE file to start the installation (see Figure 3.1)Figure 3.12. Tick the checkbox to accept the End User License Agreement (see Figure 3.2).Figure 3.2Copyright 2007 Teclink Development Ltd. All rights reserved.Last update: 23-AUG-07
Section 3 Setup Microsoft SQL Server 2005 Express Edition with Advanced Services SP2P.133. Click Next to continue after all prerequisites are installed (see Figure 3.3)Figure 3.34. Click Next to continue from the welcome windows (see Figure 3.4)Figure 3.4Copyright 2007 Teclink Development Ltd. All rights reserved.Last update: 23-AUG-07
Section 3 Setup Microsoft SQL Server 2005 Express Edition with Advanced Services SP2P.145. Click Next to continue after the system configuration check is done (see Figure 3.5)Figure 3.56. Click Next after input the Name and Company (see Figure 3.6)Figure 3.6Copyright 2007 Teclink Development Ltd. All rights reserved.Last update: 23-AUG-07
Section 3 Setup Microsoft SQL Server 2005 Express Edition with Advanced Services SP2P.157. In the Feature Selection, all components are recommended to install on local hard drive. Usethe default installation path (see Figure 3.7)Figure 3.78. Select Default instance from the Instance Name windows (see Figure 3.8)Figure 3.8Copyright 2007 Teclink Development Ltd. All rights reserved.Last update: 23-AUG-07
Section 3 Setup Microsoft SQL Server 2005 Express Edition with Advanced Services SP2P.169. Tick the checkbox in the Existing components windows to allow upgrade the workstationcomponents and development tools (see Figure 3.9)Click Next to continueFigure 3.910. Select Windows Authentication Mode from the Authentication Mode windows, click Next tocontinue (see Figure 3.10)Figure 3.10Copyright 2007 Teclink Development Ltd. All rights reserved.Last update: 23-AUG-07
Section 3 Setup Microsoft SQL Server 2005 Express Edition with Advanced Services SP2P.1711. Click Next to continue in the Configuration Options. By default, the Enable User Instances isselected (see Figure 3.11)Figure 3.1112. Click Next to continue in the Report Server Installation Options. By default, the Install thedefault configuration is selected (see Figure 3.12a)Figure 3.12aCopyright 2007 Teclink Development Ltd. All rights reserved.Figure 3.12bLast update: 23-AUG-07
Section 3 Setup Microsoft SQL Server 2005 Express Edition with Advanced Services SP2P.1813. Click Next to continue in the Error and Usage Report Settings. By default, no options areselected (see Figure 3.13)Figure 3.1314. Click Install to continue in the Ready to Install (see Figure 3.14)Figure 3.14Copyright 2007 Teclink Development Ltd. All rights reserved.Last update: 23-AUG-07
Section 3 Setup Microsoft SQL Server 2005 Express Edition with Advanced Services SP2P.1915. After all components are installed, click Next to continue16. Click Finish to complete the installation (see Figure 3.16)Figure 3.16Copyright 2007 Teclink Development Ltd. All rights reserved.Last update: 23-AUG-07
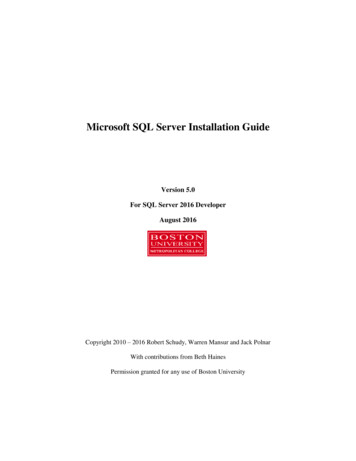
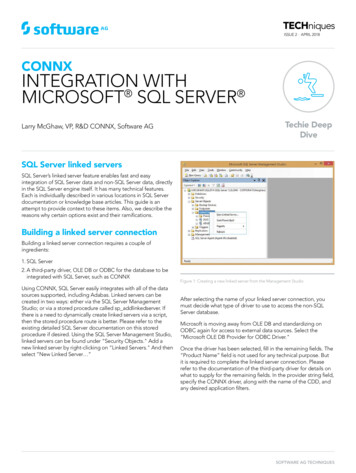
Section 4 SQL Server ConfigurationP.20Section 4 SQL Server Configuration1. Open the SQL Server Configuration Manager from StartÆAll ProgramsÆMicrosoft SQLServer 2005ÆConfiguration ToolsÆSQL Server Configuration Manager (see Figure 4.1)Figure 4.12. In the SQL Server Configuration, click the SQL Server 2005 Services. Then you can see theserver status from the right hand side.If the SQL Server is running, stop it first. Double click the SQL Server (SQLEXPRESS), theproperties window will pop up (see Figure 4.2)The default setting in the Built-in account is Network Service, change to Local System, andclick OK to confirmFigure 4.2Copyright 2007 Teclink Development Ltd. All rights reserved.Last update: 23-AUG-07
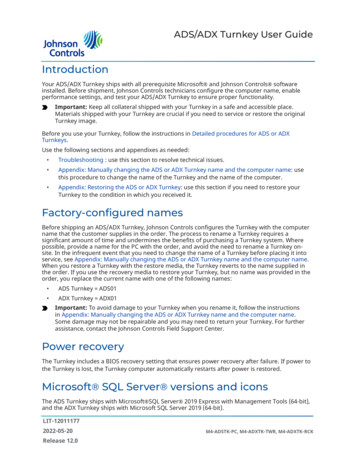
Section 4 SQL Server ConfigurationP.213. For the SQL Server Browser, also set the Log on as Local System (see Figure 4.3)Figure 4.34. Expend the SQL Server 205 Network Configuration and then click the Protocols forMSSQLSERVER from the left hand side (see Figure 4.4).By default, only Shared Memory is enabledDouble click Named Pipes and TCP/IP to make the status EnabledFigure 4.4Copyright 2007 Teclink Development Ltd. All rights reserved.Last update: 23-AUG-07
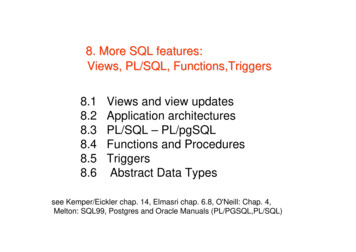
Section 4 SQL Server ConfigurationP.225. Expend the SQL Native Client Configuration and then click the Client Protocols from the lefthand side (see Figure 4.5).By default, only Shared Memory is enabledDouble click Named Pipes and TCP/IP to make the status EnabledFigure 4.56. All database setup and configurations are done, please refer to IP-guard User guide to continuethe IP-guard installationCopyright 2007 Teclink Development Ltd. All rights reserved.Last update: 23-AUG-07
1. Open the SQL Server Configuration Manager from StartÆAll ProgramsÆMicrosoft SQL Server 2005ÆConfiguration Tools ÆSQL Server Configuration Manager (see Figure 4.1) Figure 4.1 2. In the SQL Server Configuration, click the SQL Server 2005 Services. Then you can see the server status from the right hand side.