Transcription
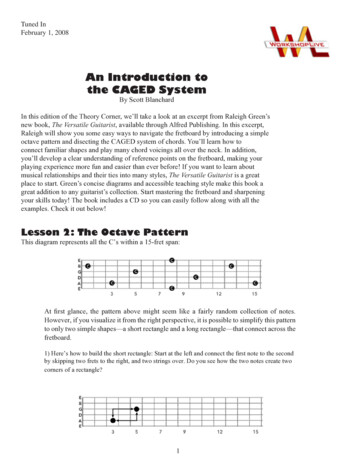
Tuned InFebruary 1, 2008An Introduction tothe CAGED SystemBy Scott BlanchardIn this edition of the Theory Corner, we’ll take a look at an excerpt from Raleigh Green’snew book, The Versatile Guitarist, available through Alfred Publishing. In this excerpt,Raleigh will show you some easy ways to navigate the fretboard by introducing a simpleoctave pattern and disecting the CAGED system of chords. You’ll learn how toconnect familiar shapes and play many chord voicings all over the neck. In addition,you’ll develop a clear understanding of reference points on the fretboard, making yourplaying experience more fun and easier than ever before! If you want to learn aboutmusical relationships and their ties into many styles, The Versatile Guitarist is a greatplace to start. Green’s concise diagrams and accessible teaching style make this book agreat addition to any guitarist’s collection. Start mastering the fretboard and sharpeningyour skills today! The book includes a CD so you can easily follow along with all theexamples. Check it out below!Lesson 2: The Octave PatternThis diagram represents all the C’s within a 15-fret span:At first glance, the pattern above might seem like a fairly random collection of notes.However, if you visualize it from the right perspective, it is possible to simplify this patternto only two simple shapes —a short rectangle and a long rectangle—that connect across thefretboard.1) Here’s how to build the short rectangle: Start at the left and connect the first note to the secondby skipping two frets to the right, and two strings over. Do you see how the two notes create twocorners of a rectangle?1
2) Here’s how to build the long rectangle: Start at the left and connect the first note to the secondby skipping three frets to the right, and two strings up. Do you see how the two notes create twocorners of a longer rectangle?3) Now, connect the two shapes together: You can visualize this as one big shape outlined by thenotes on the 5th, 3rd, and 1st strings (going from left to right).4) Now, copy the whole shape to the 6th, 4th, and 2nd strings: Notice how the last note of the firstshape (on the 1st string) lines up on the same fret as the first note of the second shape (on the 6thstring)? The shapes will always line up this way. You have now covered all six strings!5) Start the pattern over from the beginning: Just go two frets to the right of the last note in thesecond shape, and start the whole pattern over. (This pattern repeats over the entire fretboard.)Here’s the really good news: every note on the guitar follows this same pattern. For this reason,it’s crucial to be able to shift the whole system up and down the fretboard, backwards andforwards. So, the next time you are faced with an unfamiliar note, ask yourself “what string am Ion?” Then, refer to the pattern above to quickly move into familiar territory. Using this method,the open strings, the 12th fret, or the ACE shape will always be close by.Lesson 3: The CAGED SystemHave you ever wondered what would happen if you took a common C Major triad(a three-note chord composed of the root, 3rd, and 5th; in this case C–E–G) andplotted all three notes across the entire fretboard? Well if you did, you would getthe CAGED system. This system provides a way to connect major chords across theentire fretboard by visualizing familiar open chords.1) Build a C Major chord:2) Use the octave pattern to locate all of the C’s.2
3) Use the octave pattern to plot out all of the E’s and G’s as well, and you get this collection ofnotes:4) Look at these notes carefully—familiar open chord shapes will start to appear.And here they are: the common C, A, G, E, and D chord shapes. Keep in mind thesedon’t necessarily represent the actual names of the chords. Instead, they represent the fivepositions of a single major chord (in this case, C Major) as it appears across the entirefretboard. By shifting this pattern up and down the neck, you can now use familiar openchord shapes to play any major chord, in any position.Lesson 4: Simplifying the CAGED SystemYou might be wondering: is there a way to simplify the CAGED system to make iteasier to visualize? Well, there is an alternate, and perhaps easier, way. Rather thanconceptualize five chord shapes connected across the entire fretboard, you might try tovisualize four chord shapes that are connected to two root locations. One of the roots ison the 5th string (A), and the other is on the 6th string (low E). Visualizing these tworoots as a “toggle switch” with a chord on each side is a very practical way to simplifythese patterns; especially since chord shape 2 and 4 are common barre chords. Studythe following diagram carefully to understand this concept.3
Now remember, this entire system is movable. So, if you were going to apply theCAGED system to, say, a G# Major chord, you would shift the entire system down fourfrets so that the root was G#. The pattern would now look like this:4
ConclusionFor more information on octaves and the CAGED system, be sure to check out the Licksand Tricks section of this newsletter, or order Raleigh Green’s book, The VersatileGuitarist, at www.ordermusictoday.com. Visit Raleigh Green at www.WorkshopLive.comtoday!For some more insight on octaves, guitarists will want to check out the many lessons onthis concept in the rock, blues, acoustic and jazz curriculums, as well as Tobias Hurwitz’sadvanced rock guitar lesson “Advanced Minor Scales and Modes Lesson 1,” in which hedemonstrates the CAGED system in relation to scale patterns.Not a guitarist? Keyboardists should check out the Pianist’s Toolbox lesson “Octaves,”taught by David Pearl and Joe Rose.Have fun—more in just two short weeks!5
Using this method, the open strings, the 12th fret, or the ACE shape will always be close by. 1) Build a C Major chord: 2) Use the octave pattern to locate all of the C's. Lesson 3: The CAGED System . advanced rock guitar lesson "Advanced Minor Scales and Modes Lesson 1," in which he