Transcription
CAGED System PrimerFor Community Guitarby Andrew LawrenceLevel 2communityguitar.com
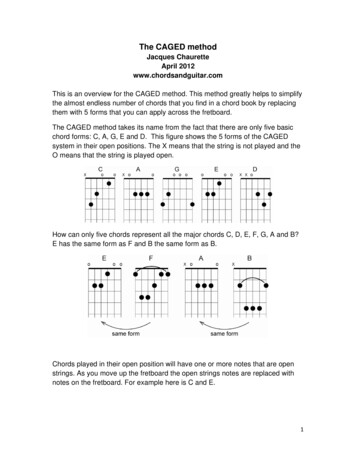
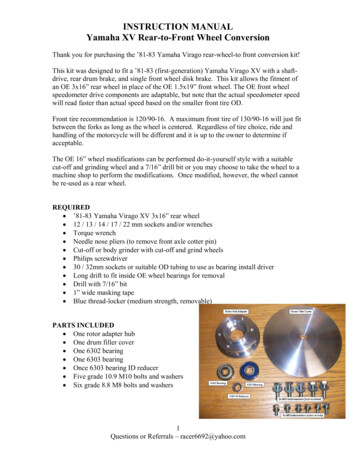
Chords and Chord ShapesThe CAGED system is based on the recognition that although there are many major chords on the neck ofthe guitar, there are really only five major chord shapes that you can use to play them. These chord shapescorrespond to the common chords C, A, G, E and D, hence the system’s name. To make use of the CAGEDsystem it is important that you understand the difference between a chord and a chord shape (which somerefer to as a chord form). A chord is defined by the notes that make it up (for example, an E chord is made up of E, G# and B).It can be played on guitar, piano, autoharp or any other chording instrument. A chord shape, on the other hand, is just a configuration of your fingers on the guitar fretboard.With one major chord shape you can play every major chord, simply by moving the shape up ordown the fingerboard using a capo or bar.As you can see here, the distinction between achord and a chord shape really only becomesimportant when you move the chord beyondopen position. After all, in open position an Echord is played using the E shape, a C chordwith a C shape, and so forth. But as soon asyou place a bar behind an E shape and playit—as shown here—at the 3rd fret, now thereis a difference between the shape (which stilllooks like an E) and the actual chord beingplayed (which is now a G).E shapeE chordE shapeG chord3capo or barAlthough many guitarists learn to bar the E and A shapes and move them around the fingerboard, mostwould never think to do the same thing with the C, G and D shapes for the simple reason that, when barred,these chord shapes are physically challenging. That’s why it is critical to understand that the real value ofthe CAGED system has nothing to do with being able to play all five barred shapes. It just has to do withbeing able to see and understand them on the fingerboard. Your mind doesn’t have the physical limitationsof your hands, so you should be able to visualize all kinds of things that your hands couldn’t possibly do.Let your hands worry about what’s physically possible when it comes time to actually grab something. Fornow, let’s get the picture of the basic CAGED shapes clear in your mind’s eye.Exercise 1:Use the diagrams below to sketch out the remainder of the five major chord shapes—we’ve already done theE shape for you—with the bar at the fifth fret. Then try to play each of them. Remember though, it makes nodifference whether you can get all the notes of the chord to ring out clearly. You don’t even need to pick thestrings. Just make sure you know where the fingers of your fretting hand belong in each barred shape.CA5G5E5D55
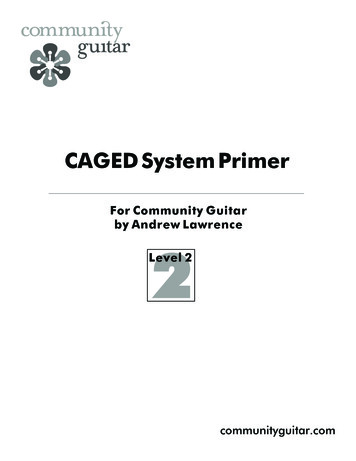
Once you’ve dislodged the C, A, G, E and D chords from their home in open position by putting a barbehind them, you realize something very significant: that each major chord shape can be used to play anymajor chord simply by moving it up or down the fingerboard. So now the question becomes, “How do Iknow what chord I’m playing when I put a barred shape in a given fingerboard position?” Let’s find out.Root Configurations and Chord NamesThe first critical piece of information you need in order to answer this question is the location of the rootwithin the chord shape. Fortunately, this is easy information to get your hands on: simply look at the chordsin open position. Shall we?Exercise 2:The diagrams below show the five major chord shapes in open position. (Because they are in open position, thename of the chord and the shape are the same.) For each chord/shape, identify all the occurrences of the rootas we have done for C.CAGEDCCWhen you’ve completed the exercise above you will have identified what we’ll call the root configurationof each of the shapes. The important thing to notice at this point is that as you move the shape up thefingerboard, the actual note given by the root configuration changes (and so, the name of the chord), butthe position of those notes relative to each other and the overall chord shape stays constant. In other wordsalthough the root of the chord changes, the root configuration of the chord shape does not. The diagramsbelow should make this idea clear.5C9FACFAAs the C shape is moved up thefingerboard, the root changes, butthe root configuration does not.Notice how the named notes in eachdiagram are always in the sameposition relative to each other and theoverall chord shape.This brings us to the second piece of information you need in order to name the actual chord you areplaying as you move these shapes up and down the neck: the names of the notes on the fingerboard,including those beyond the fifth fret. We’ll assume here that you know how to find those notes (if not, seeour Level 1 Theory Primer) but if you are just beginning to explore the entire fingerboard, chances are thatyou don’t know them quickly enough to make use of that knowledge “on the fly”. That’s the point we’retrying to get to. In a jam setting you don’t have time to count up fret by fret from the nut to the 8th fret tofind a good G chord!
Although you can approach it from a variety of angles, there’s no real trick to learning the notes up thefingerboard. As you work on Level 2 or 3 Community Guitar material you will be playing up the neck alot, especially if you get to the second rhythm parts and solos. In the accompanying Theory and Exercisesfor these songs you’ll be invited again and again to say, sing or write the names of the notes of the musicyou’re learning. The more you do it, the more familiar the note names become in various positions, just asthey have (presumably) in open position. If you skip those exercises, however, you can pretty much counton getting lost as you move up the fingerboard. It’s your choice!The following exercise will give you a chance to combine your understanding of the root configurations ofthe five CAGED shapes with your knowledge of the notes on the fingerboard. Together, these two elementsgive you all you need in order to determine what actual chord you are playing as you move a chord shapearound the fingerboard. Since this is not a jam situation, speed is of no value or concern, so take yourtime.Exercise 3For each diagram below, name the actual note of the root configuration given the chord shape’s position on thefingerboard. In so doing, you name the root of the chord. The first diagram is provided by way of example.CA4GE77D98EEThe CAGED SequenceWe have already seen above that any one the five major chord shapes can give us any major chord simplyby moving the shape up or down the fingerboard. Here’s a related insight: any major chord can be playedfive different ways, using each of the five chord shapes. The word “CAGED” not only tells us which chordshapes we use to accomplish this, but it also gives us the order in which they occur as we move up thefingerboard.The fretboard diagram below should make clear how this works. Assume we want to play a C major chordfive different ways. We begin, of course, with the common C chord in open position. Moving up thefingerboard, the next C chord we could play would be the A shape (barred at the third fret), then the Gshape (barred at the fifth fret), and so on. Notice the order of the shapes: C-A-G-E-D.CACCG3CE5 CCCDC 810CCCCC
C shapeThe diagram to the right illustrates this point. It shows the D and Cshapes side by side on the fingerboard with their roots indicated. Thenotes with cross-hatching are shared by both chord shapes. Noticethat one of these is a root of both shapes. If your guitar is nearby,try moving back and forth between those two shapes anywhere onthe fingerboard, keeping that shared root constant as you do. Thentry putting this insight to use on the entire fingerboard by doing theexercise below.D shapeAs they succeed one another up the fingerboard there are no gaps between the five chord shapes. Rather,they fit together like pieces of a jigsaw puzzle, interlocking by means of shared notes. It will be much easierfor you to see exactly how the chord shapes fit together if you keep at least one of those shared notes inmind, namely, the root. Every root is shared by two adjacent chordshapes. So think about it—as long as the root stays constant, the shapesRyou play will give you the same chord.RRExercise 4:The two rows of fretboard diagrams below start with a common chord followed by a series of chord shapes thatare organized in the CAGED sequence, but at undetermined locations on the fretboard. Add fret numbers toeach diagram (to the right of the bar) so that every shape in the row gives you the chord that starts the row.AAGE2ADA 5AC97AAAAEFDFCA53FAAAAG8F10FFFFFFFFPartial Chord ShapesOnce you can visualize the full chord shapes all over the fingerboard, the question becomes, “OK, so whatcan I do with them?” You’ll be answering that question for as long as you play the guitar with an enquiringmind. But for starters, you can break the full chord shapes into more manageable units by selecting justa few notes from them, creating what we’ll refer to as partial chord shapes. In Level 2 and 3 CommunityGuitar arrangements we commonly use these partial shapes to create 2nd or 3rd rhythm guitar parts upthe neck. For that purpose you don’t really need the sound of a five or six-note chord, but just enough toadd something of rhythmic or harmonic interest. The next exercise will help you begin your exploration ofpartial major chord shapes.
Exercise 5To do this exercise, start by visualizing the full chord shape indicated above each pair of diagrams. If you’d like,you can pencil that shape in with very light or dotted lines. Then sketch in the partial chord shape that wouldbe created by using only the notes on the bracketed strings. (The x’s beside the bracket indicate which strings toavoid.) On the top row, you’ll map out partial chord shapes on strings 1, 2 and 3; the second row will use onlystrings 2, 3 and 4. Indicate which (if any) of the notes in the partal shape would be the root. The first diagramof each row is provided by way of example. D { E{ G{A{ {CRR D { E{ G{ A{ {C RRScale Forms Based on the Five Chord ShapesAs useful as the first few insights discussed above may be, the CAGED system will be of very limited useif you only apply it in the cookie-cutter fashion we’ve been discussing so far. To take things to the nextlevel of flexibility we need to turn our attention away from chords per se and toward their building blocks—individual notes. We’ll start with the exercise below.Exercise 6The fretboard to the right shows the 5th through 9th frets. By whatever method youchoose, sketch in all the notes of the C major scale (that is, all the notes of the musicalalphabet without sharps or flats) between the low A and high C that have beenprovided. For this exercise it will not be helpful to duplicate notes on adjacent strings,so move up to a higher string whenever possible. As a final step, shade in all the C’s inthe diagram you’ve just created so they stand out.5A7CWhen you are done with the exercise above, have a look at the answer we’ve provided at the back of thisprimer (or at your own if you’re sure it is correct). Notice the configuration of the C’s that have beenshaded in. Pop Quiz: those C’s give you the root configuration of which chord shape? If you said the Gshape, you’re right. (If you’re having trouble seeing that, you might want to review our discussion of rootconfigurations above.)
So now you can look at the notes of that root configuration in either of two ways: as the roots of a G-shapechord (as we’ve been doing up to this point), or as reoccurances of the tonic of a major scale that referencesthe G shape. No matter where you position the G shape on the fingerboard, you will now know not onlywhat chord it is, but how to play two octaves of a major scale starting on the root of that chord simply byfollowing the finger pattern you yourself outlined above.We’ll call that finger pattern the G scale form. That is different from a G scale, just as a G chord shape isdifferent from a G chord. A scale form is similar to a chord shape in that they both refer to a certain fingerpattern on the guitar. In the case of a scale form, that finger pattern gives you a series of intervals. And justas a G chord shape can give you many different major chords depending on where it is positioned on thefingerboard, so too the G scale form can give you any major scale you’d like. Prove that this is true by tryingthe next exercise.Exercise 7For this exercise there is no writing involved, just playing: position a G chord shape anywhere on the fingerboardand then use the diagram you just completed to play two octaves of the major scale that references that shape.The tonic of the scale will coincide with the root configuration of the G shape. When refering to your diagramyou’ll want to ignore the note names (for now) and simply pay attention to the finger pattern.You could do the same, of course, with the other four chord shapes as well. And so we shall, but as we dolet’s look at them in terms of scale degrees.Scale Forms and Scale DegreesThe big advantage of thinking in terms of scale forms on guitar is that although the actual notes changeas you move the reference shape up and down the fingerboard, the underlying scale form does not. Andnotice this: just as the root configuration of the chord shape is fixed, the position of every scale degree isfixed within the overall scale form. Learn the scale form in term of scale degrees and that information isgood no matter where you use it on the fingerboard. Try the following exercise to both deepen your insightinto the five scale forms and to begin getting them under your fingers.Exercise 8The diagrams below show five scale forms that reference the CAGED chord shapes. We’ve only filled in theroot/tonic of each scale form—now you fill in the rest of the scale degrees (2, 3, 4, etc.) Then begin to familiarizeyourself with the scale forms by playing them. Ascend and descend through all the notes of ea
Chords and Chord Shapes The CAGED system is based on the recognition that although there are many major chords on the neck of the guitar, there are really only