Transcription
Sketchup: Components and 3D WarehouseBy: Matthew JourdenBrighton High SchoolBrighton, MI1. Open Sketchup Pro Tutorial House Model2. Tags a. Createi. Furnitureii. Furniture Section Planesb. Turn on the followingi. Wallsii. Flooriii. Furnitureiv. Furniture Section Planesv. Doorsvi. Windows3. Style Turn Style to In Model Rendered ()4. Components Menu: Shows user objects (i.e. furniture, people, cabinets, etc.) that are defaulted or downloaded from 3DWarehouseEdit MenuFolder of ObjectsObject Categories
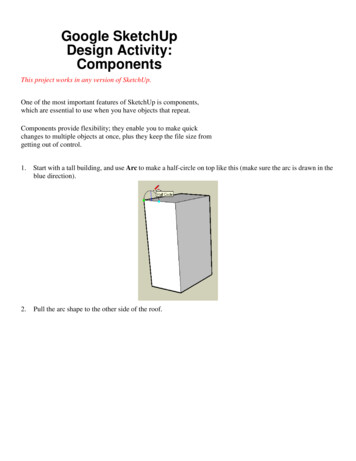
5. Create the following Cutting Planes Attach the Plane to Furniture Section PlanesNOTE: User creates section planes like these to provide context for specific area6. Insert Objecta. Select Components Menu on Right Hand Tool Barb. Select Components Sampler Folderc. Scroll to Bench Select Benchd. Move Cursor onto Workspacee. Snap Bench to the following Anchor Point of the Interior WallInterior Wall Anchor Point: PlacesObject level with the floor. User mayhave to create or rotate to a 2D viewto insure the object is level withdesired elevationf.Blue Box: Frames out the Object With Move or Rotate Icon Select User can move or rotate the object a definedmeasurement off a given point of the objecti. Move Bench1. Rotate View so Back of Bench is visible
2. Using the Move Tool Place Cursor on the Lower Back Point (Touching Floor) of the Bench closestto the Interior Wall Left Click Move Bench to the following location (Be sure to select theend/anchor point of the interior wall that intersects the exterior wall3. With Bench Selected Place Object on Furniture Tag select Icon in the Entity Info so the objectcannot be accidently moved (NOTE: Object will appear RED when selected to show it is a lockeditem)Select Lock
7. Create the following Cutting Planes Attach the Plane to Furniture Section PlanesNOTE: User creates section planes like these to provide context for specific area8. If not showing Add 3D Warehouse Menu to Menu Bara. Place mouse in the top menu area in grey area Right Mouse Button Select WarehouseRight Click in Grey AreaSelect Warehouse
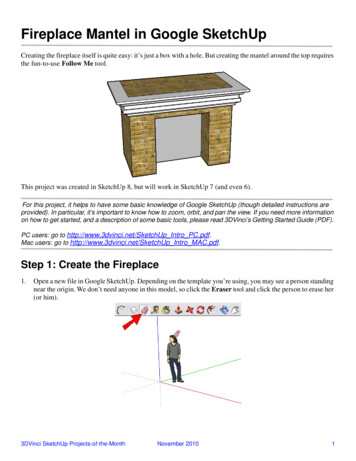
9. Warehouse IconsLayoutOpens 3D WarehouseExtension Warehousea. 3D Warehouse: Allows user to select objects (furniture, cabinets, appliances, people, etc.) complete the houseLayoutb. Extension Warehouse: Allows 3rd party developers to develop applications to better improve the workenvironment in Sketchup Pro. NOTE: some apps are free and others cost a subscription/purchase10. Select 3D Warehouse Icon NOTE: Sketchup Pro may ask user to sign in: Use School Credentials (brightonk12.com emailaddress and assigned password) Pop Menu will AppearSearch Menu and CategoriesUser can upload their owncreated models to the 3DWarehouse library
11. Search Wall CabinetProducts: ShowsIndividual Modelscreated bycompaniesModels: Usercreated ObjectsCollections: Provides multipleModels in one download(I.E Set of Kitchen Cabinets)Catalogs: Companycatalog of ProductsDownload toComputer12. Select 3rd Result: Bayside Cabinet Provides file information about the product/model
13. Select Download a. Note: May have to answer a few survey questionsi. Country: United Statesii. Industry: Education – Studentiii. Language: Englishiv. Select any interestsb. NOTE May have to select Download a 2nd Time Pop-Menu select Yesc. Model is Loaded into Model Left Click to Place Outside of the modeld. Select the Rotate Iconi. Place Cursor on the Top Corner with the Protractor turning Blue Left Click to Select
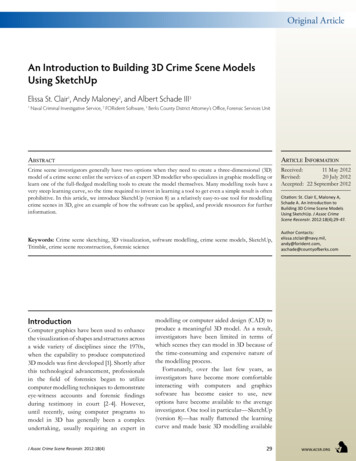
ii. Select Base Line to Rotate Around (Place Cursor Along the Following Back Edge) Left Click to Selectiii. Move Cursor Thru Quadrant 4 towards the 270 Degree Mark Type 90 Press EnterNote: Object may disappear because of the cutting plane lines. Turn off Cutting Planes object will reappear Move Object so it is not included in the cutting plane areaObject Going to theside of the cuttingplane that is removingmaterial. Turn offCutting Planes to showobject fullyMove Cursor intoQuadrant 4towards the 270Degree Markiv. Move the Cabinet so the Bottom Corner of the L is flush with the floor and the intersection of the exteriorand interior walls.
v. Moving Height of Cabinet1. Select Cabinet2. Select Move Tool3. Select one of the points of the cabinet that is touching the FloorSelect a point of the cabinet that istouching the floorvi. Move Cursor Vertical (Blue Axis) Type 4’4” (Common Height for Wall Kitchen Cabinets (3’ for BaseCabinet 1’4” Between Counter and Bottom of Wall Cabinet) Press Entervii. Place Cabinet on Tag: Furniture Lock Model
viii. Component Menu will Add Model to the In Model OptionAssignment: Add minimum of 3 Objects to the Tutorial House.Objects1. Must be in their Natural height (i.e. people at floor level; small appliances on a desk orcountertop, etc.2. 1 Object must be off the ground level.3. Apply a color/material to 2 of 5 objects placed (Note: if color applied to kitchen cabinet(default white) user will need to unlock the cabinet from the entities menu before applyingcolor/material)Submission: Show Mr Jourden final Placement of Objects. (If remote email Mr Jourden the SketchupPro File as an attachment or upload file to Google Drive and Share to jourdem@brightonk12.com)
Layout b. Extension Warehouse: Allows 3rd party developers to develop applications to better improve the work environment in Sketchup Pro. NOTE: some apps are free and others cost a subscription/purchase 10. Select 3D Warehouse Icon NOTE: Sketchup Pro may ask user to sign in: Use School Credentials (brightonk12.com email