Transcription
Part 1How to Use dForce: Creating a Blanket,Draping Clothes on Furniture and Much MoreCopyright 2017-18 by Rich Schafermeyer(RGcincy on Daz Forums)This is a summation of learnings made while trying out Daz Studio’s new dForce. These do not involve drapingclothes on figures but rather on other ways you can use dForce (such as draping blankets and towels or drapingclothing on furniture and other clothing). Because of their simplicity, some of the elements made fromprimitives are helpful in illustrating what the various dForce global and surface parameters will 18.19.20.21.22.23.24.25.Creating and Draping a Blanket Over a FiguredForce Global Environment and Duration Settings (Gravity, Air Resistance, Stabilization Time)Cast Off BlanketAdding a Smoothing ModifierUsing dForce Surface Smoothing Settings (Velocity Smoothing and Velocity Smoothing Iterations)Draping Clothes on FurnitureFrictionCreating a Clothes PileVarious Methods to Correct Poke Through (including Push Modifiers)Getting a Figure’s Head to Sink into a PillowHanging Towel (introduces use of dForce influence weight map)Wind NodedForce Surface Parameter TestsCreating a Foot StoolAnimated Posing for the Foot StoolHead Scarf and Telephone WiresCreating Blowing CurtainsCreating a Tablecloth and NapkinExploring Influence Weight MapsShort-cut Key to Clear Simulation on Selected Item(s)Dropped PapersBanner FlagEffect of Surface Properties Using Simple Sheet Drop – Part 1Effect of Surface Properties Using Simple Sheet Drop – Part 2Effect of Surface Properties Using dForce Primitive Flag TestContinues in Part 2
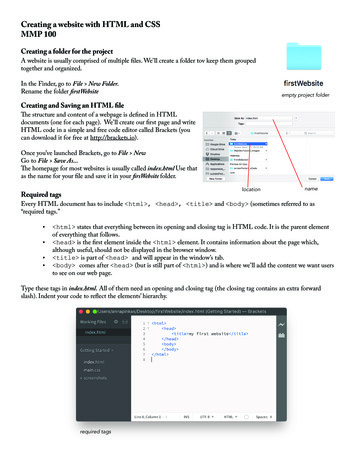
1. Creating and Draping a Blanket Over a Figure. Back in June I posted a tutorial on using a push modifier tocreate a blanket to cover a reclining figure (see How to Use a Push Modifier: Creating a Blanket). Although itworks, the push modifier approach has a number of issues: (1) it's fairly labor intensive, (2) the results relyon the skill of the artist, (3) the artist has to interpret how gravity and cloth properties affect the draping,and (4) it grows the polygons of the mesh so that the edges of the blanket do not pull in as they naturallywould.With the new dForce simulator available, I decided to revisit the idea of a simple blanket. The defaultsettings of dForce didn’t give a good result but a few simple parameter changes make it work well.Below Left: Here’s a render of the final dForce result. Below Right: The result from using a push modifier.You can see that the physics of dForce give a more realistic result.Below Left: dForce gives more natural draping of the blanket. Instead of the mesh polygons growing, theedges of the blankets pull in and all of the polygons remain square. Below Right: Using a Push Modifier, thepolygons above the figure have stretched to become rectangular and the edges of the blanket remainextended and do not pull in as a real blanket would do:
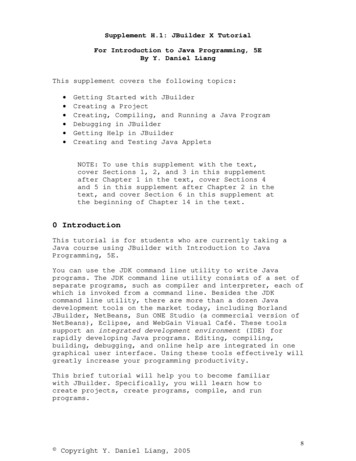
a. I used the bed from Modern Room Bedroom. It comes with a blanket at the foot of the bed and twopillows (combined as one prop) at the head of the bed. The actor is G3F in a sleeping pose on her sidewith her left arm tucked behind her head.b. Create a flat plane by going to the main menu and selecting Create/New Primitive and set the primaryaxis to Y-positive, size to 5 feet, and divisions to 100.c. Resize the plane to a Scale of 120%, X-Scale of110% and Y-Scale of 105%. Position it above thesleeping figure (I used a Y-translate value of 97.3)and move it down the bed so the upper end isover the shoulders and not the face of thereclining figure. Add whatever material or fabricshader you'd like to the plane.Right: flat plane hovering over figure and bedd. Add a dForce modifier tothe plane. Select the planein the Scene Tab, thenfrom the main menu selectEdit/Object/Geometry/AdddForce Modifier: DynamicSurface. This will allow theplane to be modifiedduring the simulation.
e. To start a simulation, click on the Simulate button at the upper right of the Simulation Settings pane. Ifthe dForce pane is not already open, go to Window/Panes (tabs) and select Simulation Settings.f.Using the default settings, the simulation will start bymoving the figure to the vertical T pose with the headprojecting through the blanket. As the simulationprogresses and the figure’s pose is transformed to thereclining pose, it will wrap the blanket around the figure,not drape it over the top as desired.g. In the Simulation Settings pane, click on the Editor tab at the top then click on Simulation/Initialization.Set Start Bones From Memorized Pose to Off. This skips the step of starting from the T-pose and lets theblanket drape over the figure.Right: a render of the final result from just this onechange. If you wanted, you could stop here.
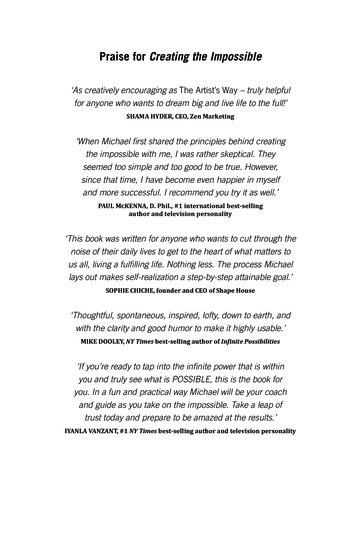
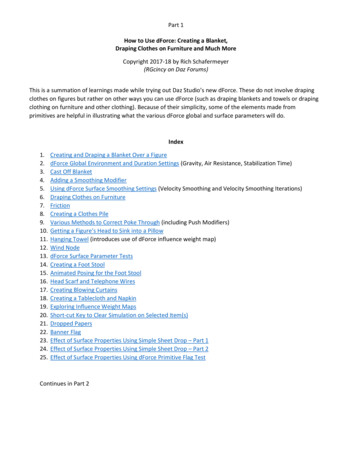
2. dForce Global Environment and Duration Settings. Notice that the blanket in the image in 1.g drapes nicelyover the figure but lays very flat on the mattress around her. Changing some other dForce parameters canadd character to those flat regions. The following shows how changing Gravity, Air Resistance, andStabilization Time affect draping.a. Gravity. The default setting is 1. Here are the results at 0.5, 1.0, and 1.5. Air Resistance and StabilizationTime are set to the default settings of 0.15 and 1.0 respectively. Top Left Image Below: With 0.5 gravityand a Stabilization Time of 1, the far left edge of the blanket does not drop down and wrap around themattress as it should. This means there was not enough time for it to settle.0.5 Gravity1.5 Gravity1.0 Gravity
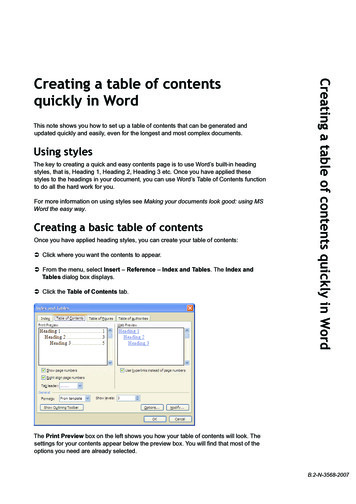
b. Stabilization Time. The default setting is 1. If setlower, the simulation will not last as long and you willget a looser draping. In the image, the time is set to0.5 with Gravity at its default value of 1. Becausethere is less time, the parts of the blanket extendingpast the mattress remain suspended unrealistically inmid-air.By raising gravity to 1.5 and leaving Stabilization Timeat 0.5, the edges of the blanket will drape over themattress edge but note that the higher gravity causesthe blanket to drape closer to the figure than at thedefault Stabilization Time of 1.0.c. Air Resistance. The default setting is 0.15. When sethigher, there is an upward force countering thedownward force of gravity. With Air Resistance set to0.6 and Gravity at the default value of 1, the blanketwill hover in mid-air as seen in the image at the right.
At the same air resistance of 0.6, increaseStabilization Time to 2 and the blanket will drape ontothe figure as seen in the image at the right.Two things to notice in the image at the right. First,compared to the default settings, there are moreridges in the blanket in the areas that were flatagainst the blanket before (desired). Second, the leftedge of the blanket is not fully laid down (undesired).To correct, increase Gravity slightly to 1.1 and you getthis result:The settings for the final render shown at right are: Start Bones From Memorized Pose set to OffGravity set to 1.1Air Resistance set to 0.6Stabilization Time set to 2
d. Negative Air Resistance. Decreasing Air Resistance below zero has an interesting effect. It causes abillowing during the simulation which results in the blanket being pulled in more tightly to the front ofthe figure (as if it was cold and someone grabbed the blanket to snuggle in tight). Increase Gravity to 2to counter the lower air resistance and set Stabilization Time to 2 to give it enough time to settle.Air -0.10Air -0.25:I did not change the starting Z-Translate at first so the result is that the blanket gets pulled off theshoulders. By moving the blanket further over the head, it wraps around the shoulders and keeps themcovered as shown below.Air -0.25 Z-Translate:
3. Cast Off Blanket. In this section, removing the figure and setting the blanket at an angle allows it to fall as ifsomeone cast it off when getting out of bed.a. Rotate the plane around the X and Y axis so a point is aimed at the lower left part of the mattress. Usetrial and error to move it around, as if too close to the corner the blanket slides mostly off the bed. Iused default Gravity and Air Resistance and a Stabilization Time of 2 so there was enough time to settle.Side View:Top View:b. Using default Gravity and Air Resistance with aStabilization Time of 2 so there is enough time tosettle, after simulation you get:4. Adding a Smoothing Modifier. You'll note that there's some jaggedness to the ridges in the image above. Toremove, add a Smoothing Modifier. Select the blanket in the Scene pane, then go to the main menu andselect Edit/Object/Geometry/Add Smoothing Modifier.
Go to the Parameters pane and set Smoothing Iterations to 6 and Collision Iterations to 2.A finished render of the smoothed and tossed aside blanket:
5. Using dForce Surface Smoothing Settings. In step 3.c I added a smoothing modifier after the simulation toremove jaggedness along some of the ridges in the blanket. The Simulation Surfaces tab offers a smoothingoption as well. It differs from the smoothing modifier in that it is applied as the simulation occurs, so itaffects the simulation results.a. Select the surface of the blanket and go to the Surfaces pane. Then select the Simulation Tab. For now,we are only changing the Velocity Smoothing and Velocity Smoothing Iterations parameters. Gravity andAir Resistance are at default values and Stabilization Time is 2.b. The result using the default values for VelocitySmoothing (a value of 0). You can see the jaggednessin the texture in the lower middle.
The result after setting Velocity Smoothing to 0.1 andVelocity Smoothing Iterations to 1. Notice that thereis no jaggedness but the blanket is not as gathered.Increasing Velocity Smoothing to 0.25 spreads it outeven more:And at 0.5 even more:
At a value of 1, the blanket is hardly gathered:c. To test changes to Velocity Smoothing Iterations,here’s the image again for Velocity Smoothing of 0.25and Iterations 1:At iterations 2:
At iterations 3:As you can see from this image series, increasing theVelocity Smoothing value or increasing the number ofVelocity Smoothing Iterations will spread the blanketout. You can get it almost flat with just a bit of foldingby setting Velocity Smoothing to 0.5 and VelocitySmoothing Iterations to 3:6. Draping Clothes on Furniture. There’s only occasional use for a cast off blanket like in step 3, but the sameidea can be applied to clothing items which are frequently found thrown about on beds, chairs, floors andother spots in a scene.a. Load the shirt from 70's Gym Uniform for Genesis 3 Females and add a striped shader to better showthe folding of the item. Position it at an angle over the bed and run the simulation using the defaultdForce parameters except turn off Start Bones from Memorized Pose.(Note that the left image is from the viewport and the right is a render. Same shader but for somereason two looks.)
Starting position:After Simulation:b. Move the starting position so part of the shirt extendsbeyond the mattress. It will now fold over themattress (right):c. Replace the bed with a chair from The Chair Collectionso the shirt drapes over the corner (below).
d. Using a different chair from Simple Living - LivingRoom:e. A lot of clothing causes crashes – the screen goes black and Daz Studio closes. The shirt used above didnot cause a crash when over the bed. It had one crash when using the first chair and several when usingthe second chair. At this time, it’s not always clear what it is about a clothing item or it’s interaction withother props that causes a crash. Switch to another item or reposition it slightly and try again. Be sure tomake lots of saves before running a simulation on a new setup.f.You’ll find that using various clothing items is hit or miss.Some work, others don’t. One shirt even flew up into thesky. I did try an experiment with a shirt (Everyday CasualOutfit for Genesis 3 Males) that caused a crash everytime. I exported it as an object then reimported it. I wasthen able to drape the shirt over a chair without a crash.To get the arms to hang straight, increase StabilizationTime to 1.5 otherwise they remain curved in space. Seethe result at the right.Exporting as an object doesn’t work for every clothingitem that causes crashing but it can help on some.g. Below is another example of clothing draping on a chair. This uses the t-shirt, pants, and boots from AirDefender for Genesis 2 Males. This clothing simulates without crashing.
7. Friction. Friction is an obvious parameter to test as some fabric have low values (silk) while others have highvalues (coarse wool). When two objects interact, there are two frictions to consider: that of the item beingsimulated (which has a dynamic surface) and that of the item being collided with (which has a staticsurface).a. The static surface will use default values unless you add a static modifier. Select the item in the Scenepane and then go to the main menu and choose Edit/Object/Geometry/Add dForce Modifier: StaticSurface. Friction is one of the few values you can adjust on a static surface. In the following series ofimages, the amount of friction for the blanket and the mattress is varied to show how it affects theresult.b. The starting point for the blanket was the same asused in section 3. At the right is the result when usingthe default friction values of 0.4 for blanket andmattress:
c. Blanket friction of 0.4 (default) and mattress friction of0.1 (silk or satin sheet). More of the blanket has slid offthe bed:d. Blanket friction of 0.1 and mattress friction of 0.1. Theblanket has slid further off the mattress:e. Blanket friction of 0.01 and mattress friction of 0.01.Whoops! The blanket slides all the way off:
f.Blanket friction of 0.6 (higher than default) and mattressfriction 0.4 (default). There’s little change from the resultusing the default values shown in 7.b above:g. Blanket friction of 0.8 and mattress friction of 0.4. Only aslight change:h. Blanket friction of 1.0 and mattress friction of 1.0 haslittle additional effect. The lower left corner of theblanket stays about where it landed instead of slidingalong the blanket:i.Based on these results, lowering friction below thedefault of 0.4 had a large effect whereas higher valuesdid not change much at all.
8. Creating a Clothes Pile. Section 6 showed clothes being draped over furniture. The items of clothinginteracted with either the bed or the chair but not with any other clothing item. In this section we’ll discussstacking clothing on top of other clothing.a. Since many clothes can cause a crash, make sure to save your last working simulation so you can quicklyget back to it. This is not as important if you already know that each clothing item will simulatesuccessfully.b. In this section, Start Bones from Memorized Pose is turned Off.c. I started with the Air Defender shirt, pants and bootsshown in step 6.g above. The shirt was positionedhorizontally halfway over the chair’s back. The pantswere positioned horizontally halfway over the chair’sseat. The boots were just set on the floor AFTER thepants were simulated (otherwise the pants leg wouldcatch on the boots). See image at Right.d. After running the simulation, select the pants andshirts in the Scene pane. Go to the Parameters pane,select Simulation, and turn Freeze Simulation to On.Now when you run the Simulation, these two itemswill be frozen in their simulated state and will notparticipate in future simulations, so a new clothingitem can be draped over the already simulated forms.Be sure to save your scene so you can go back to it if any added clothing item causes a crash.e. Next simulate the shirt from 70’s Gym Uniform that was used in 6.a. Position this to overlap the pantson the chair and one of the boots so it will hang on the boot top. After simulation, turn FreezeSimulation to On for this item.
f.Next use the Leotard for Genesis 3 Females to overlaythe pants, the gym shirt, and the corner of the chair.After simulation, turn Freeze Simulation to On for thisitem.The result after doing steps c-f is shown at the right.g. After doing the above, I thought it would look nice to render some socks stuffed into the boots. Thistakes some rework as the gym shirt is covering one of the boot holes. The socks are from Uniform Dressfor Genesis 3 Females.h. Hide the gym shirt by clicking on the eye in the Scenes pane. This keeps if from participating in thesimulations and interfering with the socks. If the socks don’t fully line up with the boots, move the legbone of the one of the socks side-to-side so both socks are over an opening. Also, bend the ankle of thesocks so the toes point down, otherwise they’ll end up just laying over or sliding off the boots.After simulation, turn Freeze Simulation to On for the socks.
i.Since the gym shirt covered the boots, and now the socks do as well, the gym shirt needs to be resimulated. Hide the leotard since it overlays the gym shirt. Then turn Freeze Simulation to Off for thegym shirt and re-run the Simulation. Afterwards, turn Freeze Simulation back to On.j.Repeat step i for the leotard since it overlays the gym shirt.k. Steps g-j would not have been needed if I haddone everything in order at the start, butsince I decided to insert the socks, it turnedinto a good demonstration of how you canplace an item in between already simulateditems.At the right is a render of the final stack ofclothing:l.The image at the right shows the starting position of thevarious clothing items. You could simulate them all at oncefrom this setup but the boots would catch the pants legs andthe pants legs would block one of the socks from going intothe boots. I find it easier to do each item one by one, freezingthe simulation for each item as I go. This way I can also makeadjustments if they don’t drape quite the way I like them.m. When simulating multiple items, you may be tempted to clickon the Clear button on the Simulation Settings pane. Don’t!!This clears ALL objects and you’ll end up with what is shownat the right.
If you want to clear just a single item to change its positions, select the item(s) in the Scene pane, thenleft-click on the Simulation Settings sub-menu (the stacked lines icon in an upper corner) and choosedForce and then Clear dForce Simulation from Selected Item(s).9. Various Methods to Correct Poke Through. One thing I’ve noticed with the clothes draping on furniture isthere can be poke through of the furniture (in the image series below, it's the red color of the chair showingthrough the green shirt). There are several ways to remove or minimize poke through.a. Make SMALL changes in X, Y, and Z translate. Small means 0.1 to 0.3 units. For this image, the t-shirt wasraised by 0.3 on the Y axis and -0.1 on the X axis. This typically does not remove all the poke throughbut will take care of much of it. Sometimes you can hide most of it on the side opposite from thecamera. You don’t need or want to make big changes as it can make the draping look off.Before with poke through:After X and Y changes:
b. Change the pose, again by small increments. The clothes have bones that you can bend, twist, or moveside-by-side. This is harder than changing XYZ position as its trial and error and you may not find theright combination that helps.c. Counter-intuitively, use Good instead of Best or Better Collision Mode. (I don’t know how often thishelps, but with Best you see a sharper crease in the clothing against the chair edges and that’s wherepoke through most often occurs).d. Change the Collision Iterations to 10 (using Best CollisonMode). This parameter affects self-collision but alsohelped with the chair collision, possibly by changing howthe shirt interacts with itself.
e. Change the Collision Offset. The default value is 0.2which gives the poke through shown in the first image ofstep 9.a. The image at the right shows Collision Offset setto 0.5 which causes less poke through.At Collision Offset of 0.75 there is very little poke throughbut now the t-shirt does not fully hang down. LongerStabilization Times do not get it to lie flat. See image atright.At Collision Offset of 1.0, the shirt falls completely off the top of the chair (not shown).
f.If you can’t hide the poke through by doing any of the above, you can add a push modifier. I won’t gointo details here as they are covered in another of my tutorials (How to Use a Push Modifier) but pushmodifiers can be added to an object after it’s been simulated. I used a value of 0.5 to minimize howmuch offset was being added. I also painted the least amount of push I could get away with.Push Modifier weight map I used:Top View with Push Modifier applied:Front View without Push Modifier:Front View with Push Modifier:As you can see, the poke through on the upper left chair corner is gone and there is little difference inthe overall draping.
10. Getting a Figure’s Head to Sink into a Pillow. When I did the blanket at the beginning, I did not bother withthe pillows. The pillows with the Modern Room Bedroom already have a slight depression built in. I also hadadded a Push Modifier in a previous tutorial and that was still in effect in all the bed images I've shown. Inthis section I discuss how to simulate these pillows so the figure sinks into them.a. Here’s what the pillows look like as loaded into DazStudio:b. If you simulate with default gravity ( 1.0), the pillowsflatten out as they collapse like a burst balloon:c. If you simulate with negative gravity (-1.0), the pillowsplump up:
d. To get the pillows to plump when the figure collideswith them, use a negative value like -0.5:Be sure to have the figure’s upper chest, arm and headslightly raised from the mattress, otherwise thesimulation will drive the pillow down into the mattress.e. I thought the pillow didn’t plump up enough just underthe figure’s arm pit and arm. You can puff up the pillowa bit more by setting the surface parameterContraction-Expansion Ratio to 105% (default is 100%).I found at 110% the mesh blew up.f.You can also add sub-division. It helps give a bit morecomplexity to the pillow but adds significantly to thesimulation time (you can export the pillow with subDon and reimport as an obj to speed things up). Here isthe result and you can see there’s not much difference:
g. Using the 105% setting for ContractionExpansion Ratio and adding back the blanket,here is the finished blanket and pillow combo.If I were to do anything else, I’d add a PushModifer and paint some slight puffing aroundthe arm.11. Hanging Towel. In this section we’ll create a towel and drape it from a clothes line with clothes pins. Thissection introduces the concept of weight maps. In the next section we’ll add wind.a. I used a laundry dryer and clothes pins from Laundry Day Mega Set. Place two pins on one of theupper lines. If you don’t have this set, you can use a long, narrow primitive cylinder and some cubesinstead.b. Create a flat plane by going to the main menu and selecting Create/New Primitive Set the primaryaxis to Z-positive, size to 3 feet, and divisions to 100. Scale X-axis to 55% so it’s a rectangle.c. Position the towel so the upper edge is inside the twoclothes pins. The towel needs to touch the pins innersurface, otherwise it will fall to the ground.
d. If you simulate now, you will see most of the towelfalling with just a few polygons attached to the pins andstretching way out. Sometimes the polygons will holdand the towel will be held by tiny strands as shownbelow. Other times the strands will break and the towelwill fall to the ground.e. To keep the towel in place under the pins, you need to add adForce weight node and weight map. Select the towel in theScene pane, then from the main menu select Create/NewdForce Modifier Weight Node:Afterwards you will see it parented to the plane in the Scenepane:
f.With the weight node selected in the Scenepane, go to the Tool Settings pane and fromthe drop down menu at the top select NodeWeight Map Brush.g. Next you need to add the weightmap. On the Tool Settings pane, inthe middle of the pane, check thatdForce Simulation::Influence Weightsis showing and click on Add Map.You will now see a map listed(Influence Weights):In the viewport, the plane (towel) will turn solid red. A red color means that area of the map has a valueof 1 and that area will participate fully in the simulation.
h. When the Weight Map tool is in use, you will see apaint brush with two concentric circles. Move itaround and it will add weight (add color) to the map.In this case, you won’t see any added color because italready fully red.Hold down the Alt key and the brush removes weight(color). How much it removes depends upon the sizeof the circles and the Sensitivity slider setting. A bluecolor means those areas will still participate in thesimulation but at a much lesser or slower rate. A grayvalue means it won’t be affected at all. The mapbelow shows the small area that has been modified:gray right around the clothes pin with a little bluesurrounding it. The influence is on the vertices, so ifyou have too few polygons, you have to paint over alarger area.In the image at the right, you will see two small areasof blue at the top of the plane just around the clothespins. Those are areas where red was removed so theyare either not involved (no color) or less involved(blues and yellows) in the simulation.
i.Now when you simulate, the area of the towel under theclothes pins will be held in place and the rest will drapeunder the influence of gravity.A finished render of the towel:
12. Wind! You can add a wind node to give a slight nudge or a heavy blast to your items. To start, I’ll describethe basics of the wind node.a. To add the node, go to the main menu and select Create/New dForce WindNode b. The wind node is not parented to anything and loads at world center onthe ground. When selected, it can be hard to see against a whitebackground, so I set the background to a dark gray.c. You’ll see that the node looks just like a fan blowing down a tube. It has along cylinder surrounded by three perpendicular circle pairs:
d. This shows the wind parameters:e. The inner circles representDiameter. This image shows alarger diameter than in thedefault view.f.The outer circles represent Diameter Falloff. What thismeans is the wind is at constant and full strengthacross the area of the inner circle. It then falls to zeroas it reaches the outer circle. In this image you can seea much large distance between the inner and outercircles than in the default view.
g. The first circle pair near thefan is where the wind starts. Itremains at full strength untilyou reach the middle circlepair. It then falloffs to zero atthe circle pair opposite thefan. This image shows alonger Falloff Start that thedefault view, which means alonger full strength windregion.h. This shows a shorter Fallofflength which means thewinds dies off more rapidly:i.To use the fan, position it to blow on thetowel. A watch out is if you blow the toweltowards these clothes lines, the mesh blowsup or Daz Studio crashes because ofinteraction between the towel and the prop.To avoid, I set it to blow the towel away fromthe dryer rack.In the top view at the right, note that I havethe towel (located at the bottom of theimage) in the falloff zone. The fan blows hardeven though set to the default 5 mph and thetowel will whip around and crash Daz Studio ifit’s in the full-strength region.j.This image shows a front view so you can seehow the wind node is positioned. Note that Ionly have the lower portion of the towelbeing impacted by wind.
k. A comparison of the simulated towel without wind (left) and with wind (right):l.For this next case, I increased the windDiameter and moved the node closer to thetowel. I also decreased Strength to 0.2 mph(as 5 is just too intense).Here you can see the wind caused the towelto pull in on itself more than the previoussettings:
13. dForce Surface Parameter Tests. To test out the influence of various surface parameters, I've created a testrig of five towels having the same influence weight map as I used in 11 and 12 above. This map has twosmall areas where the clothes pin hold the towel. Note that once you have the influence weight map, you nolonger actually need any pins or clothesline, the towel will be held in mid-space as these upcoming imagesshow. Default values are used unless noted in the description.a. Dynamic Strength. After Friction, this is the next surface parameter in the Simulation tab on the Surfacespane. This parameter is meant to be applied to accessories like belts, buckles, buttons, etc. to keep themfrom distorting. A value of 1 allows the vertices to move freely and a value of 0 stops all movement.Intermediate values suppress movement but I have found it acts quickly. The image below shows 5towels. From left to right:1. 1.0 (default)2. 0.963. 0.924. 0.885. 0.84As you can see, by 0.88, most of the draping has been suppressed. At 0.8 (not shown) it all is.The above image doesn't show much since it was draped vertically with gravity alone. The next imagehas wind applied. As you can see, there's a lot more variation on towels 4 and 5 then what shows withthe vertical draping. Since the folds that form in towel 1-3 are mostly suppressed, you wouldn't want touse these levels of dynamic strength for a towel, but you may want to for a piece of paper that wascrumpled and then unfolded. If you take the Dynamic Strength down to 0.25 (not shown), the towelends up flat and smooth.
b. Stretch Stiffness. The higher the value, the less a mesh will stretch. In the following image, from left toright, values are:1. 1.02. 0.8 (default)3. 0.64. 0.45. 0.2less stretchmore stretchWithout wind, the biggest changes are found in the lower corners, where there are fewer vertical folds,and along the lower center whe
1. Creating and Draping a Blanket Over a Figure. Back in June I posted a tutorial on using a push modifier to create a blanket to cover a reclining figure (see How to Use a Push Modifier: Creating a Blanket).