Transcription
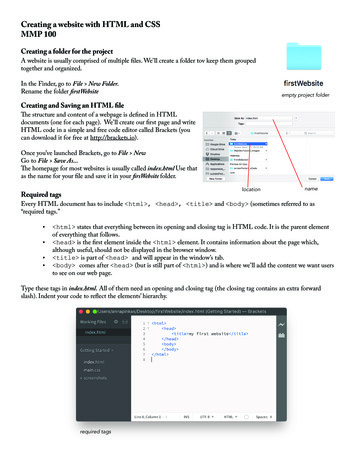
Creating a website with HTML and CSSMMP 100Creating a folder for the projectA website is usually comprised of multiple files. We’ll create a folder tov keep them groupedtogether and organized.In the Finder, go to File New Folder.Rename the folder firstWebsiteempty project folderCreating and Saving an HTML fileThe structure and content of a webpage is defined in HTMLdocuments (one for each page). We’ll create our first page and writeHTML code in a simple and free code editor called Brackets (youcan download it for free at http://brackets.io).Once you’ve launched Brackets, go to File NewGo to File Save As.The homepage for most websites is usually called index.html Use thatas the name for your file and save it in your firsWebsite folder.locationRequired tagsnameEvery HTML document has to include html , head , title and body (sometimes referred to as“required tags.” html states that everything between its opening and closing tag is HTML code. It is the parent elementof everything that follows. head is the first element inside the html element. It contains information about the page which,although useful, should not be displayed in the browser window. title is part of head and will appear in the window’s tab. body comes after head (but is still part of html ) and is where we’ll add the content we want usersto see on our web page.Type these tags in index.html. All of them need an opening and closing tag (the closing tag contains an extra forwardslash). Indent your code to reflect the elements’ hierarchy.required tags
SavingGet in the habit of frequently saving your changes as you progress by hitting Cmd S on your keyboard to avoid loosingyour work if the program crashes and to make sure you are previewing your latest version (see live preview below)ContentIf we were to open our file in a browser at this point it would be empty (except for the title displayed in the tab). We’ll adda main header and a paragraph inside our body element.main header and paragraph.Live previewAt this point, we should pause and check how our page looks in the browser. You can easily preview a page in Brackets byclicking on the Live Preview icon on the right.The preview will only display the latest saved changes. If you are not seeing some of your content, save your page in itscurrent state (Cmd S). If your file contains unsaved changes, a little dot will appear to the left of it.When open, the live preview window will automatically update as you change and save your code.dot indicating unsaved changeslive preview iconlive preview window
Finding and storing imagesMost websites have dozens if not hundreds of images. In order to keep yourproject folder organized, it is best to create an images subfolder.Find your firstWebsite folder. Double-click on it to open it.Go to File New Folder.Name the folder images.This is where you’ll save all your images for the site.Adding an imageFind an image you’d like to use (it could be one you’ve created or one you findon search.creativecommons.org)and save it in your images subfolder,main folder with images subfolderWe’ll use the img tag to display it on our site. This element is a bit different from those we’ve used up to this point: It does not have a separate closing tag. (just a forward slash before the closing bracket). It has 3 attributes (additional information needed for it to work properly). src: where the image is located. Include the name of the subfolder followed by a slash and the name ofthe image. alt: a short description in case the image can’t be displayed and for visually impaired users. width (or height): determines the size of the image (only use width or height or you risk distortingyour image).Attributes are always followed by an equal sign and their value is placed inside quotes.Add the img tag after the paragraph.image elementSave your file (Cmd S). You should now see theimage in the live preview window.live preview with image
AttributionIf the image is licensed under a creative commons license, you must credit its author. Although there is no single “correct”way to do this, you should try to include as much information as possible.With Flickr you can easily find the title, author name and license number for the image. If none of this information isavailable include at least the original URL. Add that information in a paragraph under the image.paragraph for attributionAdding another pageMost websites are comprised of multiple pages that are interconnected. Let’s add a gallery page to our project.Go to File NewGo to File Save As.Name your file gallery.html and save it in your firstWebsite folder (at the same level as your index.html file).We’ll just add the required tags and a paragarph for now.Save your file (Cmd S) and click on the Live Preview icon.gallery page in the editorgallery page in the live preview window
Linking two pagesWe currently have two pages, but no way of navigating from one to the other seamlessly. To do so, we’ll have to add a link( a tag) on both pages. This element also requires an attribute: href: gives the name of the file we are tryign to access. This could be a file you’ve created yourself (as in thisexample) or a completely separate website, in which case you would include the full URL (i.e: “https://www.nytimes.com”)Go to your index.html file, add the link below your image (or atribution), and save (Cmd S).link from the home to the gallery pageDo the same on your gallery page.link from the gallery to the home pageOnce you’ve saved both files, you should be able to go back and forths between the two pages by clicking on the links inthe live preview.link to gallery page
Creating and saving an external CSS fileThe structure and content we’ve created with HTMLcan be styled with CSS (i.e: change the color of thetext or the background, the font-family, the font-sizeetc.).There are several ways of adding CSS to HTMlL butthe most efficient is addign an external CSS file toyour project folder and linking it to the HTML files.This will allow you to write the rules only once andapply them to all the pages on your website.In Brackets, go to File NewGo to File Save As.Name the file styles.css and save it in the firstWebsitefolder, at the same level as the HTML files.the content of the firstWebsite folder at this pointChanging the color of the main headerEvery CSS rule is made of two parts: selector: the HTML element the rule is being applied to declaration: the property and value being applied. It is surrounded by curly brackets, a colon separates theproperty and its value, and ends with a semi-colon.Notice that there are no required tags on the CSS file.Save the file (Cmd S).selectordeclarationYou cannot live preview a CSS file (a CSS file cannotwork by itself, it should always be attached to anHTML file).Linking the HTML and CSS filesIf we were to live preview the index or gallery page at this point, we would see no difference. That’s because we haven’tgiven these files a way to access the CSS file yet. To do so, we will use the link tag inside of head . This elementrequires 3 attributes: href: location and name of the CSS file. rel: the relationship of the linked file to the current one (this will always be set to “stylesheet”). type: the language in which the linked file is written (this will always be set to “text/css”).link elementOnce you save the file, you should see the main header change color on the home page.Now, you can simply copy and paste this link element in the head of the gallery page. If you don’t do this, thegallery page will not know where to find the CSS rules.
Changing the background colorThe css rule for the main header only applies to the index.html file because the gallery page doesn’t have an h1 .Let’s create a rule that will apply to both pages: changing the background color. The selector should be the entire browserwindow (body). This new rule can be added right under the first one.css filehome page with cssOther elements and propertiesThere are many other HTML elements and CSS properties you can use in your project. W3 Schools is a reliable resource. List of all HTML elements: https://www.w3schools.com/html/html elements.asp List of all CSS properties: https://www.w3schools.com/cssref/tutorial by prof. anna pinkas (2017)
Creating a website with HTML and CSS MMP 100 A website is usually comprised of multiple files. We'll create a folder tov keep them grouped together and organized. In the Finder, go to File New Folder. Rename the folder firstWebsite Creating a folder for the project empty project folder Creating and Saving an HTML file