Transcription
USER GUIDECountess II FL Automated Cell CounterFor fluorescence and brightfield applicationsCatalog Number AMQAF1000Publication Number MAN0010644Revision C.0For Research Use Only. Not for use in diagnostic procedures.
Information in this document is subject to change without notice.DISCLAIMERTO THE EXTENT ALLOWED BY LAW, LIFE TECHNOLOGIES AND/OR ITS AFFILIATE(S) WILL NOT BE LIABLEFOR SPECIAL, INCIDENTAL, INDIRECT, PUNITIVE, MULTIPLE OR CONSEQUENTIAL DAMAGES INCONNECTION WITH OR ARISING FROM THIS DOCUMENT, INCLUDING YOUR USE OF IT.Important Licensing InformationThese products may be covered by one or more Limited Use Label Licenses. By use of these products, youaccept the terms and conditions of all applicable Limited Use Label Licenses. 2015 Thermo Fisher Scientific Inc. All rights reserved. All trademarks are the property of Thermo FisherScientific and its subsidiaries unless otherwise specified.Cy is a registered trademark of GE Healthcare UK Limited.ii
ContentsAbout this guide . 31. Product information . 5Product contents . 5Product description . 6Instrument exterior components . 72. Getting started . 8Installation . 8Load profile . 10Prepare sample . 15Slide operation . 173. Cell count and cell viability assays . 19Count cells in brightfield . 19View results . 21Identify objects counted. 22Graph count results . 23Gate count results . 244. Fluorescence assays . 25Count cell fluorescence . 25View results . 28Identify objects counted. 29Graph count results . 30Gate count results . 326. Save results . 33Save count results . 337. Instrument settings . 36Overview . 36Software update . 37Date/Time . 38Change light cube . 408. Maintenance . 42Instrument care . 42Clean the Countess II FL Automated Cell Counter . 43Set nominal focus . 441
Appendix A: Troubleshooting. 46Appendix B: Product specifications . 48Technical specifications . 48EVOS light cubes . 49Appendix C: Ordering information . 50Countess II FL Automated Cell Counter and accessories . 50Accessory products . 50Appendix D: CSV file format. 51CSV file format, explained . 51Appendix E: Safety . 53Safety conventions used in this document. 53Symbols on instruments . 54Safety labels on instruments . 56General instrument safety . 57Chemical safety . 58Chemical waste safety. 59Electrical safety . 60Biological hazard safety . 61Safety and electromagnetic compatibility (EMC) standards . 62Documentation and support . 63Obtaining support . 632
About this guideAudienceThis user guide is for laboratory staff operating, maintaining, and analyzing datausing the Countess II FL Automated Cell Counter.Revision historyRevisionDateDescriptionRemove Countess II Cell Counter information,update procedures for the new SW release, updatelegal and regulatory information and brandingCorrect technical specification for cell sizeNew user guide C.0Aug 2015B.0A.0Dec 2014Sep 2014 User documentation The guides listed below are available for the Countess II FL Automated CellCounter.GuidePub. no.Countess II FL Automated Cell Counters User GuideMAN0010644Countess II and Countess II FL Automated CellCounters Quick Reference Card (QRC)MAN0010826 Additional resources are available on the Countess Technical Resources page.Go to www.thermofisher.com/countess to access protocols, application notes,and tutorials.Text and keyboardconventionsText and keyboard conventions used in this user guide are listed below. For safetyalert words and symbols used in this document, see page 4.ConventionUser attentionwordsUseBoldBold text indicates user action. For example:Press More. Right arrow symbol ( ) indicates a menu choice, andseparates successive commands you execute or select from adrop-down or shortcut menu. For example:Select More Adjust.Two user attention words appear this document. Each word implies a particularlevel of observation or action as described below.Note: Provides information that may be of interest or help but is not criticalto the use of the product.IMPORTANT! Provides information that is necessary for proper instrumentoperation, accurate installation, or safe use of a chemical.3
Safety alert wordsFour safety alert words appear in this document at points where you need to beaware of relevant hazards. Each alert word—IMPORTANT, CAUTION,WARNING, DANGER—implies a particular level of observation or action, asdefined below:IMPORTANT! – Provides information that is necessary for properinstrument operation, accurate installation, or safe use of a chemical.CAUTION! – Indicates a potentially hazardous situation that, if not avoided,may result in minor or moderate injury. It may also be used to alert againstunsafe practices.WARNING! – Indicates a potentially hazardous situation that, if notavoided, could result in death or serious injury.DANGER! – Indicates an imminently hazardous situation that, if notavoided, will result in death or serious injury. This signal word is to belimited to the most extreme situations.Except for IMPORTANT! safety alerts, each safety alert word in this documentappears with an open triangle figure that contains a hazard symbol. These hazardsymbols are identical to the hazard symbols that are affixed to the instruments(see “Safety symbols” in Appendix E).4
1. Product informationProduct contentsThe Countess II FL Automated Cell Counter is shipped with the components listedbelow.ComponentQuantityCountess II FL Automated Cell Counter (Cat. no. AMQAF1000)1 eachPower Cord with 4 adaptor cords(for U.S./Canada/Taiwan/Japan, Europe, or UK)1 eachCountess Cell Counting Chamber Slides (50 slides/box)1 boxCountess II FL Disposable Slide Holder1 eachCountess II FL Reusable Slide Holder1 eachCountess II FL Light Cube Removal Tool1 eachCountess II USB drive1 eachCountess II FL Automated Cell Counter Quick Reference Card1 each Upon receiving theinstrumentExamine the instrument carefully for damage incurred during transit. Ensure thatall parts of the instrument, including accessories listed above, are included with theproduct. Damage claims must be filed with the carrier; the warranty does not coverin-transit damage.See page 8 for instructions on installing the instrument.Register yourinstrumentVisit www.thermofisher.com/registercountess to register your instrument. Youwill be asked to supply the serial number, your name, and your contact details.Registering your instrument ensures that you will receive notifications of softwareupgrades and information on new assays for use with the Countess II FLAutomated Cell Counter.5
Product descriptionCountess II FLAutomated CellCounterThe Countess II FL Automated Cell Counter is a fully automated, 3-channel cellcounter and assay platform that uses EVOS light cube technology, state-of-the-artoptics, and image analysis algorithms to analyze fluorescently labeled cells ortrypan blue stained samples in suspension. The Countess II FL Automated Cell Counter offers an intuitive user interface,and provides the option to save data and generate a report, which can then betransferred to a PC using the USB drive supplied with the instrument oravailable separately. The cells to be counted are loaded into the instrument either in disposableCountess Cell Counting Chamber Slides or in glass Countess II FL ReusableSlides (page 15). Each chamber slide contains two enclosed chambers to hold thesample to allow you to measure two different samples or perform replicates ofthe same sample. The instrument takes 10 seconds per sample for a typical cell count in thebrightfield channel and is compatible with a wide variety of eukaryotic cells. Inaddition to cell count and viability, the Countess II FL Automated Cell Counteralso provides information on cell size. In addition to the brightfield channel, the Countess II FL Automated CellCounter can accommodate two interchangeable EVOS fluorescent light cubes(page 49), enabling it to be used for multiple-fluorescence research applications. When equipped with EVOS light cubes, the Countess II FL Automated CellCounter can be used to perform fluorescence assays for cells in suspension,including simultaneous counts of cells stained with two different fluorescentdyes, GFP and RFP expression, apoptosis, and cell viability (live, dead, and totalcells). These assays are compatible with a wide variety of eukaryotic cells.6
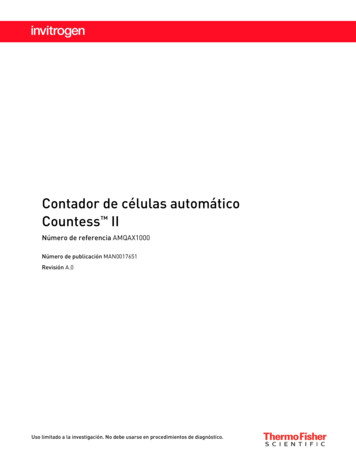
Instrument exterior componentsTouch-screen display: The 7-inch capacitive touch-screen display is the main user interface of theCountess II FL Automated Cell Counter. It contains the buttons for all instrument functions anddisplays data from the cell count.USB ports: The USB ports allow you to transfer and save the cell count data and image to an externalcomputer for record keeping and printing purposes. You can use the USB drive supplied with theinstrument or any other standard, FAT32-formatted USB drive for data transfer. If desired, you can plugin a USB mouse into the rear USB port for instrument control.Note: The USB ports located in the front and the back of the instrument function the same. However, thefirst USB drive connected will be the preferred saving location and both USB drives cannot be accessedat the same time.Slide port: The slide port is used to insert the analysis slide containing the sample into the counter.The Countess II FL instrument accepts both the disposable Countess Cell Counting Chamber Slidesand the glass Countess II FL Reusable Slides via interchangeable, slide-specific carriers. For moreinformation, see “Slide operation”, page 17.Back panel: The back panel of the Countess II FL Automated Cell Counter allows access to the optionalEVOS light cubes and provides storage for the light cube tool and the reusable slide carrier. The backpanel is secured to the instrument by two captive ¼-turn fasteners.Power switch: The ON/OFF rocker switch is the main power switch. It is not necessary to use the powerswitch for day-to-day operation of the instrument.EVOS light cubes: The EVOS light cubes allow the Countess II FL Automated Cell Counter to analyzefluorescently labeled samples. The Countess II FL Automated Cell Counter can accommodate twofluorescent light cubes. For more information, see “EVOS light cubes”, page 49.Power input jack: The power input jack connects the instrument to an electrical outlet through thesupplied power cord and the appropriate plug, based on the electrical outlet configuration in yourcountry.7
2. Getting startedInstallationOperatingenvironment Place the instrument on a level surface away from vibrations emanating fromother pieces of equipment. Allow at least 5 cm (2 in) free space at the back of the instrument to allow forproper ventilation and prevent overheating of electronic components. Set up the instrument away from direct light sources, such as windows.Ambient room lighting can enter the imaging path and affect the image quality. Operating temperature range: 4 –32 C (40 –90 F). Relative humidity range: 30–90%.IMPORTANT! Do not position the instrument so that it is difficult to turn offthe main power switch located on the back of the instrument (see page 7). Incase of an instrument malfunction, turn the main power switch to the OFFposition and disconnect the instrument from the wall outlet.Install theinstrument1. Unpack the instrument and place the instrument on a flat, level, dry surface.2. Remove the thin plastic protector film from the touch-screen display.3.Plug one end of the power cord appropriate for your region into the instrument.4. Plug the power cord into the electrical outlet. Be sure to use only the powercord supplied with your instrument. Powering the instrument with anunapproved power cord may damage the instrument.8
Turn ON theinstrument1. Turn on the instrument by flipping the power switch on the back of theinstrument (page 7) to the ON position.The instrument initializes and displays the Home screen.2. From the Home screen, you can proceed immediately to the assays by insertinga slide (page 19).Alternatively, you can change or add a profile (Step 3, below) or changeinstrument settings (Step 4, below).3. To change the current profile or to add a new profile to the instrument,press the Profiles button in the upper left corner.Profiles allow you to create customized count preferences (i.e., gate countsbased on cell size, brightness, circularity, and/or relative fluorescence intensity)(see page 10).4. To change instruments settings, press the Instrument Settings button inthe upper right corner.Instrument settings allow you to update the Countess II software, change thedate and time, and install or change up to two EVOS light cubes (page 36).9
Load profileProfiles screenAutomaticinstrumentfunctionsProfiles screen allows you to create and save up to 9 customized profiles. Eachcustom profile defines the count parameters (size, brightness, circularity, andfluorescence intensity) and automatic instrument functions (Auto Lighting andAuto FL Threshold) for a consistent and streamlined workflow. You can access the Profiles screen from the Home, Capture, Results, Advanced,or Adjust screens. The current profile is displayed on the upper left corner ofthe Home, Capture, Results, Advanced, or Adjust screens. Automatic instrument functions (below) and count parameters (page 11) aredefined in the Edit profile screen (see “Add/edit a profile”, page 12). The Default profile contains default count settings and cannot be edited. The count parameters specified in the selected profile are applied to all newcell counts. If you have already performed a count, loading a new profile from the Resultsscreen applies the count preferences to the current counts results (total cells,viability etc.) and to all new counts.Auto FL Threshold and Auto Lighting functions are turned on and off in the Editprofile screen using the Auto FL Threshold and Auto Lighting checkboxes (seepage 12). Auto FL Threshold: Automatically applies threshold in fluorescence channelsto subtract background fluorescence for improved analysis despite variablebackground levels between samples. This function is available only forinstruments equipped with the optional EVOS light cubes. Auto Lighting: Automatically illuminates the sample in the brightfield forincreased sample-to-sample consistency and decreased user-to-user variability.10
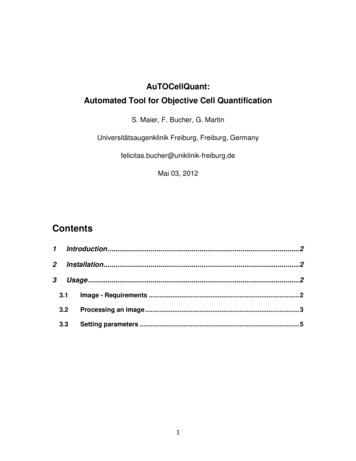
Count parametersCount parameters are adjusted in the Edit profile screen using the parametersliders. Parameter sliders correspond to a single channel, which is selected usingthe channel selection radio buttons located above the sliders.Size, brightness, and circularity sliders Size: As you move the slider up, the algorithm includes larger objects in thecount. As you move the slider down, only the smaller objects are counted. larger objects smaller objectsBrightness: As you move the slider up, the algorithm includes the brighterobjects in the count. As you move the slider down, only the dimmest of objectsare counted. brighter objects more circularFluorescence intensity: As you move the slider up, the algorithm includes theobjects that fluoresce more brightly in the count. As you move the slider down,only the dimmest of objects are counted. brightly fluorescent objects dimmer objectsCircularity: As you move the slider up, the algorithm includes more objectswith shapes other than circular in the count. As you move the slider down,only the objects that are perfect circles are counted. less circular Fluorescence intensity slider dim or less fluorescent objectsSize, brightness, and fluorescence intensity sliders are range sliders.To adjust the upper and lower boundaries without changing the data range,drag the slider by its middle section (i.e., the slider bar).To adjust only the upper or the lower boundary, move the upper or the lowerhandle in the desired direction. This will also change the range of valueswithin which the cells are counted. The circularity slider only sets a single threshold value; cells that fall below theset value are counted, and cells that are beyond this range are excluded.To adjust the threshold for circularity, drag the slider in the desired direction.11
Load a profile1. Press the Profiles button located on the upper left corner of the screen toopen the Profiles screen.2. Press the desired profile to select, and then press Load.The instrument will load the count parameters specified in the selected profileand return to the previous screen.3. To return to the previous screen without loading the new profile, pressthe previous button.The instrument will keep the saved profile, but return to the previous screenwithout loading it.Add/edit a profile1. Press the Profiles button located on the upper left corner of the screen tonavigate to the Profiles screen.2. To add or edit a new profile, select an empty or an existing profile, and thenpress Edit. The Edit screen for the selected profile opens.Note: The Default profile contains default count settings and cannot be edited.3. Select or deselect the Auto FL Threshold checkbox to turn the Auto FLThreshold function ON or OFF (page 10).Note: This function is available only for instruments equipped with theoptional EVOS light cubes.4. Select or deselect the Auto Lighting checkbox to turn the Auto Lightingfunction ON or OFF (page 10).Define count parameters for the brightfield channel:5. To define the new count parameters in the brightfield channel:a. From the Trypan Blue selection box, select Live or Dead radio buttons (seeimage below).b. Adjust the size, brightness, and circularity thresholds using theappropriate parameter slider (see page 11).12
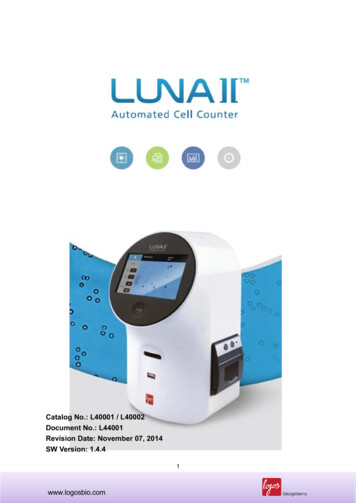
Define count parameters for the fluorescent channels6. To define the new count parameters for fluorescence assays (available only forinstruments equipped with the optional EVOS light cubes):a. From the FL selection box, select the desired channel using the appropriateradio button (see image below).The available options are BF (brightfield) and up to two fluorescencechannels, depending on the light cube(s) installed (GFP and TxRed in theexample below).b. Define the new count parameters for the selected channel using theappropriate parameter slider (see page 11).c.Repeat for the remaining channel(s), as necessary.Note: Parameter sliders in the BF channel allow you to gate count results basedon size, brightness, and circularity. The parameter slider in the selectedfluorescence channel allows you to gate count results based on relativefluorescence intensity in that channel.13
7. To assign a name to the new profile or to change the name of the existingprofile, press the Profile name text box. The alpha-numeric keypad opens.8. Type in the desired profile name using the alpha-numeric keypad.To enter symbols, press the symbol (@%&) key. To return to the alphanumeric keypad, press ABC.9. Press Enter to save the name and return to the Edit profile screen.To return to the Edit profile screen without saving the name, press theclose button.10. Press Save to save the new profile, and then press Close in the confirmationscreen to return to the Profiles screen.To return to the Profiles screen without saving, press Cancel.11. On the Profiles screen, press Load. The instrument will load the countparameters specified in the selected profile and return to the previous screen.12. To return to the previous screen without loading the new profile, pressthe previous button. The instrument will keep the saved profile, butreturn to the previous screen without loading it.14
Prepare sampleRecommendationsLoad Countess Chamber SlideTo obtain the best results, follow these recommendations: Ensure that the cell sample is homogeneously mixed. The measurement range extends from 1 104–1 107 cells/mL, but the optimalrange is 1 105–4 106 cells/mL. For accurate results in cell viability assays, ensure that the counting area iscovered with the cell suspension and count the cells immediately after stainingper the assay protocol. Do not press the optical surfaces of the chamber slides. Hold the slides by theedges. Take care to avoid forming bubbles in the sample.1. Prepare the sample by adding 10 μL of your cell suspension to 10 μL of 0.4%trypan blue stain. Mix the sample mixture well by pipetting it up and down afew times.2. Gently pipet 10 µL of the sample into the half moon-shaped sample loadingarea. The sample is loaded into the chamber through capillary action.3. Let the sample mixture settle in the chamber for 30 seconds, and then insert theslide into the slide port (see page 7). You will hear a soft click, if the slide ispushed in correctly.4. To remove the slide, push the slide gently into the instrument until it "clicks"and a spring pushes the slide out. Grasp the slide and pull it out the rest of theway.Note: After using the Countess Cell Counting Chamber Slides,appropriately dispose of them as biohazardous waste. Do not reuse thedisposable chamber slides.15
Load Countess IIFL Reusable Slide1. Before loading your sample into the Countess II FL Reusable Slide, place acover slip on the counting chamber, making sure the cover slip is clean andfree of grease.2. Gently pipet 10 µL of the sample into the sample inlet, allowing capillaryaction to draw the sample into the counting chamber. A properly loadedcounting chamber should have a thin, even film of fluid under the cover slip.3. After using the Countess II FL Reusable Slide, rinse the glass slide and coverslip with water, and then clean with 70% ethanol. Use Kimwipes laboratorytissues to clean and dry the slides, as needed.Note: Each chamber in the Countess Cell Counting Chamber Slide or theCountess II FL Reusable Slide has a 10-µL sample capacity. Do notoverfill the slide chambers.16
Slide operationThe Countess II FL instrument accepts both disposable Countess Cell CountingChamber Slides and glass Countess II FL Reusable Slides on interchangeable,slide-specific carriers.Countess CellCounting ChamberSlide1. To use the plastic, disposable Countess Cell Counting Chamber Slide with theCountess II FL Automated Cell Counter, insert the slide carrier (black, seeimage below) into the slide port of the instrument until it clicks into place.Note: The Countess II FL Automated Cell Counter is shipped with thedisposable slide carrier already installed2. Load the chamber slide with your sample as described on page 15, and theninsert the slide into the slide carrier in the slide port until it clicks into place.3. To remove the slide, push the slide gently into the instrument until it "clicks"and a spring pushes the slide out. Grasp the slide and pull it out the rest of theway.4. Optional: To remove the slide carrier, gently squeeze the tabs and pull the carriercompletely out of the instrument.Note: You can store the slide carrier behind the access panel on the back of theinstrument (see page 7).17
Countess II FLReusable Slide1. To use the Countess II FL Reusable Slide, unlatch the back panel of theCountess II FL Automated Cell Counter with the two captive ¼-turn fastenersthat secure the back panel on the rear of the instrument.2. Remove the reusable slide carrier (white) from inside of the back panel.3. Load the reusable glass slide with the sample as described on page 16, andplace the loaded slide into the white slide carrier.4. Insert the carrier and reusable slide assembly into the slide port, and gentlypush into the instrument until it "clicks" into place.5. To remove the slide, push the slide gently into the instrument until it "clicks"and a spring pushes the slide out. Grasp t
Countess II FL Automated Cell Counter The Countess II FL Automated Cell Counter is a fully automated, 3-channel cell counter and assay platform that uses EVOS light cube technology, state-of-the-art optics, and image analysis algorithms to analyze fluorescently labeled cells or