Transcription
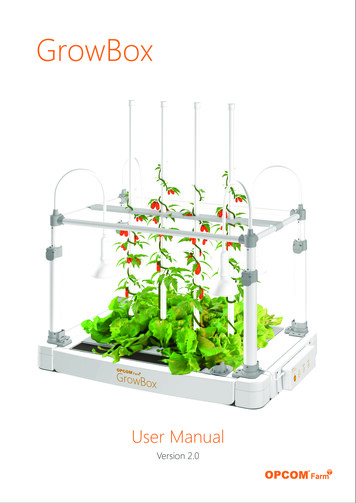
User ManualVersion 2.0
User ManualGrowBoxWELCOMEThank you for purchasing your OPCOM Farm GrowBox. Please follow this UserManual to assemble your GrowBox and plant your first garden.This manual is a guideline to help you quickly learn the basics on how to plant withOPCOM Farm GrowBox. Final results may change according to the varietal of seedsused, plant selection, and your indoor environment.Your GrowBox will do much of the work and save your time in the process ofgrowing a crop of up to 50 plants. It is a tool to grow plants from seeds to harvest,simply and in a clean environment. Have peace of mind that your food is grown in apollution and pesticide free environment under your control.OPCOM Farm GrowBox helps automate the process of taking care of your plantsduring their growth stages. With attention from you and a bit of experimentation,you will quickly find out how to achieve the gardening result you want. For moreproduct information, to register your OPCOM Farm membership, to receive updateson new products, and to purchase supplies and seeds, please visit ourwebsite: www.opcomfarm.comOPCOM Farm developed our line of indoor gardens in dedication to a healthyenvironment with safe food. We invite you to become a professional indoorhydroponic farmer!Enjoy Your OPCOM Farm!
User ManualGrowBoxContentsPageA: Assembly.11-1. 1-3 Accessories.11-4. Grow kit.21-5. Planting Accessories.21-6. Manual.22. Description.33. ! Caution.44. Set up Process.55. Preparing.8B: Planting.10B1. Sowing Stage.10B2. Seedling Stage.12B3. Growing Stage.15B4. Grow to Harvest.15C: Optional.18C1. Regrowing.18C2. Growing Sprouts.19C3. Climbing Plants.21C4. Insect Protection.22D: Maintenance.23D1. Change Water.23D2. Check EC & pH.25D3. EC / pH Meter Use and Calibration.26E: .27E1. Troubleshooting.27E2. GrowBox Q&A.28Register with OPCOM.29
User ManualGrowBoxA: Assembly:Please check all accessories listed here before starting setup.1-1. Main Body - pre-assembled partsGrowing Plate(OANS01A)Control Box(OAEE08A)Water Level Indicator(OANS03A)Water Filter(OAMS01A)Pump(OAEE01A)Dosing Cup(OANS01A)1-2. Lighting support kit!1 Long Support Tube x 2(OAAS01A)2 Short Support Tube x 2(OAAS02A)3 Screw pack(Screw Φ4 x 10mm x 8& Screwdriver x 1)(OAAS03A)1-3. Climbing tube kit4 Climbing Tube Holder x 1(OANS04A)5 Climbing Tube x 4(OANS05A)P16 18W LED Growth Lamp(L18B) x 4(OAEE02A)
User ManualGrowBoxPlease check all accessories listed here before starting setup.1-4 Grow KitBasilRed Leaf LettuceLettuceRed Leaf LettuceOSLT02AOSHB01A75 seed capsules75 seed capsules75 seed capsulesSeed CapsulesSeed CapsulesSeed CapsulesOSLT01A7-ApH /- Capsules7-B Seeds Capsules (105 pcs / per bottle)(OAMS05A,OAMS06A) Green Lettuce,Red Leaf Lettuce,Basil(OSLT01A,OSLT02A,OSHB01A)Nutrient Starter Cup 15( 2)g x 3(OAMS03A)7-D7-EReplacement Filters x trient Adjuster Cup 5( 1)g x 12(OAMS04A)EC and pH Meter Set with Bag(OAEE03A,OAEE04A)Seedling Sponge (60 x 4)(OAMS10A)1-5 Planting Accessories8 Sprout Cover(OAAS04A)9 Sprouting Sponges x 12(OAMS02A)10 Draining Tube x 111 Insect Net(OAAS06A)(OAAS05A)1-6 ManualOptional Accessories KitPlanting Q&AQuick Guide Manual12 Warranty Card13 Quick Guide14 OptionalManual! Note 15 Planting Q&AAccessories KitWe recommend keeping seed capsules refrigerated around (5 C / 41 F) with over 30% humidity after opening.Please use dry hands when taking out seed capsules.Use OPCOM Farm grow kit supplies for best results. OPCOM cannot guarantee the results of seeds from other sources.A germination rate of seeds of 70% 10% is normal (depending on varietal of plant).P2
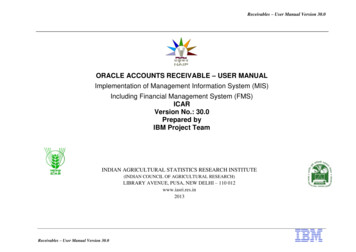
User ManualGrowBox2. DescriptionControl BoxPumpWater TankSprout AreaClimbing Tube Holes x 4Growing PlateDosing HoleAdjustable Lamp Holder x 4Support Arms x 4P3
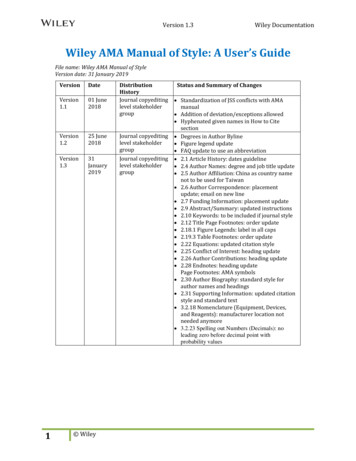
User ManualGrowBox! 3. Caution C FUnder30%-85%RH200 WKeep indoorsat room temperature41-90 F (15-32 C).Please use LED Growth Lampsunder 200W. Unplug unitwhen changing LED Growth Lamps.To avoid electric shock,do not touch plugged-inappliance while in contactwith faucet or water line.Unplug unit if not in use.Mind children's use of unit,and ensure that plantnutrition and other suppliesare not ingested.Do not stack.Place on stable surfacebefore assembly andoperation. Two people arerequired to lift the unit.The surface must support70lbs, the weight of theunit and water.Keep away from fireand chemicals.P4Designed forindoor use only.
User ManualGrowBox4. Set up ProcessPlease visit the GrowBox page at www.opcomfarm.com/growbox,or scan the QR code on the right, to watch the assembly video.Step 1. Using two people, remove the main unit from the box.Pick up the unit from the bottom side and place on a flat surface.Step 2. Raise the four Support Arms straight up.1.Ensure all 4 Arms are in their lowestposition by opening the lever,checking that it is in the lowestposition, and locking the lever.P5
User ManualGrowBoxSet-up InstructionStep 3. Install the Long and Short TubesREMIDERInsert tubes into sockets, ensuringthat the holes line up. Use theincluded screws and screwdriver.Do not use power tools as this maydamage the plastic.P6
User ManualGrowBoxSet-up InstructionStep 4. Install the LED Growth LampsScrew four LED Growth Lamps into holder clockwise.NoteTighten until snug, but not too tight.Lamps can be replaced by other brands of E26 lamp ( less than 200 W ) to accommodateplant varietals' special needs.We cannot guarantee the results when using non-OPCOM lamps.P7
User ManualGrowBox5. PreparingStep 1. Add WaterAdd water until the water level indicator floats to the top. You will need approximately3.96 gallons. Do not overfill. Make sure that the Growing Plate is resting against the main bodyand not floating on the water.15L (3.96 gallon)Maintain water level and keepthe water level indicator on the top.Refill evaporated water weekly.P8
User ManualGrowBoxStep 2. Turn Power on and Test UnittEnsure the AC cable and pump cable are connected to the controbox, and press the POWERbutton. Confirm that the LED lights are on and that the water pump motor is running. Do notstart the unit without water, as this will damage the pump.Ensure pump cable plug intothe control box.Most plants can be grown using the AUTO mode. For specific varietals or if you want toexperiment on your own, you can manually control the timing of the LED Growth Lamps andpump. The table below will explain the other manual settings that are available.Control PanelLEDPumpTime (On / Off)NormalONHigh Duty CycleLow Duty CycleOFFNormalONHigh Duty CycleLow Duty CycleModeAUTOONHILOWOFFAUTOONHILOWOFFOFF(12H / 12H)(24H / 0H)(16H / 8H)( 8H / 16H)( 0H / 24H)12 cycles/day24 cycles/day4 cycles/day2 cycles/day0 cycles/day* 30 mins/cycleNotePlease power and turn on GrowBox at 6-9 AM to meet daytime / night cycle time.P9
User ManualGrowBoxB: PlantingB1. Sowing StageStageTime afer plantingLEDPumpSowingDay 0 Day 7OFFOFFStage(Starting to sprout)Note・Remove the top half of the seed capsules.・Check the sprout every day and makesure the sponges are always wet.Step 1.1. Find the black seedling sponge from the Grow Kit, which is pre-cut for planting use.Refer to below table for sponge quantity and planting numbers.The germination rate of seeds is around 70%.NOTE: The germination rate may be affected by climate, environment and the variety of plants.Plant SizeSmallSponge Number72Planting number50How to Set upPlant SizeMedium-LargeSponge Number36Planting number25How to Set upP10
User ManualGrowBoxPlant SizeVery LargeSponge Number25Planting number18How to Set up2. Wet the sponges in the water at the Sprout area and gently squeeze to make fully wet.P11
User ManualGrowBoxStep 2. Seed SowingIf using OPCOM Farm seed capsules:1. With completely dry hands, take out seed capsules from capsule bottle.2. Insert seed capsules vertically halfway into the middle of each cross-opening in theseedling sponge.3. Put any unused capsules back in bottle and store in the refrigerator immediately.Press and open105Make sure cross-opening at the topof the sponge is facing up.If using non OPCOM Farm seeds:Insert 3-4 seeds into the middle of each cross-opening of each sponge. The seeds should be placedjust below the surface of sponge.Step 3.After 30 minutes, remove the top half of the seed capsules with tweezers. The bottom half will havedissolved into the sponge, depositing the seeds in the perfect location for growing.NOTE: If you don't remove the seed capsule tops, they may inhibit sprouting rate.P12
User ManualGrowBoxStep 4.Cover the sprout cover for 0-7 days for sprouting and ensure sponge wet during thisstage.P13
User ManualGrowBoxB2. Seedling StageThe seedling stage should give young plants the best conditions to start their growth.Please refer to the instruction below.StageTime afer plantingLEDPumpSeedingDay 7 Day 14ONONStage(GerminationNote・Ensure seeds germination rate 70%.・In each sponge, keep strong plants andrate 70%)cut the other weak plants (refer to thedrawing below).・Adjust LED lights position and keepdistance to cover all plants.・Ensure EC & pH value.Step 1.Separate the seedling sponges.Then move the sponges from sprout area to growing Hole.Be careful not to push sponges intothe water, sponge surface should be just below the surface of the plate. You may want touse the enclosed tweezers to adjust a sponge.Throw away the non-germinated one(s).Gap for AirP14
User ManualGrowBoxStep 2.Adjust the Lamps. Ensure the whole growing plate are covered by LED light.B3. Growing StageStageTime afer plantingLEDPumpGrowingAfter Day 14AutoAutoStageNote・When young plants grow to 3-4 inchesheight, change control box to AUTO mode.・Maintain EC & pH value.3-4 inchP15
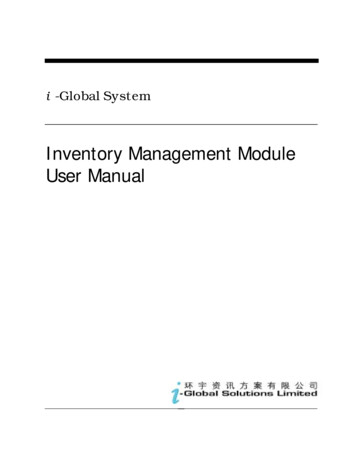
User ManualGrowBoxB4. Grow to HarvestOnce a week, check the water level and refill as needed. Also test the water's pH and EC levelsand adjust as necessary. For more information, see pages 21-22.Below are images of what to expect as your plant progresses through the growth stages.Have fun and enjoy experimenting with your plants at home!Week 3-4The picture shows the growth status of lettuce around the 3rd - 4th week.(Growth pattern varies by seed type).Week 5The picture shows the growth status of lettuce around the 5th week.(Growth pattern varies by seed type).P16
User ManualGrowBoxHarvestWhen plants have reached full growth, you can enjoy your harvest. If plants start gettingcrowded and interfere with each other, harvest the large ones, to give the others more spaceto grow to full size.P17
User ManualGrowBoxC. OptionalC1. Regrowing3-4 weeks (50 plants)5-6 weeks (25 plants)For certain plants like lettuce, you may be able to get a second growth cycle andProTipharvest by cutting the leaves off for consumption and keeping the roots in the reservoir.Cut off the large leaves, and leave 2-3 young leaves in the middle for regrowing.We recommend regrowing the plants 3-5 times ,then start a new planting cycle.P18
User ManualGrowBoxC2. Sprouts Process1. Put seeds in a bottle of warm water (max:105 F / 40 C) for 12 24 hours to start theprocess. Please change the water at least one time.2. Take the black sprouting sponge (OAMS02A) and place it in the Sprout Area. The spongeshould be fully wet.3. Spread sprout seeds from the bottle onto the wet sponge; discard the water.Recommended Quantity for the SprountsWheatgrassAlfalfa SproutsDaikon SproutsBuckwheat Sprouts60g25g50g80gP19
User ManualGrowBox8. Growing Sprouts4. Cover the seeds and sponge with the Sprout Cover (OAAS04A).5. After 1 days, check the status of your sprouts.If they are varietals such as sprouting beans which have no edible
Thank you for purchasing your OPCOM Farm GrowBox. Please follow this User Manual to assemble your GrowBox and plant your first garden. This manual is a guideline to help you quickly learn the basics on how to plant with OPCOM Farm GrowBox. Final results may change according to the varietal of seeds used, plant selection, and your indoor environment. Your GrowBox will do much of the work