Transcription
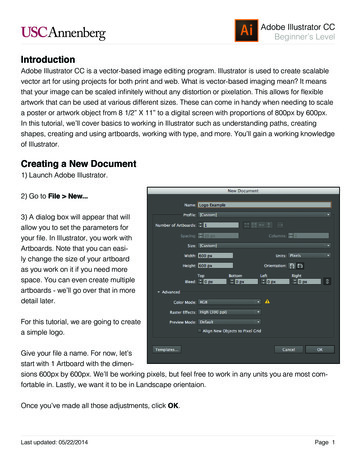
Adobe Illustrator CCBeginner’s LevelIntroductionAdobe Illustrator CC is a vector-based image editing program. Illustrator is used to create scalablevector art for using projects for both print and web. What is vector-based imaging mean? It meansthat your image can be scaled infinitely without any distortion or pixelation. This allows for flexibleartwork that can be used at various different sizes. These can come in handy when needing to scalea poster or artwork object from 8 1/2” X 11” to a digital screen with proportions of 800px by 600px.In this tutorial, we’ll cover basics to working in Illustrator such as understanding paths, creatingshapes, creating and using artboards, working with type, and more. You’ll gain a working knowledgeof Illustrator.Creating a New Document1) Launch Adobe Illustrator.2) Go to File New.3) A dialog box will appear that willallow you to set the parameters foryour file. In Illustrator, you work withArtboards. Note that you can easily change the size of your artboardas you work on it if you need morespace. You can even create multipleartboards - we’ll go over that in moredetail later.For this tutorial, we are going to createa simple logo.Give your file a name. For now, let’sstart with 1 Artboard with the dimensions 600px by 600px. We’ll be working pixels, but feel free to work in any units you are most comfortable in. Lastly, we want it to be in Landscape orientaion.Once you’ve made all those adjustments, click OK.Last updated: 05/22/2014Page 1
Adobe Illustrator CCBeginner’s LevelNavigating Your DocumentYour window will look like this. Within Illustrator, it’s pretty easy to navigate around your documentusing the Hand Tool (H) and the Zoom Tool (Z). Try using the tools to move your document aroundand to zoom in and out of it. Use their shortcuts (H, Z) or click on them on the tool bar (circled below).Tip: If you hold down the space bar, you can use the hand tool while you’re using most other tools.Once you let go, your cursor will go back to the tool you were using. This is helpful when you need tomove around your document while using a tool and saves you the time it takes to switch tools.When using the zoom tool, it defaults to zooming in. Hold down the Alt key while using the zoom toolto change it to zoom out. You’ll notice the cursor now shows a magnifying glass with a minus sign(zoom out) in the middle instead of a plus sign (zoom in).Last updated: 05/22/2014Page 2
Adobe Illustrator CCBeginner’s LevelUnderstanding & Creating ArtboardsAs noted before, when you create your file, you can create multiple artboards from the beginning.You can also add them later as well.When creating a new document, you willnotice this section here. You can increase the number of artboards, set thespacing between artboards, change theway the grid of artboards is set up (Gridby Row, Grid by Column, etc.) and setup how many columns of artboards youwant.Again, you can edit them after you create the document by using theArtboard Tool (Shift O) or finding iton the toolbar.Once in the Artboard tool, in the toptoolbar, you’ll be able to rename yourArtboard and change the dimensionsof each artboard. You can also manually hover over the markers around theartboards until the cursor appears andcinch it in. You can also hover over thecenter of your artboard and move itaround your screen in the case that youwant more space between your artboards.Again, multiple artboards can come inhandy when you want multiple artworkto exist on the same document. It alsomakes it easy to export each artworkindividually when you place them eachin their own artboard. See ‘Exporting.’Last updated: 05/22/2014Page 3
Adobe Illustrator CCBeginner’s LevelCreating Shapes & Adding Fill and StrokesFor this tutorial, we only need 1 artboard for our logo. Let’s say I want to create a simple personallogo for my website. First, i’ll come up with a concept. I want to start off with a simple box that I’mgoing to have my initials running through.1) Click on the Rectangle Tool in the tool bar. If you clickand hold on it on the toolbar, you’ll notice lots of differentshape tools at your disposal.2) Click and drag until you’ve got the shape desired or double click on the screen until a dialog window shows up thatallows you to input specific dimensions for your rectangle.You can always adjust the size manually later by draggingthe markers around the shape or on the top toolbar, you canadjust the width and height by inputting specific dimensions. Inthis case I’ve created a rectangle that is 350 px wide and 150 px tall.3) Now, we need to change the stroke and fill of our shape. Free free tomake it any color you want. You can access this in your side toolbar. Itusually defaults to a white fill and black stroke. I’m going to double clickon the fill box and change it to a seafoam green.4) Single click on the stroke box and click on the handy ‘No Fill’ buttonunderneath the Stroke/Fill box. My Stroke and Fill now looks like this onthe toolbar:5) My shape appears like this:Last updated: 05/22/2014Page 4
Adobe Illustrator CCBeginner’s LevelUsing the Paintbrush ToolFor my logo, now I want to place a cursive lettering of my intials on top of the rectangle in white. Inthis case, I’m going to use the paintbrush tool. Note: you can also use a premade type here, but Iwant mine to have a homemade look.1) Open up the Paintbrush tool.2) Hold and start painting on your artboard.3) Change the stroke of your line to white. This is what mine looks like:You can also make adjusts to the line you’ve created by going to your top toolbar, where you canchange the fill/stroke, stoke line width, opacity, and style.Illustrator gives you lots of options for preset styles. In this case, I’ve used the default 5pt. Round. Ifyou click on the little triangle next to it, it will drop down a menu with different types of brushes thatyou can use.Last updated: 05/22/2014Page 5
Adobe Illustrator CCBeginner’s LevelUnderstanding & Drawing Path PointsPaths are the line segments that make up the overall structure of the artwork that you create (theskeleton). For instance, a rectangle is made up of a path that has four vertical lines that all connectand there are four anchor points (the joints) in the corners. Every shape and object will have pathand anchor points.You can also draw your own paths using the Pen Tool, esentially creating your own artwork within Illustrator. The PenTool has some advanced features, but we’re going to goover basics to using the Pen Tool. Essentially, you are setting the dots and drawing the lines for your artwork object.You can create both straight and curved lines.For my logo, I want to create some abstract shapes underneath my rectangle in different shades ofgreen/blue, which will serve as the background for my title: “Graphic Designer & Artist.” In this case,I just need to draw straight lines with the Pen tool.1) Select the Pen Tool.2) Click anywhere to start drawing your object.3) Continue clicking to create your object.4) To close your object, click back on the first point. You shouldsee a small circle next to the Pen tool that indicates that you are closing your path. I’m going to continue making abstract shapes until it creates a big enough cluster to add my title.Last updated: 05/22/2014Page 6
Adobe Illustrator CCBeginner’s LevelMy logo now looks like this:When working with paths, you can adjust your anchor/paths by using the Direct Selection Tool.The Direct Selection Tool will allow you to select the points within a path and move them around.For instance, let’s say I draw that last shape and don’t like how it looks. Instead of creating a wholenew path, I can use the Direct Selection Tool to adjust the points.1) Select the Direct Selection Tool and click on the shape. With this tool, you select points one at atime. A selected point will be a filled in blue anchor point and an unselected point will have white inthe middle.Last updated: 05/22/2014Page 7
Adobe Illustrator CCBeginner’s Level2) Click and drag the anchor points to change the shape of your object.The shape now looks likethis.Now my rectangle doesn’t match my bottom artwork, so now I want to adjust the shape of the rectangle to mimic the atstract look. With the Pen Tool, you can also add add and subtract points.!) Click and hold down on the Pen Tool until you see adrop down menu. Select Add Anchor Point Tool.2) Now hover over the path of the rectangle and click anywhere on the path to add an anchor point.3) This will create new Anchor points and you’ll see new blue points on the path. Now, you can usethe Direct Selection Tool to move those points around and create a completely new shape.Last updated: 05/22/2014Page 8
Adobe Illustrator CCBeginner’s LevelUsing Type & Creating OutlinesNow, I want to add “Graphic Designer & Artist on top of my shapes.1) Select the Type Tool.2) Click anywhere and a cursor will appear for you to start typing.3) Once done typing, click on the Selection Tool to move your text around.This will create a box around your text. Hover over it and you’ll get a cursorthat will allow you to move your text around your artboard.4) Once I’ve placed it on top of my artwork, I can double click on it to highlight the text and changethe font/size using the top toolbar. I’ve changed my font to “Modern No. 20”, size 22pt.Last updated: 05/22/2014Page 9
Adobe Illustrator CCBeginner’s LevelIn some cases, you’ll want to convert your text to outlines. This will allow you to manipulate the textin interesting ways. However, you will not be able to use the Text Tool to change what the text saysafter creating it into outlines.1) To convert your text to outlines, click on the text with the Selection Tool.2) Go to Type Create Outlines. This will create outlines around eachindividual letter. However, the text is still grouped together. In order tomanipulate each letter individually, you’ll need to ungroup the text.3) Go to Object Ungroup.You will not be able to selecteach letter individual andchange its size and givethe letter different fill/strokecolors.4) Click on the G with the Selection Tool and increase the size by dragging the corner out. Holddown shift at the same time to ensure that it keeps the same proportions.5) Rotate the letter by using the Rotate tool.You should then be able to click and rotate theobject as desired. I did this both for the G and A as pictured below:Last updated: 05/22/2014Page 10
Adobe Illustrator CCBeginner’s LevelExportingNow that I’ve completed my logo, I can adjust my artboard accordingly to fit around my logo. Thisis crucial if you want your image to export with certain border dimensions around it. However, in thiscase, I’m exporting as a .png to allow the image to have a transparent background.1) Go to File Export.2) A new dialog box will open that allows you to name your fileand select the format. I’ve chosen PNG.Notice the “Use Artboards” checkbox. This is helpful when you want it to export using the artboardparameters. (i.e. Nothing outside of the artboard will be exported as part of the image. It is alsohelpful when you have multiple artboards in a file. With multiple artboards, it will export the imagewith what you’ve titled your image and -01, -02, etc. For example, if I have Logo as the name of myfile and I have 4 different artboards in my file, it will export as “Logo-01.png”, “Logo-02.png”, etc.3) Once done, click Export.4) Depending on the format that you select, another dialog box may open that will give you moreoptions in terms of the quality and size of the image file. This will depend on what you need for yourimage / artwork.Last updated: 05/22/2014Page 11
of Illustrator. Creating a New Document 1) Launch Adobe Illustrator. 2) Go to File New. 3) A dialog box will appear that will allow you to set the parameters for your file. In Illustrator, you work with Artboards. Note that you can easi-ly change the size of your artboard as you work on it if you need more space. You can even create multiple
