Transcription
iew.Whatyou’llfindinthispacketare:§ Topicareasandobjectivesfortheexam.§ Practicematerialswithimageassets.§ adobe.com/digital- jectives.Thankyou,AdobeEducation
Adobe Graphic Design & Illustration using Adobe IllustratorEXAM AND OBJECTIVESAfter taking the exam, your score is electronically reported. Please allow 2-4 weeks from the date you passthe exam to receive your ACA Welcome Kit.Exam StructureThe following lists the topic areas for the exam: Setting project requirements Identifying design elements when preparing graphics Understanding Adobe Illustrator Create graphics using Adobe Illustrator Archive, export, and publish graphics using Adobe IllustratorNumber of Questions and Time 39 questions 50 minutesExam ObjectivesDomain 1.0 Setting project requirements1.1Identify the purpose, audience, and audience needs for preparing graphics.1.2Demonstrate knowledge of standard copyright rules for artwork, graphics and graphic use.1.3Demonstrate knowledge of project management tasks and responsibilities.1.4Communicate with others (such as peers and clients) about design plans.Domain 2.0 Identifying design elements used when preparing graphics2.1Demonstrate knowledge of design principles, elements, and graphic composition.2.2Demonstrate knowledge of graphic resolution, graphic size, and graphic file format for web, video, andprint.2.3Demonstrate knowledge of typography.2.4Demonstrate knowledge of the use of symbols and representative graphics.2.5Understand key terminology of graphics.Adobe Graphic Design & Illustration using Adobe Illustrator 2013 Adobe Systems IncorporatedPage 1
Domain 3.0 Understanding Adobe Illustrator3.1Identify elements of the Illustrator user interface and demonstrate knowledge of their functions.3.2Use non-printing design tools in the interface.3.3Demonstrate an understanding of and select the appropriate features and options required to managecolor, pattern, and gradient swatches.3.4Demonstrate an understanding of vector drawing concepts.3.5Demonstrate knowledge of how to work with brushes, symbols, graphic styles, and patterns.3.6Demonstrate knowledge of layers and masks.3.7Import, export, and save files.Domain 4.0 Create graphics using Adobe Illustrator4.1Demonstrate knowledge of how to create documents4.2Demonstrate knowledge of how to use drawing and shape tools.4.4Demonstrate knowledge of how to use type tools.4.5Demonstrate knowledge of how to use scanned or photographic images.4.6Demonstrate the ability to create realistic graphics.4.7Demonstrate knowledge of how to modify and transform objects.Domain 5.0 Archive, export, and publish graphics using Adobe Illustrator5.1Demonstrate knowledge of preparing graphics for web, print and video.Adobe Graphic Design & Illustration using Adobe Illustrator 2013 Adobe Systems IncorporatedPage 2
PRACTICE MATERIALSGraphic Design and Illustrationby using Adobe Illustrator Overview of Adobe IllustratorHow to use layers in IllustratorHow to work with swatchesHow to modify and transform graphicsHow to draw in IllustratorHow to export and save files
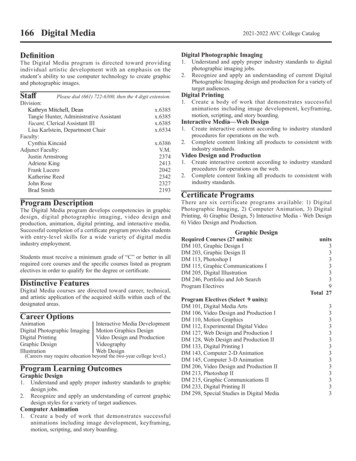
Adobe IllustratorGuideOverview of Adobe IllustratorIn this guide, you’ll learn how to do the following: Work with the Adobe Illustrator workspace, tools, document windows, and panels. Learn how to customize the workspace. Learn how to create a new document. Change the magnification of the document. Navigate through a document by using the artboard and navigator panels.Exploring the workspaceThe Illustrator workspace encompasses everything you see when you first open or create a document: the Toolspanel, document window, artboard, and panels. You can customize and save the workspace to suit your work style.For example, you can choose to display only those panels you frequently use, minimize and rearrange panel groups,resize windows, add additional document windows, and so on.Tools elDocumentwindowPanelsTools panelZoom levelArtboard navigationArtboardScratch areaFigure 1 Adobe Illustrator interfaceThe default workspace in Illustrator (Figure 1) includes an Application bar at the top of the screen. Within thisApplication bar are the Illustrator application icon, main menu (Windows only), Go To Bridge button, ArrangeDocuments button, and workspace switcher. Below this bar are the Control panel, the Tools panel on the left, panelsto the right, and one or more document windows, which are opened separately. The main menu across the top organizes commands under menus. The Tools panel contains tools for creating and editing images, artwork, page elements, and so on. Relatedtools are grouped together. 2013 Adobe Systems IncorporatedOverview of Adobe IllustratorThis document requires Adobe Illustrator CC, June 2013. Technical instructions may differ depending on your version.1
GuideAdobe Illustrator The Control panel displays control options for the currently selected tool. Document windows display document pages for files you’re currently working on. Each page in thedocument is surrounded by its own artboard, which represents the maximum printable area. Outside theartboard is the scratch area, on which you can create, edit, and store elements of artwork before movingthem to the artboard. Objects on the scratch area are visible onscreen, but they do not print. Panels help you monitor and modify your work. You can reorganize, group, stack, or dock panels.Customizing the workspaceBy saving the current size and position of panels in the Illustrator interface as a named workspace, you can restorethat arrangement even if you move or close a panel. The names of saved workspaces appear in the workspaceswitcher.How to create a custom workspace:1. Move and manipulate the interface layout in Illustrator tosuit your needs (Figure 2).2. From the workspace switcher menu, select NewWorkspace (Figure 3).The New Workspace dialog box appears (Figure 4).3. Name your workspace.4. Click OK to close the New Workspace dialog box.Figure 2 Custom interface layoutFigure 3 Workspace switcher menuFigure 4 New Workspace dialog box2Overview of Adobe Illustrator 2013 Adobe Systems IncorporatedThis document requires Adobe Illustrator CC, June 2013. Technical instructions may differ depending on your version.
Adobe IllustratorGuide5. Choose Window Workspace.Notice that your new workspace now appears at the topof the Workspace menu.Even if you make changes, you can return to theworkspace you saved by selecting it from the menu orfrom the workspace switcher (Figure 5).You can restore the saved workspace at any time bychoosing Reset [your named] Workspace from theworkspace switcher menu.Figure 5 Selecting a saved workspace from theworkspace switcherCreating a new Illustrator documentYou can create new Illustrator documents from a new document profile or from a template. Creating a document froma new document profile gives you a blank document with the selected profile’s default fill and stroke colors, graphicstyles, brushes, symbols, actions, viewing preferences, and other settings.How to create a new Illustrator document:1. To create a new Illustrator document, choose File Newfrom the main menu.The New Document dialog box appears, with all optionsset to the optimized values for the selected new documentprofile (Figure 6).2. Change any of the preset values as desired: Give your document a new name. Change or customize the document profile. Add or delete artboards. Modify the document size. Choose to have a bleed area around the trimmingedge of the page.Figure 6 New Document dialog box3. Click OK to create the new document (Figure 7).Paper edgeBleedArtboardFigure 7 New blank document 2013 Adobe Systems IncorporatedOverview of Adobe IllustratorThis document requires Adobe Illustrator CC, June 2013. Technical instructions may differ depending on your version.3
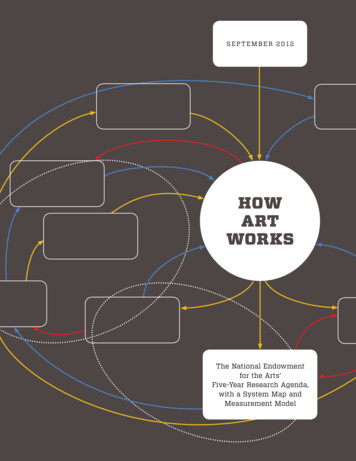
GuideAdobe IllustratorTools panel overviewThe first time you start the application, the Tools panel (Figure 8) appears at the left side of the screen. You can movethe Tools panel by dragging its title bar or the Illustrator icon. You can also show or hide the Tools panel by choosingWindow Tools.You use tools in the Tools panel to create, select, and manipulate objects in Illustrator. Some tools have options thatappear when you double-click the tool. These include tools that let you use type and select, paint, draw, sample, edit,and move images.You can expand some tools to show hidden tools beneath them. A small triangle at the lower right corner of the toolicon signals the presence of hidden tools. To see the name of a tool, position the pointer over it.Figure 8 Overview of the Tools panel4Overview of Adobe Illustrator 2013 Adobe Systems IncorporatedThis document requires Adobe Illustrator CC, June 2013. Technical instructions may differ depending on your version.
Adobe IllustratorGuideHow to use the Zoom tool to navigate your documentYou can zoom in or out of artwork to manipulate fine elements of a layout.How to use the Zoom tool to change the magnification of your document:1. Open a document, examine the filename at the top of thedocument window, and notice the percentage listed at theend of the filename (Figure 9).This represents the current enlargement view of theimage, or zoom level.2. Select the Zoom tool by clicking the Zoom tool button inthe Tools panel (Figure 10) or by pressing Z, thekeyboard shortcut for the Zoom tool.3. Click anywhere in the document window.The image zooms in according to a preset percentagelevel, which replaces the previous value in the documentwindow. The location you clicked when you used theZoom tool becomes the center of the enlarged view.Figure 9 Filename with zoom level4. Using the Zoom tool, drag a rectangle to enclose a regionof the document (Figure 11).The selection enlarges to fill the entire documentwindow.5. To zoom out, hold down the Alt key (Windows) or theOption key (Mac OS) (Figure 12).Zoom toolFigure 10 Tools panelFigure 11 Selecting a rectangular regionFigure 12 Zooming out in a document 2013 Adobe Systems IncorporatedOverview of Adobe IllustratorThis document requires Adobe Illustrator CC, June 2013. Technical instructions may differ depending on your version.5
GuideAdobe IllustratorHow to scroll around a document with the Hand toolThe Hand tool moves a document within the document window. This is useful if you want to see a part of thedocument that is currently out of view.How to use the Hand tool:1. Zoom into an area of your document until some of thecontent is out of view (Figure 13).2. Select the Hand tool from the Tools panel (Figure 14).You can also press Shift H.3. Using the Hand tool, drag to scroll around and viewdifferent parts of the document (Figure 15).Figure 13 Document window with scroll barsHand toolFigure 14 Tools panelFigure 15 Using the Hand tool to move around adocument6Overview of Adobe Illustrator 2013 Adobe Systems IncorporatedThis document requires Adobe Illustrator CC, June 2013. Technical instructions may differ depending on your version.
Adobe IllustratorGuideAbout artboardsArtboards represent the regions that can contain printable artwork. Multiple artboards are useful for creating a varietyof things, such as multiple page PDFs, printed pages with different sizes or different elements, independent elementsfor websites, video storyboards, or individual items for animation.You can have 1 to 100 artboards per document, depending on size. You can specify the number of artboards for adocument when you first create it, and you can add and remove artboards at any time while working in a document.Illustrator offers two ways you can interact with artboards, by using the Artboard panel or the Artboard tool(Figure 16). The Artboards panel allows you to add, reorder, rearrange, and delete artboards; reorder and renumberartboards; and select and navigate through multiple artboards. The Artboard tool offers greater flexibility to createartboards in different sizes, resize them, and position them anywhere on the screen.Move artboards up or downAdd new artboardsDelete artboardsFigure 16 Artboards in a layoutHow to add and edit artboards:1. To access the Artboards panel, click Window Artboards.The Artboards panel opens.2. To add artboards, click the New Artboard icon at thebottom of the Artboards panel.A new artboard the same size as the first is added to thedocument window and appears in the Artboard panel(Figure 17).Figure 17 New artboard and Artboard panel 2013 Adobe Systems IncorporatedOverview of Adobe IllustratorThis document requires Adobe Illustrator CC, June 2013. Technical instructions may differ depending on your version.7
GuideAdobe Illustrator3. To create a custom artboard, select the Artboard tool(Figure 18) and drag in the workspace to define theshape, size, and location.Artboard toolGreen Smart Guides and dimension values appear to helpyou align and resize the new artboard (Figure 19).4. With the Artboard tool selected: To resize the artboard, position the pointer on anedge or corner until the cursor changes to a doublesided arrow, and then drag to adjust. To change the orientation of the artboard, click thePortrait or Landscape button in the Control panel. To move the artboard and its contents, click to selectthe Move/Copy Artwork With Artboard icon on theControl panel, and then position the pointer in theartboard and drag (Figure 20).Figure 18 Tools panel5. To delete an artboard, select the artboard in the Artboardpanel and click the Delete icon, or click the Delete icon inan artboard’s upper-right corner. You can delete all butthe last remaining artboard.6. To commit the artboard and exit the artboard-editingmode, click a different tool in the Tools panel orclick Esc.Figure 19 Drag in the workspace to create newartboardMove/Copy Artwork With ArtboardFigure 20 Drag the artboard to reposition8Overview of Adobe Illustrator 2013 Adobe Systems IncorporatedThis document requires Adobe Illustrator CC, June 2013. Technical instructions may differ depending on your version.
Adobe IllustratorGuideHow to select an object and work with the Control panelThe Control panel (Window Control) offers quick access to options, commands, and other panels related to thecurrent page item or objects you select (this is called contextual). By default, the Control panel is docked to the top ofthe document window; however, you can dock it to the bottom of the window, convert it to a floating panel, or hide italtogether.How to use the Selection tool:1. With a document open, choose the Selection tool fromthe Tools panel (Figure 21), and then select an object inyour document.Selection toolNotice that the Control panel information reflects suchthings as the path color, stroke, and brush options(Figure 22).2. Next, choose the Type tool and select a region of text.Figure 21 Tools panelThe Control panel changes to show options that providecontrol over text formatting (Figure 23).Figure 22 Control panel with a path selectedFigure 23 Control panel with text selected 2013 Adobe Systems IncorporatedOverview of Adobe IllustratorThis document requires Adobe Illustrator CC, June 2013. Technical instructions may differ depending on your version.9
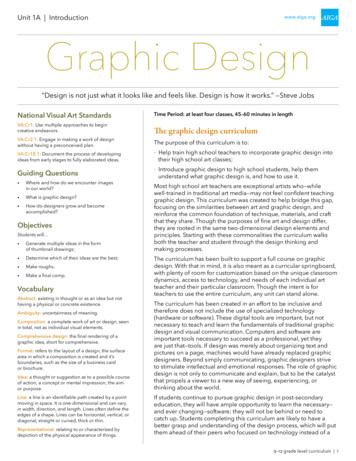
GuideAdobe IllustratorNavigator panel overviewYou use the Navigator panel (Window Navigator) to quickly change the view of your artwork by using a thumbnaildisplay. The colored box in the Navigator (called the proxy view area) corresponds to the currently viewable area inthe Illustrator window.How to use the Navigator panel:1. At the lower-left part of the document window, you canmove from one artboard to another by using the arrowcontrols. Click the forward arrow to go to the next pageand the back arrow to go to the previous artboard.The arrow will be dimmed if there is no artboard to go to.There is also a pop-up menu that allows you to navigateby artboard (Figure 24).2. Open the Navigator panel by choosing Window Navigator.Figure 24 Using the page number controls3. Locate the slider under the image thumbnail in theNavigator panel and drag it to the right. (If yourdocument has only one artboard, this slider is inactive.)The image in the image window enlarges.4. Now drag the slider to the left to reduce the scale of theimage in the image window.Note: The red rectangular outline represents the portionof the image that appears in the image window(Figure 25). When you zoom in until the image windowshows only part of the image, you can drag the redoutline to pan around other areas of the thumbnail image.This also is an excellent way to verify which part of animage you’re working on when you work at very highzoom levels.ArtworkthumbnailZoom outZoom sliderZoom inProxy viewareaFigure 25 Navigator panel10Overview of Adobe Illustrator 2013 Adobe Systems IncorporatedThis document requires Adobe Illustrator CC, June 2013. Technical instructions may differ depending on your version.
Adobe IllustratorGuideUsing rulers, grids, and guidesYou can easily align and size objects and artboards in Illustrator by using rulers, grids, and guides (Figure 26).Rulers help you accurately place and measure objects in the illustration window or in an artboard. The point where 0appears on each ruler is called the ruler origin. The grid appears behind your artwork in the illustration window andhelps you align items on the artboard, and it does not print. Guides help you align text and graphic objects. You cancreate ruler guides (straight vertical or horizontal lines) and guide objects (vector objects you convert to guides). Likethe grid, guides do not print. Smart Guides are temporary snap-to guides that appear when you create or manipulateobjects or artboards. They help you align, edit, and transform objects or artboards relative to other objects, artboards,or both by snap-aligning and displaying X, Y location and delta values. Smart Guides are on by default.RulerGuidesGridFigure 26 Artboard with ruler, grid, and guides visibleHow to use rulers, grids, and guides:1. To show rulers, choose View Rulers Show Rulers. Toturn off rulers, choose View Rulers Hide Rulers.2. To set the general unit of measurement for rulers in thecurrent document, choose File Document Setup.The Document Setup dialog box opens (Figure 27)3. Choose the unit of measure you want to use from theUnits menu, and click OK to close the Document Setupdialog box.Note: You can also set the default unit of measurementfor all your Illustrator documents by choosing Edit Preferences Units (Windows) or Illustrator Preferences Units (Mac OS), and then select units forthe General, Stroke, and Type options.Figure 27 Document Setup dialog box detail 2013 Adobe Systems IncorporatedOverview of Adobe IllustratorThis document requires Adobe Illustrator CC, June 2013. Technical instructions may differ depending on your version.11
GuideAdobe Illustrator4. To use the grid, choose View Show Grid. To hide thegrid, choose View Hide Grid.5. To snap objects to gridlines, choose View Snap ToGrid, select the object you want to move, and drag it tothe desired location.When the object’s boundaries come within 2 pixels of agridline, it snaps to the point.Note: To specify the spacing between gridlines, grid style(lines or dots), grid color, or whether grids appear in thefront or back of artwork, choose Edit Preferences Guides & Grid (Windows) or Illustrator Preferences Guides & Grid (Mac OS).Figure 28 Drag a guide to position6. To show guides, choose View Guides Show Guides.To hide guides, choose View Guides Hide Guides.7. Position the pointer on the left ruler for a vertical guide oron the top ruler for a horizontal guide.8. Drag the guide into position (Figure 28).9. Move the guide by dragging or delete the guide bypressing Backspace (Windows) or Delete (Mac OS), orby choosing Edit Cut or Edit Clear.10. Choose View Smart Guides to turn guides on or off.11. Use Smart Guides in the following ways: When you create an object, use the Smart Guides toposition a new object's position relative to anexisting object. Or, when you create a new artboard,use Smart Guides to position it relative to anotherartboard or an object. When you move an object or artboard, use the SmartGuides to align the selected object or artboard toother objects or artboards. The alignment is based onthe geometry of objects and artboards. Guides appearas the object approaches the edge or center point ofother objects (Figure 29). When you transform an object, Smart Guidesautomatically appear to assist the transformation.Smart GuidesFigure 29 Positioning an object by using SmartGuidesYou can change when and how Smart Guides appear bysetting Smart Guide preferences. Choose Edit Preferences Smart Guides (Windows) or Illustrator Preferences Smart Guides (Mac OS).12Overview of Adobe Illustrator 2013 Adobe Systems IncorporatedThis document requires Adobe Illustrator CC, June 2013. Technical instructions may differ depending on your version.
Adobe IllustratorGuideAbout bleedsBleed is the amount of artwork that falls outside of the printing bounding box or outside the crop area and trim marks(Figure 30). You can include bleed in your artwork as a margin of error—to ensure that the ink is still printed to theedge of the page after the page is trimmed. Once you create the artwork that extends into the bleed, you can useIllustrator to specify the extent of the bleed. Increasing the bleed makes Illustrator print more of the artwork that islocated beyond the trim marks. The trim marks still define the same size printing bounding box, however.The size of the bleed you use depends on its purpose. A press bleed (that is, an image that bleeds off the edge of theprinted sheet) should be at least 18 points. The maximum bleed you can set is 72 points; the minimum bleed is 0points. Your print shop can advise you on the size of the bleed necessary for your particular job.When you first create a document, you can set the bleed in the New Document dialog box (shown previously) or inthe Document Setup dialog box. When the document is ready to be printed, you can use the Print dialog box.Document bleedCrop areaFigure 30 Artboard with bleed and crop areasHow to add a bleed:1. Click the Document Setup button in the Control Panel.Link iconThe Document Setup dialog box opens (Figure 31).2. In the Bleed and View Options section, set the units ofmeasure, and enter values for Top, Left, Bottom, andRight to specify the placement of the bleed marks. Clickthe Link icon to make all the values the same.3. Click OK to close the Document Setup dialog box.Figure 31 Document Setup dialog box 2013 Adobe Systems IncorporatedOverview of Adobe IllustratorThis document requires Adobe Illustrator CC, June 2013. Technical instructions may differ depending on your version.13
GuideAdobe IllustratorHow to add a bleed when printing:1. Choose File Print.The Print dialog box opens (Figure 32).2. Select Marks & Bleed on the left side of the Print dialogbox.3. Do one of the following: Enter values for Top, Left, Bottom, and Right tospecify the placement of the bleed marks. Click theLink icon to make all the values the same(Figure 33). Select Use Document Bleed Settings to use the bleedsettings defined in the New Document dialog box.4. Click Done or Print to close the Print dialog box.Figure 32 Print dialog boxLink iconFigure 33 Print Dialog box, Bleeds detail14Overview of Adobe Illustrator 2013 Adobe Systems IncorporatedThis document requires Adobe Illustrator CC, June 2013. Technical instructions may differ depending on your version.
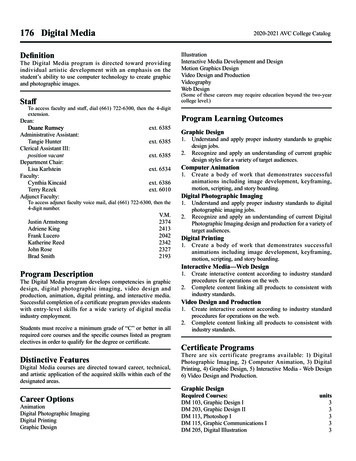
Adobe IllustratorGuideHow to use layers in IllustratorWhen creating complex artwork, keeping track of all the items in your document window is a challenge. Small itemsget hidden under larger items, and selecting artwork becomes difficult. Layers provide a way to manage all the itemsthat make up your artwork. Think of layers as clear folders that contain artwork. If you reshuffle the folders, youchange the stacking order of the items in your artwork. You can move items between folders and create subfolderswithin folders.The structure of layers in your document can be as simple or complex as you want it to be. By default, all items areorganized in a single, parent layer. However, you can create new layers and move items into them, or move elementsfrom one layer to another at any time. The Layers panel provides an easy way to select, hide, lock, rename, andchange the appearance attributes of artwork.Layers panel overviewYou use the Layers panel to list, organize, and edit the objects in a document (Figure 1). By default, every newdocument contains one layer, and each object you create is listed under that layer. However, you can create new layersand rearrange items to best suit your needs.By default, Illustrator assigns a unique color (up to nine colors) to each layer in the Layers panel. The color appearsnext to the layer name in the panel. The same color appears in the illustration window in the bounding box, path,anchor points, and center point of a selected object. You can use this color to locate an object's corresponding layerquickly Layers panel, and you can change the layer color to suit your needs.When an item in the Layers panel contains other items, a triangle appears to the left of the item’s name. Click thetriangle to show or hide the contents. If no triangle appears, the item contains no additional items.Visibility columnTarget columnSelection columnLayer nameEdit columnFigure 1 Layers panelThe Layers panel provides columns to the left and right of the listings. Click in a column to control the followingcharacteristics: Visibility column Indicates whether items in the layers are visible or hidden (blank space), or whether theyare template layers or outline layers. Edit column Indicates whether items are locked or unlocked. The lock icon indicates that the item is lockedand cannot be edited; a blank space indicates the item is unlocked and can be edited. 2013 Adobe Systems IncorporatedHow to use layers in IllustratorThis document requires Adobe Illustrator CC, June 2013. Technical instructions may differ depending on your version.1
GuideAdobe Illustrator Target column Indicates whether items are targeted for application of effects and edit attributes in theAppearance panel. When the target button appears as a double-ring icon, the item is targeted; a single ringicon indicates that the item is not targeted. Selection column Indicates whether items are selected. A color box appears when an item is selected. If anitem, such as a layer or group, contains some objects that are selected and other objects that are unselected, asmaller selection color box appears next to the parent item. If all of the objects within the parent item areselected, the selection color boxes are the same size as the marks that appear next to selected objects. Youcan use the Layers panel to display some items as outlines and other items as they will appear in the finalartwork. You also can dim linked images and bitmap objects so you can edit artwork on top of the imagemore easily. This is especially useful when tracing a bitmap image. Layer name Indicates the name of the item as it appears in the Layers panel. To edit the layer name, doubleclick the item name in the Layers panel.How to create a layer and move objects to a different layer:1. In the Layers panel, click the name of the layer abovewhich (or in which) you want to add the new layer(Figure 2).2. To add a new layer above the selected layer, click theCreate New Layer button in the Layers panel.Note: You can also create a new sublayer inside theselected layer by using the Create New Sublayer button.The new layer is added.3. To move an object to a different layer, select the object inthe Layers panel.Create New SublayerCreate New LayerFigure 2 Layers panelSelected-art Indicator4. Drag the selected-art indicator, located at the right of thelayer in the Layers panel, to the layer you want(Figure 3).5. To edit the layer name, double-click the item name in theLayers panel and type a new name in the text field(Figure 4).Figure 3 Dragging a layer in the Layers panelFigure 4 Renaming a layer in the Layers panel2How to use layers in Illustrator 2013 Adobe Systems IncorporatedThis document requires Adobe Illustrator CC, June 2013. Technical instructions may differ depending on your version.
Adobe IllustratorGuideHow to duplicate a layer:1. Select one or more layers in the Layers panel.Layers panel menu2. Choose Duplicate “ layer name ” in the Layers panelmenu (Figure 5).3. The swatch is copied, “copy” is appended to its name,and it is added to the Layers panels (Figure 6).Figure 5 Duplicate a layer in the Layers panelmenuFigure 6 Duplicated layer in the Layers panelHow to delete a layer:1. Select one or more layers in the Layers panel.2. Click the Delete icon at the bottom of the Layers panel(Figure 7).Illustrator notifies you that the layer contains artwork andasks you to confirm that you want to delete the layer(Figure 8).3. Click OK to delete the layer.Delete iconFigure 7 Layers panelFigure 8 Start anywhereRelease items to separate layersThe Release To Layers command redistributes all of the items in a layer into individual layers and you can build newob
Adobe Graphic Design & Illustration using Adobe Illustrator 2013 Adobe Systems Incorporated Page 2 Domain 3.0 Understanding Adobe Illustrator . The Illustrator workspace encompasses everything you see when you first open or create a document: the Tools panel, document window, artboard, and panels. You can customize and save the workspace to .