Transcription
USER GUIDE5.7.0 December 2017 3725-49085-003A Polycom VVX Business MediaPhones with Better Togetherover Ethernet
Copyright 2017, Polycom, Inc. All rights reserved. No part of this document may be reproduced,translated into another language or format, or transmitted in any form or by any means, electronic ormechanical, for any purpose, without the express written permission of Polycom, Inc.6001 America Center Drive San Jose, CA 95002 USATrademarks Polycom , the Polycom logo and the names and marks associated with Polycom productsare trademarks and/or service marks of Polycom, Inc. and are registered and/or common law marks in theUnited States and various other countries.All other trademarks are property of their respective owners. No portion hereof may be reproduced ortransmitted in any form or by any means, for any purpose other than the recipient's personal use, withoutthe express written permission of Polycom.Disclaimer While Polycom uses reasonable efforts to include accurate and up-to-date information in thisdocument, Polycom makes no warranties or representations as to its accuracy. Polycom assumes noliability or responsibility for any typographical or other errors or omissions in the content of this document.Limitation of Liability Polycom and/or its respective suppliers make no representations about thesuitability of the information contained in this document for any purpose. Information is provided "as is"without warranty of any kind and is subject to change without notice. The entire risk arising out of its useremains with the recipient. In no event shall Polycom and/or its respective suppliers be liable for anydirect, consequential, incidental, special, punitive or other damages whatsoever (including withoutlimitation, damages for loss of business profits, business interruption, or loss of business information),even if Polycom has been advised of the possibility of such damages.End User License Agreement BY USING THIS PRODUCT, YOU ARE AGREEING TO THE TERMS OFTHE END USER LICENSE AGREEMENT (EULA) . IF YOU DO NOT AGREE TO THE TERMS OF THEEULA, DO NOT USE THE PRODUCT, AND YOU MAY RETURN IT IN THE ORIGINAL PACKAGING TOTHE SELLER FROM WHOM YOU PURCHASED THE PRODUCT.Patent Information The accompanying product may be protected by one or more U.S. and foreignpatents and/or pending patent applications held by Polycom, Inc.Open Source Software Used in this Product This product may contain open source software. You mayreceive the open source software from Polycom up to three (3) years after the distribution date of theapplicable product or software at a charge not greater than the cost to Polycom of shipping or distributingthe software to you. To receive software information, as well as the open source software code used inthis product, contact Polycom by email at OpenSourceVideo@polycom.com (for video products) orOpenSourceVoice@polycom.com (for voice products).Customer Feedback We are striving to improve our documentation quality and we appreciate yourfeedback. Email your opinions and comments to DocumentationFeedback@polycom.com.Polycom Support Visit the Polycom Support Center for End User License Agreements, softwaredownloads, product documents, product licenses, troubleshooting tips, service requests, and more.
ContentsBefore You Begin. 4Audience, Purpose, and Required Skills.4Related Documentation.4Getting Help. 5Polycom Partner and Solution Resources.5The Polycom Community. 5Getting Started with VVX Business Media Phones.6Overview of Phone Hardware and Keys. 6VVX 201 Hardware.6VVX 300 Series Hardware. 8VVX 400 Series Hardware. 10VVX 500 Series and VVX 600 Series Hardware. 11Securing Your Phone with the Security Slot.13Navigating VVX Business Media Phones. 13Accessing Screens on VVX Business Media Phones. 13Icons and Status Indicators. 16Entering Information in Data Fields.21Entering Information Using the Dial Pad. 22Enter Information Using the Onscreen Keyboard.23Entering Chinese Characters with PinYin. 24Using a VVX Phone as a Common Area Phone. 25Logging in to and Locking Your Phone. 26Sign in to Skype for Business on Your Computer Using BToE.26Sign Into Skype for Business as a Guest Using BTOE on Your Computer. 26Sign Out of Skype for Business. 27Set the Time and Date Format.27Locking Your Phone.27Set a Lock Code.27Lock Your Phone.28Unlock the Phone. 28Change Your Lock Code. 29Reset Your Lock Code. 29Disable Device Lock.29Polycom, Inc.1
ContentsConnecting to Skype for Business on Your Phone using BetterTogether over Ethernet.30Installing the Polycom Better Together over Ethernet Connector. 30Download and Install the Polycom BToE Connector.30Start the Polycom BToE Connector. 31Disable Auto-Start for the Polycom BToE Connector.31Pairing Your Phone with Your Computer. 32Automatically Pair Your Phone with Your Computer using BToE. 32Manually Pair Your Phone with Your Computer using BToE. 33Set Your Phone as Your Primary Audio Device.34Use Your Phone as Your Primary Audio Device for Your Computer. 34Use BToE to Open the Web Configuration Utility. 35Using BToE to Lock and Unlock Your Phone. 35Using BToE to Manage Calls on Your Phone and Skype for BusinessClient. 36Answer BToE Calls. 36Place BToE Calls. 37Pause and Resume BToE Calls.37Move Call Audio between Your Phone and Computer.37Disabling BToE and Uninstalling the BToE Connector Application. 38Disable BToE on Your Phone. 38Stop BToE on Your Computer. 38Uninstall the Polycom BToE Connector. 38VVX Business Media Phones Settings.40Password Required to Access Basic Settings. 40Set the Language.40Time and Date Display.41Change the Time and Date Format.41Disable the Time and Date Display. 41Backlight Intensity and Timeout. 41Set the Backlight Intensity. 42Set the Backlight Timeout. 42Changing Your Background. 42Change the Background Picture. 42Adding Personal Photos as Your Background. 43Reset Your Background. 44Polycom, Inc.2
ContentsCustomizing Line Keys.44Customize the Columns on the Lines Screen. 45Enable Transparent Line Keys. 45Show Only Your Line Registration. 46Enable Line Key Customization. 46Insert an Empty Line Key. 46Clear a Line Key.46Delete a Line Key. 47Reset Customized Line Keys. 47Screen Savers.47Enable Screen Savers.48Use Personal Photos as Screen Savers. 48Disable the Screen Saver.49Use Your Phone as a Digital Picture Frame. 49Picture Frame Icons. 50Power-Saving Mode.50Change Your Office Hours. 51Change Timeouts. 51Changing Audio Settings.52Change Incoming Call Notifications. 52Set a Ringtone for Incoming Calls.52Set a Ringtone for Individual Contacts. 52Change the Volume.53Enable Acoustic Fence.53Update Your Skype for Business Presence. 53Adding a Profile Photo to Display on the Lock Screen.53Disable Hot Desking.54Troubleshooting. 55Better Together over Ethernet.55Troubleshoot Polycom BToE Connector Installation.55Troubleshoot Polycom BToE Connector Start Issues. 55Troubleshoot Pairing with Phone with Your Computer.56Troubleshoot Polycom BToE Connector with a USB Audio Device. 56Polycom, Inc.3
Before You BeginTopics: Audience, Purpose, and Required Skills Related Documentation Getting HelpThis Polycom VVX Business Media Phones with Better Together over Ethernet - User Guide containsoverview information for navigating and performing tasks on Polycom VVX business media phones.This user guide contains information for the following Polycom VVX products: VVX 201 business media phones VVX 300, 301, 310, and 311 business media phones VVX 400, 401, 410, and 411 business media phones VVX 500 and 501 business media phones VVX 600 and 601 business media phones VVX Expansion ModulesAudience, Purpose, and Required SkillsThis guide is intended for beginning users, as well as intermediate and advanced users, who want tolearn more about the features available with VVX Business Media Phones.Related DocumentationFor additional information about Polycom VVX products, view the following support pages: Polycom VVX 201 Polycom VVX 300 and 310 Polycom VVX 301 and 311 Polycom VVX 400 and 410 Polycom VVX 401 and 411 Polycom VVX 500 Polycom VVX 501 Polycom VVX 600 Polycom VVX 601 Polycom VVX Expansion ModulesYou can view the following types of documents on each product support page: Quick Tips—A quick reference on how to use the phone's most basic features.Polycom, Inc.4
Before You Begin Quick Start Guide—This guide describes the contents of your package, how to assemble the phoneor accessory, and how to connect the phone to the network. The quick start guide is included inyour phone package. Wallmount Instructions—This document provides detailed instructions for mounting your phone onthe wall. To install your phone on the wall, you need the optional wallmount package, whichincludes the wallmount instructions. Administrator Guide—This guide provides detailed information about setting up your network andconfiguring features. Regulatory Notice—This guide provides information for all regulatory and safety guidance.You can also view Feature Descriptions and Technical Notifications on the Polycom Voice Support page.These documents describe workarounds to existing issues and provide expanded descriptions andexamples for phone settings and features. You can find these documents on the Polycom Profiled UCSoftware Features and Polycom Engineering Advisories and Technical Notifications support pages.Getting HelpFor more information about installing, configuring, and administering Polycom products, refer toDocuments and Downloads at Polycom Support.Polycom Partner and Solution ResourcesTo find all Polycom partner solutions, see Strategic Global Partner Solutions.Polycom Implementation and Maintenance services provide support for Polycom solution componentsonly. Additional services for supported third-party Unified Communications (UC) environments integratedwith Polycom solutions are available from Polycom Global Services and its certified Partners. Theseadditional services help customers successfully design, deploy, optimize and manage Polycom visualcommunications within their UC environments.Professional Services for Microsoft Integration is mandatory for Microsoft Office Communications Server,Microsoft Lync Server 2013, Skype for Business Server 2015, or Office 365 integrations. For additionalinformation and details, refer to http://www.polycom.com/services/professional services/index.html orcontact your local Polycom representative.The Polycom CommunityThe Polycom Community gives you access to the latest developer and support information, and thecommunity enables you to participate in discussion forums to share ideas and solve problems with yourcolleagues. To register with the Polycom Community, simply create a Polycom online account. Whenlogged in, you can access Polycom support personnel and participate in developer and support forums tofind the latest information on hardware, software, and partner solutions topics.Polycom, Inc.5
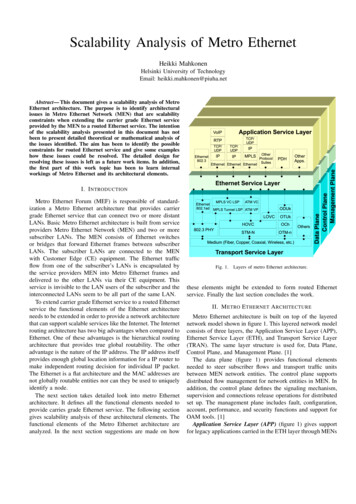
Getting Started with VVX BusinessMedia PhonesTopics: Overview of Phone Hardware and Keys Navigating VVX Business Media Phones Entering Information in Data Fields Using a VVX Phone as a Common Area PhoneBefore you use your phone, take a few moments to familiarize yourself with its features and userinterface.The terms “the phone” and “your phone” refer to any of the business media phones. Unless specificallynoted in this guide, especially with regard to phone graphics, all VVX business media phones operate insimilar ways.Note: As you read this guide, keep in mind that certain features are configurable by your systemadministrator or determined by your network environment. As a result, some features may not beenabled or may operate differently on your device. Additionally, the examples and graphics in thisguide may not directly reflect what is displayed or is available on your device screen.Overview of Phone Hardware and KeysUse the following figures and tables to understand your VVX phone's hardware features. For moreinformation about attaching phone hardware, including how to connect your phone to the network, see theQuick Start Guide for your phone available on your phone's support page on Polycom Voice Support.VVX 201 HardwareThe following figure displays the hardware features on the VVX 201 business media phones. The tablelists each feature numbered in the figure.Polycom, Inc.6
Getting Started with VVX Business Media PhonesVVX 201 hardware featuresVVX 201 Hardware Feature DescriptionsReferenceNumberFeatureFeature Description1HookswitchHolds the handset and ends calls.2Line keysEnable you to select a phone line, view calls on a line, orquickly call a favorite contact.3SpeakerProvides ringer and speakerphone audio output.4Dialpad keysEnable you to enter numbers, letters, and specialcharacters. You can also use the dialpad keys to selectmenu items that have index numbers.5MicrophoneTransmits audio to other phones.6Volume keysAdjust the volume of the handset, headset, speaker, andringer.7Mute keyMutes local audio during calls and conferences.8Speakerphone keyEnables you to place and receive calls using thespeakerphone.9Headset keyEnables you to place and receive calls through a headset.10Security slot (on side)Enables you to attach a universal security cable lock toyour phone so you can secure it to a desktop.11Navigation keys / Select keyScrolls through information or options displayed on thephone's screen. Selects a field of displayed data.Polycom, Inc.7
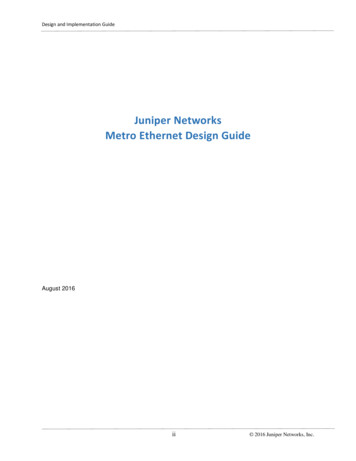
Getting Started with VVX Business Media PhonesReferenceNumberFeatureFeature Description12Soft keysEnable you to select context sensitive keys that displayalong the bottom of the screen.13Home keyDisplays the Home screen from other screens anddisplays the Lines and Calls screen from the Homescreen.14ScreenShows a 2.5-inch (6.35 cm) diagonal screen with abacklight that enables you to view menus and data.15Message Waiting IndicatorFlashes red to indicate when you have new messages.VVX 300 Series HardwareThe following figure displays the hardware features on the VVX 300, 301, 310, and 311 business mediaphones. The table lists each feature numbered in the figure.VVX 300 series hardware featuresVVX 300 Series Hardware Feature DescriptionsReferenceNumberFeatureFeature Description1Security slot (ontop)Enables you to attach a universal security cable lock to your phone so youcan secure it to a desktop.Polycom, Inc.8
Getting Started with VVX Business Media PhonesReferenceNumberFeatureFeature Description2Reversible tabSecures the handset in the cradle when your phone stand is positioned ata high angle. To secure the handset, remove the tab, reverse it so theprotrusion points up, and re-insert it. Position the handset so the protrusionon the tab fits into the slot on the handset.3SpeakerProvides ringer and speakerphone audio output.4Soft keysEnable you to select context sensitive keys that display along the bottom ofthe screen.5Transfer keyTransfers an active call to a contact.6Dialpad keysEnable you to enter numbers, letters, and special characters. You can alsouse the dialpad keys to select menu items that have index numbers.7Messages keyEnables you to access and manage instant and voice messages.8Hold keyHolds an active call or resumes a held call.9MicrophoneTransmits audio to other phones.10Volume keysAdjust the volume of the handset, headset, speaker, and ringer.11Mute keyMutes local audio during calls and conferences. The key glows red whenactivated.12SpeakerphonekeyEnables you to place and receive calls using the speakerphone. The keyglows green when activated.13Headset keyEnables you to place and receive calls through a headset. The key glowsgreen when an analog headset is activated and blue when a USB orBluetooth headset is activated.14Navigation key/Select keyScrolls through information or options displayed on the phone's screen.Selects a field of displayed data.15Home keyDisplays the Home screen from other screens, and displays the Lines andCalls screen from the Home screen.16Line keysEnable you to select a phone line, view calls on a line, or quickly call afavorite contact.17ScreenShows a 3.2-inch (8.3 cm) diagonal screen with a backlight that enablesyou to view menus and data.18Message WaitingIndicatorFlashes red to indicate when you have new messages.Polycom, Inc.9
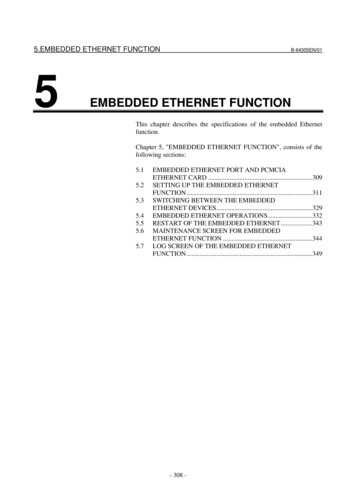
Getting Started with VVX Business Media PhonesVVX 400 Series HardwareThe following figure displays the hardware features on the VVX 400, 401, 410, and 411 business mediaphones. The table lists each feature numbered in the figure.VVX 400 series hardware featuresVVX 400 Series Hardware Feature DescriptionsReferenceNumberFeatureFeature Description1Security slot(on top)Enables you to attach a universal security cable lock to your phone so you cansecure it to a desktop.2Reversible tabSecures the handset in the cradle when your phone stand is positioned at ahigh angle. To secure the handset, remove the tab, reverse it so the protrusionpoints up, and re-insert it. Position the handset so the protrusion on the tab fitsinto the slot on the handset.3SpeakerProvides ringer and speakerphone audio output.4Soft keysEnable you to select context sensitive keys that display along the bottom of thescreen.Polycom, Inc.10
Getting Started with VVX Business Media PhonesReferenceNumberFeatureFeature Description5Transfer keyTransfers an active call to a contact.6Dialpad keysEnable you to enter numbers, letters, and special characters. You can also usethe dialpad keys to select menu items that have index numbers.7Messages keyEnables you to access and manage instant and voice messages.8Hold keyHolds an active call or resumes a held call.9MicrophoneTransmits audio to other phones.10Volume keysAdjust the volume of the handset, headset, speaker, and ringer.11Mute keyMutes local audio during calls and conferences. The key glows red whenactivated.12SpeakerphonekeyEnables you to place and receive calls using the speakerphone. The key glowsgreen when activated.13Headset keyEnables you to place and receive calls through a headset. The key glowsgreen when an analog headset is activated, and blue when a USB or Bluetoothheadset is activated.14Navigation key/Select keyScrolls through information or options displayed on the phone's screen. Selectsa field of displayed data.15Home keyDisplays the Home screen from other screens, and displays the Lines andCalls screens from the Home screen.16Line keysEnable you to select a phone line, view calls on a line, or quickly call a favoritecontact.17ScreenShows a 3.5-inch (8.89 cm) diagonal screen with a backlight that enables youto view menus and data.18MessageWaitingIndicatorFlashes red to indicate when you have new messages.19USB PortEnables you to attach a USB flash drive or USB headset (VVX 411 only).VVX 500 Series and VVX 600 Series HardwareThe following figure displays the hardware features on the VVX 500, 501, 600, and 601 business mediaphones. The table lists each feature numbered in the figure.Polycom, Inc.11
Getting Started with VVX Business Media PhonesVVX 500 series and VVX 600 series hardware featuresVVX 500 Series and 600 Series Hardware Feature DescriptionsReferenceNumberFeatureFeature Description1Security slot (onback)Enables you to attach a universal security cable lock to your phone so youcan secure it to a desktop.2Reversible tabSecures the handset in the cradle when your phone stand is positioned ata high angle. To secure the handset, remove the tab, reverse it so theprotrusion points up, and re-insert it. Position the handset so the protrusionon the tab fits into the slot on the handset.3SpeakerProvides ringer and speakerphone audio output.4Dialpad keysEnable you to enter numbers, letters, and special characters. You can alsouse the dialpad keys to select menu items that have index numbers.5MicrophoneTransmits audio to other phones.6Volume keysAdjust the volume of the handset, headset, speaker, and ringer.7Mute keyMutes local audio during calls and conferences. The key glows red whenactivated.Polycom, Inc.12
Getting Started with VVX Business Media PhonesReferenceNumberFeatureFeature Description8Speakerphone keyEnables you to place and receive calls using the speakerphone. The keyglows green when activated.9Headset keyEnables you to place and receive calls through a headset. The key glowsgreen when an analog headset is activated, and blue when a USB orBluetooth headset is activated.10TouchscreenEnables you to select items and navigate menus on the touch-sensitivescreen. Tap the screen to select and highlight screen items. To scroll,touch the screen, and swipe your finger up, down, right, or left.11Home keyDisplays the Home screen from other screens, and displays the Lines andCalls screens from the Home screen.12Message WaitingIndicatorFlashes red to indicate when you have new messages.13USB portEnables you to attach a USB flash drive or a USB headset.Securing Your Phone with the Security SlotThe security slot is located on the top, left, or right side of the phone and is indicated by a padlocksymbol. See the hardware figure for your phone for the location of the security slot.By fastening one end of a universal security cable to a stationary object such as a desk or table and theother end to the security slot available on VVX business media phones, you can prevent your phone frombeing removed. Refer to the universal security documentation for more information on securing yourphone.Navigating VVX Business Media PhonesThe phone has icons, status indicators, and user screens to help you navigate and understand importantinformation on the state of your phone.Accessing Screens on VVX Business Media PhonesYou can access the following screens on the phone: Home Screen—Displays your messages, settings, and information. Calls Screen—Displays all active and held calls on your line. Lines Screen—Displays your phone lines, favorites, and conditional soft keys. Active Call Screen—Displays the active call currently in progress.Access the Home ScreenOn VVX phones, the phone lines and icons you can select to access phone features, settings, andinformation display on the Home screen.Polycom, Inc.13
Getting Started with VVX Business Media PhonesThe following figure shows the Home screen on VVX 500 phones.Home screen on VVX 500 phonesProcedure1. Press.Access the Calls ScreenYou can access the Calls screen when you have one held call or an active and held call in progress onyour phone.The Calls screen is automatically displayed when you have an active call and one or more held calls onyour
Troubleshoot Polycom BToE Connector Start Issues.55 Troubleshoot Pairing with Phone with Your Computer.56 Troubleshoot Polycom BToE Connector with a USB Audio Device.56 Contents Polycom, Inc. 3. Before You Begin Topics: Audience, Purpose, and Required Skills Related Documentation .