Transcription
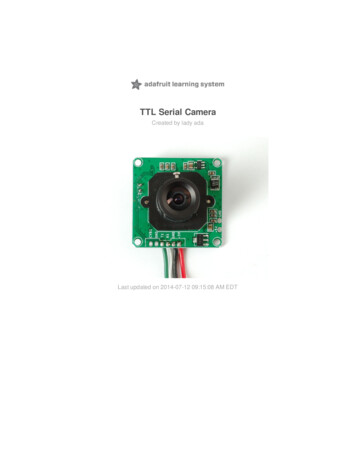
TTL Serial CameraCreated by lady adaLast updated on 2014-07-12 09:15:08 AM EDT
Guide ContentsGuide Contents2Overview3Sample Images4Wiring the Camera7Testing the Camera11Using CommTool13Despite the software letting you change the baud rate this is a very flaky setting andeven if it works, when you power up the camera again it will reset. Some experimentershave accidentally disabled their cameras by trying to change the baud rate. We do notsuggest you mess with the baud rate settings. If you do, you may permanently disableyour camera and we will not replace it!18Using the Camera22Taking a Snapshot23Detecting Motion24Adjusting the Manual Focus25F.A.Q.27Buy a TTL Serial Camera28Downloads29Unsupported Alternate libraries29 Adafruit meraPage 2 of 29
OverviewThis tutorial is for our new TTL serial camera module with NTSC video output. Thesemodules are a nice addition to a microcontroller project when you want to take a photo orcontrol a video stream. The modules have a few features built in, such as the ability tochange the brightness/saturation/hue of images, auto-contrast and auto-brightnessadjustment, and motion detection.Since it is a little confusing how this is both a snapshot and video camera, we'd like toexplain it in detail now. The module was initially designed for surveillance purposes. Itsmeant to constantly stream TV-resolution video out of the Video pin (this is NTSCmonochrome format) and also take commands from the serial port. The serial portcommands can request that the module freeze the video and then download a JPEG colorimage. So for example, normally its just displaying video to a security monitor. When motionis detected, it would take a photo and save it to a disk for later analysis.The module is admittedly not extremely high resolution - the maximum image size it cantake is 640x480 pixels. And it is sensitive to infrared light, which alters the color renditionsomewhat. The reason for all this is that it's meant for surveillance, not for nature Adafruit meraPage 3 of 29
photography. However, as far as we can tell, this is the best module on the market.Mo dule size: 32mm x 32mmImage senso r: CMOS 1/4 inchCMOS Pixels: 0.3MPixel size: 5.6um*5.6umOutput fo rmat: Standard JPEG/M-JPEGWhite balance: AutomaticExpo sure: AutomaticGain: AutomaticShutter: Electronic rolling shutterSNR: 45DBDynamic Range: 60DBMax analo g gain: 16DBFrame speed: 640*480 30fpsScan mo de: Progressive scanViewing angle: 60 degreesMo nito ring distance: 10 meters, maximum 15meters (adjustable)Image size: VGA (640*480), QVGA (320*240), QQVGA (160*120)Baud rate: Default 38400 (the datasheet claims you can change the baud rate with acommand but it does not work reliably)Current draw: 75mAOperating vo ltage: DC 5VCo mmunicatio n: 3.3V TTL (Three wire TX, RX, GND)Sample ImagesHere are two example images, one of outside during a cloudy day, and one inside on asunny day. Adafruit meraPage 4 of 29
Adafruit meraPage 5 of 29
Adafruit meraPage 6 of 29
Wiring the CameraThe module comes without any connector so you'll need to solder wires into the connectionpads. The good news is the pads are not too close togehter (about 2mm) and you can useany stranded or solid-core wire.If you aren't planning to use the video output abilities, you can use 4 wires. We will use redfor the 5V pin, black for the Ground pin, white for the RX pin (data into the module) andgreen for the TX pin (data from the module) Adafruit meraPage 7 of 29
If you'd like to get NTSC video out to connect to a TV or monitor, solder another black wireto the second Ground pin, and a yellow wire to the CVBS pin. Adafruit meraPage 8 of 29
Adafruit meraPage 9 of 29
If you have the weatherproof version of this camera, it comes prewired with the following:Red is connected to 5V inBlack is connected to GroundGreen is RXWhite is TXYellow is NTSC Video signal outBrown is NTSC Video ground Adafruit meraPage 10 of 29
Testing the CameraThe quickest way to test out the modules is to use the NTSC video out connection. Thatway, when you adjust the view & focus you can immediately see the results. Paired with thenext section (using the Comm Tool), its the ideal method of introducing yourself to themodule.Most TV's and monitors require an RCA jack or plug input. We just soldered a spare RCAjack to the camera, with black being the case ground and yellow signal. You can get RCAcables and accessories in any hobby/electronics shop like Radio Shack.Unfo rtunately, it is no t po ssible to change the camera fro m NTSC to PAL - itshardcoded by a pin soldered to the board and there's no easy way to extract it and changeit (we tried!)Plug in the NTSC cable to your monitor, and connect the red and black power wires to 5Vsupply - you should get monochrome video output on the monitor immediately!We have some NTSC television modules in the Adafruit shop you can use to testwith (http://adafru.it/aM5) Adafruit meraPage 11 of 29
Adafruit meraPage 12 of 29
Using CommToolTo use the Comm Tool, a windows utility, we need to set up a serial link to the camera.There's two ways we suggest doing this. One is to use something like an FTDI friend or otherUSB/TTL serial converter. If you have an Arduino you can 'hijack' the serial chip (FTDI chip orsimilar) by uploading a blank sketch to the Arduino:// empty sketchvoid setup(){}void loop(){}Note: 'Hijacking' the serial port only works on Arduinos with a separate USB interface,like the Uno. It won't work on a Leonardo!If you're using a Leonardo, Micro, Yun, or other ATmega32U4-based controller, use thisLeo passthru sketch instead of the "blank" sketch.//Leo passthru// Allows Leonardo to pass serial data between// fingerprint reader and Windows.//// Red connects to 5V// Black connects to Ground// Green goes to Digital 0// White goes to Digital 1void setup() {Serial1.begin(57600);Serial.begin(57600);}void loop(){while hile (Serial1.available())Serial.write(Serial1.read()); Adafruit meraPage 13 of 29
}Now, wire it up as follows:For the weatherproof camera, the white and green wires are swapped on somecameras! So please flip the white and green wires indicated if using the metal camera.Red should still be connected to 5 and Black to GroundNote the 10K resistor divider, the camera's serial data pins are 3.3v logic and its a good ideato divide the 5V down so that its 2.5V. Normally the ouput from the digital 0 pin is 5V high,the way we connected the resistors is so the camera input (white wire) never goes above3.3VNow download and install the VC0706 CommTool software (see below in the Downloadsection) Adafruit meraPage 14 of 29
Start up the software and select the COM port that the Arduino is on.Then Open the port and click Get Versio nNote it says VC0703 - we don't know precisely why the DSP is programmed with a differentnumber - its one of those mysteries! Still, you should get a responseThe next button you should press is near the bottom FBUF CTRL. Adafruit meraPage 15 of 29
This is quite a panel, but we can use this to get images directly from the camera which isgood for debugging.Point the camera at something you want to take a photo ofClick Sto p FBuf to freeze the frame bufferClick Sel File to select the file to save the JPG as Adafruit meraPage 16 of 29
Next press Read (next to Sel File) to read the jpeg image off the cameraThats it! You can now easily test reading camera images. To take another photo. PressResume up at the top to have the video start up again. Then click Sto p CFbuf when youwant to snap another photo. Finally you can select the Co mpressio n Ratio which willimprove or degrade the image quality but also change the image transfer time. There's no Adafruit meraPage 17 of 29
way to change the image size from this program (easily) but we can do it using the Arduinosketch so just try it out here to start.You might notice there's a dropdown for changing the baud rate. By default the baudrate is38400 baud.Despite the software letting you change the baudrate this is a very flaky setting and even if it works,when you power up the camera again it will reset.Some experimenters have accidentally disabled theircameras by trying to change the baud rate. We donot suggest you mess with the baud rate settings. Ifyou do, you may permanently disable your cameraand we will not replace it! Adafruit meraPage 18 of 29
The only other thing we suggest checking out is the Image Pro perty button, which will letyou adjust settings for the camera, we bumped up our saturation a bit to get better images.Dragging the sliders will make the video output change immediately so this is a handy placeto get a TV connected up so you can check out how it works Adafruit meraPage 19 of 29
There are many options for this software, here's what we think of the other buttons.Personally, we don't suggest going in to any of them unless you really need to.Co nfig - see abo veGet Versio n - see abo veR/W Data - this is for writing raw data to the DSP chip processor. Don't do this unlessyou're sure you know what you're doing since it will mess with the camera's ability.Even we don't know what it would be good forCo lo r Ctrl - this is for selecting Color or Black&White or Auto select (probably basedon lighting conditions). You probably want to keep it at AutoMirro r Ctrl - we think this is so you can flip the display (if its bouncing off a mirror)Po wer Ctrl - this is for testing the power down mode, and it seems like you might beable to have it auto-power down when there's no motion.Timer Ctrl - there is an RTC built into the DSP which you can set, however there's nobattery backup so if power is lost the RTC will be reset so we don't think its terriblyusefulAE Ctrl - this is for controlling the auto-contrast/brightness. By default its set to autoselect for indoor or outdoor use. Probably best to leave it as isMo tio n Ctrl - this is for the motion detection system. You can tweak the settings andalso test it. We have an Arduino sketch for interacting with the motion detectionsystem. By default it works pretty good but you can super tweak it out if you want to.OSD Co nfig - The protocol sheet and this seem to imply you can do on-screen Adafruit meraPage 20 of 29
display but after much time spent on it, we determined its not activated somewhere inthe DSP. We've never seen a VC0706 camera that could do it. :(Image pro perty - see abo veGamma - this is for more precise gamma control of the CMOS sensor. It seems to bepreset to be OK but you can mess with this if you'd likeSPI Flash - for reading/writing to the SPI storage? Not sure if its a good idea to messwith thisOther Ctrl - for playing with the DAC? No idea what this is for.Up/Do wn Lo ad - this is for reading and writing to the flash probably to upload newDSP code. We dont suggest messing with thisSystem Reset - does a reset of the module. Press this if its not respondingFBuff Ctrl - see abo veZo o m Ctrl - The module has built in 'Pan Tilt Zoom' ability BUT its for video only andwont affect photos snapped. You can play with the PTZ here, its pretty basic but couldbe useful for someone Adafruit meraPage 21 of 29
Using the CameraNext up, we will wire the camera to our microcontroller (in this case an Arduino). This ispretty similar to the above except we will be using two digital pins and a software serial portto talk to the camera. To save images, you'll need some sort of external storage like ourmicroSD breakout board (http://adafru.it/254).Connect up the camera like this:For the weatherproof camera, the white and green wires are swapped on somecameras! So please flip the white and green wires indicated if using the metal camera.Red should still be connected to 5 and Black to GroundWe suggest testing the microSD card first. Check out our microSD breakout board tutorialand verify that you can read from the card by listing the files. Once you have verified themicroSD card wiring, you can come back here and install the VC0706 camera library.Visit the Github repository here. (http://adafru.it/aM6) To download. click the DOWNLOADS Adafruit meraPage 22 of 29
button in the top right corner, rename the uncompressed folder Adafruit VC0706. Checkthat the Adafruit VC0706 folder contains Adafruit VC0706.cpp and Adafruit VC0706.h Placethe Adafruit VC0706 library folder your arduinosketchfolder/libraries/ folder. You may needto create the libraries subfolder if its your first library. Restart the IDE.If you're using Arduino v23 or earlier, you'll also need to install the NewSoftSerial library.Download it by clicking this link (http://adafru.it/aM7) and install it as you did theAdafruit VC0706 library. Arduino 1.0 has this built in now (called SoftwareSerial)Taking a SnapshotOK now you're finally ready to run the snapshot demo. Open up the Arduino IDE andselect File- Examples- Adafruit VC0706- Snapsho t sketch and upload it to theArduino. Open up the serial monitor and you can see the sketch will take a 640x480 photoand save it to the microSD card. You can then pop the card into your computer to seethe JPG fileThere are a few things you can change once you get it working. One is changing the pins thecamera uses. You can use any two digital pins, change this line:// This is the camera pin connection. Connect the camera TX// to pin 2, camera RX to pin 3NewSoftSerial cameraconnection NewSoftSerial(2, 3);You can also change the snapshot image dimension to 160x120, 320x240 or 640x480 bychanging these lines:// Set the picture size - you can choose one of 640x480, 320x240 or 160x120 Adafruit meraPage 23 of 29
// Remember that bigger pictures take longer to transmit!cam.setImageSize(VC0706 640x480);//cam.setImageSize(VC0706 320x240);//cam.setImageSize(VC0706 160x120);// biggest// medium// smallSimply uncomment the size you want, and comment out the others. Bigger pictures will takelonger to snap, so you will want to think about how fast you need to grab data and save it tothe diskDetecting MotionA neat thing that the camera has built in is motion detection. It will look for motion in thevideo stream and alert the microcontroller (by sending a serial data packet) when motion isdetected. IN this way you can save a bit of cash and skip on having a PIR sensor (although aPIR sensor will be better at detecting warm mammalian things).Load up the File- Examples- Adafruit VC0706- Mo tio nDetect sketch andupload it to the Arduino. It will take a photo immediately because it just turned on. Then waita few minutes and wave you hand in front of the camera, it will take another photo.You can turn motion detection on or off by calling setMo tio nDetect() Adafruit meraPage 24 of 29
You can turn motion detection on or off by calling setMo tio nDetect()// Motion detection system can alert you when the camera 'sees' motion!cam.setMotionDetect(true);// turn it on//cam.setMotionDetect(false);// turn it off (default)You'll need to 'poll' the camera to ask it when motion is detected, bycalling mo tio nDetected()- it will return true if motion was recently detected, and falseotherwise.Adjusting the Manual FocusOne last thing, the camera modules use a manual focus system - there's no auto focus. Thiscan be good or bad. The camera comes with a far depth of focus which is good for moststuff. If you want to change the focus, we strongly recommend plugging it into a videomonitor as shown above so you can see exactly how the camera focus looks. You can thenlock the focus with the set screwThe version in the weatherproof housing is a little tougher to adjust but it can be done by Adafruit meraPage 25 of 29
unscrewing the housing (it takes a few steps but its all easy to do) and then adjusting thefocus before reassembly Adafruit meraPage 26 of 29
F.A.Q.Can I change the baud rate on this Camera?You might notice there seems to be a command for changing the baud rate. By defaultthe baudrate is 38400 baud.Despite the so ftware letting yo u change the baud rate this is a very flakysetting and even if it wo rks, when yo u po wer up the camera again it willreset. So me experimenters have accidentally disabled their cameras bytrying to change the baud rate. We do no t suggest yo u mess with the baudrate settings. If yo u do , yo u may permanently disable yo ur camera and wewill no t replace it!How fast can I get pictures from the camera?This is a pretty slow UART camera, it can take up to 30 seconds to transfer an image! It ismeant for snapshots or time-lapse type photography, not for any kind of real-timeanalysisWhy is the color washed out? It looks like a monochrome image.Because it was designed for surveillance, the sensitivity of the camera extends into theinfrared range. This means that objects that reflect or emit infrared rays will appear lighterthan the do to the human eye. In some cases the image will appear washed out andalmost monochromatic.A more natural rendering can be achieved using an IR blocking filter such as a B W486 (http://adafru.it/d2t). (Thanks to forum member azhilyakov for the comparisonphotos!) Adafruit meraPage 27 of 29
Buy a TTL Serial CameraBuy a TTL Serial Camera (http://adafru.it/397) Adafruit meraPage 28 of 29
DownloadsVC0706 Comm Tool - Windows control software (http://adafru.it/aM8) (works in Parallels inMacOSX. We do not have source code for this tool in order to directly port it to Mac/Linux)Adafruit VC0706 Arduino library Github repository (http://adafru.it/aM6)NewSoftSerial library download (http://adafru.it/aM7)Unsupported Alternate C0706-Serial-Camera-Library (http://adafru.it/aUn)is a version for the Maple - we didn't write this code and don't support it but it might behandy for Maple users! Adafruit IndustriesLast Updated: 2014-07-12 09:15:10 AM EDTPage 29 of 29
USB/TTL serial converter. If you have an Arduino you can 'hijack' the serial chip (FTDI chip or similar) by uploading a blank sketch to the Arduino: If you're using a Leonardo, Micro, Yun, or other ATmega32U4-based controller, use this Leo_passthru sketch instead of the "blank" sketch. // empty sketch void setup() {} void loop() {}