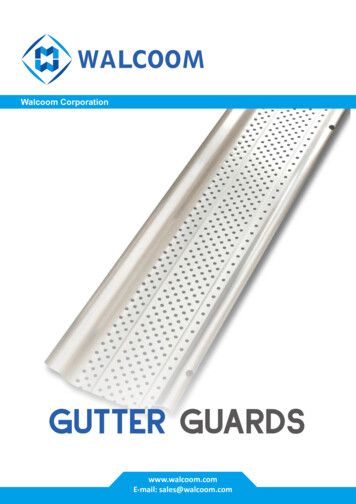
Transcription
Stainless SteelMicro-MeshGUTTERGUARDDIY KITFREEGUTTERGUARD*BRUSHby registering for your25 year warranty!*Shipping and handlingnot DEDTOOLSNot ADDERWith StandoffINSTALLGUIDENEED HELP?INCLUDED Gutter Guard Self-tapping screwsProper installationis very important toensuring optimalperformance fromyour gutter guards.We encourage you toreview the full guideprior to installing.SCAN HERESTART YOUR INSTALLJOURNEY terguard.com/contact (844) 359-7691 M-F 8am-7pm CST
IMPORTANTINFORMATIONBEFORE YOU BEGINSAFETY IS OUR #1 PRIORITY.During Installation we recommendthat you. Wear gloves & safety glasses. Use an extension ladder and ladderstandoff for stability.DO ITRIGHT.DO IT ONCE. Make all cuts and bends to the gutterguards on the ground.Also make sure to: Obey local building codes. Check to see if your roofing materialis adhered to your underlayment.Do not pry up your shingles or tearyour underlayment. Use alternateinstallation method. Complete the “Do it Right, Do it OnceInstall Check List”. See page 16.FREEZING CONDITIONSIf you live in an area that is prone tofreezing, the following issues can occurwith any gutter guard.ICICLES & ICE DAMSIcicles and ice dams may form on yourgutter during freezing conditions. Icedams can cause water to leak back intoyour home. Icicles can break and causeserious bodily harm and injury. Properlyinstalled, operated and maintainedheating elements on your roof and guttercan melt icicles and ice dams. Use alocal licensed electrical contractor ingood standing for installing any heatingelement products.SNOW MELTINGSnow melt may result in water runoff fromyour roof which can refreeze on theground below creating a potential slippinghazard.
INSTALLOVERVIEWPRE-INSTALLThe Basics.2Preparing Your Gutters.3Determining Roof Slope/Pitch.4Choose Your Install Method.5Your Securing Method.7INSTALLATIONIMPORTANT STEPS.7Typical Install Guide.8Cutting & Joining Sections.10Inside Corners.11Outside Corners.12End Caps.12Bending the Mesh.13Removing the Gap.14EXTRASGeneral Customization.15DO IT RIGHT. DO IT ONCE. Checklist.16Maintaining Your Gutter Guards.17Warranty Information.18DO NOT RETURN THIS PRODUCT TO THE STOREPlease contact our Customer Experience Team before returningany product. If you experience problems with your installation, ourteam will be happy to assist you.vikinggutterguard.com/contact (844) 359-7691 M-F 8am-7pm CST1
THE BASICSIN YOUR KITTROUGHProvides maximum water filtration whilevastly improving overall performance.ALUMINUMFRONT RAILHolds mesh in place andoffers superior strengthand performance.ALUMINUMREAR RAILThe rear rail isintentionallyshorter in lengththan the front rail.This allows roombetween installedpieces for anyshifting/settlingof the home overthe lifespan of thegutter guards.EXTENDEDMESHFor overlapping mesh whenjoining sections.SELF-TAPPINGSCREWSUse 3 self-tapping screwsper section for easy install.NEED HELP? CONTACT OUR CUSTOMER EXPERIENCE TEAM.vikinggutterguard.com/contact (844) 359-7691 M-F 8am-7pm CSTDO IT RIGHT. DO IT ONCE. LET’S GET STARTED2
PRE-INSTALLXPREPARINGYOUR GUTTERSClean Your GuttersClean all leaves, pine needles,and other debris from yourgutters and downspouts.PRE-INSTALL1Take Care of RepairsComplete any repairs to yourgutters and downspouts asneeded.2PRE-INSTALLDETERMININGROOF SLOPE/PITCHDetermine the slope/pitch of your roof.If the roof is mildly to moderately pitched (1–6 pitch), youcan install the gutter guards at the same slope (5º–25º).If the roof is steeply pitched (7 or greater), you will needto use one of the bending methods shown on page 14 toachieve the recommended installation slope (5º–10º or 1–2pitch) of the gutter guard.Need more information on findingthe slope for your installation?Check out this video.More information on determining roof slope on page 43
PRE-INSTALLDETERMINING ROOF SLOPE/PITCH CONTINUEDROOF & GUTTER GUARDMILD/MODERATEROOF SLOPE/PITCHSLOPEPITCHor5º-25º1-6ROOFSTEEPROOF SLOPE/PITCH4GUTTER 1-2You will need to use one of the bending methods shown on p. 13 to achievethe recommended installation slope.
PRE-INSTALL3PRE-INSTALLCHOOSE YOURINSTALLATION METHODDetermine the method that works best foryour gutter-to-roof configuration.TRADITIONAL INSTALLATIONROOFMETHOD AGLESHINARDER GUGUTTUnder the RoofInstallationFASCIAWOODSlide gutter guard underroof shingles.GUTTERIMPORTANT: If your roofingmaterial is adhered to yourunderlayment, do not use thismethod. Use one of the bendingmethods instead. (See page 13)ROOFMETHOD BBelow the RooflineInstallationBend mesh either up ordown, then fasten to thegutter, drip edge or fasciawith screws. (See page 13)NOTE: This method workson any scenario whenyou cannot install directlyunder the shingles, tile, etc.GLESHINBEND UPMETHODERTTGUARDGUBEND DOWNMETHODFASCIAWOODGUTTERSee more install methods on page 65
LEGSHINFMETHOD COBEND UPMETHODROPRE-INSTALLINSTALL METHODS CONTINUEDSteep RoofInstallationARDER GUGUTTSlide it under the roof shingle, ifit causes the roof shingle to rampup or your roofing material isadhered to your underlayment,see Method B and bend themesh up or down and fasten tothe gutter, drip edge or fasciawith screws. (See page 13)BEND DOWNMETHODFASCIAWOODGUTTERMETHOD DFROOAlternative InstallationMethodIf the gutter guard isn’t wideenough to slide under the roofshingles, put 3 screws in the backof the gutter, drip edge, or fasciato hold up each section. Securethe gutter guard to the front lipof the gutter with screws.GLESHINARDER GUGUTTFASCIAWOODGUTTER**If you need additional screws,please give us a call at 844.359.7691.IMPORTANT NOTE FOR ALL INSTALL METHODSAVOID ROOF RAMPINGRoof ShingleCorrectly-InstalledGutter GuardCORRECTGutterThe gutter guard should be bent downat an angle to slide under the shinglewithout ramping up.6XRamped ShingleIncorrectly-InstalledGutter GuardINCORRECTGutterThe gutter guard is installedimproperly since the shingleon the roof is being impacted.
PRE-INSTALLHOW TO SECUREWe’ve designed Viking Gutter Guard with a simple installationin mind. Manageable sections slide right into place. Then, simplyscrew them on. Most homes are completed in an afternoon.PRE-INSTALL4SCREW IT ON Use 3 self-tapping screws persection. Pre- drilling not required.IMPORTANT: DON’T MISS THESE STEPS!Rainwater may run over the front lip of your gutter if these steps are overlooked.REMOVE THE GAPTHE TROUGHFront frame of the gutter guard should beflat against the front lip of your gutter.The trough (see page 2) should be atleast 1/8” below the lip of the gutter. Thisadjustment may need to be made onsteeply pitched roofs or gutters that arehung 1 inch or lower below the roofline.PUSH DOWN FIRMLYWITH YOUR FINGERSFront lipof gutterPUSH DOWN FLATTO REMOVE GAP.7
INSTALLATIONTYPICALINSTALLATIONThis section provides general guidance on getting started and working yourway through an install. Remember to check pages 4 – 6 to determine theinstallation method that will work best with yourgutter-to-roof scenario.1STARTING OUTWe recommend starting at an insidecorner. If you do not have one, start bythe downspout. Otherwise, start and theend of the gutter.2FOR CUTTING SECTIONS3Use a new, or freshly sharpened, pairof tin snips for cutting the aluminumrail. A pair of commercial gradescissors will work for cutting the mesh.34DID YOU CHOOSE METHOD B OR C?BENDING THE MESH (If Necessary)Depending on the install method you chose onpages 5-6, you may need to bend the mesh upor down to achieve the recommended slopeof the gutter guard (5º-25º). See page 13 forfurther instruction on how to bend the mesh.If you chose method A, you can skip this step.8
INSTALLATION4FOR JOINING SECTIONSFor joining sections together- layone end of the mesh so it overlapsdirectly over the other section.56SCREW INSTRUCTIONSIf screwing it down, use the guideson the front rail to place the screw.Fasten with 3 screws for eachsection of gutter guard.FOR MAKING THE END CAPFor creating an end cap, trim off a fewinches from the front and back rail.You will need to expose enough meshto cover the gap at the end of thegutter. Push the mesh into the gutterend to seal the space.7FOR CORNERSRefer to pages 11-12 for installingat an inside and/or outside corner.9
DO IT RIGHT. DO IT ONCE. INSTALLATIONCutting & Joining SectionsCUTTING SECTIONSUse a sharp pair of tin snips to cut through the aluminum rail and themesh. Commercial-grade scissors can also be used to cut the mesh.HAVING TROUBLE?Check out this video to see our recommendedmethod for cutting the rails.JOINING SECTIONSEach section has mesh that extends past the aluminum rail. Lay oneend of the mesh so it overlaps directly over the other section.Note: The rear rail has more exposed mesh than the front rail. This is intentional.10NEED HELP?vikinggutterguard.com/contact (844) 359-7691 M-F 8am-7pm CST
vikinggutterguard.com/contact (844) 359-7691 M-F 8am-7pm CSTInside CornersINSIDE CORNERSSlide one piece so that it is flush with the back corner. On a second piece,trim back the aluminum rails by approximately 1 inch. Tuck the exposedmesh down inside the gutter adjacent to the piece already in place.1234INSTALLATIONDO IT RIGHT. DO IT ONCE. NEED HELP?RAINWATER DIVERTERSRoof valleys can cause excessive rain water anddebris build up creating challenges for all gutterguards. Rainwater diverters help hold debrisback and away from the gutter guard.Get more information and purchasing detailsat RainwaterDiverters.com.11
DO IT RIGHT. DO IT ONCE. INSTALLATIONEnd Caps & Outside CornersOUTSIDE CORNERSLet the piece run long to the end of the gutter. Bend down theback aluminum rail into the gutter. Mark the adjoining piece atthe same angle as the roof edge, then use tin snips to cut awaythe outlined piece. Once cut, fit it into the outside edge so thatit’s aligned with the opposite piece.1234END CAPSTrim back the aluminum rails and tuck the exposed mesh downinto the gutter. Make sure the entire gutter end is sealed.121234
vikinggutterguard.com/contact (844) 359-7691 M-F 8am-7pm CSTBending The MeshWhat you’ll need:BENDING THE MESH Bending the mesh allows youto fit the gutter guard on anygutter-to-roof scenario. 1Two - 1”x2” boards that are4.5’ long with square edgesTwo - 4” clampsMeasuring TapePermanent MarkerGlovesMeasure & MarkOnce you have all materialsgathered, measure and markwhere the bend needs to beon the mesh based on yourgutter-to-roof scenario.2INSTALLATIONDO IT RIGHT. DO IT ONCE. NEED HELP?Clamp MeshClamp the gutter guardbetween two 1”x2” boardsto hold it in place.3Bend MeshUse the leverage from theclamp and/or boards tobend the mesh along theline you’ve marked.Note: Bend the mesh either upor down depending on the typeof roof you have.4InstallMaking sure the mesh isbent at an angle that alignswith your roof configuration,install the gutter guard perthe best installation for yourgutter-to-roof scenario.(See pages 5-6.)NEED HELP?vikinggutterguard.com/contact (844) 359-7691 M-F 8am-7pm CST13
INSTALLATIONDO IT RIGHT. DO IT ONCE. Removing The GapIMPORTANT: DON’T MISS THESE STEPS!Rainwater may run over the front lip of your gutter if these steps are overlooked.REMOVING THE GAPXINCORRECTCORRECTPUSH TROUGH DOWNMake sure gutter guardsits flat on gutter lip. Meshtrough should be at least 1/8”below gutter lip. Use fingersif necessary to push meshtrough down.REMOVE THE GAPThere should be no spacebetween the front rail andthe gutter lip when youinstall the gutter guards.14
vikinggutterguard.com/contact (844) 359-7691 M-F 8am-7pm CSTCUSTOMIZATIONOPTIONSBelow are several examples of howto customize an install by bending themesh or notching the gutter guards.HAVINGTROUBLE?Scan this QRcode to see ourhow-to videos foreach roof/gutterconfigurationLOW-HANGING GUTTERSTANDING LOCK METAL SEAMFLAT ROOFSOFT METAL ROOFVILA TILE ROOFWOOD SHAKE ROOFEXTRASNEED HELP?MORE CUSTOM INSTALLS15
EXTRASFollow All Safety GuidelinesComplete the Pre-Installation PlanSee pages 3-7.Acknowledge Important Install StepsSee page 7.Install Gutter GuardsSee pages 8-14.Register Your Product & Leave a ReviewReceive a free “The Gutter Guard Brush” when you registeryour product. See page 17.Learn How To Maintain YourGutter GuardsSee page 17.Follow @VikingGutterGuard16
vikinggutterguard.com/contact (844) 359-7691 M-F 8am-7pm CSTMAINTAINING YOURGUTTER GUARDSYour new gutter guards are designed to be easy to maintain.Follow the tips below for easy maintenance:GET YOUREXTRASNEED HELP?SCAN HEREFREE GUTTERGUARD BRUSH*by registering for your 25 year warranty!*Shipping & handling not includedPERIODICALLY INSPECTBRUSH OFF DEBRISCheck your gutter guards forany debris that may not haveblown off, particularly wheretwo sections of your roof cometogether (valley) or in areas thatare protected from wind.We created “The Gutter GuardBrush” for just this purpose. Screwthe brush on the end of an extensionpole, then from the ground, reachup and brush off the debris. Be sureto wear protective eye wear.Get more information at TheGutterGuardBrush.com17
25 YEAR LIMITEDPARTS WARRANTYGutterglove, Inc. (herein referred to as GGI)warrants to the original purchaser that itsspecially designed Viking Gutter Guard will befree from defects in manufactured parts andagrees that it will, at its option only, either repairthe defect or replace the defective part thereofwith a new or reconditioned equivalent. ThisLimited Warranty is valid for 25 (twenty-five)years for parts only and does not include costof labor for re-installation. In coastal areas,warranty is reduced to 5 (five) years for partsonly. “Coastal areas” is defined as anywherewithin 5 (five) miles of the coast. Shipping costswill be absorbed by the purchaser of VikingGutter Guard. The above named item is subjectto the fol-lowing terms and conditions. No otherwarranty is expressed or implied in this LimitedWarranty.Coverage Exclusions and Limitations: Theabove mentioned warranties are void if anyof the following conditions occur: Improperinstallation; Settlement of building structure;Structural shrinkage or distortion of structure(Example: warping of roof or gutter over time,etc.); Vandalism; Hail; Fire; Tornado; Windstorm;Earthquakes; Lightning; Protective liquids or anytype of roof preservation product applied to rooftops to extend the life of a roof; Maintenanceprocedures are not followed properly; Treesapping on mesh; Insect/bird droppings onmesh; Accidental damage; Acts of God; Misuse orabuse of the gutter guard; Mildew accumulation;Paint overspray; Moss accumulation; Impact offoreign objects; Caustic atmospheric conditions(Example: Acid rain, harmful chemicals, salt spray,etc.) or any other causes beyond the control ofGGI. It is the owner’(s) responsibility to unclog themesh in the event it gets clogged. Icicles can form,and ice can form on top of Viking Gutter Guard inextreme cold weather where snow is present.GGI’s obligation under this warranty shall at no timeexceed the original purchase price of this product attime of sale, but not for installation or re-installationcosts. This warranty covers only Viking Gutter Guardand does not cover the gutter or any part of thebuilding structure.GGI reserves the right to withdraw this warrantyfrom the market at any time. Any and all warrantiesin effect at the time of removal will not be affectedby the withdrawal and will remain in effect until theirexpiration. This warranty is non -transferable.GGI will not be liable to you or any subsequentowner’(s) for a breach of any written or oralexpress warranties, such as those given to youby a contractor, sub-contractor or installer. Anyimplied warranties imposed by law, such as theimplied warranties of merchantability and fitnessfor a particular purpose are limited in time to theduration of this ex-press warranty. GGI shall not beliable for any consequential damages for breach ofany express, written, oral, or implied warranty on anyViking Gutter Guard. Your exclusive remedy shall berepair or replacement solely at GGI’s option, only onterms stated in the warranties.Activation of Warranty: This warranty becomeseffective at time of purchase. Retain this documentwith original purchase receipt. Failure to do so willrender this warranty null and void.Claims Procedure: Any claim made hereundermust be presented to GGI within the warrantyperiod within a reasonable period of time afterdiscovering the defect. The claim should makereference to original date of installation, thepurchaser’s name, address, phone number and acopy of the original receipt.Contact Gutterglove at (844) 359-7691.DO NOT RETURN THIS PRODUCT TO THE STOREPlease contact our Customer Experience Team before returningany product. If you experience problems with your installation, ourteam will be happy to assist you.SCAN HEREvikinggutterguard.com/contact (844) 359-7691 M-F 8am-7pm CST
If the gutter guard isn't wide enough to slide under the roof shingles, put 3 screws in the back of the gutter, drip edge, or fascia to hold up each section. Secure the gutter guard to the front lip of the gutter with screws. **If you need additional screws, please give us a call at 844.359.7691. The gutter guard should be bent down