Transcription
Ventaire Scope Drying and Tracking Cabinet User ManualTM1Storage solutions for healthcare
Ventaire Scope Drying and Tracking Cabinet User Manual2Ventaire User Manual Table of ContentsIntroductionFor All System OperatorsSystem Overview. . . . . . . . . . . . . . . . . . . . . . . . . . . . . . . . . . . . . . . . . . . . . . . . . . . . . . . . . 3System Operation. . . . . . . . . . . . . . . . . . . . . . . . . . . . . . . . . . . . . . . . . . . . . . . . . . . . . . 10System Specifications. . . . . . . . . . . . . . . . . . . . . . . . . . . . . . . . . . . . . . . . . . . . . . . . . . 4Scopes. . . . . . . . . . . . . . . . . . . . . . . . . . . . . . . . . . . . . . . . . . . . . . . . . . . . . . . . . . . . . . . . . . 10Kit descriptions. . . . . . . . . . . . . . . . . . . . . . . . . . . . . . . . . . . . . . . . . . . . . . . . . . . . . . . . . . . 4 Add, edit, and delete endoscope information. . . . . . . . . . . . . . . . 10InnerSpace Support. . . . . . . . . . . . . . . . . . . . . . . . . . . . . . . . . . . . . . . . . . . . . . . . . . . . . . 4Status screen and indicator definitions. . . . . . . . . . . . . . . . . . . . . . . . . . . 11Check In. . . . . . . . . . . . . . . . . . . . . . . . . . . . . . . . . . . . . . . . . . . . . . . . . . . . . . . . . . . . . . . . 12 Inserting scope in cabinet. . . . . . . . . . . . . . . . . . . . . . . . . . . . . . . . . . . . . . . 18For System Administrators Initiating drying process. . . . . . . . . . . . . . . . . . . . . . . . . . . . . . . . . . . . . . . . . 19Check Out. . . . . . . . . . . . . . . . . . . . . . . . . . . . . . . . . . . . . . . . . . . . . . . . . . . . . . . . . . . . . . 19Initial Set-up. . . . . . . . . . . . . . . . . . . . . . . . . . . . . . . . . . . . . . . . . . . . . . . . . . . . . . . . . . . . . . . 5 Check-out process. . . . . . . . . . . . . . . . . . . . . . . . . . . . . . . . . . . . . . . . . . . . . . . . 19Settings. . . . . . . . . . . . . . . . . . . . . . . . . . . . . . . . . . . . . . . . . . . . . . . . . . . . . . . . . . . . . . . . . . . 5 Removing scope from cabinet. . . . . . . . . . . . . . . . . . . . . . . . . . . . . . . . . . 20 Changing PIN. . . . . . . . . . . . . . . . . . . . . . . . . . . . . . . . . . . . . . . . . . . . . . . . . . . . . . . . . 5 Venting. . . . . . . . . . . . . . . . . . . . . . . . . . . . . . . . . . . . . . . . . . . . . . . . . . . . . . . . . . . . . . 20 Changing defaults. . . . . . . . . . . . . . . . . . . . . . . . . . . . . . . . . . . . . . . . . . . . . . . . . . . 6 Expiration. . . . . . . . . . . . . . . . . . . . . . . . . . . . . . . . . . . . . . . . . . . . . . . . . . . . . . . . . . . 21Cabinet. . . . . . . . . . . . . . . . . . . . . . . . . . . . . . . . . . . . . . . . . . . . . . . . . . . . . . . . . . . . . . . . . . . 7Generating a report. . . . . . . . . . . . . . . . . . . . . . . . . . . . . . . . . . . . . . . . . . . . . . . . . . 22 Defining check-in and check-out screens. . . . . . . . . . . . . . . . . . . . . . 7 Tube/filter replacement reset. . . . . . . . . . . . . . . . . . . . . . . . . . . . . . . . . . . . . 8 Changing time. . . . . . . . . . . . . . . . . . . . . . . . . . . . . . . . . . . . . . . . . . . . . . . . . . . . . . . 9 Diagnostics. . . . . . . . . . . . . . . . . . . . . . . . . . . . . . . . . . . . . . . . . . . . . . . . . . . . . . . . . . . 9Care and Maintenance. . . . . . . . . . . . . . . . . . . . . . . . . . . . . . . . . . . . . . . . . . . . . . . . 23 Network settings. . . . . . . . . . . . . . . . . . . . . . . . . . . . . . . . . . . . . . . . . . . . . . . . . . . . 9 Restart system. . . . . . . . . . . . . . . . . . . . . . . . . . . . . . . . . . . . . . . . . . . . . . . . . . . . . . . 9Product Ordering and Replacement InformationReplacement instructions. . . . . . . . . . . . . . . . . . . . . . . . . . . . . . . . . . . . . . . . . . . . 24Ordering replacement parts. . . . . . . . . . . . . . . . . . . . . . . . . . . . . . . . . . . . . . . . 24Removing and replacing a compressor tube/air filter. . . . . . . . . 25Removing and replacing manifold andmanifold auxiliary water tubes. . . . . . . . . . . . . . . . . . . . . . . . . . . . . . . . . . 26Updating Ventaire System SoftwareSoftware Updates. . . . . . . . . . . . . . . . . . . . . . . . . . . . . . . . . . . . . . . . . . . . . . . . . . . . . . 27Storage solutions for healthcare
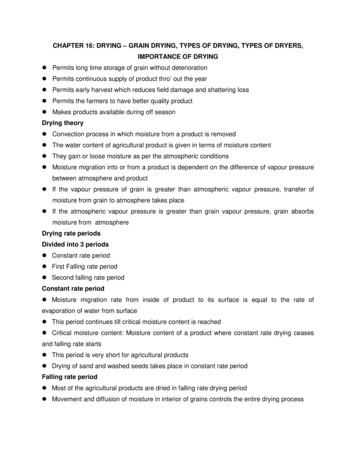
Ventaire Scope Drying and Tracking Cabinet User Manual3CompressorFan Ventilation UnitA completely dry endoscope is critical for ensuring greaterhygiene, prohibiting bacterial growth, and potentially loweringinfection rates. The InnerSpace Ventaire scope drying and trackingcabinet includes an automated system that provides consistentand continuous delivery of HEPA-filtered, pressurized air into allCompressor Tube/Air FilterManifoldendoscope channels to keep scopes dry and avoid reprocessing.A Ventaire Scope Drying and Tracking Cabinet includes a dryingand tracking unit (compressor and manifold), fan ventilation unit,filter and tubes, and 10" touchscreen. Tubes and connector kitsare disposable and can be purchased separately.10" TouchscreenUSB PortManifold TubeManifold AuxiliaryWater TubeStorage solutions for healthcare
Ventaire Scope Drying and Tracking Cabinet User Manual4System SpecificationsCompressor air output: up to 45 LPMCompressor decibels: 62 dB, with doors closedElectrical requirements for drying and tracking unit: 120 VAC, 60Hz, 15-amp standard duplex receptacle Includes a hospital-grade, UL-approved, 125V, 10-amp10-foot-long power cord with Y-splitter to power both thedrying and tracking unit and the fan unitElectrical requirements for cabinet fan ventilation unit: Voltage Rating: 115VAC Watts: 13.0W Amps: 0.19AKit descriptionsTo operate your Ventaire scope drying and tracking system, youwill need to order disposable connector kits. The scope dryingand tracking cabinet includes an initial filter and tubes, whichwill need to be replaced every six months. To find the connectorkit compatible with your endoscope or to order replacementitems, call InnerSpace Customer Service at 888-435-2256 orvisit e SupportFor any questions about your Ventaire scope drying and trackingcabinet, call InnerSpace Customer Service at 888-435-2256Storage solutions for healthcare
Ventaire Scope Drying and Tracking Cabinet User Manual5Initial setup (for system administrators)Most of the steps that system administrators complete in theinitial setup will not need to be repeated in the future, but you cancontinue to add, edit, and delete information programmed into thesystem, such as building on the names of users, endoscopists,and your facility’s endoscope inventory, editing scope dryingtimes, or deleting pre-programmed endoscopes.After powering the Ventaire scope drying and tracking system, thescreen will display a series of boot-up screens. Once the system hascompleted its startup and is ready to operate, you will be taken to theStatus homepage screen.SettingsIf you have questions, please contact InnerSpace CustomerChanging PINService at 888-435-2256.Select settings. You will be prompted to enter a PIN to access Settings.The default PIN is 0001. To change the default PIN, scroll to and selectChange PIN, enter new PIN, and select Confirm.Note: After 2 minutes of inactivity, a message will display, promptingyou to select Yes to continue. If the system remains inactive for another10 seconds, the Settings display will automatically return to the Statusscreen.Storage solutions for healthcare
Ventaire Scope Drying and Tracking Cabinet User Manual6Initial setup (for system administrators)Changing DefaultsYour cabinet is preconfigured with default settings for drying, venting,and expiration durations, but it is the responsibility of those using thesystem to determine drying, venting, and expiration durations basedon an organization’s guidelines and/or the guidelines provided by theendoscope manufacturer.The default settings are: Drying time: 10 minutes Venting time: 1 minute Venting interval: 60 minutes Expiration time: 7 daysTo modify any of these settings, select the default time, enter yourcustom time(s), and select OK.Storage solutions for healthcare
Ventaire Scope Drying and Tracking Cabinet User Manual7Initial setup (for system administrators)Check InScope check in always requires that the endoscope serial number isentered; all other check-in steps are optional. Administrators can chooseto Hide an optional step, Show an optional step, or Require a step. Userswill see information based on the administrator’s setup.New Check-In StepYou can also add more steps to the check-in list by selecting NewCheck-In Step, and then enter the name of the new step. An example ofa new check-in step might be Procedure Room.Next add the information that answers the new check-in step.Responses will automatically build a generated list for subsequentcheck-ins. Following the example of Procedure Room, the list wouldidentify that unique procedure room number or name.Example:New Check-In Step Procedure Room (Name) Room Number (List) 2ANote: When users check in scopes, they will need to enter the responseto the new step (list). If this same step is added to the check-out processand has the same name as the list in check in, the system can pullthe appropriate list of previously entered names for both check-in andcheck-out steps, avoiding the need to re-enter the information each timea scope is checked in or out. A list can be used for more than one checkin or check-out step if it is relevant to multiple steps.Completion History allows the information entered in the List toautomatically generate a list of recent entries so that that informationdoesn’t have to be manually entered again. The user only has to enter itthe first time, and then it automatically populates for both check-in andcheck-out.When you have added the New Check-In Step and clicked Save, you willsee the updated Check In screen. The 3 dots to the left of the customname signal that you have the option to reorder information by clickingthe dots and moving the custom field.Select Yes if the information you are adding is something that will beused and shared multiple times. For information that is unique, such as acase number, select No.Storage solutions for healthcare
Ventaire Scope Drying and Tracking Cabinet User Manual8Initial setup (for system administrators)Check OutEntering the endoscope serial number and identifying who is checkingout the scope are both required steps in the Check Out process; all othersteps are optional. Again, the administrator can flag optional steps ashidden (Hide), shown but not required (Show), or Always Required.When the air filter/compressor tube or manifold and/or manifold auxiliarywater tubes have expired, a red warning message will appear in themenu. The message and red dot reminders will remain until the tube orfilter is replaced and Settings updated.New Check-Out StepJust as you did with Check-In, you can also add steps to Check-Out byselecting New Check-Out Step and entering the name of the new step.Next, add the List information, which is the response to the new checkout step.Remember to select Yes in Completion History for information that willbe shared and used multiple times, such as the names of endoscopytechnicians and doctors or the name/number of procedure rooms.This feature saves time by capturing recent entries and automaticallygenerating the list used during check in and check out.For information that is unique, such as a case number, select No toCompletion History.The 3 dots to the left of the custom name signal that you have the optionto reorder information by clicking the dots and moving the custom field.To view the full warning message or reset the replacement date afterreplacing expired items, select Settings, enter PIN, and scroll to Cabinet.Click on the expired equipment and select Reset to begin a new 6-monthcountdown.Settings warning messages:CabinetThe tube/filter is set to expire soon. Please replace.Tube/filter replacement resetThe manifold and/or manifold auxiliary water tubes are set to expiresoon. Please replace.The air filter/compressor tube, the manifold tube, and manifold auxiliarywater tube should be replaced every 6 months.2 weeks prior to expiration, a yellow warning message (Replace Tube/Filter) will appear in the menu, and a red dot will appear in Settings.To remove the yellow warning message, close the window. The red dotwill remain in Settings until the air filter/compressor tube or manifoldand/or manifold auxiliary water tube is replaced and Settings updated.Settings expiration messages:The tube/filter has expired. Please replace immediatelyThe manifold and/or manifold auxiliary water tubes have expired.Please replace immediately.For instructions on replacing tubes and filters, go to page 25.Storage solutions for healthcare
Ventaire Scope Drying and Tracking Cabinet User Manual9Initial setup (for system administrators)Changing timeNetwork SettingsTo change the time zone or reset the time, select Change Time, makechanges, and then select Save. The current time, time zone, and date arealways displayed in the lower left corner of the screen.Use these steps for connecting to Wi-Fi:DiagnosticsDiagnostics can be helpful if you’re troubleshooting an issue withyour scope drying system or working with an InnerSpace CustomerRepresentative on an issue.Select Show Diagnostics and review your system’s information. Whendone, select Hide Diagnostics.1. Select Settings, enter PIN, and scroll to Network Settings2. Select Connect to Wi-Fi3. A dialog box will appear. Use the dropdown menu to select yournetwork Once the network is selected, the dialog box may change basedon the selected network’s requirements4. To connect, enter your network's credentials If this is a standard network with a password, you can use thedialog box to enter the WPA (Wi-Fi protected access) passphrase If this is an enterprise network, you will need to request the fileslisted below from your IT department in order to connect. Onceyou receive these files, save them to a USB drive, and give themthe following names. Plug the USB device into the cabinet. Thesystem will detect these authentication files to proceed withlogging in ca.pem - Certificate Authority (CA) certificate file user.pem - Client certificate file user.prv - Client private key file RADIUS authorization is not currently supported5. Once you are connected to a network, the Connect to Wi-Fi buttonwill appear as Disconnect from Wi-FiRestart SystemYou may need to restart the system if it freezes or you experienceanother issue that can’t be resolved. The system will turn off and rebootwhen you select Restart System. All information previously entered andsaved is stored and will repopulate upon restarting the system.Storage solutions for healthcare
Ventaire Scope Drying and Tracking Cabinet User Manual10System Operation (for all users)ScopesEndoscope information for your department’s scope inventory canbe pre-entered by the administrator during the initial setup, but allusers can subsequently edit, delete, and add information about thedepartment’s scope inventory.To edit scope information:Select Edit Scope, make changes, and select SaveTo delete a scope from list of scopes:Select Delete ScopeAdd, Edit, and Delete ScopesWhen adding scopes, you will be required to enter the scope serialnumber; all other fields are optional. You can also provide a shortdescription of a scope. If you add a description, it will appear on theStatus screen to identify which scope is in which stage of the dryingprocess. If the description field is left blank, the model number willappear on the Status screen.To add a scope:1. Select Add Scope2. Enter scope informationNote: When a scope is being dried, you will not be able to Edit or Deleteinformation about that particular endoscope.Deleting a scope from the inventory list will not delete the informationabout that scope that has been recorded in the Report.3. Select SaveCheck-in Summary Status IndicatorsWhen a scope is being dried, a Check-in Summary will appear next tothat scope information. The slot icon will be noted in yellow, indicating itis not yet ready for removal.Storage solutions for healthcare
Ventaire Scope Drying and Tracking Cabinet User Manual11System Operation (for all users)When the drying cycle is complete, the slot icon will turn green.StatusThe system is operated from the Status screen.Select Status to view the home screen. Note the numbered drying slots.Open indicates slots that are available to dry a scope.Status IndicatorsThe Status screen uses color and arrows to track the drying process.Green with down arrow: The scope has been dried and is ready for use.Ready is displayed under the slot icon with a timer showing the time leftuntil the scope expires.When a scope has expired, the slot icon will turn red. An expired scopemust be reprocessed.The scope will go through a venting process once all scopes have beendried. Venting will be displayed above the slot icon.Yellow with upward arrow: The scope is being dried. Drying is displayedunder the slot icon with a timer showing the drying time remaining.When a scope is checked out, a Check-out Summary will appear to theright of the scope information.Red with XXX: The scope has expired and will need to be removedand reprocessed. Expired is displayed under the slot icon with a timershowing how long the scope has been expired.Storage solutions for healthcare
Ventaire Scope Drying and Tracking Cabinet User Manual12System Operation (for all users)Check InWhen checking in a scope, you can hang and connect a scope in thecabinet and then Check In the scope via the Status screen, or youcan first Check In the scope and then connect it to the system beforeinitiating the drying process. Typically, users connect a scope first andthen operate the drying system.Follow these instructions to attach a connector to a scope. Begin byplacing the scope on an available scope manager.Storage solutions for healthcare
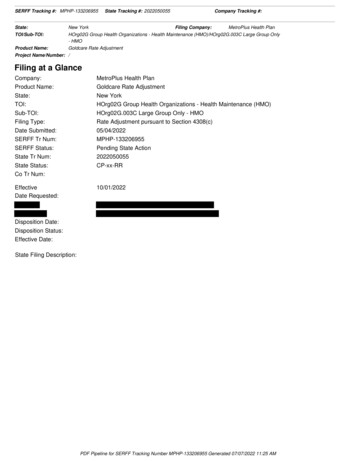
Ventaire Scope Drying and Tracking Cabinet User Manual13System Operation (for all users)Connector Kit 1 (SVCK1)3. Slide the cover onto the biopsy valveKit includes a connector and biopsy port coverBiopsy port coverConnector1. Attach the connector to the manifold tube2. Insert the connector into the suction valve port below the controlknobs on the scope bodyConnector attachesinto the valve belowthe control knobs onthe scope handleStorage solutions for healthcare
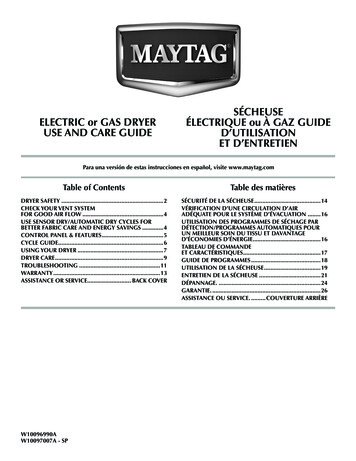
Ventaire Scope Drying and Tracking Cabinet User Manual14System Operation (for all users)Connector Kit 2 (SVCK2)Kit includes a connector, biopsy port cover, and auxiliary water nector3. Attach the auxiliary water connector to the manifold auxiliarywater tube, and then screw the connector into the water jet porton the scopeAttach the auxiliarywater connectoronto the water jetport on scope1. Attach the connector to the manifold tube2. Insert the connector into the suction and air watervalve ports below the control knobs on the scope body4. Slide the cover onto the biopsy valveConnector attachesinto the valves belowthe control knobs onthe scope handleStorage solutions for healthcare
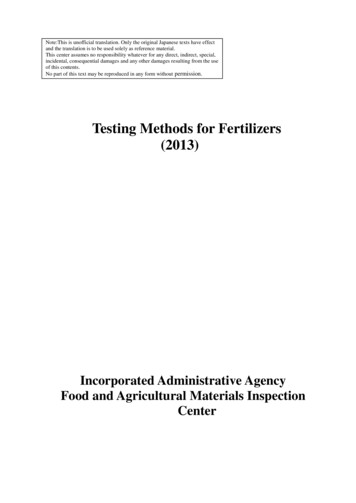
Ventaire Scope Drying and Tracking Cabinet User Manual15System Operation (for all users)Connector Kit 3 (SVCK3)3. Screw the plug into the biopsy valveKit includes a connector and luer plugLuer plugConnector1. Attach the connector to the manifold tube2. Insert the connector into the suction valve portbelow the control knobs on the scope bodyConnector attachesinto the valve belowthe control knobs onthe scope handleStorage solutions for healthcare
Ventaire Scope Drying and Tracking Cabinet User Manual16System Operation (for all users)Connector Kit 4 (SVCK4)Kit includes a connector, water jet connector, and luer plugLuer plugWater jetconnectorConnector3. Attach the water jet connector to the manifold auxiliary water tube,and then insert into the water jet port on the scopeAttach the water jetconnector onto thewater jet port onthe scope1. Attach the connector to the manifold tube2. Insert the connector into the suction and air water valve portsbelow the control knobs on the scope body4. Screw the plug into the biopsy valveConnector attachesinto the valves belowthe control knobs onthe scope handleStorage solutions for healthcare
Ventaire Scope Drying and Tracking Cabinet User Manual17System Operation (for all users)Connector Kit 5 (SVCK5)Kit includes a connector, biopsy port cover, and luer couplerNote: Some endoscopes do not have a water jet port. If connecting ascope without a port, a coupler will not be needed.3. Attach the luer coupler to the manifold auxiliary water tube,and then screw the coupler into the water jet port of scope(if applicable)Attach the luercoupler into thewater jet port ofscopeLuercouplerBiopsyportcoverConnector1. Attach the connector to the manifold tube2. Insert the connector into the suction and air water valve portsbelow the control knobs on the scope body4. Slide the cover onto the biopsy valveConnector attachesinto the valves belowthe control knobs onthe scope handleStorage solutions for healthcare
Ventaire Scope Drying and Tracking Cabinet User Manual18System Operation (for all users)Check in scope:1. From the Status screen, select an open slot in cabinet or the slotin which you’ve already attached the scope. Select to assignthat slot3. Select your name from the generated list or enter your name if newto the system, and select Next4. Enter any other required information from the automaticallygenerated list or add new information2. Enter scope serial number from the automatically generated list orkey in new serial number, and select NextIf checking in a new scope, a pop-up window will appear and askif you would like to enter the information about the new scope intoan automatically generated list. Select Yes or Skip. Informationcan be added or modified at a later time.5. Select Review. Review the scope information. If correct, selectConfirm. To edit the information, select either Endoscope, Checkedin by and any new Check-In steps, edit information, select Review,and then ConfirmStorage solutions for healthcare
Ventaire Scope Drying and Tracking Cabinet User Manual19System Operation (for all users)6. Check scope connections and select Start Drying Cycle. If scopeis not yet attached, select Cancel and follow above instructionsto connect the scope, and then select Confirm to begin the dryingprocess.To review drying progress, click on the active slot. If a scopedescription was entered, it will be displayed on the screen. If nodescription was provided, the model number will be displayed.Check out scope:Check out the scope from the drying unit:1. Select the active slot icon and then Check Out2. Select your name from the generated list or enter your name if newto the system, and select NextStorage solutions for healthcare
Ventaire Scope Drying and Tracking Cabinet User Manual20System Operation (for all users)3. Enter any other required information from the automaticallygenerated list or add new information4. Select Review. If scope information is correct, select Confirm. Toedit the information, select Checked out by and any new CheckOut steps, edit information, select Review, and then ConfirmThe Remove prompt will display for 2 minutes.Remove scope from the cabinet:1. Disconnect the connector from the scope, and then remove theconnector from the manifold tube. (Before discarding, inspectconnector to ensure it is fully intact and that there are no brokenpieces remaining in the suction and air water valves.) Theconnectors and all connector kit parts can now be thrown out2. Remove the scope from the cabinet by lifting it off the scopemanagerVentingThe Ventaire system continuously pushes air through the channels at setintervals. The default venting interval will occur every 60 minutes andvent each channel for 1 minute. Both the vent interval and vent time canbe changed in Settings.Note: The drying process always overrides the venting process. If youadd a scope and begin the drying process, venting will begin after alldrying cycles are complete.Storage solutions for healthcare
Ventaire Scope Drying and Tracking Cabinet User Manual21System Operation (for all users)ExpirationOnce a scope has expired, it needs to be removed from the cabinet andreprocessed. The default expiration is 7 days, but it can be changed inSettings.3. Select Review. Review the scope information. If correct, selectConfirm. To edit the information, select Checked out by, editinformation, select Review, and then ConfirmWhen a scope has expired, the drying slot will turn red and displayExpired with a timer showing the length of time since the scopeexpired.To remove scope for reprocessing:1. Select the slot the expired scope is in, and select Remove forReprocessing4. Disconnect the connector from the scope, and then remove theconnector from the manifold tube. (Before discarding, inspectconnector to ensure it is fully intact and that there are no piecesare remaining in the suction and air water valves.) The connectorsand all connector kit parts can now be thrown out2. Select your name from the generated list or enter your name ifnew to the system5. Remove the scope from the cabinet by lifting it off the scopemanagerYou can also first remove the scope from the cabinet and then selectRemove for Reprocessing to check it out.After removing the scope, the Remove prompt will display for 2 minutes.Storage solutions for healthcare
Ventaire Scope Drying and Tracking Cabinet User Manual22System Operation (for all users)ReportThe Ventaire drying and tracking unit generates a report that includes asummary of all the activity taking place within the cabinet.To download a report:Insert a USB drive into the USB port on the back of the display unitNote: This feature supports FAT12, FAT16, FAT32, and ExFAT USB types.This does not support Windows proprietary USB type NTFSThe Report tab will turn from gray to white, signaling a report is readyto download. Select Report to download report to the USB driveUSB PortStorage solutions for healthcare
Ventaire Scope Drying and Tracking Cabinet User ManualCare and Maintenance of your drying and tracking unit and cabinetCare and Maintenance:Follow these guidelines to disinfect, clean, and care for your drying andtracking unit and cabinet.Cleaning materials: The best choices for disinfection are compounds that containquaternary ammonium Use a 10%-50% isopropyl alcohol solution as an option whenquaternary ammonium compounds aren’t available Don’t use abrasive cleaning pads Don’t leave cleaning compounds on the surface; wipe surfaces dryafter cleaning A 10% (or less) mixture of active bleach and water can be usedthough not recommendedRecommended disinfectant/cleaning products: Hepacide Quat II virucidal disinfectant cleaners PDI Sani-Cloth cleaner CaviWipes disinfectant cleaner Virox disinfectant cleanerRecommended: Wipe down all tubing once a week with Sani-Cloth wipesStorage solutions for healthcare23
Ventaire Scope Drying and Tracking Cabinet User Manual24Product Ordering and Replacement InformationProduct Ordering and Replacement InformationTo order replacement parts, call InnerSpace Customer Service at888-435-2256 or visit https://innerspacehealthcare.com/VentaireReplace the following items every 6 months for optimal performance: Compressor tube/air filter replacement, pkg of 1: SVCTAF Manifold tube replacement, pkg of 5: SVMT5 Manifold tube replacement, pkg of 8: pkg of SVMT8 Manifold tube replacement, pkg of 9: SVMT9 Manifold auxiliary water tube replacement, pkg of 5: SVWAT5 Manifold auxiliary water tube replacement, pkg of 8: SVWAT8 Manifold auxiliary water tube replacement, pkg of 9: SVWAT9 Replacement HEPA filter for SFVU fan unit: 1 filter: SHEPFIL,3 filters: SHEPFIL3Single-use connector kits: Connector Kit 1, pkg of 100: SVCK1.Includes connector and biopsy port cover Connector Kit 2, pkg of 100: SVCK2.Includes connector, biopsy port cover, and auxiliary water connector Connector Kit 3, pkg of 100: SVCK3.Includes connector and luer plug Connector Kit 4, pkg of 100: SVCK4.Includes connector, water jet adaptor, and luer plug Connector Kit 5, pkg of 100: SVCK5.Includes connector, biopsy port cover, and luer couplerStorage solutions for healthcare
Ventaire Scope Drying and Tracking Cabinet User Manual25Product Ordering and Replacement InformationRemove and replace the compressor tube/air filter2. Press the quick release button on the air output port connector onthe compressor3. Press the quick release button below the filter on the air filter porton the manifold4. The tube/filter can now be removed1. Locate the pressure sensor port on the manifold. Turn the tubefitting to the left to loosen and then remove from port5. To replace, insert the new compressor tube and filter into place.The quick release buttons will reset once the tube is attached6. Reattach the tube fitting by turning it to the right until the fitting isfirmly attached to the manifoldStorage solutions for healthcare
Ventaire Scope Drying and Tracking Cabinet User Manual26Product Replacement and Ordering InformationRemove and replace a manifold tube or manifold auxiliary water tubeManifold auxiliary water tube1. Turn the tube fitting to the left to loosen and remove the tube fromthe manifoldManifold tube2. To replace the tube, insert a new tube and turn the hose fitting tothe right until the tube is firmly attached to the manifoldManifold tubeManifold auxiliary water tubeStorage solutions for healthcare
Ventaire Scope Drying and Tracking Cabinet User Manual27Updating Venta
The scope drying and tracking cabinet includes an initial filter and tubes, which will need to be replaced every six months. To find the connector kit compatible with your endoscope or to order replacement items, call InnerSpace Customer Service at 888-435-2256 or visit https://innerspacehealthcare.com/Ventaire InnerSpace Support