Transcription
AdvanTex O&M MANUALP A R T 1 : S T A R T- U P A N D R O U T I N E M A I N T E N A N C EPart 1: Start-Up and Routine Maintenance RESIDENTIALof AdvanTex ResidentialWastewater Treatment Systems MANUAL O&MOrenco Orenco Systems , Incorporated 814 Airway Ave., SutherlinOR 97479 USA800-348-9843 541-459-4449www.orenco.comwww.vericomm.net
AdvanTex O&M MANUALP A R T 1 : S T A R T- U P A N D R O U T I N E M A I N T E N A N C EIntroductionAs a trained AdvanTex Service Provider, you play a crucial role in Orenco’s AdvanTex Program.Orenco has always advocated regular, professional servicing of all onsite systems . not just during thewarranty period but for the life of the system. Regular servicing optimizes the treatment process andprotects the property owner’s investment. It also ensures that onsite systems protect public health, protectthe environment, and are viewed as a reliable, sustainable technology.Orenco relies on you to perform the AdvanTex system start-up, doroutine (scheduled) maintenance, and respond to calls for unscheduledmaintenance (alarm calls). We also rely on you to keep in contact withthe homeowners or property owners, review the Homeowner’s Manualwith them, advise them on preventive maintenance, and work to keep thesystem under a continuous service contract. Equally important, we rely onyou to keep good service records on the system, creating a “history” of itsperformance.To make your job easier, Orenco has created one of the most service-friendly and trouble-free onsitesystems on the market. Then we paired that system with a remote telemetry control panel, to allow youto “view” the system right from your computer.* And we’ve provided a Web-based business tool —advantexservice.com — to help you file and retrieve system data automatically, schedule service events,and manage service technicians.Finally, we’ve provided classroom and field training, as well as support materials, like this O&M Manual.Please read this manual thoroughly, for up-to-date information on the best practices for system start-upand routine maintenance. You can find information about troubleshooting in Part 2 of our O&M Manual:Advanced Service Tips and Troubleshooting Guide.We’re very proud of our AdvanTex Treatment System. Like all our products, it has gone through extensiveresearch, development, and field-testing. Then each component is built to written specifications andsubjected to quality review, before shipping. In addition, our AXN models meet the requirements of NSFANSI Standard 40 for Class I Systems. If any component of this system does not meet your expectations,please call your authorized AdvanTex Dealer.Thank you, in advance, for your knowledge, your conscientiousness, and your good work.* Orenco MVP control panels are available in some markets. For more information, contact your Dealer or OrencoAIM-OM-ATX-1, Rev. 1.2, 03/14 Copyright Orenco Systems , Inc. Property of Orenco Systems , Inc. Do not reproduce or distribute without written authorization from Orenco: 800-348-9843.2
AdvanTex O&M MANUALP A R T 1 : S T A R T- U P A N D R O U T I N E M A I N T E N A N C ETable of ContentsLL Introduction. 2LL Unscheduled Field Maintenance Report. 20LL Typical Site Plan for an AdvanTex Treatment System. 4LL Performing Unscheduled Field Maintenance. 21 Unscheduled Maintenance Procedures. 21LL How the AdvanTex Treatment System Works. 5 Notification of Site Condition. 21LL Equipment List. 6 Site Condition at Time of Call. 21LL Start-Up Checklist. 7 Field Sampling/Observations. 21LL Completing the Start-Up Checklist. 8 System Start-Up Procedure. 8 Conditions at Site. 21 VCOM ATRTU Board (if applicable). 21 Planning the Start-Up. 8 Cause of Malfunction. 22 Before Leaving the Office. 8 Services Rendered. 22 At the Site. 8 Parts Used. 22 Primary Treatment . 9 Notes/Final Recommendations. 22 Secondary Treatment. 10 Final/Safety Inspection. 22 Other System Components. 12 Time/Date/Signature. 22 Control Panel. 12LL Change of Service Provider Authorization. 23 Final/Safety Inspection. 13LL Changing Service Providers. 24 Homeowner’s Package. 13LL Appendix 1: AX20 Timer Settings Worksheet. 25 Back at the Office. 13LL Appendix 2: Float and RSV Settings. 26 Typical RSV Levels. 27LL Scheduled Field Maintenance Report. 14LL Performing Scheduled Field Maintenance. 15 Homeowner Communication. 15 Typical Float Levels. 27 Retrieve O&M Info. 15 Perform Field Sampling/Observations. 15 Check Control Panel. 16 Inspect/Clean Recirc Pump System. 16 Measure Sludge/Scum. 17 Inspect/Clean AdvanTex Filter. 17 Inspect/Clean Discharge Pump System. 18 Inspect/Service Other System Components. 18 Additional Services Rendered. 18 Final/Safety Inspection. 18 Summary/Recommendations. 19 Comments. 19Copyright Orenco Systems , Inc. Property of Orenco Systems , Inc. Do not reproduce or distribute without written authorization from Orenco: 800-348-9843.3 AIM-OM-ATX-1, Rev. 1.2, 03/14
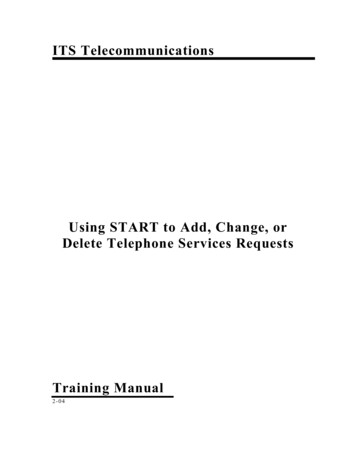
AdvanTex O&M MANUALP A R T 1 : S T A R T- U P A N D R O U T I N E M A I N T E N A N C ETypical Site Plan for an AdvanTex Treatment SystemAdvanTex AX20 Filter Podprovides advanced secondarytreatment RXVHBuilding sewerline conveyswastewater fromhousePump basin(on some systems)Watertight processing tankprovides primary treatmentFinal dispersal (shallow gravelless drainfield,drip system, shrub irrigation, water reuse,lagoon, wetland, etc.) or STEP collection(not shown)AIM-OM-ATX-1, Rev. 1.2, 03/14 Copyright Orenco Systems , Inc. Property of Orenco Systems , Inc. Do not reproduce or distribute without written authorization from Orenco: 800-348-9843.4
AdvanTex O&M MANUALP A R T 1 : S T A R T- U P A N D R O U T I N E M A I N T E N A N C EHow the AdvanTex Treatment System WorksThe AdvanTex Treatment System consists of a watertight processingtank and the AX20 textile filter pod. Wastewater from the home flowsto the tank, where natural biological and physical processes provideprimary treatment. In the primary chamber of the tank, the wastewaterseparates into three layers: a floating scum layer, a bottom sludgelayer, and a relatively clear layer of liquid effluent in the middle.nitrogen from the effluent is required.After recirculating several times, the effluent is discharged, eitherdirectly from the processing tank or after first being collected in apump basin. Depending on the design for a particular site, the treatedeffluent may be discharged to a drainfield, an underground dripirrigation system, a constructed wetland, an effluent sewer (STEP)system, or a reuse system. The system may include equipment forultraviolet (UV) disinfection before ultimate dispersal of the effluent.From the secondary chamber, a pump draws liquid effluent throughthe Biotube filter and sends it to the AX20 pod. There, the effluentis sprayed over hanging sheets of porous synthetic textile media.Microorganisms live in this moist, oxygen-rich (aerobic) environment.As effluent trickles over and through the sheets, the microorganismsremove impurities from it.Properly sited, installed, and operated, a Residential AdvanTexTreatment System can treat wastewater to 10 mg/L BOD and 10mg/L TSS. This level of treatment is better than what municipalwastewater plants provide. The system can also be configured toreduce nitrogen levels as required locally. When effluent treated in thisway is dispersed to the soil, natural processes purify it further, and iteventually returns to the underlying water table, where it can be usedagain.Effluent recirculates between the tank and the AX20 pod. In Mode 1,the most common configuration, the effluent recirculates to thesecond compartment of the tank. In Mode 3, effluent recirculates tothe first compartment. This mode is used where maximum removal ofbu6LidAccessRiser9Components of a ResidentialAdvanTex Treatment System(Mode 1) Listed by Flow Path51 Two Chamber23456789buProcessing TankBiotube Pump VaultBiotube FilterEffluent PumpDischarge AssemblyAdvanTex AX20 Filter PodRecirculatingSplitter Valve (RSV)Float SwitchesExternal Splice BoxVeriComm Control Panel71Primary Chamber8BaffleRecirculationChamber234Discharge toDispersal SystemCopyright Orenco Systems , Inc. Property of Orenco Systems , Inc. Do not reproduce or distribute without written authorization from Orenco: 800-348-9843.5 AIM-OM-ATX-1, Rev. 1.2, 03/14
AdvanTex O&M MANUALP A R T 1 : S T A R T- U P A N D R O U T I N E M A I N T E N A N C EEquipment ListFor RepairsRoutine maintenance and troubleshooting requires a variety of tools,equipment, and spare parts. We recommend that all trained AdvanTexService Providers have the following items at hand: Structural adhesive and adhesive/sealant Control panel parts (circuit breakers, motor contactors,relays) Effluent pump(s) Extension cord Flashlight Hand tools (pliers, wrenches, screwdrivers, drill bits, hammer,shovel, hand saw, etc.) Heat gun or torch for bending conduit Inspection mirror (e.g., Prototek “Mirror on a Stick”) Plumber’s snake PVC cement and primer PVC fittings, ¾-inch to 2-inch (20-50 mm) PVC pipe, ¾-inch to 2-inch (20-50 mm) Spare parts for downstream components (e.g. dripheadworks, UV) Waterproof wire nuts Wire stripping/crimping tool Float switchesFor Routine Inspection and Maintenance Cordless drill with 3 16-inch Allen wrench for lid bolts on risersand pod Extra lid bolts Sludge and scum measuring device (e.g., Nasco SludgeJudge for sludge and Orenco SMUG for scum) Hook for raising floats to test them Biotube filter cradle (OM-BIOTUBECRADLE) Bronze threaded check valve, for measuring pump flow ratein systems with drainbacks Backpack pressure washer Trash pump (and generator, if pump is electric) for removingsolids from discharge basin AX20 manifold brush (AX-LATERALBRUSH) AX20 sheet cleaning wand (AX-CLEANINGWAND) Handheld computer (PDA) or laptop computer withBluetooth Kit and BT-VCOM software (optional, to turnpump on and off at a distance from the panel) Electrical tester (voltage and amperage) Phone line tester (available from RadioShack ) Dissolved oxygen (DO) meter or colorimetric ampoules Sample bottles Turbidity meter pH meter or pH test strips Test strips for nitrate, ammonia, alkalinity Tape measure Calculator A copy of the AX20 Installation Instructions (NIM-ATX-AX-1),for referenceAIM-OM-ATX-1, Rev. 1.2, 03/14 For Troubleshooting Digital camera Watch or timer A copy of Part 2 of the AdvanTex O&M Manual: AdvancedService Tips and Troubleshooting Guide (AIM-OM-ATX-2)For Personal Hygiene and Cleanup Bleach/water solutionEye protectionHand cleanserPaper towelsProtective clothingRagsRubber glovesCopyright Orenco Systems , Inc. Property of Orenco Systems , Inc. Do not reproduce or distribute without written authorization from Orenco: 800-348-9843.6
AdvanTex O&M MANUALP A R T 1 : S T A R T- U P A N D R O U T I N E M A I N T E N A N C EStart-Up ChecklistCopyright Orenco Systems , Inc. Property of Orenco Systems , Inc. Do not reproduce or distribute without written authorization from Orenco: 800-348-9843.7 AIM-OM-ATX-1, Rev. 1.2, 03/14
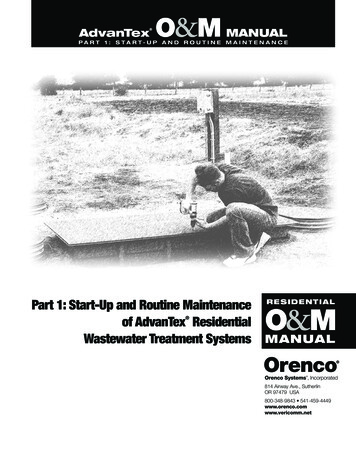
AdvanTex O&M MANUALP A R T 1 : S T A R T- U P A N D R O U T I N E M A I N T E N A N C ECompleting the Start-Up ChecklistSystem Start-Up ProcedureA typical start-up visit takes about an hour. Arrange to meet the systeminstaller at the site so that he or she can answer any questions you mayhave about the installation. The installer should bring the site plan or asbuilt. If the system owners can be present too, this is a good opportunityfor them to learn how the system functions. As part of the start-up, youwill need to review the Homeowner Package with the homeowners or, ifthe house has not yet been sold, with a representative of the homebuilder.You can do this at the start-up visit, or arrange a meeting prior to thestart-up.Your System Start-Up visit provides final confirmation that the system hasbeen correctly installed and is ready to function properly. It also acquaintsyou, the service provider, with each individual system, so that you arefamiliar with any special components or requirements.The AX20 Start-Up Checklist (SCL-ATX-OM-1), shown on the precedingpage, will help you remember to complete all the steps needed to checkthe system’s functions. While you don’t need to return the Start-UpChecklist to Orenco, we recommend bringing a copy to the start-up andchecking off the steps to make sure that you perform all of them.Before Leaving the OfficeDownload the Start-Up Summary Report from www.advantexservice.com.The top of the form should be pre-filled with information about the site.If any information is missing,fill it in. You will fill out therest of the form at the site asyou go through the start-upprocedure.As part of the start-up, you’ll also download a computer-generated Start-UpSummary Report from advantexservice.com and fax it to the fax numberon the bottom of the form. An automated system will add the report to thedata file for that system on advantexservice.com. This will confirm that thesystem is ready for operation, so that Orenco and the AdvanTex Dealer canconfidently warranty it and your service contract can begin. i-fax.com126 472 AdvanTexField Maintenance ReportTreatment SystemsStart-Up Summary ReportProperty Owner/Tracking #ABC Septic Services(541) 496-0700OperatorInstalled Date08/08/2006Greg HartSite AddressStart-Up Date19132 N Umpqua Highway - Glide, Oregon 97443Phone NumberPermit #08/25/2006Mode(541) 459-4449Designer/EngineerPhone(541) 459-4449ET Engineering LLCPhonePrimary Treatment08/25/2006Authorized InstallerPhoneSteve's Septic, Inc.(541) 459-4449ElectricianPhoneControl PanelIf using a single Processing Tank, complete the following:At the SiteOccupancy Date(541) 459-9716ABCOnsite,Inc.Occupants4Mode 1BAdvanTex DealerIf the system does not have adischarge tank or basin anddischarge pump, note that inthe Start-Up Summary Report.BedroomsPanel ID (RTU or UL #)“On” Timer Setting“Off” Timer SettingPod #2 Serial No.Pod #3 Serial No.Processing TankSeptic Volume ( gal.)ConstructionConcreteRecirc Volume ( gal.)Fiberglass OtherFilter PodsPod #1 Serial No.Manufacturer:If using a separate Septic Tank and Recirc Tank, complete the following:Septic Tank ( gal.)ConstructionConcreteFiberglass OtherManufacturer:Recirc Tank ( gal.)ConstructionConcreteFiberglass OtherManufacturer:Disinfection equipment (manufacturer):Dispersal system (type of):Declarations (Initial)Orenco’s Start-Up Procedure was followed.Pump Model:All lids are secured.Floats set properly at -in. -in. -in.Circuit breakers are on and control panel is latched.“For Service Call” label with phone # was affixed to panel.Secondary TreatmentOther System ComponentsHomeowner Package was reviewed with:RSV setting: -in.Residual head measurement:Pod #1 -in. Pod #2 -in. Pod #3 -in.Discharge Tank/Basin ( gal.)ConstructionConcreteFiberglass PVC (Basin)Manufacturer:Builder on (date)Resident on (date)The system is ready for useYes No (explain)Pump Model:Floats set properly at -in. -in. -in.Discharge pump flow rate (drawdown test): ( gpm)Ask the system installerabout the size, material, andmanufacturer of each primarytank and discharge tank orbasin, and record it on the Start-Up Summary Report. Also record theserial number(s) of the AX20 pods.Discharge pump dose volume: ( gal./dose)CommentsSignature DateFax completed form to 1-866-384-7404Planning the Start-UpWhen the installer calls to tell you that the system is ready for start-up,ask the following questions: Did the electrician connect the panel to the home’s electricalservice and turn the power on? Did the installer test the controlpanel to make sure it wasfunctional? Is there phone service, or, atminimum, is the phone linephysically connected to thepanel?If the installer answers “yes” to thesequestions, then the system is readyfor start-up.AIM-OM-ATX-1, Rev. 1.2, 03/14 Copyright Orenco Systems , Inc. Property of Orenco Systems , Inc. Do not reproduce or distribute without written authorization from Orenco: 800-348-9843.8
AdvanTex O&M MANUALP A R T 1 : S T A R T- U P A N D R O U T I N E M A I N T E N A N C ECompleting the Start-Up Checklist (continued)Primary TreatmentOpen the risers of the tank and of any discharge or recirculation tanks orbasins.WARNING: Do not enter the tank. Entering a tank without proper confinedspace procedures and equipment can cause serious injury, asphyxiation,or drowning.LL Proper inlet tee installed.In the inlet riser of the primary processing tank, make sure that the inlettee is present, firmly attached, and plumb.Raise the bottom float to stop the alarm. A yellow LED should light up.LL Discharge plumbing properly installed.Next, raise the middle float, if it is present. No alarm should sound, butanother yellow LED should light up.In the outlet riser, make sure that the discharge plumbing is properlyinstalled through a watertight grommet. The threaded connections shouldbe hand-tight, and the ball valve should be open. Look at the pump tomake sure that it is the model specified on the plans, and record themodel on the Start-Up Summary Report.When you raise the top float, the alarm should sound again and the thirdyellow LED should light up.LL Floats set properly.Replace the float tree in its bracket, making sure it’s properly mounted.Neatly coil the float cords, and secure them to the splice box. Measure thefloat heights from the outside top of the tank and verify that the heightsare correct according to the AX20 Installation Guide. Record them on theStart-Up Summary Report.NOTE: Orenco provides float and RSV settings for all tanks approved foruse with AdvanTex Treatment Systems in your area. At start-up and duringannual maintenance, you need only verify that the actual settings on theequipment match Orenco’s recommendations. If you need to adjust thesettings to solve a problem, see Appendix 2.LL Splice box mounted on access riser. Watertight connectorsused.Inspect the splice box to make sure that it is securely mounted inside oroutside the riser; that connections have been made using watertight wirenuts; and that there is no water in the splice box. We also recommend thatyou seal the conduit using conduit seals or any electrically approved sealant.LL Float assembly mounted in Biotube vault.LL Floats operate properly.Before you test the floats, open the control panel and place it in test modeby pressing and holding the red button on the front for 15 seconds. Insidethe panel, the correct yellow digital input LED should light up. Release thebutton when the audible alarm chirps.If you can’t see the inside of the control panel while you raise and lowerthe float switches, you may need a helper. Pull the float tree out of thewater. The floats will go down, the alarm will sound, and all the yellowLEDs should be off.Copyright Orenco Systems , Inc. Property of Orenco Systems , Inc. Do not reproduce or distribute without written authorization from Orenco: 800-348-9843.9 AIM-OM-ATX-1, Rev. 1.2, 03/14
AdvanTex O&M MANUALP A R T 1 : S T A R T- U P A N D R O U T I N E M A I N T E N A N C ECompleting the Start-Up Checklist (continued)LL Pump operates in Manual.NOTE: Improper RSV settings are a common installation error, so pleaseLL Pump operates in Automatic.check them carefully.LL Pump amps and volts checked.LL All pods installed level.At the control panel, with the panel still in test mode, check the runamperage of the recirculation pump and discharge pump by placing theclamp of an ammeter around the wire to each pump’s circuit breaker andreading the amperage while each pump is running. You can run the pumpby holding the toggle switch on MAN. Amperage should be no more thanthe pump’s maximum service factor amperage.LL All piping properly covered and compacted.Check that each AX20 pod is installed level and that all piping is coveredwith compacted fill.LL Ventilation intake(s) properly located and installed.LL Squirt height verified.First for the recirculation pump and then for the discharge pump, measurethe voltage with the pump off, by putting the probes of a voltmeter oneach pump’s terminals. Then measure the voltage with the pump running.The difference between running and rest voltage should be no more than3 percent. That is 3.6 voltsfor a 120-volt system, or 7.2volts for a 240-volt system.Open each AX20 pod and makesure that the ball valves at theend of the laterals are closed.Remove an orifice cover andmeasure the squirt height.Record the squirt height on theStart-Up Summary Report as“Residual Head Measurement.”Release the switch back tothe AUTO position. Make surethe pump comes on as thetimer cycles. Timer cyclesare shortened to about 30seconds in test mode.LL Discharge basin/tankinspected for infiltration.LL Discharge basin/tank setlevel.Inspect the discharge pump basin or tank to make sure that it is set leveland there is no sign of water infiltration.Secondary TreatmentLL Verify proper RSV setting.LL Pump and discharge plumbing are compatible.Measure the distance from the outside topof the tank to the top of the RecirculatingSplitter Valve (RSV) ball cage, and record iton the Start-Up Summary Report.AIM-OM-ATX-1, Rev. 1.2, 03/14 LL Discharge plumbing properly installed.Look at the pump to make sure that it is the model specified on the plans,and record the model on the Start-Up Summary Report. Verify that thedischarge plumbing is installed as specified on the plans; that it is properlyinstalled through a watertight grommet; and that the ball valve is open.Copyright Orenco Systems , Inc. Property of Orenco Systems , Inc. Do not reproduce or distribute without written authorization from Orenco: 800-348-9843.10
AdvanTex O&M MANUALP A R T 1 : S T A R T- U P A N D R O U T I N E M A I N T E N A N C ECompleting the Start-Up Checklist (continued)LL Flow rate verified.LL Dose volume verified.Determining the discharge pump’s actual flow rate enables you todetermine the dose volume (the volume of wastewater being treated ineach dose) and to calculate timer settings.Knowing the dose volume also enables you to determine the volume ofwastewater being treated in a given period. To do this, multiply the dosevolume by the number of doses.To verify the flow rate, follow Steps 1 through 7, then verify the dosevolume in Step 8.Step 1. Determine the gallons per inch (gpi) or liters per centimeter (L/cm) volume of the dosing tank or basin. A 24-inch (600-mm) diameterbasin holds 1.88 gpi (2.8 L/cm). A 30-inch (750-mm) diameter basinholds 2.96 gpi (4.4 L/cm). For tanks, consult the manufacturer’s volumechart. For Orenco fiberglass tanks, use Fiberglass Tank Volume Charts,NCH-TNK-1.LL Discharge floats operate properly.LL Discharge floats set properly.Check the function and settings of the floats in the discharge basin/tankas described under Primary Treatment Components, and record the floatheights on the Start-Up Summary Report, as before.Step 2. You’ll be running the pump for one minute during the flow ratetest, so check the liquid level inside the tank/basin to ensure that there’senough water above the pump’s minimum liquid level (MLL), or thelowest float (whichever is higher), to complete the test. For example, inone minute, a pump operating at 10 gpm (37.8 L/min) will draw downapproximately 5¼ inch (14 cm) of liquid in a 24-inch (600-mm) diameterbasin, orNOTE: To ensure proper system operation, check to make sure that floatsare Orenco “A” or “V” floats.10 gallons 1.88 gpi 5¼ inch, or37.8 liters 2.8 L/cm 14 cmSo, to perform a flow rate test with the pump and basin in this example,you’d need at least 5¼ inch (14 cm) of water above the MLL or thebottom float (whichever is higher). If there is not enough liquid, add some.Step 3. If your system isn’t configured to drain back to the basin aftereach dose, skip to step 4. If your system is configured to drain backto the basin, you’ll need to account for the drainback volume in yourcalculations. Or you can stop drainback during the test by temporarilyinstalling a threaded check valve between the pump and the pump discharge assembly. This eliminates the need to measure drainback volume.LL Splice box mounted in discharge access riser. Watertightconnectors used.Inspect the splice box in the discharge basin/tank to make sure that it issecurely mounted inside or outside the riser; that connections have beenmade using watertight wire nuts; and that there is no water in the splicebox. Use conduit seals or electrically approved sealant.Step 4. To measure the flow rate, first measure the distance from the topof the tank or basin to the liquid level. Record this as H1.LL Discharge pump operates in Manual.LL Discharge pump operates in Automatic.Step 5. Using a stopwatch, hold the discharge pump’s toggle switchon MAN for exactly one minute. Then switch off the pump. If the systemis configured to drain back into the tank or basin after a dose, wait untildrainback is complete.LL Discharge pump amps and volts checked.Test the discharge pump and check running amps, running volts, andresting volts at the same time you check the recirc pump.Copyright Orenco Systems , Inc. Property of Orenco Systems , Inc. Do not reproduce or distribute without written authorization from Orenco: 800-348-9843.11 AIM-OM-ATX-1, Rev. 1.2, 03/14
AdvanTex O&M MANUALP A R T 1 : S T A R T- U P A N D R O U T I N E M A I N T E N A N C ECompleting the Start-Up Checklist (continued)Step 6. Measure the new distance from the top of the tank or basin tothe liquid level. Record this as H2.Step 7. To get the pump’s flow rate, find the difference between H2 andH1. Multiply this number by the gpi (or L/cm) volume of the tank or basin.Add the drainback volume (DB), if applicable. Then divide by the pumprun time in minutes (T). For this test, the pump run time in minutes shouldequal one minute.Pump flow rate (gpm) [(H2 - H1) gpi] DBTorPump flow rate (L/min) Control Panel[(H2 - H1) L/cm] DBTLL Proper timer settings.Important: For VeriComm panels, enter the gpm value on the “Site Details”page at vericomm.net as “Discharge Pump GPM.” The VeriComm panel will use itto automatically calculate and record the system’s actual flow rates, which can beused for reports, troubleshooting, and determining timer settings.Open the control panel and, using a handheld or laptop computer, verifythat the timer settings are appropriate for the installation. Record thePanel ID (RTU or UL number) and timer settings on the Start-Up SummaryReport. Default timer settings are set for an occupancy of 3 people.This may also be adjusted at vericomm.net, for systems equipped withVeriComm. Step 8. To verify the pump’s dose volume, multiply the pump’s flow rate(gpm or L/min) by the pump run time in minutes (T) — as determinedby float settings or timer operation, depending on panel m
irrigation system, a constructed wetland, an effluent sewer (STEP) system, or a reuse system. The system may include equipment for ultraviolet (UV) disinfection before ultimate dispersal of the effluent. Properly sited, installed, and operated, a Residential AdvanTex Treatment System can treat wastewater to 10 mg/L BOD and 10 mg/L TSS.