Transcription
Dual Output SDI IPPTZ CameraUSER MANUALPart Two: Network Camera User ManualVersion: SN-IP-09042020 2020 Bolin Technology1
ContentsPART TWO: NETWORK CAMERA USER MANUAL. 3NETWORK CONNECTION . 3PREPARATION . 3CHECK BEFORE LOGIN . 3LOGGING IN TO THE WEB INTERFACE . 4INTRODUCTION TO THE WEB INTERFACE . 5PREVIEW . 6PAN AND TILT . 6PRESETS . 6VIDEO ENCODE . 7VIDEO TRANSMISSION. 8IMAGE ADJUST . 9AUDIO SETTING . 12ETHERNET . 12FIRMWARE UPGRADE . 13RESET OPTIONS . 13ACCOUNT . 14OSD . 14SYSTEM TIME . 152
Part Two: Network Camera User ManualNetwork ConnectionBefore accessing a network camera (also known as IP Camera or IPC) from a PC, you need to connectthe network camera to the PC directly with a network cable or via a switch or router.Use a Shielded Twisted Pair (STP) cable to connect the network interfaces of the network camera andthe PC.Use Shielded Twisted Pair (STP) cables to connect the network interfaces of the camera and the switchor router.PreparationAfter you have completed the installation in accordance with the quick guide, connect the camera topower to boot it. After the camera is booted, you can access the camera from a PC client using InternetExplorer or a Video Management System (VMS).The following uses Internet Explorer 11 on a Microsoft Windows 10 operating system as an example.Check before login The camera is powered on and connected to the network switch The camera’s IP address is located within the same subnet as the PC The PC is connected to the network switch The PC’s IP address is located within the same subnet as the camera The PC is installed with Internet Explorer 8.0 or higher (Internet Explorer 11 recommended) Use default video format setting or set the camera video format to 1080P30 or 1080P25 usingRS485 keyboard (Refer to camera setting menu).3
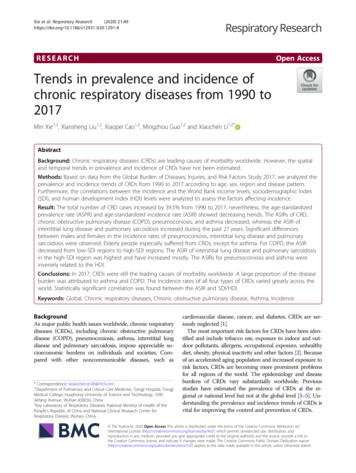
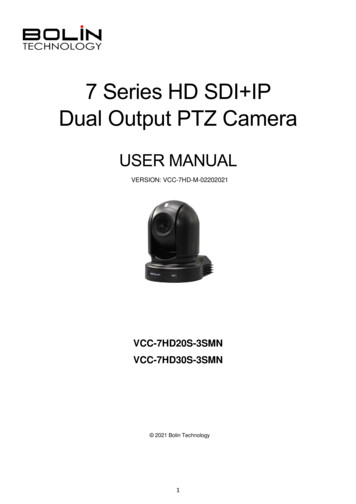
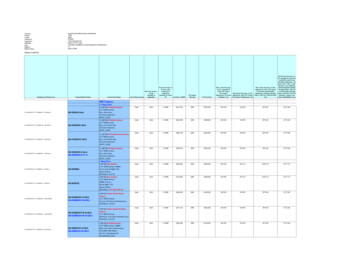
Logging in to the Web InterfaceThe default static IP address of the camera is 192.168.0.13, and the default subnet mask is255.255.255.0The following uses Internet Explorer 11 as an example to describe the login procedure.1. Browse to the login page by entering thecorrect IP (default IP is 192.168.0.13)address of your camera in the address bar.2. Enter the username and password, and thenclick Login. For the first login, use thedefault username admin and passwordadmin. The default password is used for yourfirst login. To ensure account security,please change the password after yourfirst login. You are recommended to set astrong password (no less than eightcharacters). The camera protects itself from illegalaccess by limiting the number of failedlogin attempts. If login fails six timesconsecutively, the camera locksautomatically for ten minutes.NOTE: If your PC/laptop already installed VLC player, you can watch live preview directly after logged in. Ifyour PC/laptop haven’t installed VLC player yet, you may be prompted to install the VLC player.Please download and install the correct version of VLC player (it means if your PC/ laptop operating system is64 bit, you have to download the 64 bit version VLC, if your PC/laptop is 32 bit, so you have to download the 32bit version VLC), after done the installation, user can re-login to the IP interface and watch the live preview.4
Introduction to the Web Interface1. Preview Used to monitor the camera video image Used to do camera PTZ control and preset setting2. Video Encode Used to configure the camera video Main and Sub streams video parameter, such as encodemode, resolution, bit rate, frame rate, I Frame Interval and so on3. Video Transmission Used to configure the camera RTMP streaming, to push the RTMP streaming to the third-partyvideo platform, like the Youtube, Facebook and so on4. Image Adjust Used to configure the camera image parameter, such as focus, exposure, white-balance, image,image setting, noise reduction5. Audio Setting Used to configure the camera audio parameter, such as the Encoder Mode, Sample rate andBitrate6. Ethernet Used to configure the camera network parameter, can be static IP or DHCP, as well as HTTP portand RTSP port configuration7. Firmware Upgrade Used to display the camera current version information Used to do firmware upgrade8. Reset Options Used to reset the camera image parameter/all parameter to default Used to reboot the camera9. Account Used to modify the admin account password10. OSD Used to overlay the time, camera name, logo and text content on the IP video11. System Time Used to setting the time zone and synchronize camera system time with the NTP server5
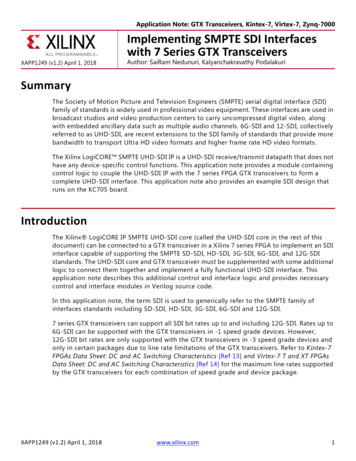
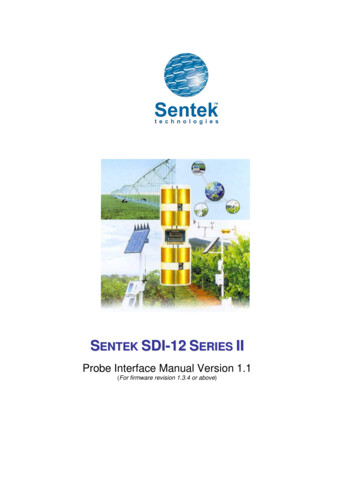
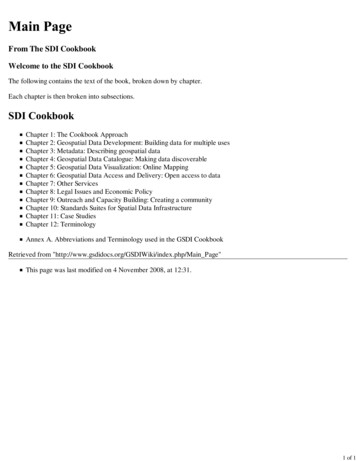
PreviewThe preview page is used to watch the live previewof the camera.Play/stop Live Preview:User can click the/button which on thebottom toolbar, to watch live video or stop the livevideo.Mute:User can enable or disable the audio of live previewby click thebutton on bottom toolbar, whileenabled audio, user can drag the volume bar toadjust the audio.Fullscreen:User can click thebutton to enlarge the live preview window to full screen, then clickbutton again toback to normal size, or press PC/laptop “Esc” button to switch back to normal size while in full screen.Pan and TiltPan and Tilt menu is used to do: Camera PTZ control, Adjust the pan / tilt / zoom speed Set focus modePan/Tilt Speed: to adjust the pan/tilt speed, support 0-24 level selectableFocus Speed: to adjust the focus speed, support 0-7 level selectableZoom Speed: to adjust the zoom speed, support 0-7 level selectableSpeed Reset: To reset the zoom and focus speed to defaultPTZ Reset: To reset the PTZ control to defaultStandby: If turn on standby switch, the camera will go to standby status, it is notpower off, you can get it back immediately by turn off the standby.PresetsPresets are predetermined positions that the user can command the camerato recall quickly.To add a new preset:1. Use the control panel and image viewer to pan to the desired Pan, Tilt,Zoom, and Focus position2. Click the triangle symbol which in the drop-down list, select a number forthis position (here we select 2 as example)3. Click the pencil symbol and it will save this position as preset 24. Select a preset number and click Go button, the camera will to recall theposition quickly5. Select a preset number and click Delete button, it will delete this presetand you can not recall it quickly by GO button6
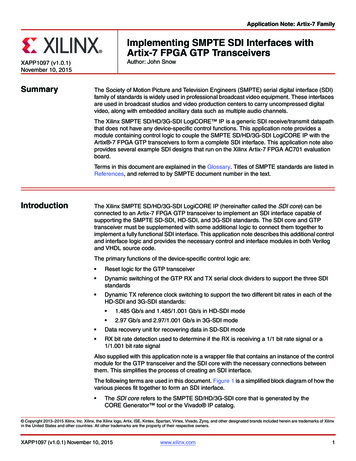
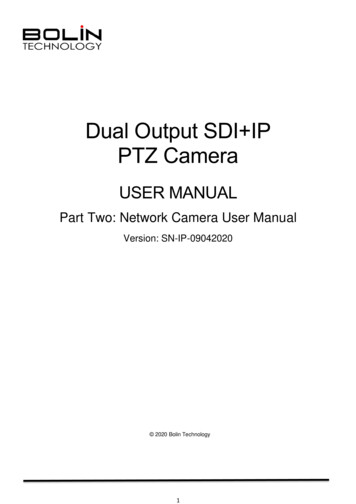
Video EncodeThe video encode page is used to configure settings for the compression, format, and data rates for all videostreams produced by the cameraDefinitions: Encode Mode: The encoding standards thatare available for use (H.264 / H.265) Profile: Support baseline, MP and HP mode RTSP Address: The RTSP streaming URLof both main stream and sub stream Resolution: (W x H) The number of Pixelsthat make up the width of the image (W) bythe number of horizontal lines that make upthe height of the image (H) Bitrate: The amount of data transmitted persecond. Measured in Kilobits Per Second(Kbps). 1000 kbps 1Mbps Framerate: Rate at which image frames arecaptured Bitrate Control:o CBR – Constant Bit Rateo VBR – Constrained Variable Bit Rate. I Frame Interval: The shorter the Interval, thebetter chance you have of video being ofbetter quality.I Frame also can be called “Key Frame”, a "KeyFrame" is an entire and complete and total image, thatis used as a reference for other frames ("images") thatthe camera generates Main Stream – The main stream, viewed by default on the preview pageo Encode Mode: H.264 H.265o RTSP Address: RTSP main stream address Automatically generated based on the current IP address of the camera You can copy this address and using VLC or other network video compatible player toreceive the RTSP main stream and watch the video.o Resolution: 1920x1080 1280x720 1024x576o Bitrate: The amount of data transmitted per second. Measured in Kilobits Per Second (Kbps).1024 kbps 1Mbps 0-15360 selectableo Framerate: Rate at which image frames are captured 1-60 selectableo Bitrate Control: CBR – Constant Bit Rate VBR – Constrained Variable Bit Rate.o I Frame Interval 1-100 selectable Sub Stream – The sub video stream produced by the camera; this can be disabled by unchecking thebox at the top of this stream’s settings we can switch to sub stream on the top bar of preview pageo Encode Mode: H.264 H.265o RTSP Address: RTSP sub stream address7
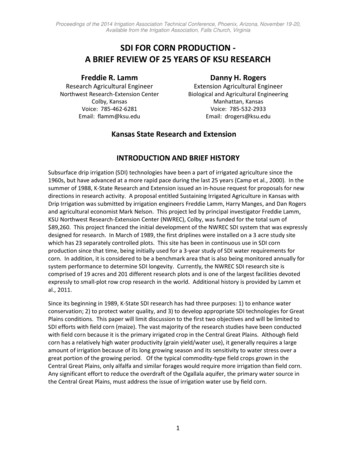
oooooAutomatically generated based on the current IP address of the cameraYou can copy this address and using VLC or other network video compatible player toreceive the RTSP sub stream and watch the videoResolution: 1280x720 1024x576 640x360Bitrate: 0-15360 selectableFramerate: Rate at which image frames are captured 1-60 selectableBitrate Control: CBR – Constant Bit Rate VBR – Constrained Variable Bit Rate.I Frame Interval: 1-100 selectableVideo TransmissionThis camera supports RTMPprotocol, it can push streaming toother CDN or cloud platform.oooCheck the RTMP StateMain or Sub Enable buttonCopy and paste the streamURL from the onlineplatformCopy and paste the StreamKey (Also known as theStream ID) from the onlineplatform.Example shows where to copy theinformation from YouTubeFor ExampleURL/Key: 9-35ebooClick Save button on camera RTMP pageAllow a few minutes for the stream to connect. The status on your streaming platform (Such asYouTube) will change to Live. When this happens, the camera is streaming video Live toNOTE: Must enable audio on Audio Setting page before setup RTMP streaming, otherwise, RTMP streamingmay without audio source. Similar steps can be followed to stream to any platform that supports RTMP, such as Facebook, Twitter,Twitch, etc.)8
Image AdjustImage parameters can be adjusted to control the way the image is captured and displayedFocusThe Focus menu is used to set the items related to focusFocus Mode:You can set to Manual or Auto modeDigital Zoom:Turn Digital Zoom ON, 2x digital zoom is activated.You can set digital zoom to ON or OFF. When turn to OFF, digital zoom does not operate, and only opticalzoom is available. When turn to ON, digital zoom takes over after optical zoom reaches MAX (20x). Up to 40xcan be zoomed digitally.When digital zoom is available, the resolution decreases9
ExposureThe Exposure menu is used to set the items related to exposure.Exposure ModeAuto: The exposure is adjusted automatically using the values set for EX-COMP (ExposureCompensation).Manual: Adjust the GAIN, electronic shutter speed (SPEED), iris (IRIS) manually.Iris Priority: Iris Priority mode. The exposure is adjusted automatically using the values manually setfor iris (IRIS) and EX-COMP.Shutter Priority: Shutter Priority mode. The exposure is adjusted automatically using the valuesmanually set for electronic shutter speed (SPEED) and EX-COMP.Brightness Priority: Bright Priority mode. The exposure is adjusted automatically using the valuesmanually set for electronic brightness level.When you select one from various exposure modes, some of the following setting items that can be adjusted.Gain: Adjustable from 0 to 15 by drag the setting bar (not available in Auto, Iris, Shutter, Brightness mode)Shutter: Adjustable from the following1/30, 1/60, 1/90, 1/100, 1/125, 1/180, 1/250, 1/350, 1/500, 1/725, 1/1000, 1/1500, 1/2000, 1/3000, 1/4000,1/6000, 1/10000 (not available in Auto, Iris, Brightness mode)Iris: Adjustable from 0 to 13 by drag the setting bar (not available in Auto, Shutter, Brightness mode)Anti-flicker: Enable it before you to select, 50Hz and 60 Hz selectableBrightness: Adjustable from 0 to 27 by drag the setting bar (not available in Auto, Manual, Iris, Shutter mode)White-BalanceThe White-Balance menu is used to set the items related to white balance.White Balance ModeAuto: This mode computes the white balance value output using color information from the entirescreen. It outputs the proper value using the color temperature radiating from a black subject based ona range of values from 2500K to 7500K. This mode is the initial setting.Indoor: 3200K Base ModeOutdoor: 5800K Base Mode10
One Push: The One Push White Balance mode is a fixed white balance mode that may beautomatically readjusted only at the request of the user (One Push Trigger), assuming that a whitesubject, in correct lighting conditions, and occupying more than 1/2 of the image, is submitted to thecamera. One Push White Balance data is lost when the power is turned off. If the power is turned off,reset One Push White Balance.NOTE: When you select the One PushPerform the following operations:1. Place an image of white subject (For example: A piece of white paper) in the center of thescreen.2. Press the HOME button of the infrared remote controller.The one-push white balance adjustment is activated.Auto tracking: Auto Tracking White balance (2000K to 10000K), allows the camera to adjust the toneaccording to the temperature of the light source illuminating the subjectManual: This is a mode that enables you to manually set the control of Red and Blue gain from o to 255ImageThe Image menu is used to set the items related to imageMirror: You can have the image as seen in a mirror, with the right side as though it were the left.Flip: Image E-Flipper – Used when ceiling mounting or upright mounting. Set to OFF is upright mode, set toON is for ceiling mount.BLC (Backlight compensation):When the background of the subject is too bright, or when the subject is too dark, back light compensation willmake the subject appear clearer.Gamma: The gamma can be set to value from 0 to 4D-WDR (Wide Dynamic Range): Wide Dynamic: ON, OFF. The camera distinguishes light and dark areaswithin the same scene, adjusts the brightness for dark areas, and also controls the blown-out highlights.You can select the wide dynamic range mode between ON and OFImage SettingThe Image Setting menu is used to set the items related to image qualityBrightness: You can adjust the values manually for electronic brightness level from 0 to 15Sharpness: Picture sharpness value ranges from 0 to 15. You can enjoy emphasized edge and highresolution images.Contrast: You can adjust the contrast level in the range from 0 to 15. The smaller the value is, the lower the11
contrast becomes, and the larger the value is, the higher the contrast becomes.Saturation: You can configure the color gain from 0-15. Use this setting when bright color is particularlyimportant.Noise-reductionThe Noise-reduction is used to set the items related to noise, it supports 2D and 3D mode noise reduction.You can enjoy clearer images by removing unnecessary noise.For 3D mode, you can select Auto, or set value from 1 (MIN) to 4 (MAX).Audio SettingThis section contains the ability to select the audio Encode Mode,Sample rate and Bitrate. Encode Mode:o AACo LPCMSample rate:o Selectable from 11050, 22050, 44100Bitrate (Kbps):o Selectable from 32000, 48000, 64000, 96000, 128000EthernetThe Ethernet settings page is where the user is able to configure thefollowing: DHCP optionso DHCP – An IP address will be dynamically assigned tothe camera from the gateway (router)o Static IP – The user will enter / define the IP address IP Address Netmask Gateway DNS (Domain Name System) MAC (MAC address of the camera)o Media Access Control address, is a unique identifierassigned to a network interface controller of the camera,it comes with camera by default, can’t be changed. HTTP port: Default 80o HTTP is the protocol used to access the web interface.o Changing this port number will require the user to specifythe port number when entering the IP address to the webbrowser.o For example, if it is changed to 8080, the IP address willneed to be entered as follows in order to access the web interface: http://192.168.0.13:808012
RTSP Port: Default 554o RTSP is the protocol used to pull real-time video over the network (using VLC Player or othernetwork video- compatible software)o Changing this port number will change the way the RTSP video can be viewed. Most RTSPstreaming software uses port 554 by default, therefore it is not recommended that this portnumber be changed.o URL for receive RTSP streaming is:Main stream – rtsp://IP:554/stream/mainSub stream – rtsp://Ip:554/stream/subFirmware UpgradeThis page allows the user to get the camera current version information, camera name, serial number and todo upgrade. Control versiono To display the camera current control versionDevice Nameo The name of this camera model, you alsocan see it on the top left corner of any page.Serial Numbero The unique serial number after the camera isproduced, each camera serial number isdifferent, and can’t be changed.Bootloader Versiono To display the camera current bootloaderversionSystem Versiono To display the camera current systemversionApp versiono To display the camera current App versionUpgradeo You can upgrade the camera version whenthere has new firmware available.o New firmware file can be obtained from BOLIN Technologyo Click “Click to upload files” button, navigate to the file (.bin), select and then can start upgradeo It takes a few minutes for the camera to come back onlineReset OptionsThis page allows user to reset parameter to default, youcan just reset image parameter or reset all parameters,Also supports to reboot the camera Reseto Will reset the camera’s image parameterto factory default valuesReset/Rebooto Will reset all settings / parameters tofactory default values and camera willauto rebootRebooto This button performs a soft reboot(camera will restart without needing todisconnect power)13
AccountThis page allows user to modify admin account password,the default password is admin;User can login to the web interface, access to Accountpage, to modify the password;Input the new password in Password option bar, theninput the password once again in Confirm Passwordoption bar;After done, click Save button to make it take effect, thenyou can login the web interface with the new password.OSDThere are On Screen Display (OSD) sections within the IP video image, each OSD section can be individuallyconfigured to display configurable data.Camera Name:User can define a name for thecamera.Background:Background of the OSD, can beconfigured as Translucent orTransparent.Color:Color of the OSD content, selectablefrom Black, Blue, Red, Green,Magenta, Cyan, Yellow and Whitecolor.Background Color:Background color of the OSD content, only available while Background selected Translucent mode.Selectable from Black, Blue, Red, Green, Magenta, Cyan, Yellow and White color.Area (Center, Area1, Area2, Area3, Area4):OSD position on the IP video imageAny of the 5 areas (Center and Area 1 Area 4)can be configured to contain one of the following:Close – The area will not be used, and will notdisplay anything;Datetime – The internal Date and Time settingswill be used to fill the area;Camera Name – The user will define a name forthe camera;Logo – An image, such as a company logo canbe uploaded to be displayed within the IP videoimage;Text – User can enter the text that they wish tobe displayed14
System TimeThe interface allows user to configure the time zone andsynchronize camera system time with the NTP server.Time Zone:Support 24 time zones, users can choose the correspondingtime zone according to their country.NTP Enable:To enable and disable NTP serverNTP Update Interval:Update interval of time synchronization between camera andthe NTP server, selectable from 30 minutes, and 1 hour to 24hours.NTP Server AddressTo configure the address of the NTP ServerNTP PortPort setting for NTP Server, default setting is 8015
www.bolintechnology.com2082 TECHNOLOGY LLCdbaBOLIN TECHNOLOGY16
4 Logging in to the Web Interface The default static IP address of the camera is 192.168.13, and the default subnet mask is 255.255.255. The following uses Internet Explorer 11 as an example to describe the login procedure.